首先回顾上节的Django三个基础函数:
from django.shortcuts import HttpResponse   #返回字符串
from django.shortcuts import render    #给他一个数据,再给他一个模板 来渲染后返给用户
from django.shortcuts import redirect   #跳转到某个地址
因为request中包含用户请求相关的所有信息(对象),所以可以通过
request.method来看请求的方法【GETPOST】
题外话:GET是以URL的形式传递数据,不安全。
print(request.method)
所以基于此,就可以作为判断,提取用户post提交的表单数据:
    if request.method == "GET":
        return render(request,'login.html')
    else:
        #用户POST提交的数据
        u = request.POST.get('user')
        p = request.POST.get('pwd')
        if u == 'admin' and p == 'admin':
            #登录成功跳转
            return redirect('http://www.baidu.com')
        else:
            #登录失败
            return render(request,'login.html')
login.html配置:
<form method="POST" action="/login/">
这时候我们发现确实实现的登陆控制,但是没有登陆失败提示啊~!!!
这就用到 {{ msg}}
这个是在html中容载特殊字符的,若没有给他传值,django就不显示。
login.html中:
...
<input type="submit" value="登录"/><br>
  {{ msg }}

---------------------
urls.py中:

...
        else:
            #登录失败
            return render(request,'login.html',{'msg':'用户名或密码错误!'})
其实这个{{ msg}} 就是模板引擎中的特殊标记
除了字符串外,还支持列表和字典、循环、if.else等的特殊标记取值
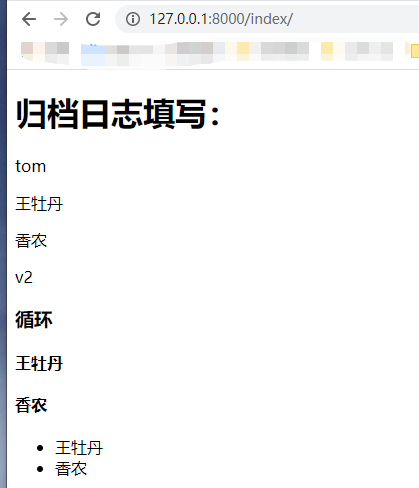
return render(request,'index.html',{...})
<!DOCTYPE html>
<html lang="en">
<head>
    <meta charset="UTF-8">
    <title>日志文档填写</title>
</head>
<body>
<h1>归档日志填写:</h1>
        <p>{{ name }}</p>
        <p>{{ users.0 }}</p>
        <p>{{ users.1 }}</p>
        <p>{{ user_dict.k2 }}</p>

        <h3>循环</h3>
        {% for item in users %}
            <h4>{{ item }}</h4>
        {% endfor %}

       <ul>
        {% for item in users %}
            <li>{{ item }}</li>
        {% endfor %}
        </ul>
</body>
</html>
附加补充:
{% if a == b %}
    ..
{% else %}
    ..
{% endif %}
urls.py的配置:
def index(request):
    return render(
        request,
        'index.html',
        {
            'name':'tom',
            'users':['王牡丹','香农'],
            'user_dict':{'k1':'v1','k2':'v2'},
        }
    )

urlpatterns = [
    #path('admin/', admin.site.urls),
    path('login/',login),
    path('index/',index),
]
注意:
- 特殊标记可以为列表和字典,用 · 来索引取值;
- 特殊标记作为循环时,可以连同标签一块循环,也可以单独循环。
使用场景举例:
接上面index.html:
模板源进行渲染可以加列表加表格增删操作之
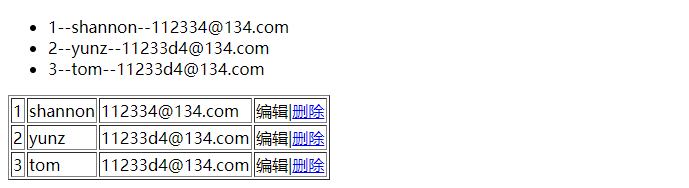
...
     <ul>
        {% for row in user_dict %}
            <li>{{ row.id }}--{{row.name}}--{{ row.email }}</li>
        {% endfor %}
        </ul>

        <table border="1">
        {% for row in user_dict %}
            <tr>
                <td>{{ row.id }}</td>
                <td>{{ row.name }}</td>
                <td>{{ row.email }}</td>
                <td>
                    <a>编辑</a>|<a href="/del/?nid={{ row.id }}">删除</a>
                </td>
            </tr>
        {% endfor %}
        </table>
相当于对列表元素进行循环,每一项又是一个字典,所以可以用哪个row.id ...
接上面urls.py 修改为:
...
def index(request):
    return render(
        request,
        'index.html',
        {
            'user_dict':[
                {'id':'1','name':'shannon','email':'112334@134.com'},
                {'id': '2', 'name': 'yunz', 'email': '11233d4@134.com'},
                {'id': '3', 'name': 'tom', 'email': '11233d4@134.com'},
            ]
        }
    )
执行:
一定注意索引用 · 获取

【网络铅笔头,扫一扫~】
附录1:实验登陆 login.html
<!DOCTYPE html>
<html lang="en">
<head>
    <meta charset="UTF-8">
    <title>登录 </title>
    <link rel="stylesheet" href="/static/common.css" />
</head>
<body style="background-color:PowderBlue;">
    <h1>用户登录入口</h1>
    <form method="POST" action="/login/">

        用户名:<br>
        <input type="text"  name="user" required autofocus placeholder="username"><br>
        密码:<br>
        <input type="password" name="pwd" maxlength="12" placeholder="password"><br><br>
        <input type="submit" value="登录"/><br>
        {{ msg }}
    </form>
</body>
</html>
附录2:实验urls.py
from django.contrib import admin
from django.urls import path

from django.shortcuts import HttpResponse,render,redirect
def login(request):
    '''
    处理用户请求并返回内容
    :param request:用户请求相关的所有信息(对象)
    :return:
    '''
    #return HttpResponse('<input type="text" />')
    if request.method == "GET":
        return render(request,'login.html')
    else:
        #用户POST提交的数据
        u = request.POST.get('user')
        p = request.POST.get('pwd')
        if u == 'admin' and p == 'admin':
            #登录成功跳转
            #return redirect('http://www.baidu.com')
            return redirect('/index/')
        else:
            #登录失败
            return render(request,'login.html',{'msg':'用户名或密码错误!请重新输入'})

def index(request):
    return render(request,'index.html')

urlpatterns = [
    #path('admin/', admin.site.urls),
    path('login/',login),
    path('index/',index),
]