There are plenty of tutorials out there right now, and this means the Flutter community is growing exponentially. So as we build more complicated apps with Flutter, at one point of time, we may require a “central storage” or location to store a global variable that can be called anytime, instead of passing it from one view to another. The use case is like the concept of a cart in an e-commerce website.
Today, we are not going into building a complicated app. We are going to use Flutter’s starter app to help me demonstrate how we can use ScopedModel to achieve our primary goal today.
I am going to assume you have Flutter installed, head over to your project directory and run flutter create flutter_global_variable. Now, cdinto flutter_global_variable. Open this folder in your favorite IDE, I prefer Visual Studio Code as it is lightweight and has a big library of powerful extensions.
Head over to pubspec.yaml and add our package like this, then run flutter packages get:
dependencies:
  flutter:
    sdk: flutter

  # The following adds the Cupertino Icons font to your application.
  # Use with the CupertinoIcons class for iOS style icons.
  cupertino_icons: ^0.1.2
  scoped_model: ^1.0.1
Here, ScopedModel is going to help us to pass a Model down from Parent Widget to its Descendant Widgets, which is exactly what we want to achieve today!
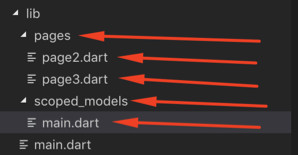
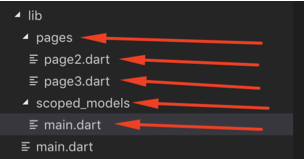
Next, let's prepare our folders and files:


In lib create 2 new folders call pages and scoped_models.
In pages , create 2 new files call page2.dart and page3.dart.
In main.dart you can replace all the code with this:
import 'package:flutter/material.dart';
import 'package:scoped_model/scoped_model.dart';
import 'package:flutter_global_variable/scoped_models/main.dart';
import 'package:flutter_global_variable/pages/page2.dart';

void main() => runApp(MyApp());

class MyApp extends StatelessWidget {
  @override
  Widget build(BuildContext context) {
    final MainModel _model = MainModel();

    return ScopedModel<MainModel>(
        model: _model,
        child: MaterialApp(
          title: 'Flutter Demo',
          theme: ThemeData(
            primarySwatch: Colors.blue,
          ),
          home: MyHomePage(title: 'Flutter Demo Home Page'),
        ));
  }
}

class MyHomePage extends StatelessWidget {
  MyHomePage({Key key, this.title}) : super(key: key);

  final String title;

  @override
  Widget build(BuildContext context) {
    return ScopedModelDescendant<MainModel>(
        builder: (BuildContext context, Widget child, MainModel model) {
      return Scaffold(
        appBar: AppBar(
          title: Text(title),
        ),
        body: Center(
          child: Column(
            mainAxisAlignment: MainAxisAlignment.center,
            children: <Widget>[
              Text(
                'You have pushed the button this many times:',
              ),
              Text(
                '${model.count}',
                style: Theme.of(context).textTheme.display1,
              ),
              SizedBox(height: 10.0),
              RaisedButton(
                  padding: const EdgeInsets.all(8.0),
                  child: Text('Submit'),
                  onPressed: () {
                    Navigator.push(
                      context,
                      MaterialPageRoute<Page2>(
                          builder: (BuildContext context) => Page2()),
                    );
                  })
            ],
          ),
        ),
        floatingActionButton: FloatingActionButton(
          onPressed: () {
            model.incrementCount();
          }, //_incrementCounter(_model),
          tooltip: 'Increment',
          child: Icon(Icons.add),
        ), // This trailing comma makes auto-formatting nicer for build methods.
      );
    });
  }
}
Here we are doing a few things:
- We import the
scoped_modelpackage and the model which we will implement in the next section. - We initiated our
MainModelwhich will be the main source of truth. - We passed the
MainModelinto our mainMaterialAppviaScopedModelfunction from thescoped_modelpackage. - Then in our
HomePage, we use itsScopedModelDescendantfunction to:
1. Get Current Count
2. Increment Count - We have a button call
Submitwhich will help us navigate to next page.
In page2.dart paste these codes in:
import 'package:flutter/material.dart';
import 'package:scoped_model/scoped_model.dart';
import 'package:flutter_global_variable/scoped_models/main.dart';
import 'package:flutter_global_variable/pages/page3.dart';

class Page2 extends StatelessWidget {
  @override
  Widget build(BuildContext context) {
    return Scaffold(
      backgroundColor: Colors.white,
      appBar: AppBar(
          title: Text("Page 2"),
          backgroundColor: Colors.transparent,
          elevation: 0.0),
      body: ScopedModelDescendant<MainModel>(
          builder: (BuildContext context, Widget child, MainModel model) {
        return Center(
          child: Column(
            mainAxisAlignment: MainAxisAlignment.center,
            children: <Widget>[
              Text(
                'Your counter value is: ${model.count}',
                style: TextStyle(fontSize: 18.0),
              ),
              RaisedButton(
                  padding: const EdgeInsets.all(8.0),
                  child: Text('Confirm'),
                  onPressed: () {
                    Navigator.push(
                      context,
                      MaterialPageRoute<Page3>(
                          builder: (BuildContext context) => Page3()),
                    );
                  })
            ],
          ),
        );
      }),
    );
  }
}
Pretty much the same, we want to use the MainModel to leverage on its power to get current count which was captured in the previous page.
Let’s just confirm that we are getting the right counter by moving to one more page, page3.dart:
import 'package:flutter/material.dart';
import 'package:scoped_model/scoped_model.dart';
import 'package:flutter_global_variable/scoped_models/main.dart';

class Page3 extends StatelessWidget {

  @override
  Widget build(BuildContext context) {
    return Scaffold(
      backgroundColor: Colors.white,
      appBar: AppBar(
          title: Text("Page 3"),
          backgroundColor: Colors.transparent,
          elevation: 0.0),
      body: ScopedModelDescendant<MainModel>(
          builder: (BuildContext context, Widget child, MainModel model) {
        return Center(
          child: Text(
            '${model.count}',
            style: TextStyle(fontSize: 80.0),
          ),
        );
      }),
    );
  }
}
We pretty much replicate what we do in Page2, but the purpose is to demonstrate that the data is still retained in the model :)
Now, let’s implement our MainModel in scoped_models/main.dart :
import 'package:scoped_model/scoped_model.dart';

class MainModel extends Model {
  String _name = "";
  int _count = 0;

  String get name {
    return _name;
  }

  int get count {
    return _count;
  }

  void updateName(String name) {
    _name = name;
  }

  void incrementCount() {
    _count += 1;
    notifyListeners();
  }
}
- We import our
scoped_modelpackage. - We created some getting and setting for count and name.
- Then we have an
incrementCountfunction to increment the count. - We call
notifyListeners,this is an exclusive function that will notify all the widgets which are automatically listeners, to callbuildagain to reload its view with updated data. This entire concept is a miniature version of Reactive Programming, which Flutter can go beyond.
Now try performing a flutter run on your preferred simulator or device and test out the app!
If you encounter any issue when following this tutorial, feel free to download the working project from here. Good Day!
Bonus!
You may have noticed the name and its update function in the main model are untouched, try applying what you have learned by asking for input in the home page and see it appearing in page 2 & 3!