客户有部署有状态服务的需求,单机部署模式相对简单,尝试一下集群部署。
关于Redis的master,slave 以及sentinal的架构和作用不提,有兴趣可以参考之前的博客
https://www.cnblogs.com/ericnie/p/7203950.html
github上参考的文章不少,但很多都需要基于连接互联网进行构建,同时也创建不少的buildconfig,研究了一下,还需要在本地部署一个git.
立刻觉得把问题搞复杂了。所以本文主要以简化为主,说明主要核心步骤,当然也掉到坑里浪费了些时间,不失为一种学习过程吧。
github上参考链接
https://github.com/mjudeikis/redis-openshift
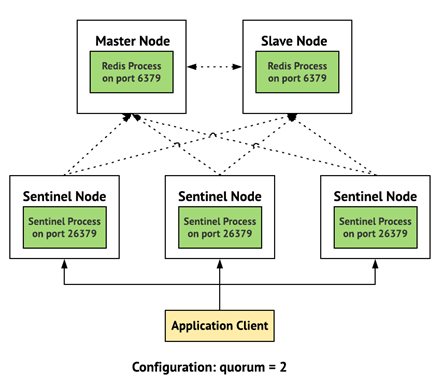
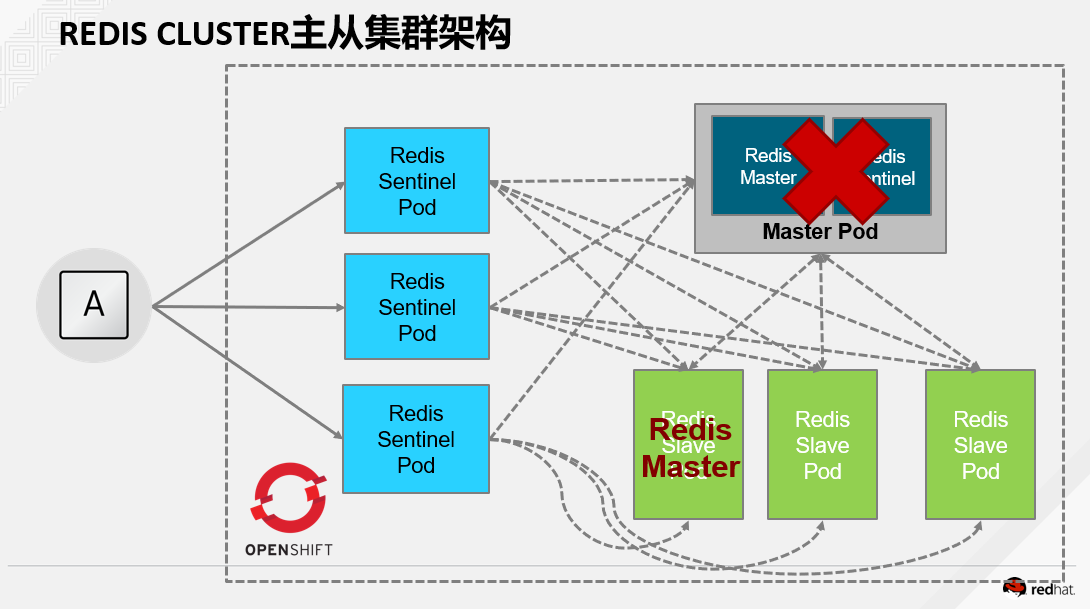
架构
传统的Redis个节点角色和端口
在OpenShift上部署架构图
1.构建镜像
先clone到本地
git clone https://github.com/mjudeikis/redis-openshift
目录结构比较清晰明了,我喜欢
[root@master ~]# tree redis-openshift
redis-openshift
├── image
│   ├── Dockerfile
│   ├── Dockerfile.1
│   ├── epel-7.repo
│   ├── redis-master.conf
│   ├── redis-openshift.tar
│   ├── redis-slave.conf
│   └── run.sh
├── list.yaml
├── openshift
│   ├── build.yaml
│   ├── is-base.yaml
│   ├── is-output.yaml
│   ├── redis-master-dc.yaml
│   ├── redis-master-service.yaml
│   ├── redis-sentinel-dc.yaml
│   ├── redis-sentinel-services.yaml
│   └── redis.yaml
└── README.md
对了,这里我也根据我的环境修改了Dockerfile,主要是yum源的问题
先下载一个放到目录下
http://mirrors.aliyun.com/repo/epel-7.repo,
Dockerfile
FROM rhel7

#RUN yum install epel-release -y
COPY epel-7.repo  /etc/yum.repos.d/epel.repo

RUN yum install redis hostname -y ; yum clean all

COPY redis-master.conf /redis-master/redis.conf
COPY redis-slave.conf /redis-slave/redis.conf
RUN mkdir -p /redis-sentinel ; chmod -R 777 /redis-sentinel /redis-slave
COPY run.sh /run.sh

CMD [ "/run.sh" ]

ENTRYPOINT [ "bash", "-c" ]
比较核心的run文件,我修改成这样
[root@master image]# cat run.sh
#!/bin/bash

# Copyright 2014 The Kubernetes Authors All rights reserved.
#
# Licensed under the Apache License, Version 2.0 (the "License");
# you may not use this file except in compliance with the License.
# You may obtain a copy of the License at
#
#     http://www.apache.org/licenses/LICENSE-2.0
#
# Unless required by applicable law or agreed to in writing, software
# distributed under the License is distributed on an "AS IS" BASIS,
# WITHOUT WARRANTIES OR CONDITIONS OF ANY KIND, either express or implied.
# See the License for the specific language governing permissions and
# limitations under the License.

function launchmaster() {
  if [[ ! -e /redis-master-data ]]; then
    echo "Redis master data doesn't exist, data won't be persistent!"
    mkdir /redis-master-data
  fi
  redis-server /redis-master/redis.conf --protected-mode no
}

function launchsentinel() {
  echo "Enter launch sentinel...."

   while true; do
    master=$(redis-cli -h ${REDIS_SENTINEL_SERVICE_HOST} -p ${REDIS_SENTINEL_SERVICE_PORT} --csv SENTINEL get-master-addr-by-name mymaster | tr ',' ' ' | cut -d' ' -f1)
    if [[ -n ${master} ]]; then
      master="${master//"}"
    else
      master=$(hostname -i)
    fi

    redis-cli -h ${master} INFO
    if [[ "$?" == "0" ]]; then
      break
    fi
    echo "Connecting to master failed.  Waiting..."
    sleep 10
  done

  sentinel_conf=/redis-sentinel/sentinel.conf

  echo "sentinel monitor mymaster ${master} 6379 2" > ${sentinel_conf}
  echo "sentinel down-after-milliseconds mymaster 60000" >> ${sentinel_conf}
  echo "sentinel failover-timeout mymaster 180000" >> ${sentinel_conf}
  echo "sentinel parallel-syncs mymaster 1" >> ${sentinel_conf}
  echo "bind 0.0.0.0" >> ${sentinel_conf}

  redis-sentinel ${sentinel_conf} --protected-mode no

}

function launchslave() {
  echo "Enter lauch slave....."

   while true; do
    master=$(redis-cli -h ${REDIS_SENTINEL_SERVICE_HOST} -p ${REDIS_SENTINEL_SERVICE_PORT} --csv SENTINEL get-master-addr-by-name mymaster | tr ',' ' ' | cut -d' ' -f1)
    if [[ -n ${master} ]]; then
      master="${master//"}"
    else
      echo "Failed to find master."
      sleep 60
      exit 1
    fi

    redis-cli -h ${master} INFO
    if [[ "$?" == "0" ]]; then
      break
    fi
    echo "Connecting to master failed.  Waiting..."
    sleep 10
  done
  sed -i "s/%master-ip%/${master}/" /redis-slave/redis.conf
  sed -i "s/%master-port%/6379/" /redis-slave/redis.conf
  redis-server /redis-slave/redis.conf --protected-mode no

}

if [[ "${MASTER}" == "true" ]]; then
  launchmaster
  exit 0
fi

if [[ "${SENTINEL}" == "true" ]]; then
  launchsentinel
  exit 0
fi

launchslave
oc new-project建立一个项目,然后
docker build -t  registry.example.com/openshift/redis-openshift:1.0 .

docker push  registry.example.com/openshift/redis-openshift:1.0

oc import-image redis-openshift:latest --from=registry.example.com/openshift/redis-openshift:1.0  --insecure --confirm
这里必须表扬一下openshift的了,因为在调试过程中我的run.sh改来改去,每次改动需要build镜像,搞完后,直接运行上面三条,就把镜像刷新了
而Openshift的dc的trigger功能发挥作用,每次发现镜像更新后就自动更新,发布新应用,减少大量时间,感觉非常不错!
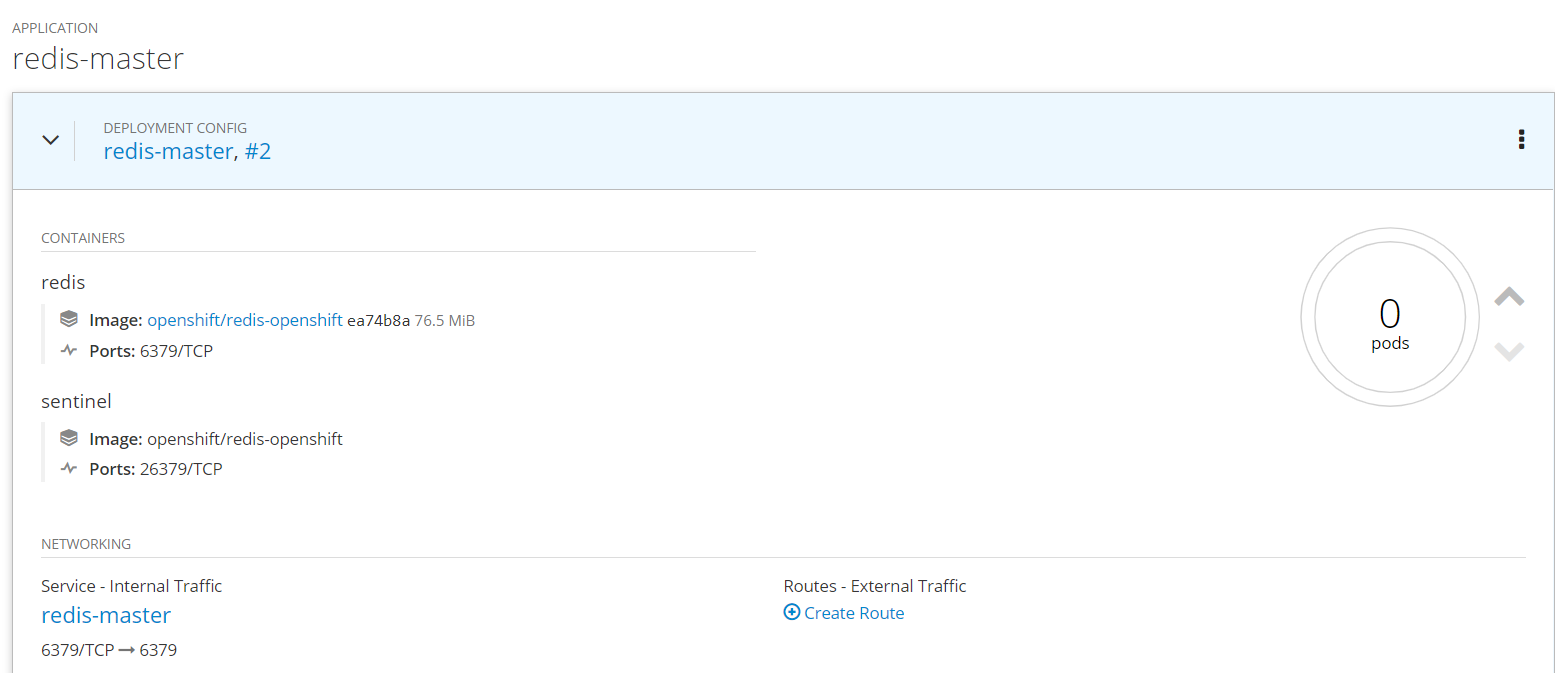
2.构建一系列的dc和service
修改openshift下的配置文件,确保镜像地址无误。
oc create -f openshift/redis-master-dc.yaml
oc create -f openshift/redis-master-service.yaml

oc create -f openshift/redis-sentinel-dc.yaml
oc create -f openshift/redis-sentinel-services.yaml

oc create -f openshift/redis.yaml
会建立一个master,3个sentinel和3个slave,如图

进去逐个检查日志,确保成功启动
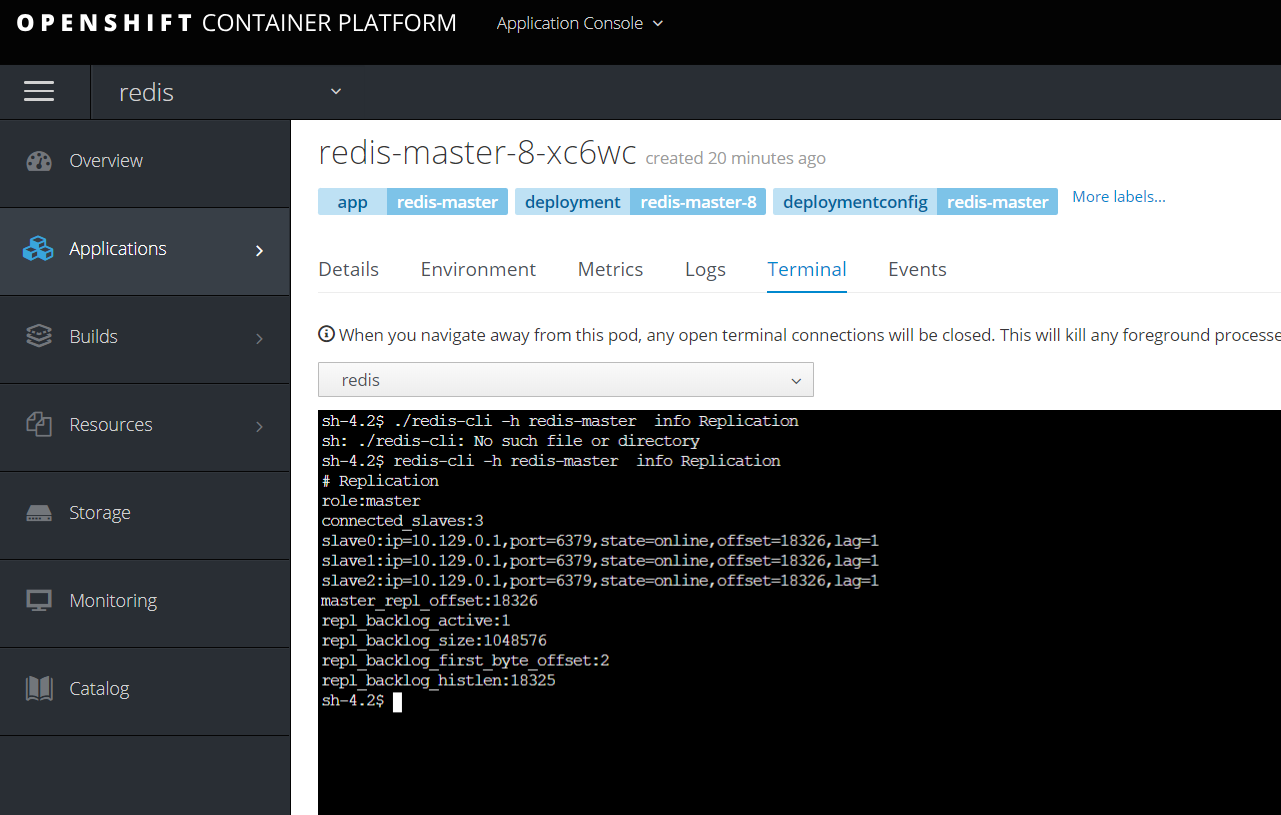
运行下面命令,查看集群信息。
redis-cli -h redis-master info Replication
构建成功,可以愉快的使用了。
3.集群切换
讲redis-master直接scale到0,模拟down掉
然后检查sentinel的日志,发现mymaster已经从10.129.0.2切换到了10.129.0.8的redis pod.

在reids节点上运行 redis-cli -h 10.129.0.8 info Replication
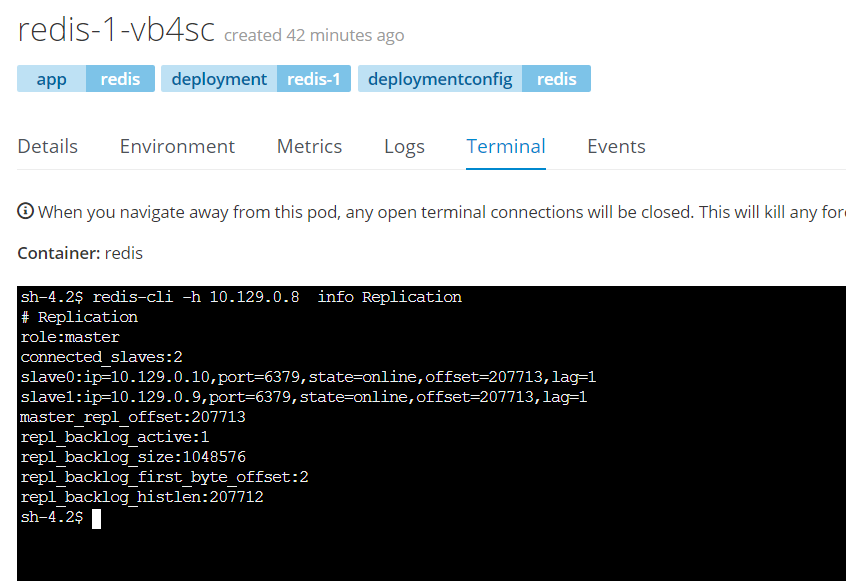
可以看到集群状态已经发生变化