Directive 指令
v-for:
<li v-for=’food in foodList’>{{fppd}}
{{}}
new Vue({
el:
data:{
foodList:[…]
}
})
v-bind:
:src
:class=’klass’
new Vue({
el:
data:{
Klass:’btn btn-default’
}
})
:class = '{active:isActive}'
new Vue({
el:
data:{
isActive:true
}
})
v-on:
v-on:click=’CLICK’
new Vue({
el:
methods:{
CLICK(){
Console.log(‘clicked’)
}
}
}
})
示例二:
v-on=’{ mouserenter:onEnter,mouseleave:onLeave }’
示例三:
<form v-on:submit=’onSubmit’>
</form>
示例四:
<form v-on:submit=’onSubmit($event)’>
</form>
示例五://vue把这个也封装了
<form v-on:submit.prevent=’onSubmit($event)’>
</form>
示例六:
<form v-on:keyup=’fun’>
</form>
示例七:
<form v-on:keyup.enter=’fun’>
</form>
v-model:
v-model.lazy //blur的时候才会触发
v-model.trim
v-model.number //字符串转字母
computed:{
sum(){
return this.math + this.pyshics +this.english
}
}
组件:
Vue.component(‘alert’,{
Template:
Methods:{
}
})
<alert><alert/>
new Vue({
el:’#seg1’
})
new Vue({
el:’#seg2’
})
父子通信:
props:[‘a’,’b’]
子父通信:
$emit()
v-on:

任意平行间组件通讯:
事件调度器 var Event = new Vue()
“我说, 花花说” 案例
Event.$emit(‘xxx’,…)
在第二个组件中:
this.$on(‘xxx’,…)
Filter:
使用管道符 |
{{length|meter}}
Vue.filter('meter',function(val){
return val + '元'
})
自定义指令:
自定义指令前面要加v,格式是v-directive

定义的时候就不用了

binding这个属性中有一些值,如binding.value...
自定义指令配置传参:
比如我想:

我可以:

。。。(这里写的不详细,以后可以再来看)
组合Mixins:
官网示例:
var mixin = {
created: function () { console.log(1) }
}
var vm = new Vue({
created: function () { console.log(2) },
mixins: [mixin]
})
// => 1
插槽Slots:

Vue-Router:
引入vue-router.js
Var routes = [
{
Path:’/’,
Component:{
Template:`
<div>
<h1>首页</h1>
</div>
`
},
{
Path:’/about’,
Component:{
Template:`
<div>
<h1>关于我们</h1>
</div>
`
}
}
]
Var router = new VueRouter({
Routes:routes
})
New Vue({
El:’#app’,
Router:router
})
<Router-link to=’/’></Router-link >
传参:
:params
{{$route.params.name}}
子路由:
Children:{
Path:
Component:
}
手动访问和传参:
this.router.push(‘/about’)
this.router.push({name:’user’,params:{name:’..’}})
命名视图:
Components:{
A:{
Template:``
}
B:{
Template:``
}
}
<Route-view name=’A’
<Router-view name=’B’
导航钩子:
Router.beforeEach(function(to,from,next){})
Router.afterEach(function(to,from,next){})
路由匹配:
Console.log(‘to.matched:’,to.matched.some(function(item){
}))

元数据:
Path:’/’,
Meta:{
Login_required.true
}
//item.meta.Login_required
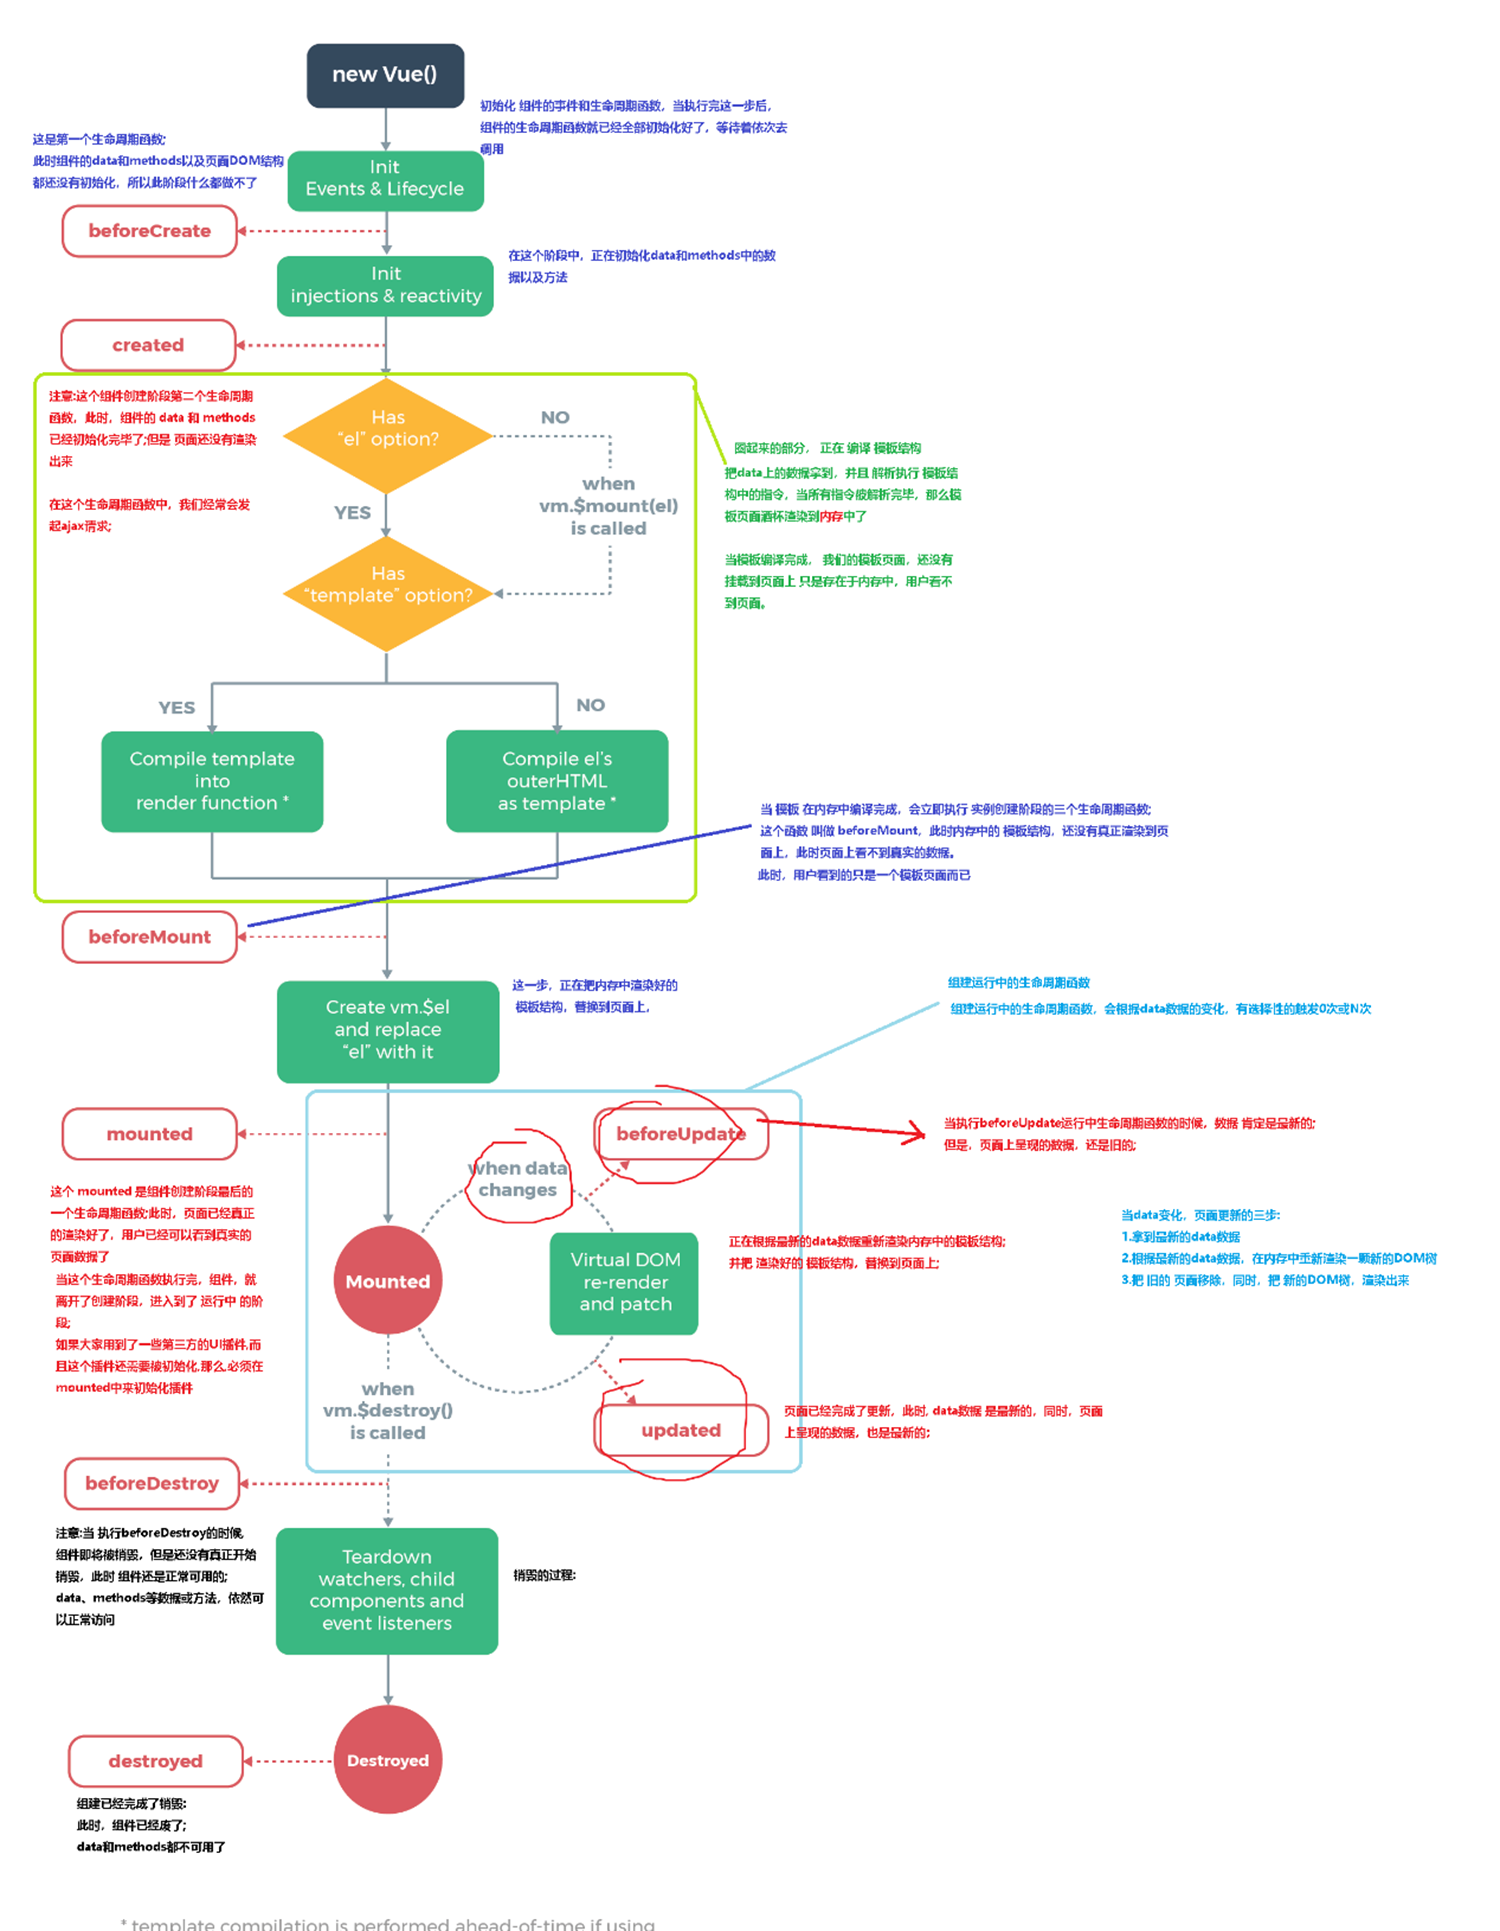
Vue生命周期:
Watch:

 el: '#watch-example',
  data: {
    question: '',
    answer: 'I cannot give you an answer until you ask a question!'
  },
  watch: {
    // 如果 `question` 发生改变,这个函数就会运行
    question: function (newQuestion, oldQuestion) {
      this.answer = 'Waiting for you to stop typing...'
      this.debouncedGetAnswer()
    }
  },


Mutation
 JavaScript 的限制,Vue 不能检测对象属性的添加或删除:

对于已经创建的实例,Vue 不能动态添加根级别的响应式属性。但是,可以使用 Vue.set(object, key, value) 方法向嵌套对象添加响应式属性。
有时你可能需要为已有对象赋予多个新属性,比如使用 Object.assign() 或 _.extend()。在这种情况下,你应该用两个对象的属性创建一个新的对象。所以,如果你想添加新的响应式属性,不要像这样:
Object.assign(vm.userProfile, {
|
你应该这样做:
vm.userProfile = Object.assign({}, vm.userProfile, {
|
处理边界:
// 获取根组件的数据
this.$root.foo
// 写入根组件的数据
this.$root.foo = 2

// 访问根组件的计算属性
this.$root.bar

// 调用根组件的方法
this.$root.baz()

对于 demo 或非常小型的有少量组件的应用来说这是很方便的。不过这个模式扩展到中大型应用来说就不然了。因此在绝大多数情况下,我们强烈推荐使用 Vuex来管理应用的状态。


//引用DOM
<base-input ref="usernameInput"></base-input>
|
现在在你已经定义了这个 ref 的组件里,你可以使用:
this.$refs.usernameInput
|
计划
=========================
Vue.extend:
Vue.extend是构造一个组件的语法构造器,你给这个构造器预设一些参数,而这个构造器给你一个组件,然后这个组件你就可以用到Vue.component这个全局注册方法里,也可以在任意Vue模板里使用这个构造器。
Vue.mixin
与组件的区别:
Vuex:
vuex中的几个概念:
1.state => $store.state.xxx
2.getter => store.getters.xxx (相当于是计算属性
3.mutation => {mutation就是mutation啦 mutation必须是同步操作
4.action => {
Action类似于mutattion 不同在于
Action提交的是mutation,而不是直接变更状态
让我们注册一个简单的action:
const store = new Vuex.Store({
state:{
count:0
},
mutations:{
increment(state){
state.count++
}
},
actions:{
increment(context){
contxt.commit('incremnt')
}
}
})
##!!注意 context对象不是store实例本身
Action 可以包含异步操作
action通过store.dispatch方法触发:
store.dispatch('increment')