介绍
原文链接:k8s技术圈-阳明
在Kubernetes中,服务和Pod的IP地址仅可以在集群网络内部使用,对于集群外的应用是不可见的。为了使外部的应用能够访问集群内的服务,Kubernetes目前提供了以下几种方案:
- NodePort
- LoadBalancer
- Ingress
Ingress只是Kubernetes中的一个普通资源对象,需要一个对应的Ingress Controller来解析 Ingress 的规则,暴露服务到外部,如ingress-nginx。
ingress-nginx和traefik都是热门的ingress-controller。
相对于traefik来说,nginx-ingress性能更加优秀,但配置比 traefik 复杂,当然功能也要强大一些,支持的功能多。
官网 有一些常见的ingress controller。
Ingress工作原理
Ingress其实就是从kubernets集群外部去访问集群的一个统一管理入口,它会将外部请求转发到集群内不同service的endpoint列表中的pod。
ingress controller监听kube-apiserver,实时感知后端service、pod的变化。得到的信息变化后,ingress controller再结合ingress的配置,更新反向代理负载均衡器,达到服务发现的作用。
这个逻辑和consul非常类似。
部署nginx Ingress
Ingress组成
- ingress controller:将新加入的Ingress转化成Nginx的配置文件并使之生效。
- ingress服务:将Nginx的配置抽象成一个Ingress对象,每添加一个新的服务只需写一个新的Ingress的yaml文件,然后应用到kubernetes集群。
要使用Ingress对外暴露服务,就需要提前安装一个Ingress Controller。
生产环境使用LB + DaemonSet hostNetwork模式需要修改values.yaml
- .Values.kind设置为DaemonSet,生产环境使用 LB + DaemonSet hostNetwork 模式
- .Values.hostNetwork设置为true,表示ingress-nginx这个pod启动的端口直接在ingress nginx DaemonSet运行的节点上开启。
比如DaemonSet启动在nodeSelector设置为http-endpoint:here的k8s-node1,k8s-node2两个节点上运行,那只会在这两个节点开启80,443端口。而不会在k8s-node3上启动 - .Values.publishService.enabled设置为false,hostNetwork 模式下设置为false,通过节点IP地址上报ingress status数据
- .Values.controller.digest,镜像手动上传的,这行一定要注释掉。否则一直提示找不到拉取不到镜像
- .Values.dnsPolicy设置为ClusterFirstWithHostNet,如果pod工作在主机网络,效率更高
- .Values.defaultbackend.enabled设置为true,默认后端pod
helm repo add ingress-nginx https://kubernetes.github.io/ingress-nginx
helm repo update
helm fetch ingress-nginx/ingress-nginx
tar -xvf ingress-nginx-3.23.0.tgz
kubectl create ns ingress-nginx
helm install --debug --namespace  ingress-nginx   ingress-nginx  ingress-nginx
注意:
- 默认配置监听所有命名空间的ingress对象。--watch-namespace 可以限制监听的namespace
- 如果多个Ingresses定义了同一个host的不同路径,ingress控制器会合并这些规则
- 如果使用的是GKE,则需要使用以下命令将用户初始化为cluster-admin:
console kubectl create clusterrolebinding cluster-admin-binding --clusterrole cluster-admin --user $(gcloud config get-value account)
线上环境为了保证高可用,需要运行多个nginx-ingress实例,然后用一个nginx/haproxy 作为入口,通过keepalived来访问边缘节点(集群内部用来向集群外暴露服务能力的节点)的vip地址。
检查
# pod运行状态,可以看到这两个pod的IP直接就是node节点的IP
[root@k8s-master1 ingress-nginx]# kubectl get pods -n ingress-nginx -o wide

NAME                                           READY   STATUS    RESTARTS   AGE   IP              NODE        NOMINATED NODE   READINESS GATES
ingress-nginx-controller-cgf99                 1/1     Running   0          16m   192.168.1.120   k8s-node1   <none>           <none>
ingress-nginx-controller-krgkp                 1/1     Running   0          16m   192.168.1.121   k8s-node2   <none>           <none>
ingress-nginx-defaultbackend-cb7bcf6d7-hkmhs   1/1     Running   0          16m   100.2.4.26      k8s-node2   <none>           <none>

#service
[root@k8s-master1 ingress-nginx]# kubectl get svc -n ingress-nginx

NAME                                 TYPE        CLUSTER-IP       EXTERNAL-IP   PORT(S)   AGE
ingress-nginx-controller-admission   ClusterIP   172.16.206.255   <none>        443/TCP   28m
ingress-nginx-defaultbackend         ClusterIP   172.16.81.103    <none>        80/TCP    28m

# nginx ingress controller 日志
[root@k8s-master1 ingress-nginx]# kubectl logs  -n  ingress-nginx  ingress-nginx-controller-cgf99

-------------------------------------------------------------------------------
NGINX Ingress controller
  Release:       v0.44.0
  Build:         f802554ccfadf828f7eb6d3f9a9333686706d613
  Repository:    https://github.com/kubernetes/ingress-nginx
  nginx version: nginx/1.19.6

-------------------------------------------------------------------------------
创建一个简单的nginx应用的ingress资源
cat > test-app-nginx.yaml << EOF
apiVersion: apps/v1
kind: Deployment
metadata:
  name: test-nginx
spec:
  selector:
    matchLabels:
      app: test-nginx
  template:
    metadata:
      labels:
        app: test-nginx
    spec:
      containers:
      - name: test-nginx
        image: nginx
        ports:
        - containerPort: 80
---
apiVersion: v1
kind: Service
metadata:
  name: test-nginx
  labels:
    app: test-nginx
spec:
  ports:
  - port: 80
    protocol: TCP
    name: http
  selector:
    app: test-nginx
---
apiVersion: extensions/v1beta1
kind: Ingress
metadata:
  name: test-nginx
  annotations:
    kubernetes.io/ingress.class: "nginx"  #指定这个ingress资源用ingress-nginx来处理
spec:
  rules:
  - host: erbiao.com  # 将域名映射到 test-nginx 服务
    http:
      paths:
      - path: /
        backend:
          serviceName: test-nginx  # 将所有请求发送到 test-nginx 服务的 80 端口
          servicePort: 80     # 不过需要注意大部分Ingress controller都不是直接转发到Service
                            # 而是只是通过Service来获取后端的Endpoints列表,直接转发到Pod,这样可以减少网络跳转,提高性能
EOF

kubectl create ns test
kubectl apply -f test-app-nginx.yaml -n test
资源创建成功后将域名erbiao.com解析到ingress-nginx所在边缘节点。就可以通过域名访问。
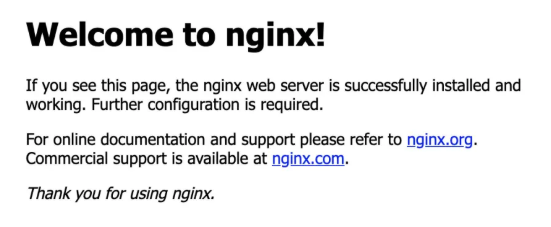
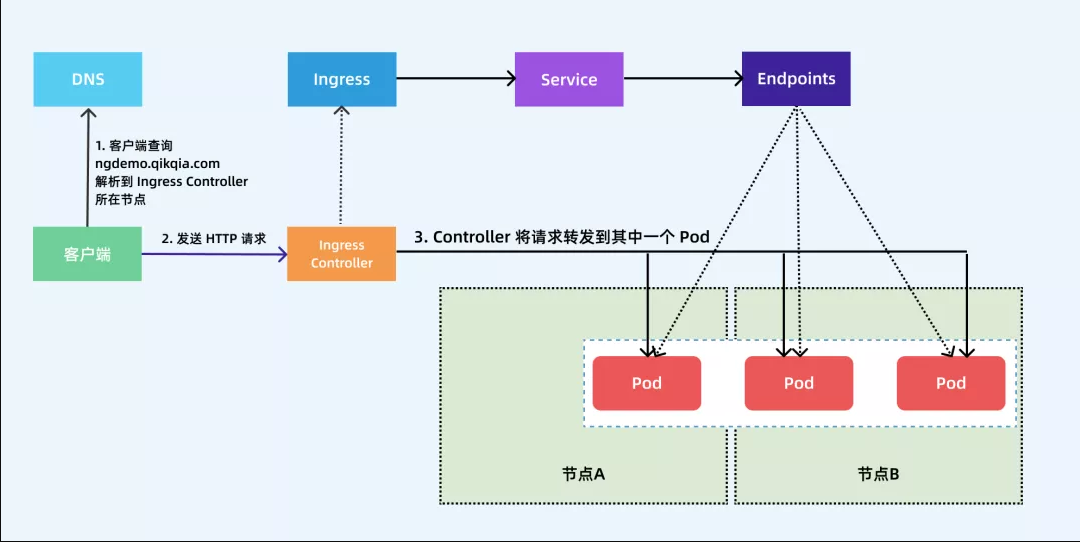
请求流程:客户端解析域名erbiao.com得到边缘节点IP,然后向节点上的Ingress Controller发送http请求。依据Ingress对象里的描述匹配域名,找到对应的service对象,获取关联的endpoint列表,最后将客户端请求转发给其中某个pod。
在ingress-nginx-controller的pod的nginx.conf配置中,生成了nginx配置段
  ## start server erbiao.com
    server {
        server_name erbiao.com ;

        listen 80  ;
        listen 443  ssl http2 ;

        set $proxy_upstream_name "-";

        ssl_certificate_by_lua_block {
            certificate.call()
        }

        location / {

            set $namespace      "test";
            set $ingress_name   "test-nginx";
            set $service_name   "test-nginx";
            set $service_port   "80";
            set $location_path  "/";
            set $global_rate_limit_exceeding n;

            rewrite_by_lua_block {
                lua_ingress.rewrite({
                    force_ssl_redirect = false,
                    ssl_redirect = true,
                    force_no_ssl_redirect = false,
                    use_port_in_redirects = false,
                global_throttle = { namespace = "", limit = 0, window_size = 0, key = { }, ignored_cidrs = { } },
                })
                balancer.rewrite()
                plugins.run()
            }

            # be careful with `access_by_lua_block` and `satisfy any` directives as satisfy any
            # will always succeed when there's `access_by_lua_block` that does not have any lua code doing `ngx.exit(ngx.DECLINED)`
            # other authentication method such as basic auth or external auth useless - all requests will be allowed.
            #access_by_lua_block {
            #}

            header_filter_by_lua_block {
                lua_ingress.header()
                plugins.run()
            }

            body_filter_by_lua_block {
                plugins.run()
            }

            log_by_lua_block {
                balancer.log()

                monitor.call()

                plugins.run()
            }

            port_in_redirect off;

            set $balancer_ewma_score -1;
            set $proxy_upstream_name "test-test-nginx-80";
            set $proxy_host          $proxy_upstream_name;
            set $pass_access_scheme  $scheme;

            set $pass_server_port    $server_port;

            set $best_http_host      $http_host;
            set $pass_port           $pass_server_port;

            set $proxy_alternative_upstream_name "";

            client_max_body_size                    1m;

            proxy_set_header Host                   $best_http_host;

            # Pass the extracted client certificate to the backend

            # Allow websocket connections
            proxy_set_header                        Upgrade           $http_upgrade;

            proxy_set_header                        Connection        $connection_upgrade;

            proxy_set_header X-Request-ID           $req_id;
            proxy_set_header X-Real-IP              $remote_addr;

            proxy_set_header X-Forwarded-For        $remote_addr;

            proxy_set_header X-Forwarded-Host       $best_http_host;
            proxy_set_header X-Forwarded-Port       $pass_port;
            proxy_set_header X-Forwarded-Proto      $pass_access_scheme;

            proxy_set_header X-Scheme               $pass_access_scheme;

            # Pass the original X-Forwarded-For
            proxy_set_header X-Original-Forwarded-For $http_x_forwarded_for;

            # mitigate HTTPoxy Vulnerability
            # https://www.nginx.com/blog/mitigating-the-httpoxy-vulnerability-with-nginx/
            proxy_set_header Proxy                  "";

            # Custom headers to proxied server

            proxy_connect_timeout                   5s;
            proxy_send_timeout                      60s;
            proxy_read_timeout                      60s;

            proxy_buffering                         off;
            proxy_buffer_size                       4k;
            proxy_buffers                           4 4k;

            proxy_max_temp_file_size                1024m;

            proxy_request_buffering                 on;
            proxy_http_version                      1.1;

            proxy_cookie_domain                     off;
            proxy_cookie_path                       off;

            # In case of errors try the next upstream server before returning an error
            proxy_next_upstream                     error timeout;
            proxy_next_upstream_timeout             0;
            proxy_next_upstream_tries               3;

            proxy_pass http://upstream_balancer;

            proxy_redirect                          off;

        }

    }
    ## end server erbiao.com
URL Rewrite功能
NGINX Ingress Controller很多高级的用法可以通过Ingress对象的annotation进行配置,如URL Rewrite功能。
比如一个 todo 的前端应用。
kubectl apply -f https://github.com/cnych/todo-app/raw/master/k8s/mongo.yaml
kubectl apply -f https://github.com/cnych/todo-app/raw/master/k8s/web.yaml
对应的Ingress资源对象:
apiVersion: extensions/v1beta1
kind: Ingress
metadata:
  name: todo
  annotations:
    kubernetes.io/ingress.class: "nginx"
spec:
  rules:
  - host: erbiao.me
    http:
      paths:
      - path: /
        backend:
          serviceName: todo
          servicePort: 3000
部署,解析域名后就可正常访问到。
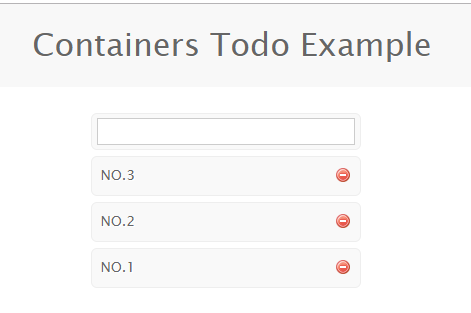
现在针对URL路径做一个rewrite:在URI中添加一个app的前缀。做法就是在annotations中添加rewrite-target的注解。
apiVersion: extensions/v1beta1
kind: Ingress
metadata:
  name: todo
  namespace: default
  annotations:
    kubernetes.io/ingress.class: "nginx"
    nginx.ingress.kubernetes.io/rewrite-target: /$2
spec:
  rules:
  - host: erbiao.me
    http:
      paths:
      - backend:
          serviceName: todo
          servicePort: 3000
        path: /app(/|$)(.*)
github中还有其他annotations的介绍。
更新后再访问就需要加上/app这个URI了
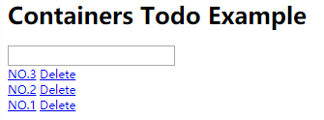

可看到静态资源在/stylesheets路径下,做了URL Rewrite后,要正常访问那也需要加上前缀http://erbiao.me/app/stylesheets/screen.css。对于图片或者其他静态资源也是如此,当然去更改页面引入静态资源的方式为相对路径也是可以的,但毕竟要修改代码,此时可借助ingress-nginx 中的configuration-snippet来对静态资源做一次跳转。
apiVersion: extensions/v1beta1
kind: Ingress
metadata:
  name: todo
  namespace: default
  annotations:
    kubernetes.io/ingress.class: "nginx"
    nginx.ingress.kubernetes.io/rewrite-target: /$2
    nginx.ingress.kubernetes.io/configuration-snippet: |
      rewrite ^/stylesheets/(.*)$ /app/stylesheets/$1 redirect;  # 添加 /app 前缀
      rewrite ^/images/(.*)$ /app/images/$1 redirect;  # 添加 /app 前缀
spec:
  rules:
  - host: erbiao.me
    http:
      paths:
      - backend:
          serviceName: todo
          servicePort: 3000
        path: /app(/|$)(.*)
现在访问主域名erbiao.me还是404,要解决此问题可设置app-root的注解,如此当访问主域名时会自动跳转到指定的app-root资源下。即访问http://erbiao.me会自动跳转到http://erbiao.me/app。但是还有一个问题是path 路径其实也匹配了/app 这样的路径,可能我们更加希望应用在最后添加一个 / 这样的slash,同样,可通过configuration-snippet配置来完成。更新后应用访问地址就都会以/样的slash结尾了
apiVersion: extensions/v1beta1
kind: Ingress
metadata:
  name: todo
  namespace: default
  annotations:
    kubernetes.io/ingress.class: "nginx"
    nginx.ingress.kubernetes.io/app-root: /app/
    nginx.ingress.kubernetes.io/rewrite-target: /$2
    nginx.ingress.kubernetes.io/configuration-snippet: |
      rewrite ^(/app)$ $1/ redirect;
      rewrite ^/stylesheets/(.*)$ /app/stylesheets/$1 redirect;
      rewrite ^/images/(.*)$ /app/images/$1 redirect;
spec:
  rules:
  - host: erbiao.me
    http:
      paths:
      - backend:
          serviceName: todo
          servicePort: 3000
        path: /app(/|$)(.*)
Basic Auth
在 Ingress Controller上面可配置一些基本的认证,如Basic Auth,可用 htpasswd生成一个密码文件来验证身份验证。
# htpasswd 生成一个密码文件
[root@k8s-master1 test]# htpasswd -c auth erbiao
New password:
Re-type new password:
Adding password for user erbiao

#创建依据生成的auth文件创建secret对象。
#创建的secret一定要和应用是在同一命名空间,否则会报503
[root@k8s-master1 test]# kubectl create secret generic basic-auth --from-file=auth
对上述todo应用做个认证
apiVersion: extensions/v1beta1
kind: Ingress
metadata:
  name: todo
  annotations:
    kubernetes.io/ingress.class: "nginx"
    nginx.ingress.kubernetes.io/auth-type: basic #认证类型
    nginx.ingress.kubernetes.io/auth-secret: basic-auth #包含 user/password 定义的 secret 对象名
    nginx.ingress.kubernetes.io/auth-realm: 'Authentication Required - erbiao' #要显示的带有适当上下文的消息,说明需要身份验证的原因
spec:
  rules:
  - host: erbiao.me
    http:
      paths:
      - path: /
        backend:
          serviceName: todo
          servicePort: 3000
NGINX Ingress Controller 还支持一些其他高级的认证,比如OAUTH认证之类的
灰度发布
在日常工作中经常需要对服务进行版本更新升级,所以经常会使用到滚动升级、蓝绿发布、灰度发布等不同的发布操作。而ingress-nginx支持通过Annotations配置来实现不同场景下的灰度发布和测试,可以满足金丝雀发布、蓝绿部署与 A/B 测试等业务场景。ingress-nginx的Annotation支持以下几种Canary规则:
- nginx.ingress.kubernetes.io/canary-by-header:基于 Request Header 的流量切分,适用于灰度发布以及 A/B 测试。当 Request Header 设置为 always 时,请求将会被一直发送到 Canary 版本;当 Request Header 设置为 never时,请求不会被发送到 Canary 入口;对于任何其他 Header 值,将忽略 Header,并通过优先级将请求与其他金丝雀规则进行优先级的比较。
- nginx.ingress.kubernetes.io/canary-by-header-value:要匹配的 Request Header 的值,用于通知 Ingress 将请求路由到 Canary Ingress 中指定的服务。当 Request Header 设置为此值时,它将被路由到 Canary 入口。该规则允许用户自定义 Request Header 的值,必须与上一个 annotation (即:canary-by-header) 一起使用。
- nginx.ingress.kubernetes.io/canary-by-header-pattern:与上面的
canary-by-header-value类似,唯一的区别是它是用正则表达式(PCRE Regex matching)对来匹配请求头的值,而不是只固定某一个值。注意:当与canary-by-header-value同时存在,注解canary-by-header-pattern将被忽略。当指定的正则表达式在请求处理过程中导致错误时,该请求将被视为不匹配。 - nginx.ingress.kubernetes.io/canary-weight:基于服务权重的流量切分,适用于蓝绿部署,权重范围 0 - 100 按百分比将请求路由到 Canary Ingress 中指定的服务。权重为 0 意味着该金丝雀规则不会向 Canary 入口的服务发送任何请求,权重为 100 意味着所有请求都将被发送到 Canary 入口。
- nginx.ingress.kubernetes.io/canary-by-cookie:基于 cookie 的流量切分,适用于灰度发布与 A/B 测试。用于通知 Ingress 将请求路由到 Canary Ingress 中指定的服务的cookie。当 cookie 值设置为 always 时,它将被路由到 Canary 入口;当 cookie 值设置为 never 时,请求不会被发送到 Canary 入口;对于任何其他值,将忽略 cookie 并将请求与其他金丝雀规则进行优先级的比较。
需要注意的是金丝雀规则按优先顺序进行排序:canary-by-header - > canary-by-cookie - > canary-weight
当Ingress被标记为Canary Ingress,除nginx.ingress.kubernetes.io/load-balance和nginx.ingress.kubernetes.io/upstream-hash-by外,所有其他非Canary注解都被忽略。
已知局限性:每个Ingress规则最多可以应用一个Canary Ingress
总的来说可以把以上 annotation 规则划分为以下两类:
- 基于权重的 Canary 规则

- 基于用户请求的 Canary 规则

下面通过一个示例应用来对灰度发布功能进行说明。
1. 部署一个production版本的应用
cat > production.yaml << EOF
apiVersion: apps/v1
kind: Deployment
metadata:
  name: production
  labels:
    app: production
spec:
  selector:
    matchLabels:
      app: production
  template:
    metadata:
      labels:
        app: production
    spec:
      containers:
      - name: production
        image: cnych/echoserver
        ports:
        - containerPort: 8080
        env:
          - name: NODE_NAME
            valueFrom:
              fieldRef:
                fieldPath: spec.nodeName
          - name: POD_NAME
            valueFrom:
              fieldRef:
                fieldPath: metadata.name
          - name: POD_NAMESPACE
            valueFrom:
              fieldRef:
                fieldPath: metadata.namespace
          - name: POD_IP
            valueFrom:
              fieldRef:
                fieldPath: status.podIP
---
apiVersion: v1
kind: Service
metadata:
  name: production
  labels:
    app: production
spec:
  ports:
  - port: 80
    targetPort: 8080
    name: http
  selector:
    app: production
---
apiVersion: extensions/v1beta1
kind: Ingress
metadata:
  name: production
  annotations:
    kubernetes.io/ingress.class: nginx
spec:
  rules:
  - host: echo.erbiao.me
    http:
      paths:
      - backend:
          serviceName: production
          servicePort: 80
EOF
kubectl apply -f production.yaml
应用部署成功后,将域名echo.erbiao.me解析到边缘节点即可访问:
Hostname: production-856d5fb99-zvbd2

Pod Information:
	node name:	k8s-node1
	pod name:	production-856d5fb99-zvbd2
	pod namespace:	default
	pod IP:	100.2.3.39

Server values:
	server_version=nginx: 1.13.3 - lua: 10008

Request Information:
	client_address=100.2.4.0
	method=GET
	real path=/
	query=
	request_version=1.1
	request_scheme=http
	request_uri=http://echo.erbiao.me:8080/

Request Headers:
	accept=*/*
	host=echo.erbiao.me
	user-agent=curl/7.29.0
	x-forwarded-for=192.168.1.105
	x-forwarded-host=echo.erbiao.me
	x-forwarded-port=80
	x-forwarded-proto=http
	x-real-ip=192.168.1.105
	x-request-id=20a18db31ea6693a0207e5fc73a14baf
	x-scheme=http

Request Body:
	-no body in request-
2. 依据上述版本,创建Canary版本的应用
cat > canary.yaml << EOF
apiVersion: apps/v1
kind: Deployment
metadata:
  name: canary
  labels:
    app: canary
spec:
  selector:
    matchLabels:
      app: canary
  template:
    metadata:
      labels:
        app: canary
    spec:
      containers:
      - name: canary
        image: cnych/echoserver
        ports:
        - containerPort: 8080
        env:
          - name: NODE_NAME
            valueFrom:
              fieldRef:
                fieldPath: spec.nodeName
          - name: POD_NAME
            valueFrom:
              fieldRef:
                fieldPath: metadata.name
          - name: POD_NAMESPACE
            valueFrom:
              fieldRef:
                fieldPath: metadata.namespace
          - name: POD_IP
            valueFrom:
              fieldRef:
                fieldPath: status.podIP
---
apiVersion: v1
kind: Service
metadata:
  name: canary
  labels:
    app: canary
spec:
  ports:
  - port: 80
    targetPort: 8080
    name: http
  selector:
    app: canary
EOF
kubectl apply -f canary.yaml
3.Annotation 规则配置
- 基于权重:基于权重的流量切分的典型应用场景就是蓝绿部署,可通过将权重设置为 0 或 100 来实现。
可将 Green 版本设置为主要部分,并将 Blue 版本的入口配置为 Canary。最初,将权重设置为 0,因此不会将流量代理到 Blue 版本。一旦新版本测试和验证都成功后,即可将 Blue 版本的权重设置为 100,即所有流量从 Green 版本转向 Blue。
创建一个基于权重的 Canary 版本的应用路由 Ingress 对象。
cat > canary-ingress.yaml << EOF
apiVersion: extensions/v1beta1
kind: Ingress
metadata:
  name: canary
  annotations:
    kubernetes.io/ingress.class: nginx
    nginx.ingress.kubernetes.io/canary: "true"   # 要开启灰度发布机制,首先需要启用 Canary
    nginx.ingress.kubernetes.io/canary-weight: "30"  # 分配30%流量到当前Canary版本
spec:
  rules:
  - host: echo.erbiao.me
    http:
      paths:
      - backend:
          serviceName: canary
          servicePort: 80
EOF

kubectl apply -f canary-ingress.yaml
Canary版本应用创建成功后,在命令行终端中来不断访问这个应用,观察 Hostname 变化。Canary版本应用分配了30%左右权重的流量,符合我们的预期。:
[root@k8s-master1 ~]# for i in $(seq 1 20); do echo -n "count:$i ," && curl -s echo.erbiao.me | grep "Hostname"   ; done

count:1 ,Hostname: canary-66cb497b7f-pnqq9
count:2 ,Hostname: canary-66cb497b7f-pnqq9
count:3 ,Hostname: production-856d5fb99-zvbd2
count:4 ,Hostname: production-856d5fb99-zvbd2
count:5 ,Hostname: canary-66cb497b7f-pnqq9
count:6 ,Hostname: production-856d5fb99-zvbd2
count:7 ,Hostname: production-856d5fb99-zvbd2
count:8 ,Hostname: production-856d5fb99-zvbd2
count:9 ,Hostname: canary-66cb497b7f-pnqq9
count:10 ,Hostname: production-856d5fb99-zvbd2
count:11 ,Hostname: canary-66cb497b7f-pnqq9
count:12 ,Hostname: production-856d5fb99-zvbd2
count:13 ,Hostname: production-856d5fb99-zvbd2
count:14 ,Hostname: production-856d5fb99-zvbd2
count:15 ,Hostname: production-856d5fb99-zvbd2
count:16 ,Hostname: canary-66cb497b7f-pnqq9
count:17 ,Hostname: canary-66cb497b7f-pnqq9
count:18 ,Hostname: production-856d5fb99-zvbd2
count:19 ,Hostname: canary-66cb497b7f-pnqq9
count:20 ,Hostname: production-856d5fb99-zvbd2
- Request Header:基于Request Header进行流量切分的典型应用场景即灰度发布或A/B测试场景。
在上面canary版本的Ingress对象中新增一条annotation配置nginx.ingress.kubernetes.io/canary-by-header: canary(value可以是任意值)。使当前的 Ingress 实现基于 Request Header 进行流量切分,由于canary-by-header 的优先级大于canary-weight,所以会忽略原有的canary-weight的规则。
annotations:
  kubernetes.io/ingress.class: nginx
  nginx.ingress.kubernetes.io/canary: "true"   # 要开启灰度发布机制,首先需要启用 Canary
  nginx.ingress.kubernetes.io/canary-by-header: canary  # 基于header的流量切分
  nginx.ingress.kubernetes.io/canary-weight: "30"  # 会被忽略,因为配置了 canary-by-headerCanary版本
更新上面的 Ingress 资源对象后,在请求中加入不同的 Header值,再次访问应用的域名。
注意:当 Request Header 设置为 never 或 always 时,请求将不会或一直被发送到 Canary 版本,对于任何其他 Header 值,将忽略 Header,并通过优先级将请求与其他 Canary 规则进行优先级的比较。
#请求时设置了 canary: never 这个 Header 值,所以请求没有发送到 Canary 应用中去。

[root@k8s-master1 ~]# for i in $(seq 1 20); do echo -n "count:$i ," && curl -s -H "canary: never" echo.erbiao.me | grep "Hostname"   ; done

count:1 ,Hostname: production-856d5fb99-zvbd2
count:2 ,Hostname: production-856d5fb99-zvbd2
count:3 ,Hostname: production-856d5fb99-zvbd2
count:4 ,Hostname: production-856d5fb99-zvbd2
count:5 ,Hostname: production-856d5fb99-zvbd2
count:6 ,Hostname: production-856d5fb99-zvbd2
count:7 ,Hostname: production-856d5fb99-zvbd2
count:8 ,Hostname: production-856d5fb99-zvbd2
count:9 ,Hostname: production-856d5fb99-zvbd2
count:10 ,Hostname: production-856d5fb99-zvbd2
count:11 ,Hostname: production-856d5fb99-zvbd2
count:12 ,Hostname: production-856d5fb99-zvbd2
count:13 ,Hostname: production-856d5fb99-zvbd2
count:14 ,Hostname: production-856d5fb99-zvbd2
count:15 ,Hostname: production-856d5fb99-zvbd2
count:16 ,Hostname: production-856d5fb99-zvbd2
count:17 ,Hostname: production-856d5fb99-zvbd2
count:18 ,Hostname: production-856d5fb99-zvbd2
count:19 ,Hostname: production-856d5fb99-zvbd2
count:20 ,Hostname: production-856d5fb99-zvbd2
#请求设置的 Header 值为 canary: other-value(不匹配never或always),所以 ingress-nginx 会通过优先级将请求与其他 Canary 规则进行优先级的比较,我们这里也就会进入 canary-weight: "30" 这个规则去。

[root@k8s-master1 ~]# for i in $(seq 1 20); do echo -n "count:$i ," && curl -s -H "canary: other-value" echo.erbiao.me | grep "Hostname"   ; done
count:1 ,Hostname: production-856d5fb99-zvbd2
count:2 ,Hostname: canary-66cb497b7f-pnqq9
count:3 ,Hostname: canary-66cb497b7f-pnqq9
count:4 ,Hostname: production-856d5fb99-zvbd2
count:5 ,Hostname: production-856d5fb99-zvbd2
count:6 ,Hostname: production-856d5fb99-zvbd2
count:7 ,Hostname: production-856d5fb99-zvbd2
count:8 ,Hostname: production-856d5fb99-zvbd2
count:9 ,Hostname: production-856d5fb99-zvbd2
count:10 ,Hostname: production-856d5fb99-zvbd2
count:11 ,Hostname: production-856d5fb99-zvbd2
count:12 ,Hostname: canary-66cb497b7f-pnqq9
count:13 ,Hostname: canary-66cb497b7f-pnqq9
count:14 ,Hostname: production-856d5fb99-zvbd2
count:15 ,Hostname: canary-66cb497b7f-pnqq9
count:16 ,Hostname: canary-66cb497b7f-pnqq9
count:17 ,Hostname: production-856d5fb99-zvbd2
count:18 ,Hostname: production-856d5fb99-zvbd2
count:19 ,Hostname: production-856d5fb99-zvbd2
count:20 ,Hostname: canary-66cb497b7f-pnqq9
在上述ingress对象的基础上,再添加nginx.ingress.kubernetes.io/canary-by-header-value: user-value注解,结合nginx.ingress.kubernetes.io/canary-by-header就可以将请求路由到canary版本的服务中。
annotations:
  kubernetes.io/ingress.class: nginx
  nginx.ingress.kubernetes.io/canary: "true"   # 要开启灰度发布机制,首先需要启用 Canary
  nginx.ingress.kubernetes.io/canary-by-header-value: user-value
  nginx.ingress.kubernetes.io/canary-by-header: canary  # 基于header的流量切分
  nginx.ingress.kubernetes.io/canary-weight: "30"  # 分配30%流量到当前Canary版本
# 请求时设置canary: user-value,所有请求都会被路由到canary版本

[root@k8s-master1 ~]# for i in $(seq 1 20); do echo -n "count:$i ," && curl -s -H "canary: user-value" echo.erbiao.me | grep "Hostname"   ; done
count:1 ,Hostname: canary-66cb497b7f-pnqq9
count:2 ,Hostname: canary-66cb497b7f-pnqq9
count:3 ,Hostname: canary-66cb497b7f-pnqq9
count:4 ,Hostname: canary-66cb497b7f-pnqq9
count:5 ,Hostname: canary-66cb497b7f-pnqq9
count:6 ,Hostname: canary-66cb497b7f-pnqq9
count:7 ,Hostname: canary-66cb497b7f-pnqq9
count:8 ,Hostname: canary-66cb497b7f-pnqq9
count:9 ,Hostname: canary-66cb497b7f-pnqq9
count:10 ,Hostname: canary-66cb497b7f-pnqq9
count:11 ,Hostname: canary-66cb497b7f-pnqq9
count:12 ,Hostname: canary-66cb497b7f-pnqq9
count:13 ,Hostname: canary-66cb497b7f-pnqq9
count:14 ,Hostname: canary-66cb497b7f-pnqq9
count:15 ,Hostname: canary-66cb497b7f-pnqq9
count:16 ,Hostname: canary-66cb497b7f-pnqq9
count:17 ,Hostname: canary-66cb497b7f-pnqq9
count:18 ,Hostname: canary-66cb497b7f-pnqq9
count:19 ,Hostname: canary-66cb497b7f-pnqq9
count:20 ,Hostname: canary-66cb497b7f-pnqq9
3. 基于cookie
与基于 Request Header 的 annotation 用法规则类似。例如在 A/B 测试场景下,需要让地域为北京的用户访问 Canary 版本。那么当 cookie 的 annotation 设置为 nginx.ingress.kubernetes.io/canary-by-cookie: "users_from_Beijing",此时后台可对登录的用户请求进行检查,若该用户访问源来自北京则设置 cookie users_from_Beijing 的值为 always,这样就可以确保北京的用户仅访问 Canary 版本。
annotations:
  kubernetes.io/ingress.class: nginx
  nginx.ingress.kubernetes.io/canary: "true"   # 要开启灰度发布机制,首先需要启用 Canary
  nginx.ingress.kubernetes.io/canary-by-cookie: "users_from_Beijing"  # 基于 cookie
  nginx.ingress.kubernetes.io/canary-weight: "30"  # 会被忽略,因为配置了 canary-by-cookie
#请求时设置一个 users_from_Beijing=always 的 Cookie 值,所有请求都会被路由到canary版本

[root@k8s-master1 ~]# for i in $(seq 1 20); do echo -n "count:$i ," && curl -s  -b "users_from_Beijing=always"  echo.erbiao.me | grep "Hostname"   ; done

count:1 ,Hostname: canary-66cb497b7f-pnqq9
count:2 ,Hostname: canary-66cb497b7f-pnqq9
count:3 ,Hostname: canary-66cb497b7f-pnqq9
count:4 ,Hostname: canary-66cb497b7f-pnqq9
count:5 ,Hostname: canary-66cb497b7f-pnqq9
count:6 ,Hostname: canary-66cb497b7f-pnqq9
count:7 ,Hostname: canary-66cb497b7f-pnqq9
count:8 ,Hostname: canary-66cb497b7f-pnqq9
count:9 ,Hostname: canary-66cb497b7f-pnqq9
count:10 ,Hostname: canary-66cb497b7f-pnqq9
count:11 ,Hostname: canary-66cb497b7f-pnqq9
count:12 ,Hostname: canary-66cb497b7f-pnqq9
count:13 ,Hostname: canary-66cb497b7f-pnqq9
count:14 ,Hostname: canary-66cb497b7f-pnqq9
count:15 ,Hostname: canary-66cb497b7f-pnqq9
count:16 ,Hostname: canary-66cb497b7f-pnqq9
count:17 ,Hostname: canary-66cb497b7f-pnqq9
count:18 ,Hostname: canary-66cb497b7f-pnqq9
count:19 ,Hostname: canary-66cb497b7f-pnqq9
count:20 ,Hostname: canary-66cb497b7f-pnqq9
ssl证书手动管理
通过 Secret 对象来引用证书文件:
kubectl create secret tls erbiao-tls --cert=tls.crt --key=tls.key

#如何自签证书
# openssl req -x509 -nodes -days 3650 -newkey rsa:2048 -keyout tls.key -out tls.crt -subj "/CN=ssl.erbiao.me"
创建一个带有使用ssl证书的应用
cat > ssl-nginx.yaml << EOF
apiVersion: apps/v1
kind: Deployment
metadata:
  name: ssl-nginx
spec:
  selector:
    matchLabels:
      app: ssl-nginx
  template:
    metadata:
      labels:
        app: ssl-nginx
    spec:
      containers:
      - name: ssl-nginx
        image: nginx
        ports:
        - containerPort: 80
---
apiVersion: v1
kind: Service
metadata:
  name: ssl-nginx
  labels:
    app: ssl-nginx
spec:
  ports:
  - port: 80
    protocol: TCP
    name: http
  selector:
    app: ssl-nginx
---
apiVersion: extensions/v1beta1
kind: Ingress
metadata:
  name: ingress-with-auth
spec:
  rules:
  - host: ssl.erbiao.me
    http:
      paths:
      - path: /
        backend:
          serviceName: ssl-nginx
          servicePort: 80
  tls:
  - hosts:
    - ssl.erbiao.me
    secretName: erbiao-tls
EOF

kubectl apply -f ssl-nginx.yaml
除了自签名证书或者购买正规机构的 CA 证书之外,我们还可以通过 letsencrypt 来自动生成合法的证书。
ssl证书自动续期工具:cert-manager
cert-manager 是一个云原生证书管理开源项目,用于在 Kubernetes 集群中提供 HTTPS 证书并自动续期,支持Let's Encrypt/HashiCorp/Vault这些免费证书的签发。
在Kubernetes中,可以通过Kubernetes Ingress和Let's Encrypt 实现外部服务的自动化HTTPS。
下面是官方给出的架构图,可以看到 cert-manager 在 Kubernetes 中定义了两个自定义类型资源:Issuer(ClusterIssuer) 和 Certificate。
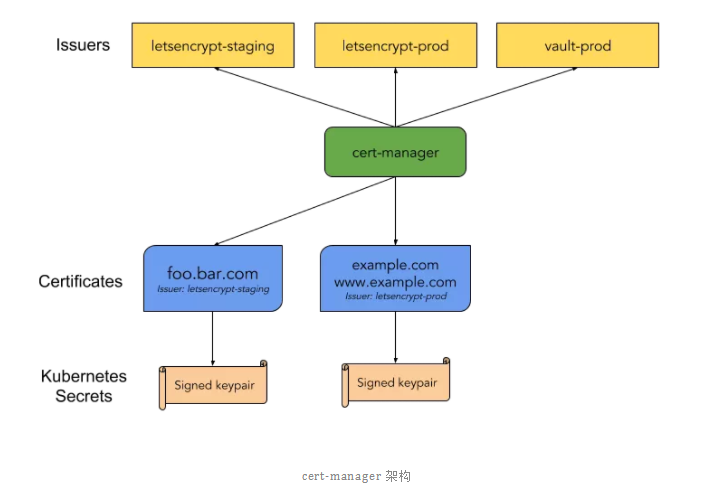
- Issuer 代表的是证书颁发者,可以定义各种提供者的证书颁发者,当前支持基于 Let's Encrypt/HashiCorp/Vault 和 CA 的证书颁发者,还可以定义不同环境下的证书颁发者。
- Certificate 代表的是生成证书的请求,一般其中存入生成证书元信息,如域名等。
当在Kubernetes中定义了上述两类资源,部署的cert-manager会根据Issuer和Certificate 生成TLS证书,并将证书保存进Kubernetes的Secret资源中,然后在Ingress资源中就可引用到这些生成的Secret资源作为TLS证书使用,对于已经生成的证书,还会定期检查证书的有效期,如将超过有效期,还会自动续期。
安装cert-manager也简单,官方提供一个单一的资源清单文件,包含所有的资源对象,直接安装
# Kubernetes 1.16+
kubectl apply -f https://github.com/jetstack/cert-manager/releases/download/v1.1.0/cert-manager.yaml
# Kubernetes <1.16
kubectl apply --validate=false -f https://github.com/jetstack/cert-manager/releases/download/v1.1.0/cert-manager-legacy.yaml
#检查状态
[root@k8s-master1 test]# kubectl get pods -n cert-manager
NAME                                      READY   STATUS    RESTARTS   AGE

cert-manager-5597cff495-ptg2n             1/1     Running   0          5m39s
cert-manager-cainjector-bd5f9c764-jmfrt   1/1     Running   0          5m39s
cert-manager-webhook-5f57f59fbc-4lctx     1/1     Running   0          5m39s
在签发证书前,群集中至少配置一个Issuer或ClusterIssuer资源
创建一个Issuer资源对象来测试webhook工作是否正常。创建了一个名为 cert-manager-test 的命名空间,创建了一个自签名的 Issuer 证书颁发机构,然后使用这个 Issuer 来创建一个证书请求的 Certificate 对象,直接创建资源清单
cat <<EOF > test-selfsigned.yaml
apiVersion: v1
kind: Namespace
metadata:
  name: cert-manager-test
---
apiVersion: cert-manager.io/v1
kind: Issuer
metadata:
  name: test-selfsigned
  namespace: cert-manager-test
spec:
  selfSigned: {}  # 配置自签名的证书机构类型
---
apiVersion: cert-manager.io/v1
kind: Certificate
metadata:
  name: selfsigned-cert
  namespace: cert-manager-test
spec:
  dnsNames:
  - example.com
  secretName: selfsigned-cert-tls
  issuerRef:
    name: test-selfsigned
EOF

kubectl apply -f test-selfsigned.yaml
创建完成后可以检查新创建的证书状态,在 cert-manager 处理证书请求之前,可能需要稍微等几秒:
[root@k8s-master1 ~]# kubectl describe certificate -n cert-manager-test

Name:         selfsigned-cert
Namespace:    cert-manager-test
Labels:       <none>
Annotations:  <none>
API Version:  cert-manager.io/v1
Kind:         Certificate

......

Spec:
  Dns Names:
    example.com
  Issuer Ref:
    Name:       test-selfsigned         #证书机构
  Secret Name:  selfsigned-cert-tls     #secret对象名称
Status:
  Conditions:
    Last Transition Time:  2021-02-22T06:08:39Z
    Message:               Certificate is up to date and has not expired    #证书状态
    Reason:                Ready
    Status:                True
    Type:                  Ready
  Not After:               2021-05-23T06:08:38Z     #证书有效期
  Not Before:              2021-02-22T06:08:38Z     #证书有效期
  Renewal Time:            2021-04-23T06:08:38Z     #证书下次更新时间
  Revision:                1
Events:
  Type    Reason     Age   From          Message
  ----    ------     ----  ----          -------
  Normal  Issuing    12m   cert-manager  Issuing certificate as Secret does not exist
  Normal  Generated  12m   cert-manager  Stored new private key in temporary Secret resource "selfsigned-cert-tqkwd"
  Normal  Requested  12m   cert-manager  Created new CertificateRequest resource "selfsigned-cert-zpdwq"
  Normal  Issuing    12m   cert-manager  The certificate has been successfully issued
从上面的Events中可看到证书已经成功签发,生成的证书存放在一个名为selfsigned-cert-tls的Secret对象:
[root@k8s-master1 ~]# kubectl get secret -n cert-manager-test   selfsigned-cert-tls -o yaml
apiVersion: v1
data:
  ca.crt: ...
  tls.crt: ...
  tls.key: ...
kind: Secret
metadata:

...

  name: selfsigned-cert-tls
  namespace: cert-manager-test
  resourceVersion: "815281"
  selfLink: /api/v1/namespaces/cert-manager-test/secrets/selfsigned-cert-tls
  uid: 4e7fac45-284c-4755-bb89-5435021048ed
type: kubernetes.io/tls
到这里证明cert-manager已经安装成功。需要注意的是cert-manager功能非常强大,不只是支持 ACME 类型证书签发,还支持其他众多类型,如SelfSigned(自签名)、CA、Vault、Venafi、External、ACME,只是一般主要是使用ACME来生成自动化的证书。
cert-manager结合ingress-nginx为Kubernetes应用自动签发Let's Encrypt类型的ssl证书
Let's Encrypt使用ACME协议来校验域名的归属(目前主要有HTTP和DNS两种校验方式),校验成功后就可自动颁发免费证书,证书有效期为90天,到期前需要再校验一次来实现续期,而cert-manager是可以自动续期的,所以不用担心证书过期问题。
HTTP-01校验
HTTP-01的校验通过给域名指向的HTTP服务增加一个临时 location,校验时 Let's Encrypt会发送http请求到http://<YOUR_DOMAIN>/.well-known/acme-challenge/
使用HTTP校验这种方式,首先需要配置域名解析,即需要保证ACME 服务端可以正常访问到你的HTTP服务。
由于Let's Encrypt的生产环境有着严格的接口调用限制,所以一般需要在 staging环境测试通过后,再切换到生产环境。
此处以一个todo项目为例
1. 创建Issuer/ClusterIssuer证书颁发机构
首先创建一个全局范围staging环境使用的HTTP-01校验方式的(ClusterIssuer对象)
cat <<EOF | kubectl apply -f -
apiVersion: cert-manager.io/v1
kind: ClusterIssuer
metadata:
  name: letsencrypt-staging-http01
spec:
  acme:
    # ACME 服务端地址
    server: https://acme-staging-v02.api.letsencrypt.org/directory
    # 用于 ACME 注册的邮箱
    email: icnych@gmail.com
    # 用于存放 ACME 帐号 private key 的 secret
    privateKeySecretRef:
      name: letsencrypt-staging-http01
    solvers:
    - http01: # ACME HTTP-01 类型
        ingress:
          class: nginx  # 指定ingress的名称
EOF
再创建一个用于生产环境使用的HTTP-01校验方式的(ClusterIssuer对象)
cat <<EOF | kubectl apply -f -
apiVersion: cert-manager.io/v1
kind: ClusterIssuer
metadata:
  name: letsencrypt-http01
spec:
  acme:
    server: https://acme-v02.api.letsencrypt.org/directory
    email: icnych@gmail.com
    privateKeySecretRef:
      name: letsencrypt-http01
    solvers:
    - http01:
        ingress:
          class: nginx
EOF
#生成两个全局范围ClusterIssuer的对象
[root@k8s-master1 ~]# kubectl get clusterissuers

NAME                         READY   AGE
letsencrypt-http01           True    106s
letsencrypt-staging-http01   True    2m2s
2. 生成证书
cert-manager提供了用于生成证书的自定义资源对象Certificate,不过这个对象需要在一个具体的命名空间下使用,证书最终会在这个命名空间下以 Secret 的资源对象存储。这里是要结合ingress-nginx一起使用,只需要修改Ingress对象,添加上cert-manager的相关注解即可,不需要手动创建Certificate 对象。:
# 修改前的ingress对象
apiVersion: extensions/v1beta1
kind: Ingress
metadata:
  name: todo-web
  annotations:
    kubernetes.io/ingress.class: "nginx"
spec:
  rules:
  - host: todo.erbiao.me
    http:
      paths:
      - path: /
        backend:
          serviceName: todo-web
          servicePort: 3000
# 修改后的ingress对象
cat <<EOF | kubectl apply -f -
---
apiVersion: apps/v1
kind: Deployment
metadata:
  name: todo-mongo
spec:
  selector:
    matchLabels:
      app: todo-mongo
  template:
    metadata:
      labels:
        app: todo-mongo
    spec:
      volumes:
      - name: todo-mongo-data
        emptyDir: {}
      containers:
      - name: todo-mongo
        image: todo-mongo
        ports:
        - containerPort: 27017
        volumeMounts:
        - name: data
          mountPath: /data/db
---
apiVersion: v1
kind: Service
metadata:
  name: todo-mongo
spec:
  selector:
    app: todo-mongo
  type: ClusterIP
  ports:
  - name: todo-mongo
    port: 27017
    targetPort: 27017
---
apiVersion: apps/v1
kind: Deployment
metadata:
  name: todo-web
spec:
  selector:
    matchLabels:
      app: todo-web
  template:
    metadata:
      labels:
        app: todo-web
    spec:
      containers:
      - name: todo-web
        image: cnych/todo:v1.1
        env:
        - name: "DBHOST"
          value: "mongodb://mongo.default.svc.cluster.local:27017" #不同的命名空间地址不同,此处为default
        ports:
        - containerPort: 3000
---
apiVersion: v1
kind: Service
metadata:
  name: todo-web
spec:
  selector:
    app: todo-web
  type: ClusterIP
  ports:
  - name: todo-web
    port: 3000
    targetPort: 3000

---
apiVersion: extensions/v1beta1
kind: Ingress
metadata:
  name: todo-web
  annotations:
    kubernetes.io/ingress.class: "nginx"
    cert-manager.io/cluster-issuer: "letsencrypt-staging-http01"  # 使用哪个issuer
spec:
  tls:
  - hosts:
    - todo.erbiao.me    # TLS 域名
    secretName: todo-tls   # 用于存储证书的 Secret 对象名字
  rules:
  - host: todo.erbiao.me
    http:
      paths:
      - path: /
        backend:
          serviceName: todo-web
          servicePort: 3000
EOF
上述执行完成,就会自动创建一个 Certificate 对象
kubectl get certificate

NAME       READY   SECRET     AGE
todo-tls   False   todo-tls   34s
在校验过程中会自动创建一个 Ingress 对象用于 ACME 服务端访问:
kubectl get ingress

NAME                        CLASS    HOSTS                ADDRESS        PORTS     AGE
todo-web                        <none>   todo.erbiao.me     192.168.1.120   80, 443   33s
校验成功后会将证书保存到 todo-tls 的 Secret 对象中
[root@k8s-master1]# kubectl get certificate
NAME       READY   SECRET     AGE
todo-tls   True    todo-tls   21m

[root@k8s-master1]# kubectl get secret
NAME                          TYPE                                  DATA   AGE
default-token-hpd7s           kubernetes.io/service-account-token   3      55d
todo-tls                      kubernetes.io/tls                     2      20m

[root@k8s-master1]# kubectl describe certificate todo-tls
Name:         todo-tls
Namespace:    default
......
Events:
  Type    Reason     Age   From          Message
  ----    ------     ----  ----          -------
  Normal  Issuing    22m   cert-manager  Issuing certificate as Secret does not exist
  Normal  Generated  22m   cert-manager  Stored new private key in temporary Secret resource "todo-tls-tr4pq"
  Normal  Requested  22m   cert-manager  Created new CertificateRequest resource "todo-tls-2gchg"
  Normal  Issuing    21m   cert-manager  The certificate has been successfully issued
3. 将ClusterIssuer替换成生产环境的
证书自动获取成功后,就可将 ClusterIssuer 替换成生产环境
cat <<EOF | kubectl apply -f -
apiVersion: extensions/v1beta1
kind: Ingress
metadata:
  name: todo-web
  annotations:
    kubernetes.io/ingress.class: "nginx"
    cert-manager.io/cluster-issuer: "letsencrypt-http01"  # 使用生产环境的issuer
spec:
  tls:
  - hosts:
    - todo.erbiao.me     # TLS 域名
    secretName: todo-tls   # 用于存储证书的 Secret 对象名字
  rules:
  - host: todo.erbiao.me
    http:
      paths:
      - path: /
        backend:
          serviceName: todo-web
          servicePort: 3000
EOF

[root@k8s-master1 ]# kubectl get certificate
NAME       READY   SECRET     AGE
todo-tls   True    todo-tls   25m
校验成功后就可自动获取真正的HTTPS证书,在浏览器中访问 https://todo.erbiao.me就可看到证书有效。
DNS-01 校验
DNS-01的校验通过 DNS 提供商的 API 拿到你的 DNS 控制权限,在 Let's Encrypt 为 cert-manager 提供 TOKEN 后,cert-manager 将创建从该 TOKEN 和你的帐户密钥派生的 TXT 记录,并将该记录放在 _acme-challenge.<YOUR_DOMAIN>。然后Let's Encrypt将向 DNS 系统查询该记录,若找到匹配项,就颁发证书,这种方法是支持泛域名证书。