• vue+element-ui+echarts 项目搭建


    1,  环境搭建

      1.1,        Node环境

            官方下载node

            检查安装情况

            node –v

            npm –v

      1.2,        安装cnpm

                 npm install –g cnpm --registry=https://registry.npm.taobao.org

      1.3,        安装vue-cli

          cnpm install vue-cli -g

    2,  项目构建

      vue init webpack ‘project-name’

      创建成功后,进入项目根目录,初始化项目并运行


     cnpm install
    
     cnpm run dev
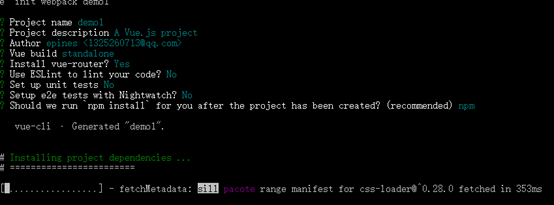


    3,  查看项目目录


    4,  创建页面相关文件夹

        /src/page

        内部创建页面文件

          /src/page/index.vue

                    /src/page/ele.vue

        配置路由 /src/router/index.js
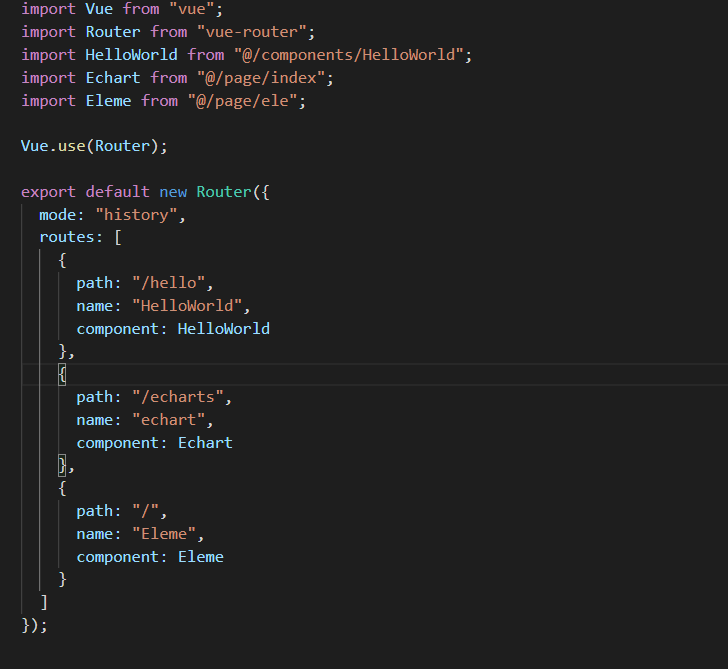


    5,  引入echarts

           安装:cnpm install echarts –S

      5.1全局引入

      进入/src/main.js


    import echarts from 'echarts'
    
    Vue.config.productionTip = false
    
    Vue.prototype.$echarts = echarts

        具体使用:


    <div id="echartsId"></div>

     下方echarts的具体配置,可以官网,直接复制官网内的配置

    mounted(){
    let myChart = this.$echarts.init(document.getElementById('echartsId'))
    
          myChart.setOption(
    
          {
    
            tooltip: {
    
                trigger: 'axis',
    
                axisPointer: {            // 坐标轴指示器,坐标轴触发有效
    
                    type: 'shadow'        // 默认为直线,可选为:'line' | 'shadow'
    
                }
    
            },
    
            legend: {
    
                data: ['直接访问', '邮件营销', '联盟广告', '视频广告', '搜索引擎', '百度', '谷歌', '必应', '其他']
    
            },
    
            grid: {
    
                left: '3%',
    
                right: '4%',
    
                bottom: '3%',
    
                containLabel: true
    
            },
    
            xAxis: [
    
                {
    
                    type: 'category',
    
                    data: ['周一', '周二', '周三', '周四', '周五', '周六', '周日']
    
                }
    
            ],
    
            yAxis: [
    
                {
    
                    type: 'value'
    
                }
    
            ],
    
            series: [
    
                {
    
                    name: '直接访问',
    
                    type: 'bar',
    
                    data: [320, 332, 301, 334, 390, 330, 320]
    
                },
    
                {
    
                    name: '邮件营销',
    
                    type: 'bar',
    
                    stack: '广告',
    
                    data: [120, 132, 101, 134, 90, 230, 210]
    
                },
    
                {
    
                    name: '联盟广告',
    
                    type: 'bar',
    
                    stack: '广告',
    
                    data: [220, 182, 191, 234, 290, 330, 310]
    
                },
    
                {
    
                    name: '视频广告',
    
                    type: 'bar',
    
                    stack: '广告',
    
                    data: [150, 232, 201, 154, 190, 330, 410]
    
                },
    
                {
    
                    name: '搜索引擎',
    
                    type: 'bar',
    
                    data: [862, 1018, 964, 1026, 1679, 1600, 1570],
    
                    markLine: {
    
                        lineStyle: {
    
                            type: 'dashed'
    
                        },
    
                        data: [
    
                            [{type: 'min'}, {type: 'max'}]
    
                        ]
    
                    }
    
                },
    
                {
    
                    name: '百度',
    
                    type: 'bar',
    
                    barWidth: 5,
    
                    stack: '搜索引擎',
    
                    data: [620, 732, 701, 734, 1090, 1130, 1120]
    
                },
    
                {
    
                    name: '谷歌',
    
                    type: 'bar',
    
                    stack: '搜索引擎',
    
                    data: [120, 132, 101, 134, 290, 230, 220]
    
                },
    
                {
    
                    name: '必应',
    
                    type: 'bar',
    
                    stack: '搜索引擎',
    
                    data: [60, 72, 71, 74, 190, 130, 110]
    
                },
    
                {
    
                    name: '其他',
    
                    type: 'bar',
    
                    stack: '搜索引擎',
    
                    data: [62, 82, 91, 84, 109, 110, 120]
    
                }
    
            ]
    
        });
    }


      5.2 局部引用(进入页面引入)

        let echarts = require('echarts/lib/echarts')
    
        // 引入柱状图组件
    
        require('echarts/lib/chart/bar')
    
        // 引入提示框和title组件
    
        require('echarts/lib/component/tooltip')
    
        require('echarts/lib/component/title')

        同样直接配置试用,只需注意echarts初始化时的差异

    let myChart = echarts.init(document.getElementById('echartsId'))


    6,  引用element-ui

      安装:

      cnpm install element-ui –S

      6.1,全局引入(/src/main.js)

       import element from "element-ui";
    
        import "element-ui/lib/theme-chalk/index.css";
    
        Vue.use(element);

         页面直接使用即可 
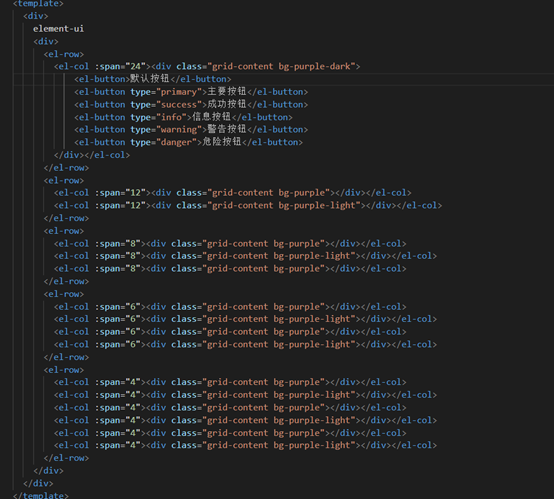
     

    由于这里使用的是element的layout布局,没有样式会看不出来效果,所以加了点样式和按钮

    .el-row {
      margin-bottom: 20px;
     
    }
     .el-row:last-child {
        margin-bottom: 0;
      }
    .el-col {
      border-radius: 4px;
    }
    .bg-purple-dark {
      background: #99a9bf;
    }
    .bg-purple {
      background: #d3dce6;
    }
    .bg-purple-light {
      background: #e5e9f2;
    }
    .grid-content {
      border-radius: 4px;
      min-height: 36px;
    }
    .row-bg {
      padding: 10px 0;
      background-color: #f9fafc;
    }
    

      然后这样一个框架就搭好了,具体还要使用其他的,大家可以根据自己的需求去安装

      (注意:样式我从官方文档上复制下来的,里面用了less或者sass,所以直接使用的话,可以按上一个)

      关于echartselement-ui的具体使用,大家可以直接去官方文档查看

    作者:epines
    本文版权归作者和博客园共有,欢迎转载,但未经作者同意必须在文章页面给出原文连接,否则保留追究法律责任的权利。
  • 相关阅读:
    vue中Axios的封装和API接口的管理
    解决Vue报错:TypeError: Cannot read property 'scrollHeight' of undefined
    JS-scrollTop、scrollHeight、clientTop、clientHeight、offsetTop、offsetHeight的理解
    理解Vue中的ref和$refs
    理解Vue中的nextTick
    CSS——overflow的参数以及使用
    JS数据结构——队列
    Vue中实现聊天窗口overflow:auto自动滚动到底部,实现显示当前最新聊天消息
    Vue中无法检测到数组的变动
    JS-观察者模式
  • 原文地址:https://www.cnblogs.com/epines/p/12170710.html
Copyright © 2020-2023  润新知