MariaDB 数据库管理系统是 MySQL 的一个分支,主要由开源社区在维护,采用 GPL 授权许可。
开发这个分支的原因之一是:甲骨文公司收购了 MySQL 后,有将 MySQL 闭源的潜在风险,因此社区采用分支的方式来避开这个风险。
MariaDB完全兼容mysql,使用方法也是一样的.
有的centos 7已经默认安装了Mariadb,可以查看自己的有没有安装(运行这个命令: systemctl start mariadb ),没有安装的再进行安装,已经安装了可以不用安装也可以卸载了重装。
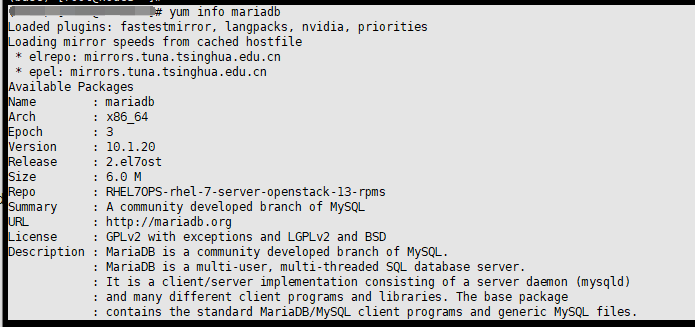
yum info mariadb

rpm -qa|grep mariadb
mariadb-config-10.1.20-2.el7ost.x86_64
mariadb-libs-10.1.20-2.el7ost.x86_64
mariadb-common-10.1.20-2.el7ost.x86_64
卸载命令
yum remove mariadb-server
1、安装MariaDB
通过yum安装就行了。简单快捷,安装mariadb-server,默认依赖安装mariadb,一个是服务端、一个是客户端。
[root@aaa]# yum install mariadb-server
yum install mariadb mariadb-server mariadb-devel mariadb-libs –y
==================================================================================================================================
Package Arch Version Repository Size
==================================================================================================================================
Installing:
mysql-community-client x86_64 5.6.51-2.el7 mysql56-community 21 M
mysql-community-devel x86_64 5.6.51-2.el7 mysql56-community 3.4 M
mysql-community-libs x86_64 5.6.51-2.el7 mysql56-community 2.2 M
replacing mariadb-libs.x86_64 3:10.1.20-2.el7ost
mysql-community-server x86_64 5.6.51-2.el7 mysql56-community 67 M
Installing for dependencies:
mysql-community-common x86_64 5.6.51-2.el7 mysql56-community 287 k
Transaction Summary
==================================================================================================================================
Transaction check error:
file /etc/my.cnf from install of mysql-community-server-5.6.51-2.el7.x86_64 conflicts with file from package mariadb-config-3:10.1.20-2.el7ost.x86_64
2、配置MariaDB
1)安装完成后首先要把MariaDB服务开启,并设置为开机启动
[root@aaa]# systemctl start mariadb # 开启服务
[root@aaa]# systemctl enable mariadb # 设置为开机自启动服务
2)首次安装需要进行数据库的配置,命令都和mysql的一样
[root@aaa]# mysql_secure_installation
3)配置时出现的各个选项
Enter current password for root (enter for none): # 输入数据库超级管理员root的密码(注意不是系统root的密码),第一次进入还没有设置密码则直接回车
Set root password? [Y/n] # 设置密码,y
New password: # 新密码
Re-enter new password: # 再次输入密码
Remove anonymous users? [Y/n] # 移除匿名用户, y
Disallow root login remotely? [Y/n] # 拒绝root远程登录,n,不管y/n,都会拒绝root远程登录
Remove test database and access to it? [Y/n] # 删除test数据库,y:删除。n:不删除,数据库中会有一个test数据库,一般不需要
Reload privilege tables now? [Y/n] # 重新加载权限表,y。或者重启服务也许
4)测试是否能够登录成功,出现 MariaDB [(none)]> 就表示已经能够正常登录使用MariaDB数据库了
[root@aaa]# mysql -u root -p
Enter password:
Welcome to the MariaDB monitor. Commands end with ; or g.
Your MariaDB connection id is 8
Server version: 5.5.60-MariaDB MariaDB Server
Copyright (c) 2000, 2018, Oracle, MariaDB Corporation Ab and others.
Type 'help;' or 'h' for help. Type 'c' to clear the current input statement.
MariaDB [(none)]>
3、设置MariaDB字符集为utf-8
1)/etc/my.cnf 文件
在 [mysqld] 标签下添加
init_connect='SET collation_connection = utf8_unicode_ci'
init_connect='SET NAMES utf8'
character-set-server=utf8
collation-server=utf8_unicode_ci
skip-character-set-client-handshake
2)/etc/my.cnf.d/client.cnf 文件
在 [client] 标签下添加
default-character-set=utf8
3)/etc/my.cnf.d/mysql-clients.cnf 文件
在 [mysql] 标签下添加
default-character-set=utf8
4)重启服务
[root@aaa]# systemctl restart mariadb
5)进入mariadb查看字符集
未配置字符集前
MariaDB [(none)]> show variables like "%character%";show variables like "%collation%";
配置字符集后
MariaDB [(none)]> show variables like "%character%";show variables like "%collation%";
4、远程链接mariadb数据库
mariadb默认是拒绝 root 远程登录的。这里用的是 navicat 软件连接数据库
1)关闭防火墙
① 关闭防火墙 systemctl stop firewalld
[root@aaa]# systemctl stop firewalld
② 在不关闭防火墙的情况下,允许某端口的外来链接。步骤如下,开启3306端口,重启防火墙
复制代码
[root@aaa]# firewall-cmd --query-port=3306/tcp # 查看3306端口是否开启
no
[root@aaa]# firewall-cmd --zone=public --add-port=3306/tcp --permanent # 开启3306端口
success
[root@aaa]# firewall-cmd --reload # 重启防火墙
success
[root@aaa]# firewall-cmd --query-port=3306/tcp # 查看3306端口是否开启
yes
2)先查看mysql数据库中的user表
[root@aaa]# mysql -u root -p # 先通过本地链接进入数据库
MariaDB [(none)]> use mysql;
MariaDB [mysql]> select host, user from user;
+-----------+------+
| host | user |
+-----------+------+
| 127.0.0.1 | root |
| ::1 | root |
| mini | root |
+-----------+------+
3 rows in set (0.00 sec)
3)将与主机名相等的字段改为 "%" ,我的主机名为xxx,
MariaDB [mysql]> update user set host='%' where host='xxx';
Query OK, 1 row affected (0.00 sec)
Rows matched: 1 Changed: 1 Warnings: 0
MariaDB [mysql]> select host, user from user;
+-----------+------+
| host | user |
+-----------+------+
| % | root |
| 127.0.0.1 | root |
| localhost | root |
+-----------+------+
3 rows in set (0.00 sec)
4)刷新权限表,或重启mariadb服务,一下二选一即可
MariaDB [mysql]> flush privileges;
Query OK, 0 rows affected (0.00 sec)
创建新数据库
MariaDB [mysql]> CREATE DATABASE mytestdb CHARACTER SET 'utf8';
创建新用户和授权
MariaDB [mysql]> use mytestdb;
MariaDB [mysql]> grant all on mytestdb.* to 'myuser'@'%' identified by 'mypassxaut*';
MariaDB [mysql]> flush privileges;
grant 为mysql授权;
all为所有权限;
on关键字;
mytestdb.*为mytestdb数据下所有的表;
'myuser'为Mysql下的用户名;
@为链接符;
'192.168.80.%'为授权可以登录的ip地址%代表所有即为0-255;
identified by 为关键字;
'mypassxaut' 为登录 myuser的用户密码;
注意grant授权如果有账户可以授权,如果没有则创建账户并授权,所有有没有账户都可以使用grant。
注意:刷新权限表是在数据库中,重启服务是在外部命令行中
systemctl restart mariadb
ref
https://blog.csdn.net/weixin_44092289/article/details/85640601
https://www.cnblogs.com/yhongji/p/9783065.html