一、概述
因个人工作需要,使用终端工具进行运维和开发工作,但是Mac OS 自带的终端工具使用堡垒机登录配置不了,而且使用CRT等终端工具每次登录堡垒机都需要配置密码,操作起来很麻烦。一直想找一款终端工具便于日常工作使用,偶遇了iTerm2,发现很强大的一款终端工具,网上配置很多,但是有些地方会有些不清楚的地方,我这边参照网上文档,边部署边记录,整理了下属文档,便于大家参考和自身查阅。
iTerm2是Terminal的替代品,是iTerm的后继产品。它适用于MacOS 10.12或更高版本的Mac。iTerm2将终端带入了您从未想过一直想要的功能,使其进入了现代时代。
二、 具体介绍
1. 安装 iTerm2
下载地址:https://www.iterm2.com/downloads.html
下载的是压缩文件,解压后是执行程序文件,你可以直接双击,或者直接将它拖到 Applications 目录下。
或者你可以直接使用 Homebrew 进行安装:
$ brew cask install iterm2
注意:有些人MAC 上没有brew安装命令,请执行如下命令进行安装:
$ /usr/bin/ruby -e "$(curl -fsSL https://raw.githubusercontent.com/Homebrew/install/master/install)"
2. 配置 iTerm2 主题
iTerm2 最常用的主题是 Solarized Dark theme,下载地址:http://ethanschoonover.com/solarized
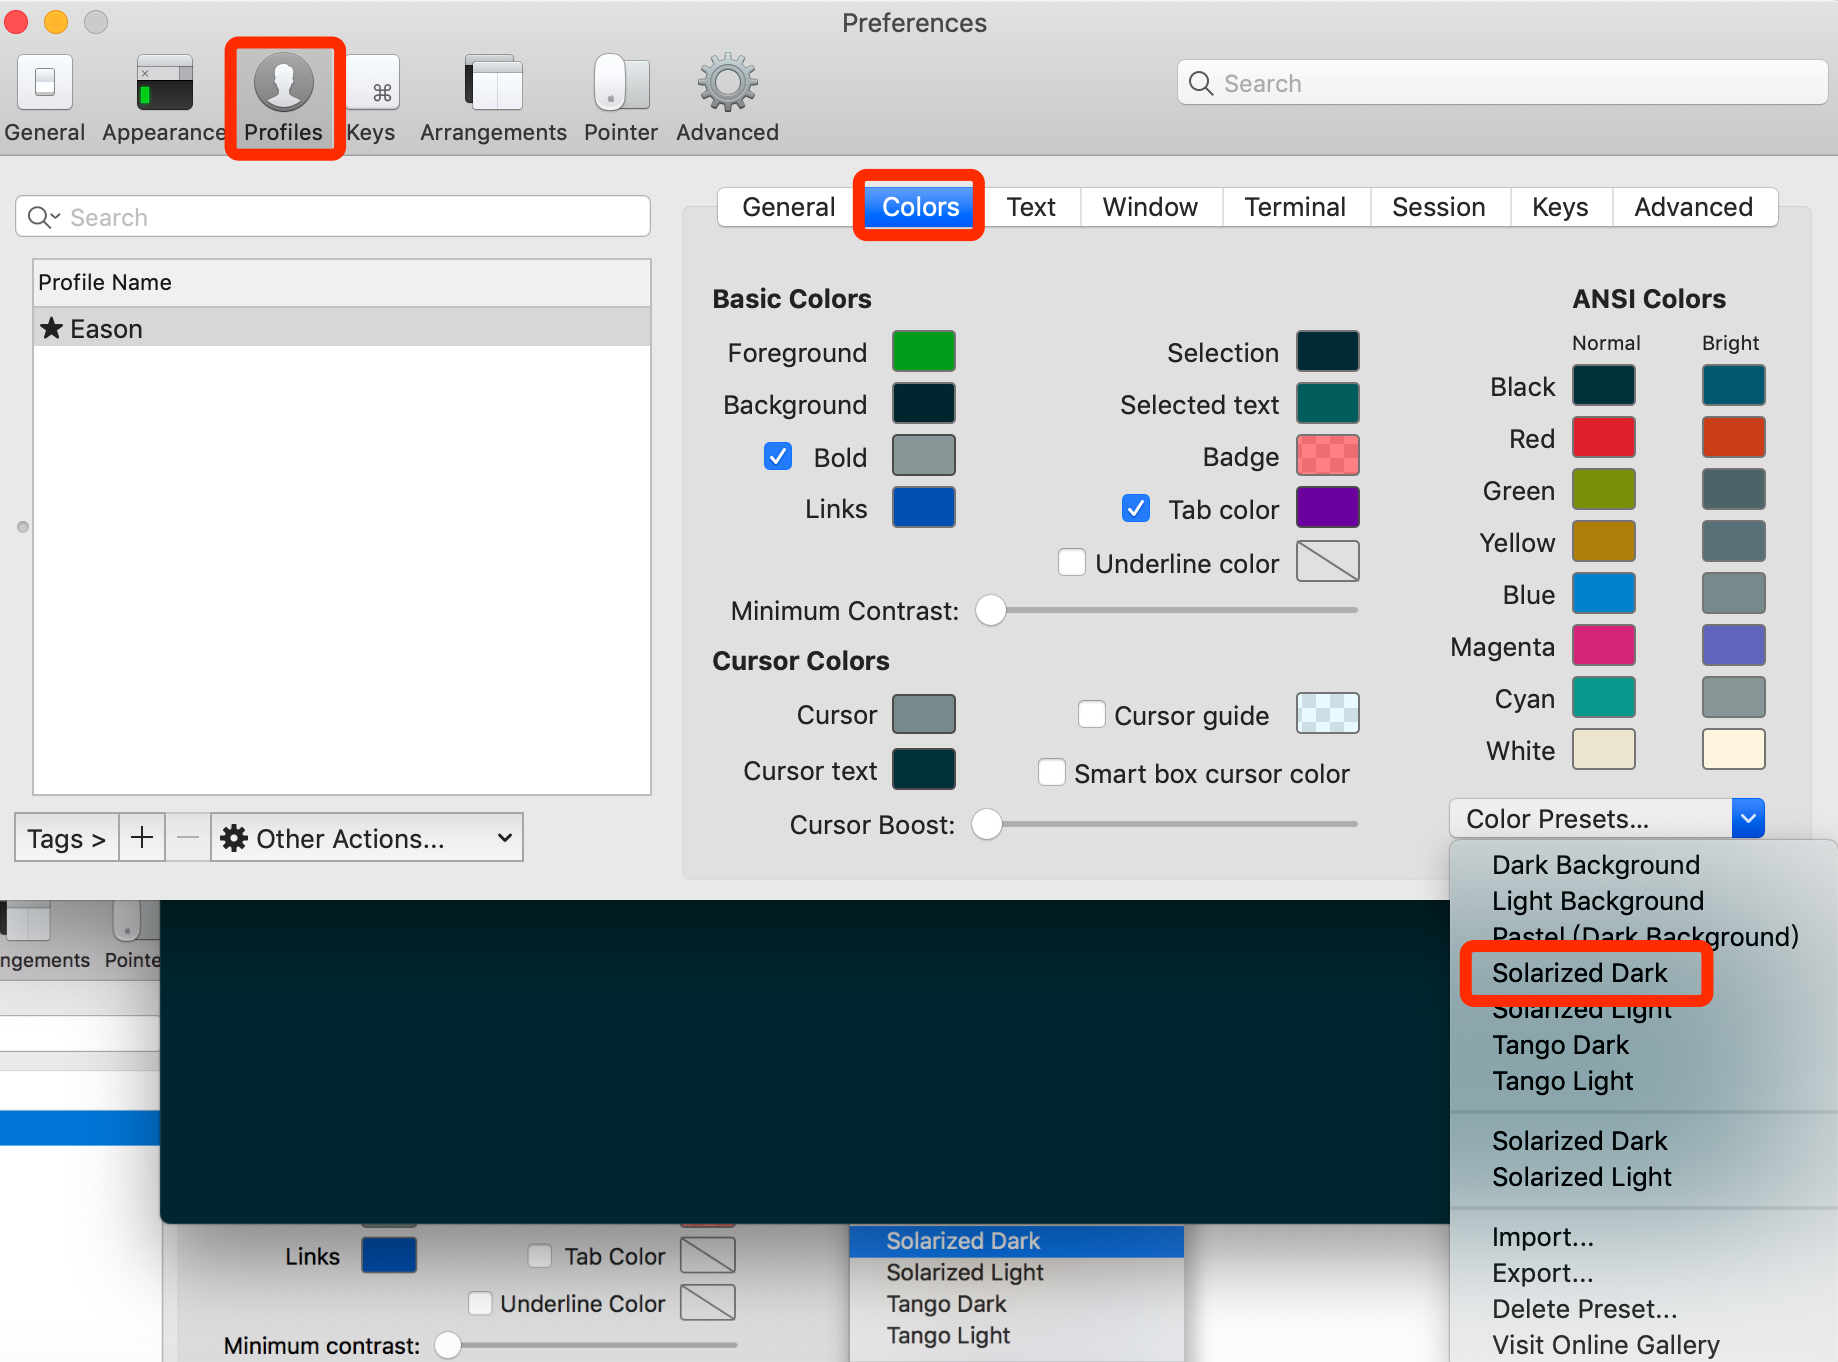
下载的是压缩文件,你先解压一下,然后打开 iTerm2,按 【Command + , 】键,打开 Preferences 配置界面,然后Profiles -> Colors -> Color Presets -> Import,选择刚才解压的solarized->iterm2-colors-solarized->Solarized Dark.itermcolors文件,导入成功,最后选择 Solarized Dark 主题,就可以了。 该工具主题有很多,可以根据自己的爱好进行选择;
3. 配置 Oh My Zsh
Oh My Zsh 是对主题的进一步扩展,地址:https://github.com/robbyrussell/oh-my-zsh
一键安装:
$ sh -c "$(curl -fsSL https://raw.github.com/robbyrussell/oh-my-zsh/master/tools/install.sh)"
Cloning Oh My Zsh...
xcode-select: note: no developer tools were found at '/Applications/Xcode.app', requesting install. Choose an option in the dialog to download the command line developer tools.
Error: git clone of oh-my-zsh repo failed
Eason:Library linan$ sh -c "$(curl -fsSL https://raw.github.com/robbyrussell/oh-my-zsh/master/tools/install.sh)"
Cloning Oh My Zsh...
Cloning into '/Users/linan/.oh-my-zsh'...
remote: Enumerating objects: 1089, done.
remote: Counting objects: 100% (1089/1089), done.
remote: Compressing objects: 100% (1030/1030), done.
remote: Total 1089 (delta 23), reused 874 (delta 19), pack-reused 0
Receiving objects: 100% (1089/1089), 716.00 KiB | 65.00 KiB/s, done.
Resolving deltas: 100% (23/23), done.

Looking for an existing zsh config...
Using the Oh My Zsh template file and adding it to ~/.zshrc.

Time to change your default shell to zsh:
Do you want to change your default shell to zsh? [Y/n] y
Changing the shell...
Changing shell for linan.
Password for linan:
Shell successfully changed to '/bin/zsh'.

         __                                     __
  ____  / /_     ____ ___  __  __   ____  _____/ /_
 / __ / __    / __ `__ / / / /  /_  / / ___/ __
/ /_/ / / / /  / / / / / / /_/ /    / /_(__  ) / / /
\____/_/ /_/  /_/ /_/ /_/\__, /    /___/____/_/ /_/
                        /____/                       ....is now installed!


Please look over the ~/.zshrc file to select plugins, themes, and options.

p.s. Follow us on https://twitter.com/ohmyzsh

p.p.s. Get stickers, shirts, and coffee mugs at https://shop.planetargon.com/collections/oh-my-zsh

➜  Library
安装好之后,需要把 Zsh 设置为当前用户的默认 Shell(这样新建标签的时候才会使用 Zsh):
$ chsh -s /bin/zsh
然后,我们编辑vim ~/.zshrc文件,将主题配置修改为ZSH_THEME="agnoster"。
$ vim ~/.zshrc

# If you come from bash you might have to change your $PATH.
# export PATH=$HOME/bin:/usr/local/bin:$PATH

# Path to your oh-my-zsh installation.
export ZSH="/Users/linan/.oh-my-zsh"

# Set name of the theme to load --- if set to "random", it will
# load a random theme each time oh-my-zsh is loaded, in which case,
# to know which specific one was loaded, run: echo $RANDOM_THEME
# See https://github.com/robbyrussell/oh-my-zsh/wiki/Themes
ZSH_THEME="agnoster"       //修改主题
agnoster是比较常用的 zsh 主题之一,你可以挑选你喜欢的主题,zsh 主题列表:https://github.com/robbyrussell/oh-my-zsh/wiki/themes
4. 配置 Meslo 字体
使用上面的主题,需要 Meslo 字体支持,要不然会出现乱码的情况,字体下载地址:Meslo LG M Regular for Powerline.ttf
下载好之后,直接在 Mac OS 中双击安装即可。
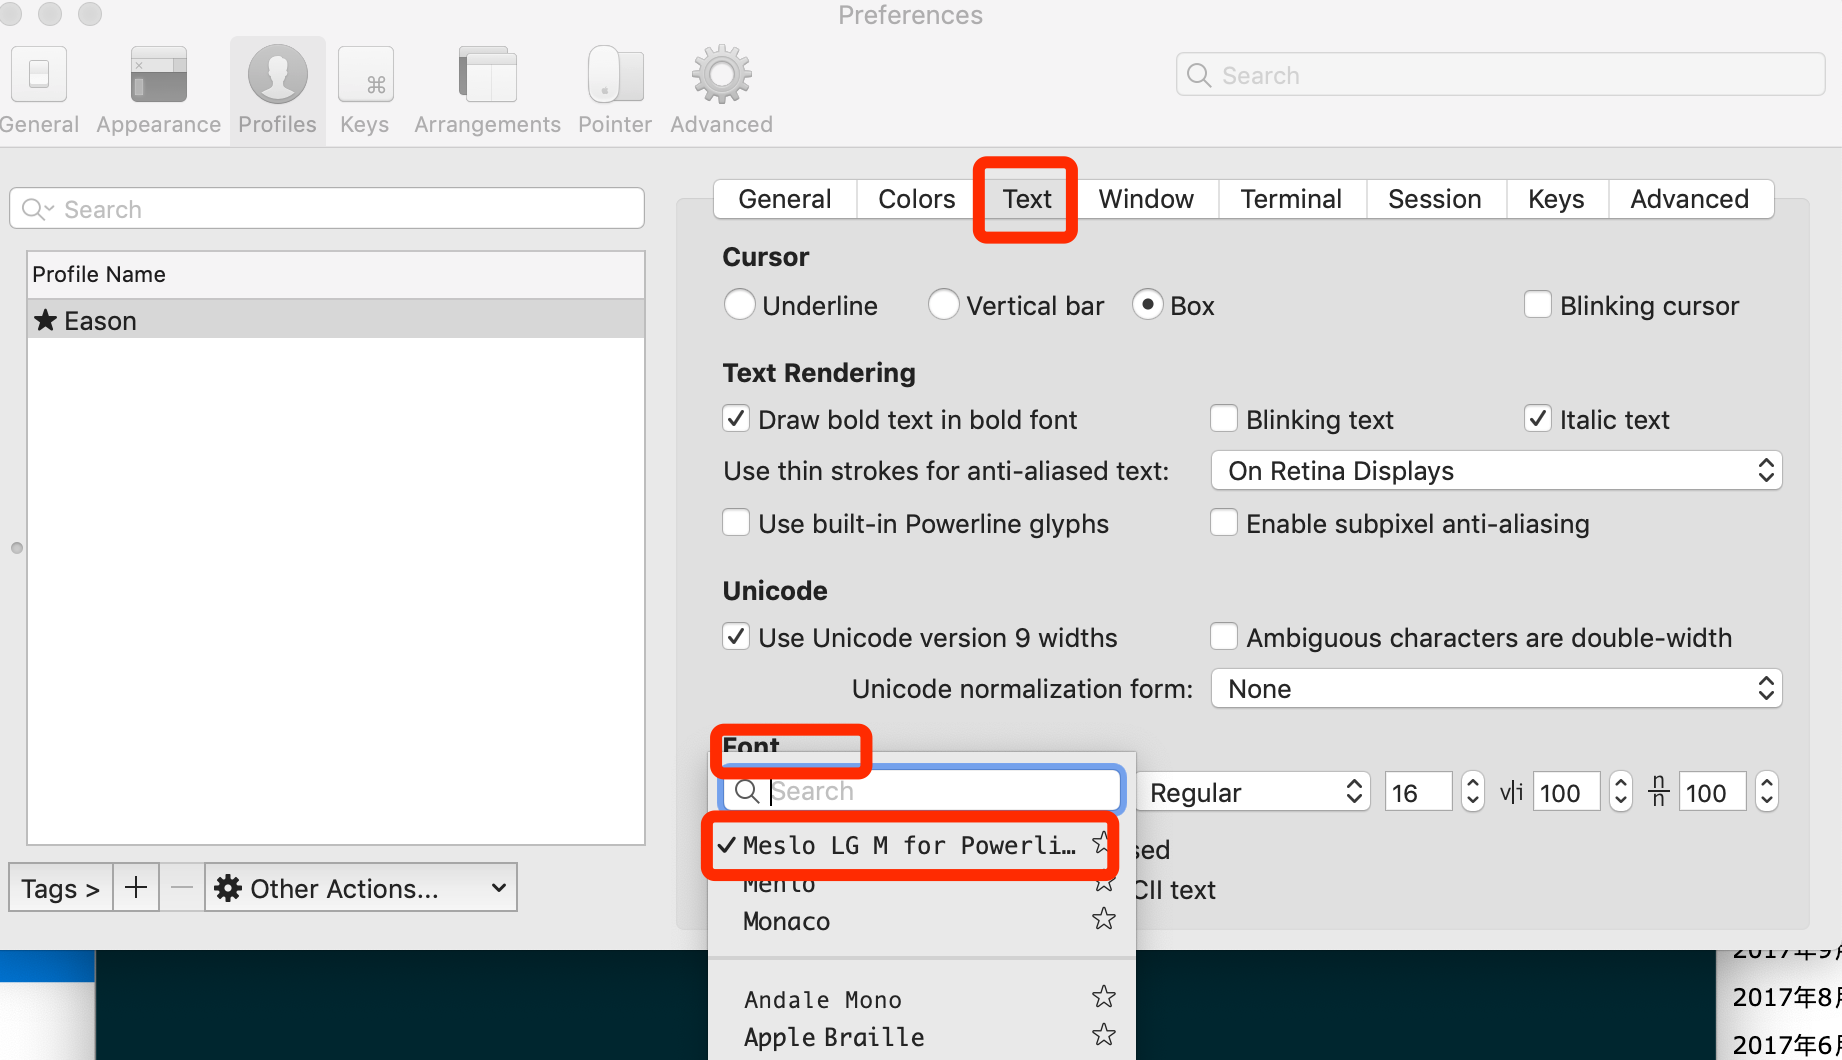
然后打开 iTerm2,按【Command + , 】键,打开 Preferences 配置界面,然后Profiles -> Text -> Font -> Chanage Font,选择 Meslo LG M Regular for Powerline 字体。
当然,如果你觉得默认的12px字体大小不合适,可以自己进行修改。
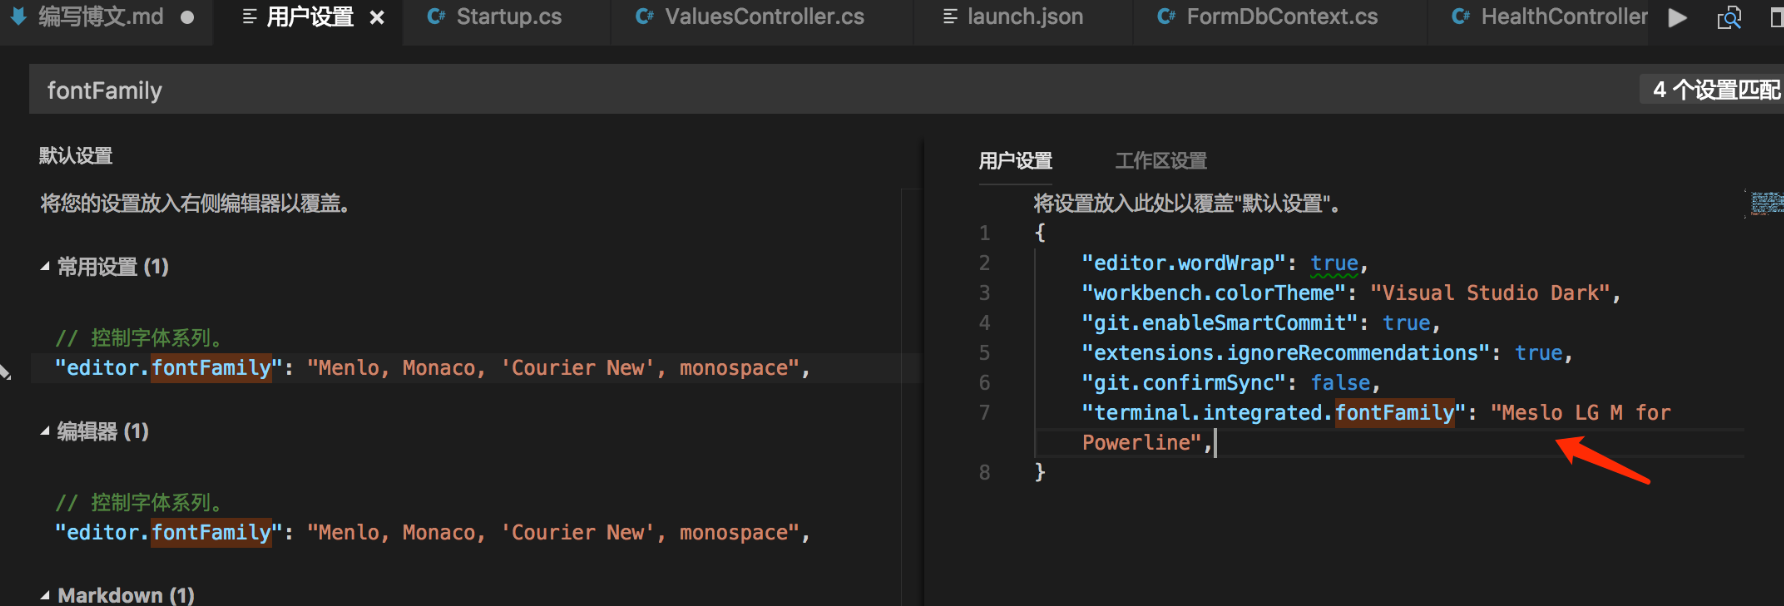
另外,VS Code 的终端字体,也需要进行配置,打开 VS Code,按Command + ,键,打开用户配置,搜索fontFamily,然后将右边的配置增加"terminal.integrated.fontFamily": "Meslo LG M for Powerline",示例:
5. 声明高亮
效果就是上面截图的那样,特殊命令和错误命令,会有高亮显示。
使用 Homebrew 安装:
$ brew install zsh-syntax-highlighting
安装成功之后,编辑vim ~/.zshrc文件,在最后一行增加下面配置:
source /usr/local/share/zsh-syntax-highlighting/zsh-syntax-highlighting.zsh
具体如下:
...................
# Compilation flags
# export ARCHFLAGS="-arch x86_64"

# Set personal aliases, overriding those provided by oh-my-zsh libs,
# plugins, and themes. Aliases can be placed here, though oh-my-zsh
# users are encouraged to define aliases within the ZSH_CUSTOM folder.
# For a full list of active aliases, run `alias`.
#
# Example aliases
# alias zshconfig="mate ~/.zshrc"
# alias ohmyzsh="mate ~/.oh-my-zsh"
source /usr/local/share/zsh-syntax-highlighting/zsh-syntax-highlighting.zsh
保存后,执行变量生效命令
source /etc/profile
6. 自动建议填充
这个功能是非常实用的,可以方便我们快速的敲命令。
配置步骤,先克隆zsh-autosuggestions项目,到指定目录:
$ git clone https://github.com/zsh-users/zsh-autosuggestions ~/.oh-my-zsh/custom/plugins/zsh-autosuggestions
然后编辑vim ~/.zshrc文件,找到plugins配置,增加zsh-autosuggestions插件。
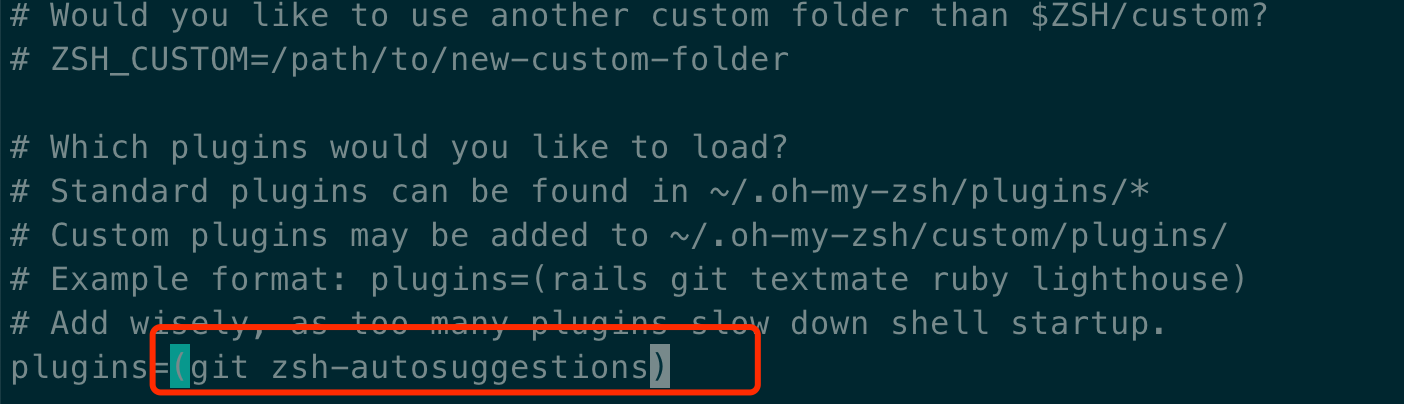
注:上面声明高亮,如果配置不生效的话,在plugins配置,再增加zsh-syntax-highlighting插件试试。
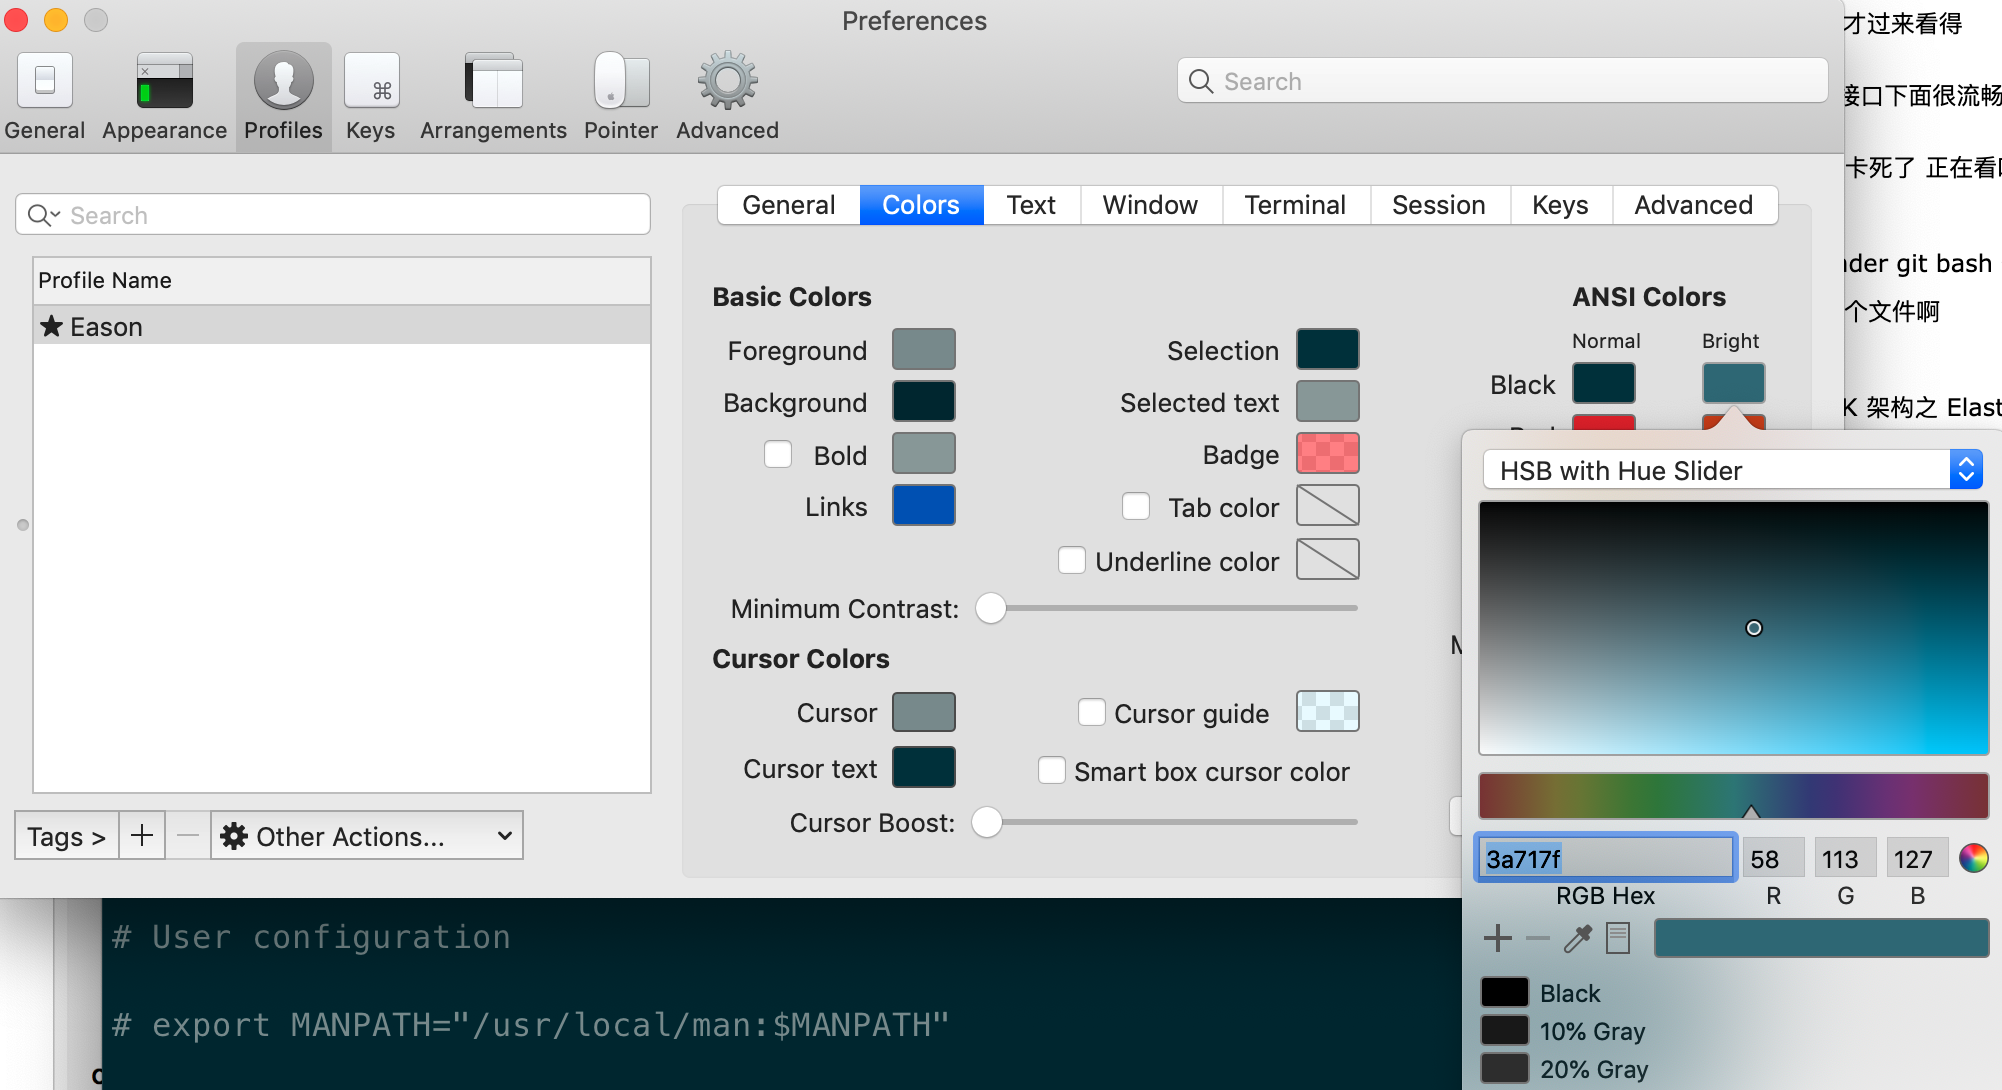
有时候因为自动填充的颜色和背景颜色很相似,以至于自动填充没有效果,我们可以手动更改下自动填充的颜色配置,我修改的颜色值为:3a717f,示例:
7. 左右键跳转
主要是按住option + → or ←键,在命令的开始和结尾跳转切换,原本是不生效的,需要手动开启下。
打开 iTerm2,按Command + ,键,打开 Preferences 配置界面,然后Profiles → Keys → Load Preset... → Natural Text Editing,就可以了。
8. iTerm2 快速隐藏和显示
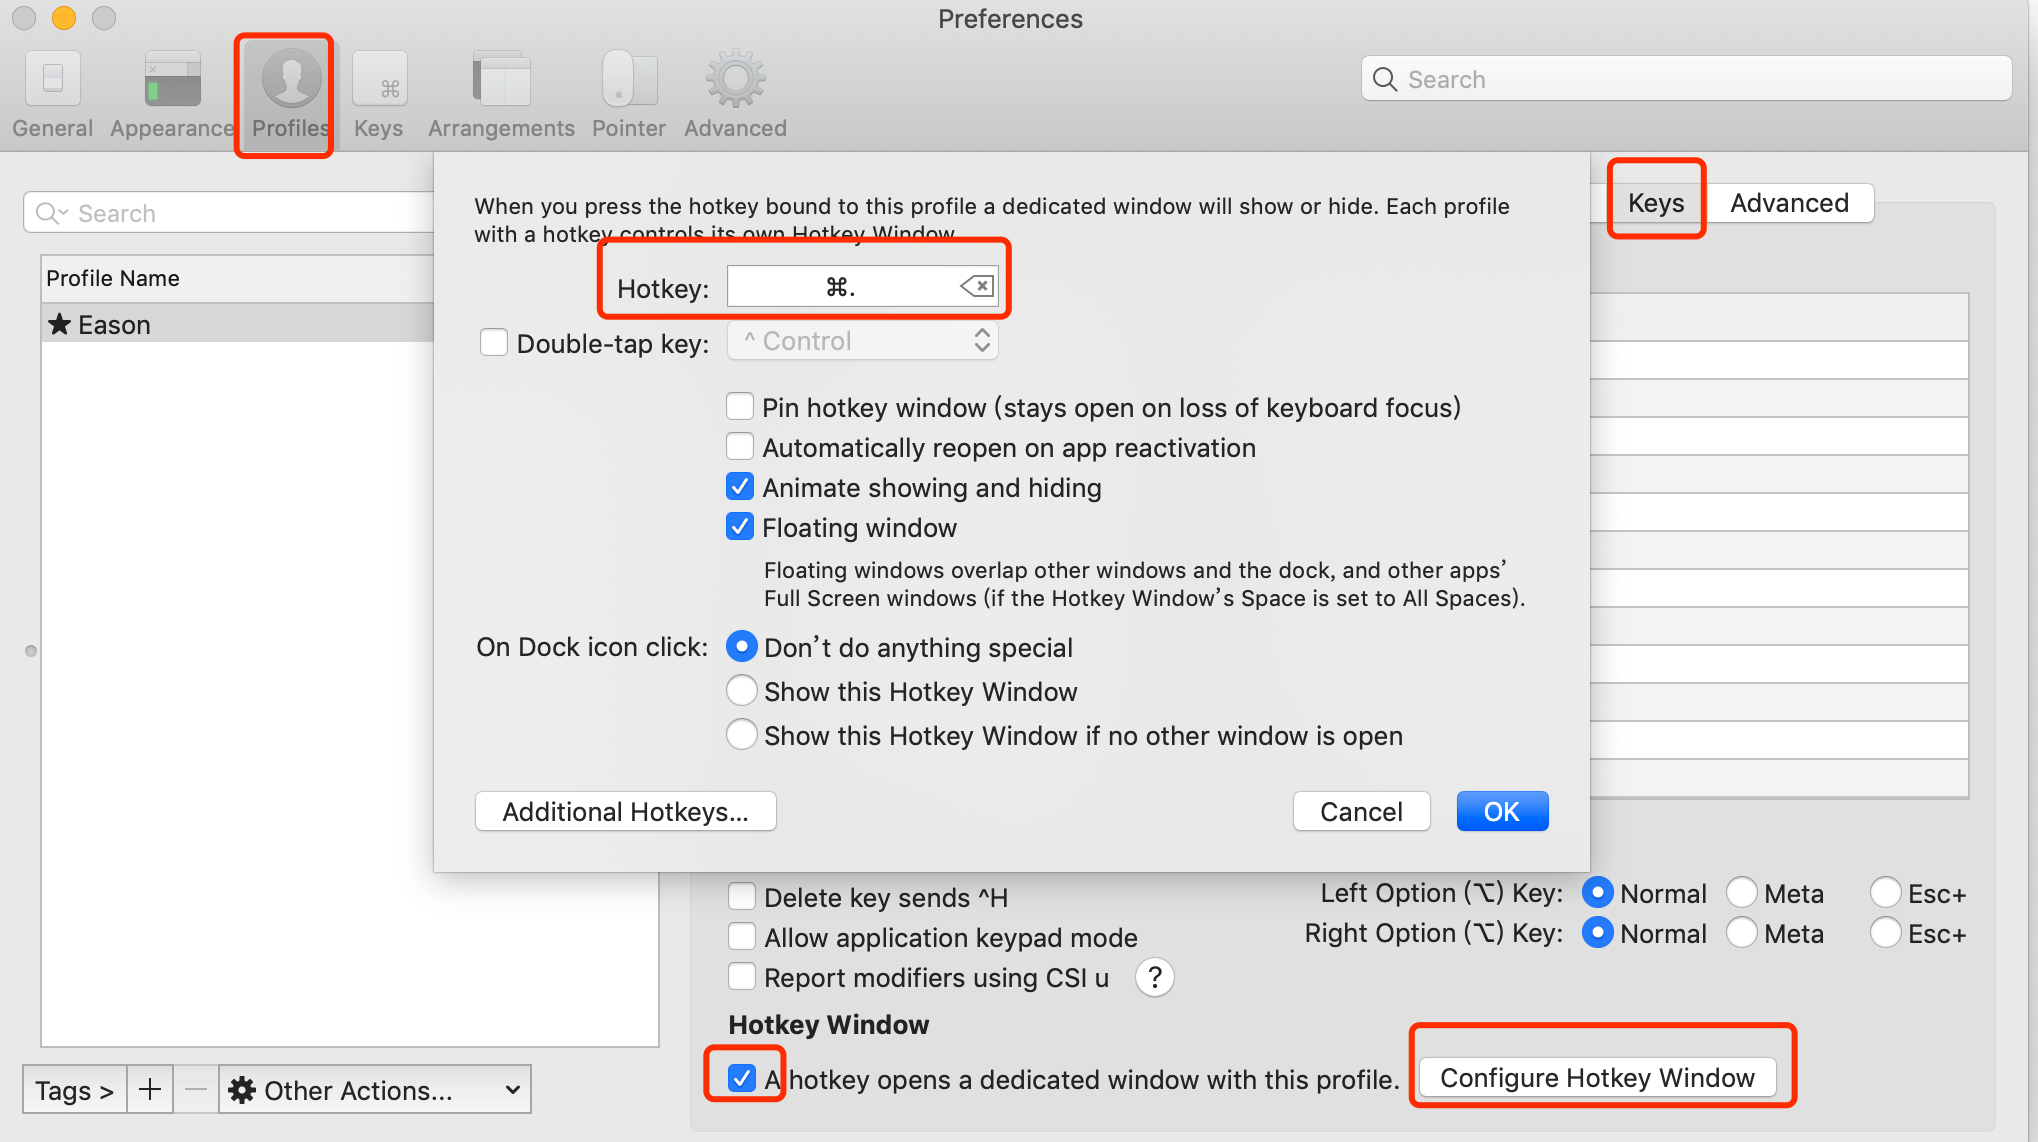
这个功能也非常使用,就是通过快捷键,可以快速的隐藏和打开 iTerm2,示例配置(Commond + .):
9. iTerm2 隐藏用户名和主机名
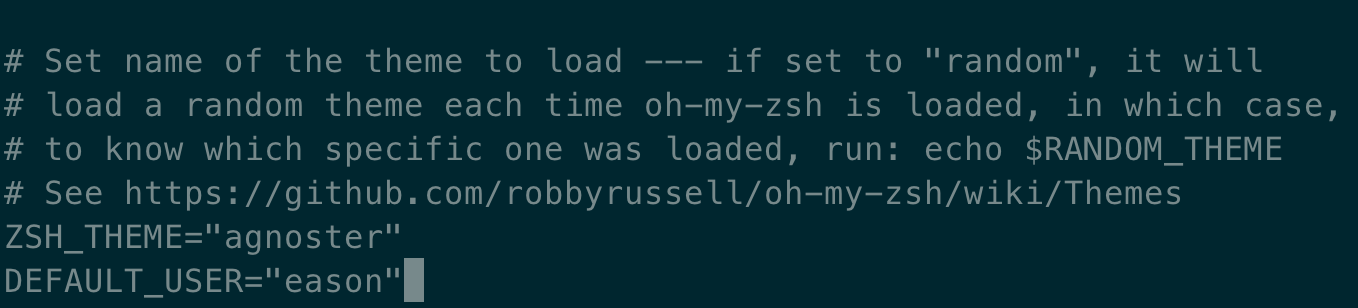
有时候我们的用户名和主机名太长,比如我的Eason@EasondeMacBook-Pro,终端显示的时候会很不好看(上面图片中可以看到),我们可以手动去除。
编辑vim ~/.zshrc文件,增加DEFAULT_USER="eason"配置,示例:
10. iTerm2 配置代理
编辑~ vim ~/.zshrc,增加下面配置(使用的 shadowsocks):
# proxy list
alias proxy='export all_proxy=socks5://127.0.0.1:1086'
alias unproxy='unset all_proxy'
iTerm2 需要新建标签页,才有效果:
$ proxy
$ curl ip.cn
当前 IP:185.225.14.5 来自:美国

$ unproxy
$ curl ip.cn
当前 IP:115.236.186.130 来自:浙江省杭州市 电信
我们可以测试下:
$ curl https://packages.cloud.google.com/yum/repos/kubernetes-el7-x86_64

<html>
  <head>
    <title>Directory listing for /yum/repos/kubernetes-el7-x86_64/</title>
  </head>
  <body>
    <h2>Index of /yum/repos/kubernetes-el7-x86_64/</h2>
    <p></p>
    <a href="/yum/repos/kubernetes-el7-x86_64/repodata">repodata</a><br />
  </body>
</html>
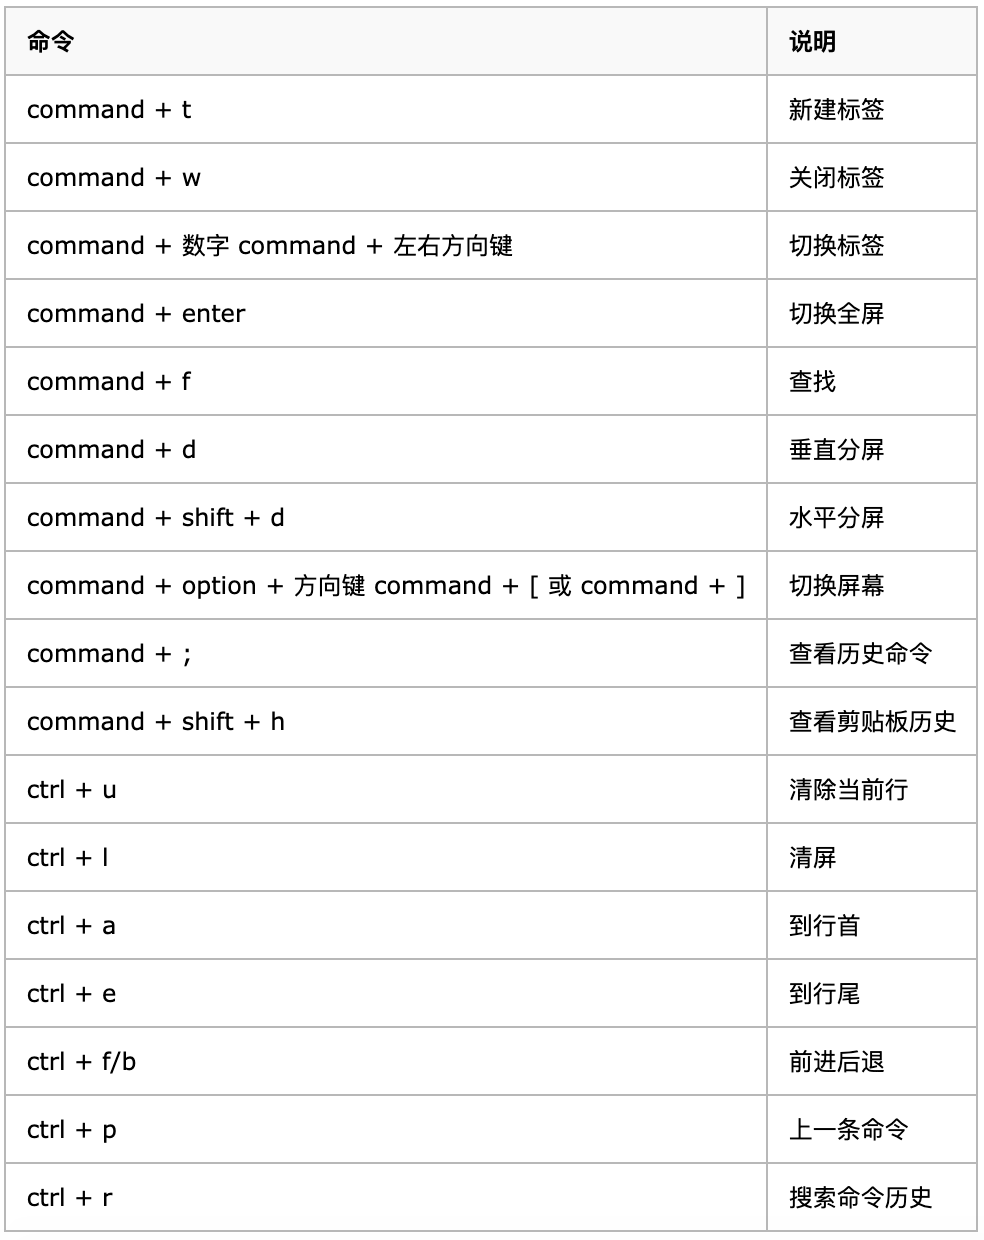
11. iTerm2 快捷命令