vue-admin-template改造实现顶部一级菜单,侧栏二级菜单:
效果如图所示:

本项目是使用 vue-admin-template 来进行修改:
第一步:新增Topbar组件
位置:src/layout/components/Topbar.vue
组件代码:
<template>
  <div class="top-nav">
    <div class="log">带一级导航的后台管理系统</div>
    <el-menu
      :active-text-color="variables.menuActiveText"
      :default-active="activeMenu"
      mode="horizontal"
      @select="handleSelect"
    >
      <div v-for="item in routes" :key="item.path" class="nav-item">
        <app-link :to="resolvePath(item)">
          <el-menu-item
            v-if="!item.hidden"
            :index="item.path"
          >{{ item.meta ? item.meta.title : item.children[0].meta.title }}</el-menu-item>
        </app-link>
      </div>
    </el-menu>

    <div class="right-menu">
      <el-dropdown class="avatar-container" trigger="click">
        <div class="avatar-wrapper">
          <img :src="avatar+'?imageView2/1/w/80/h/80'" class="user-avatar">
          <i class="el-icon-caret-bottom" />
        </div>
        <el-dropdown-menu slot="dropdown" class="user-dropdown">
          <router-link to="/">
            <el-dropdown-item>Home</el-dropdown-item>
          </router-link>
          <a href="https://github.com/PanJiaChen/vue-admin-template/" target="_blank">
            <el-dropdown-item>Github</el-dropdown-item>
          </a>
          <a href="https://panjiachen.github.io/vue-element-admin-site/#/" target="_blank">
            <el-dropdown-item>Docs</el-dropdown-item>
          </a>
          <el-dropdown-item divided @click.native="logout">
            <span style="display:block;">Log Out</span>
          </el-dropdown-item>
        </el-dropdown-menu>
      </el-dropdown>
    </div>
  </div>
</template>

<script>
import { mapGetters } from 'vuex'
import AppLink from './Sidebar/Link'
import { constantRoutes } from '@/router'
import variables from '@/styles/variables.scss'
import { isExternal } from '@/utils/validate'

export default {
  name: 'Topbar',
  components: {
    AppLink
  },
  data() {
    return {
      routes: constantRoutes
    }
  },
  computed: {
    activeMenu() {
      const route = this.$route
      const { meta, path } = route
      // if set path, the sidebar will highlight the path you set
      if (meta.activeMenu) {
        return meta.activeMenu
      }
      // 如果是首页,首页高亮
      if (path === '/dashboard') {
        return '/'
      }
      // 如果不是首页,高亮一级菜单
      const activeMenu = '/' + path.split('/')[1]
      return activeMenu
    },
    variables() {
      return variables
    },
    sidebar() {
      return this.$store.state.app.sidebar
    },
    ...mapGetters(['avatar'])
  },
  mounted() {
    this.initCurrentRoutes()
  },
  methods: {
    // 通过当前路径找到二级菜单对应项,存到store,用来渲染左侧菜单
    initCurrentRoutes() {
      const { path } = this.$route
      let route = this.routes.find(
        item => item.path === '/' + path.split('/')[1]
      )
      // 如果找不到这个路由,说明是首页
      if (!route) {
        route = this.routes.find(item => item.path === '/')
      }
      this.$store.commit('permission/SET_CURRENT_ROUTES', route)
      this.setSidebarHide(route)
    },
    // 判断该路由是否只有一个子项或者没有子项,如果是,则在一级菜单添加跳转路由
    isOnlyOneChild(item) {
      if (item.children && item.children.length === 1) {
        return true
      }
      return false
    },
    resolvePath(item) {
      // 如果是个完成的url直接返回
      if (isExternal(item.path)) {
        return item.path
      }
      // 如果是首页,就返回重定向路由
      if (item.path === '/') {
        const path = item.redirect
        return path
      }

      // 如果有子项,默认跳转第一个子项路由
      let path = ''
      /**
       * item 路由子项
       * parent 路由父项
       */
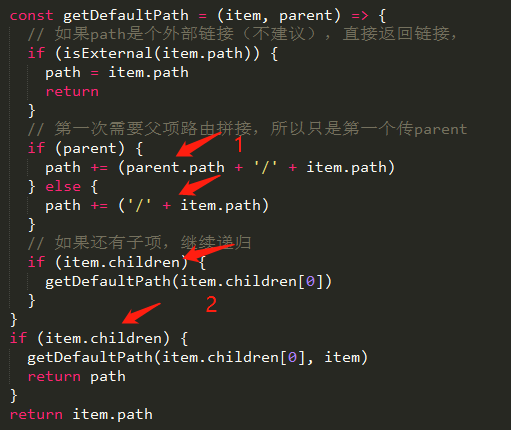
      const getDefaultPath = (item, parent) => {
        // 如果path是个外部链接(不建议),直接返回链接,存在个问题:如果是外部链接点击跳转后当前页内容还是上一个路由内容
        if (isExternal(item.path)) {
          path = item.path
          return
        }
        // 第一次需要父项路由拼接,所以只是第一个传parent
        if (parent) {
          path += (parent.path + '/' + item.path)
        } else {
          path += ('/' + item.path)
        }
        // 如果还有子项,继续递归
        if (item.children) {
          getDefaultPath(item.children[0])
        }
      }

      if (item.children) {
        getDefaultPath(item.children[0], item)
        return path
      }

      return item.path
    },
    handleSelect(key, keyPath) {
      // 把选中路由的子路由保存store
      const route = this.routes.find(item => item.path === key)
      this.$store.commit('permission/SET_CURRENT_ROUTES', route)
      this.setSidebarHide(route)
    },
    // 设置侧边栏的显示和隐藏
    setSidebarHide(route) {
      if (!route.children || route.children.length === 1) {
        this.$store.dispatch('app/toggleSideBarHide', true)
      } else {
        this.$store.dispatch('app/toggleSideBarHide', false)
      }
    },
    async logout() {
      await this.$store.dispatch('user/logout')
      this.$router.push(`/login?redirect=${this.$route.fullPath}`)
    }
  }
}
</script>
第二步:新增permission状态管理存储选中的一级导航,用来渲染侧边导航。
位置: src/store/modules/permission.js
代码:
import { constantRoutes } from '@/router'

const state = {
  routes: [],
  addRoutes: [],
  currentRoutes: {}
}

const mutations = {
  SET_CURRENT_ROUTES: (state, routes) => {
    state.currentRoutes = routes
  }
}

export default {
  namespaced: true,
  state,
  mutations
}
最后就是修改sidebar组件的路由:
位置:src/layout/components/Sidebar/index.vue 34行

第三步:增加 Topbar 样式:
位置:styles/topbar.scss
index.scss 引入:@import './topbar.scss';
代码:
#app {

  .main-container {
    // min-height: 100%;
    height: $contentHeight;
    transition: margin-left .28s;
    margin-left: $sideBarWidth;
    margin-top: $topBarHeight;
    position: relative;
  }
  .sidebarHide {
    margin-left: 0!important;
  }
  .sidebar-container {
    transition: width 0.28s;
    width: $sideBarWidth !important;
    background-color: $menuBg;
    // height: 100%;
    height: $contentHeight;
    font-size: 0px;
    z-index: 1001;
    overflow: hidden;

    // reset element-ui css
    .horizontal-collapse-transition {
      transition: 0s width ease-in-out, 0s padding-left ease-in-out, 0s padding-right ease-in-out;
    }

    .scrollbar-wrapper {
      overflow-x: hidden !important;
    }

    .el-scrollbar__bar.is-vertical {
      right: 0px;
    }

    .el-scrollbar {
      height: 100%;
    }

    &.has-logo {
      .el-scrollbar {
        height: calc(100% - 50px);
      }
    }

    .is-horizontal {
      display: none;
    }

    a {
      display: inline-block;
      width: 100%;
      overflow: hidden;
    }

    .svg-icon {
      margin-right: 16px;
    }

    .el-menu {
      border: none;
      height: 100%;
      width: 100% !important;
    }

    // menu hover
    .submenu-title-noDropdown,
    .el-submenu__title {
      &:hover {
        background-color: $menuHover !important;
      }
    }

    .is-active>.el-submenu__title {
      color: $subMenuActiveText !important;
    }

    & .nest-menu .el-submenu>.el-submenu__title,
    & .el-submenu .el-menu-item {
      min-width: $sideBarWidth !important;
      background-color: $subMenuBg !important;

      &:hover {
        background-color: $subMenuHover !important;
      }
    }
  }

  .hideSidebar {
    .sidebar-container {
      width: 54px !important;
    }

    .main-container {
      margin-left: 54px;
    }

    .submenu-title-noDropdown {
      padding: 0 !important;
      position: relative;

      .el-tooltip {
        padding: 0 !important;

        .svg-icon {
          margin-left: 20px;
        }
      }
    }

    .el-submenu {
      overflow: hidden;

      &>.el-submenu__title {
        padding: 0 !important;

        .svg-icon {
          margin-left: 20px;
        }

        .el-submenu__icon-arrow {
          display: none;
        }
      }
    }

    .el-menu--collapse {
      .el-submenu {
        &>.el-submenu__title {
          &>span {
            height: 0;
            width: 0;
            overflow: hidden;
            visibility: hidden;
            display: inline-block;
          }
        }
      }
    }
  }

  .el-menu--collapse .el-menu .el-submenu {
    min-width: $sideBarWidth !important;
  }

  // mobile responsive
  .mobile {
    .main-container {
      margin-left: 0px;
    }

    .sidebar-container {
      transition: transform .28s;
      width: $sideBarWidth !important;
    }

    &.hideSidebar {
      .sidebar-container {
        pointer-events: none;
        transition-duration: 0.3s;
        transform: translate3d(-$sideBarWidth, 0, 0);
      }
    }
  }

  .withoutAnimation {

    .main-container,
    .sidebar-container {
      transition: none;
    }
  }
}

// when menu collapsed
.el-menu--vertical {
  &>.el-menu {
    .svg-icon {
      margin-right: 16px;
    }
  }

  .nest-menu .el-submenu>.el-submenu__title,
  .el-menu-item {
    &:hover {
      // you can use $subMenuHover
      background-color: $menuHover !important;
    }
  }

  // the scroll bar appears when the subMenu is too long
  >.el-menu--popup {
    max-height: 100vh;
    overflow-y: auto;

    &::-webkit-scrollbar-track-piece {
      background: #d3dce6;
    }

    &::-webkit-scrollbar {
      width: 6px;
    }

    &::-webkit-scrollbar-thumb {
      background: #99a9bf;
      border-radius: 20px;
    }
  }
}
常见问题:
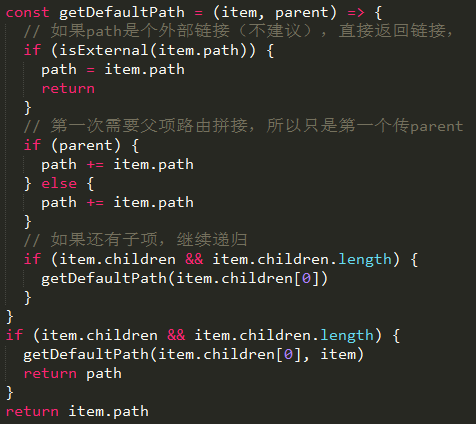
1、对接后台接口,会出现 path 无法渲染的问题:

解决方法:
1、这里会判断层级,如果有children,则会覆盖路由,而且路由会和父级路由叠加,这里需要调整一下。
2、后端请求下来的router,可能每一级都有children,只不过没有数据,所以还需要增加判断。

主要可能出现问题的地方就是这里,实际情况可根据实际项目进行调整。
参考文章:
https://blog.csdn.net/weixin_43180359/article/details/106213668
https://www.jianshu.com/p/7d998aae1fd7
代码GIT仓库:
https://gitee.com/meiyouzhanghao/vue-admin-template-topbar