java网络编程:
网络编程:用Java语言实现计算机间数据的信息传递和资源共享;
计算机网络:实现多台计算机之间的数据交互,网络通信;
网络编程的三要素:
1:IP地址:网络中计算机的唯一标识。IP地址的组成:网络号段+主机号段
2:端口:正在运行的程序的标识。有效端口:0~65535,其中0~1024系统使用或保留端口。
3:网络协议:
UDP:把数据打包;数据有限制;不建立连接;速度快; 不可靠,数据可能丢失。
TCP:建立连接通道; 数据无限制; 速度慢; 可靠。
1:UDP协议发送、接收数据图解:

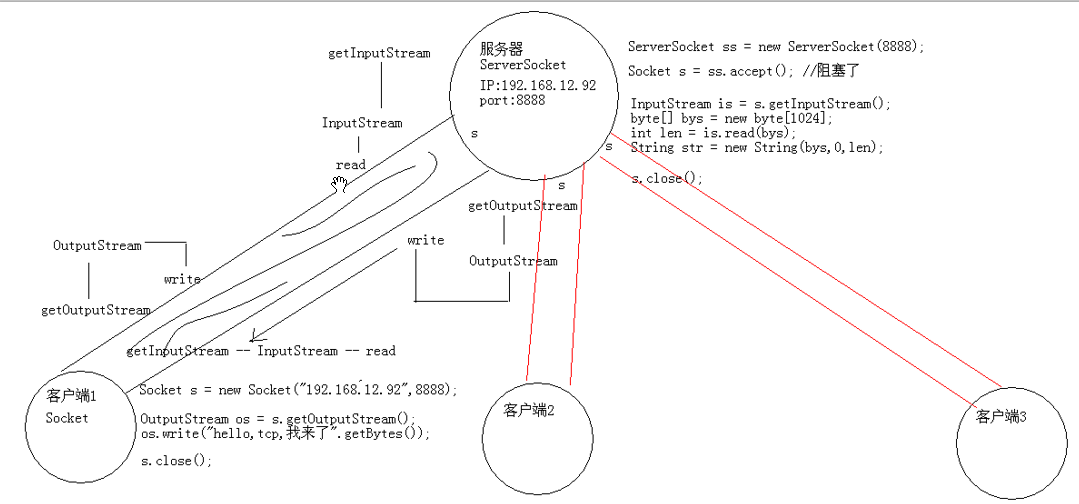
2:TCP发送、接收数据图解:
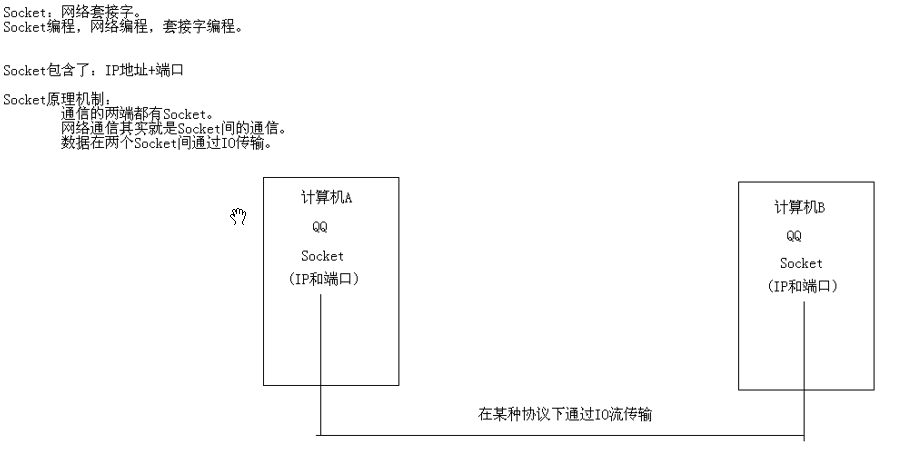
3:socket通信原理图解:
1:UDP协议发送、接收数据代码实现:
发送:


 1 /*
 2  * UDP协议发送数据:
 3  * A:创建发送端Socket对象
 4  * B:创建数据,并把数据打包
 5  * C:调用Socket对象的发送方法发送数据包
 6  * D:释放资源
 7  */
 8 public class SendDemo {
 9     public static void main(String[] args) throws IOException {
10         // 创建发送端Socket对象
11         // DatagramSocket()
12         DatagramSocket ds = new DatagramSocket();
13
14         // 创建数据,并把数据打包
15         // DatagramPacket(byte[] buf, int length, InetAddress address, int port)
16         // 创建数据
17         byte[] bys = "hello,udp,我来了".getBytes();
18         // 长度
19         int length = bys.length;
20         // IP地址对象
21         InetAddress address = InetAddress.getByName("192.168.12.92");
22         // 端口
23         int port = 10086;
24         DatagramPacket dp = new DatagramPacket(bys, length, address, port);
25
26         // 调用Socket对象的发送方法发送数据包
27         // public void send(DatagramPacket p)
28         ds.send(dp);
29
30         // 释放资源
31         ds.close();
32     }
33 }
接收:
 1 /*
 2  * UDP协议接收数据:
 3  * A:创建接收端Socket对象
 4  * B:创建一个数据包(接收容器)
 5  * C:调用Socket对象的接收方法接收数据
 6  * D:解析数据包,并显示在控制台
 7  * E:释放资源
 8  */
 9 public class ReceiveDemo {
10     public static void main(String[] args) throws IOException {
11         // 创建接收端Socket对象
12         // DatagramSocket(int port)
13         DatagramSocket ds = new DatagramSocket(10086);
14
15         // 创建一个数据包(接收容器)
16         // DatagramPacket(byte[] buf, int length)
17         byte[] bys = new byte[1024];
18         int length = bys.length;
19         DatagramPacket dp = new DatagramPacket(bys, length);
20
21         // 调用Socket对象的接收方法接收数据
22         // public void receive(DatagramPacket p)
23         ds.receive(dp); // 阻塞式
24
25         // 解析数据包,并显示在控制台
26         // 获取对方的ip
27         // public InetAddress getAddress()
28         InetAddress address = dp.getAddress();
29         String ip = address.getHostAddress();
30         // public byte[] getData():获取数据缓冲区
31         // public int getLength():获取数据的实际长度
32         byte[] bys2 = dp.getData();
33         int len = dp.getLength();
34         String s = new String(bys2, 0, len);
35         System.out.println(ip + "传递的数据是:" + s);
36
37         // 释放资源
38         ds.close();
39     }
40 }
2:TCP协议发送、接收数据代码实现:
发送:
 1 /*
 2  * TCP协议接收数据:
 3  * A:创建接收端的Socket对象
 4  * B:监听客户端连接。返回一个对应的Socket对象
 5  * C:获取输入流,读取数据显示在控制台
 6  * D:释放资源
 7  */
 8 public class ServerDemo {
 9     public static void main(String[] args) throws IOException {
10         // 创建接收端的Socket对象
11         // ServerSocket(int port)
12         ServerSocket ss = new ServerSocket(8888);
13
14         // 监听客户端连接。返回一个对应的Socket对象
15         // public Socket accept()
16         Socket s = ss.accept(); // 侦听并接受到此套接字的连接。此方法在连接传入之前一直阻塞。
17
18         // 获取输入流,读取数据显示在控制台
19         InputStream is = s.getInputStream();
20
21         byte[] bys = new byte[1024];
22         int len = is.read(bys); // 阻塞式方法
23         String str = new String(bys, 0, len);
24
25         String ip = s.getInetAddress().getHostAddress();
26
27         System.out.println(ip + "---" + str);
28
29         // 释放资源
30         s.close();
31         // ss.close(); //这个不应该关闭
32     }
33 }
接收:
 1 /*
 2  * TCP协议发送数据:
 3  * A:创建发送端的Socket对象
 4  *         这一步如果成功,就说明连接已经建立成功了。
 5  * B:获取输出流,写数据
 6  * C:释放资源
 7  *
 8  * 连接被拒绝。TCP协议一定要先看服务器。
 9  * java.net.ConnectException: Connection refused: connect
10  */
11 public class ClientDemo {
12     public static void main(String[] args) throws IOException {
13         // 创建发送端的Socket对象
14         // Socket(InetAddress address, int port)
15         // Socket(String host, int port)
16         // Socket s = new Socket(InetAddress.getByName("192.168.12.92"), 8888);
17         Socket s = new Socket("192.168.12.92", 8888);
18
19         // 获取输出流,写数据
20         // public OutputStream getOutputStream()
21         OutputStream os = s.getOutputStream();
22         os.write("hello,tcp,我来了".getBytes());
23
24         // 释放资源
25         s.close();
26     }
27 }
实例:
1: 网络编程(UDP协议)多线程实现聊天室:
发送端:
 1 public class SendThread implements Runnable {
 2
 3     private DatagramSocket ds;
 4
 5     public SendThread(DatagramSocket ds) {
 6         this.ds = ds;
 7     }
 8
 9     @Override
10     public void run() {
11         try {
12             // 封装键盘录入数据
13             BufferedReader br = new BufferedReader(new InputStreamReader(
14                     System.in));
15             String line = null;
16             while ((line = br.readLine()) != null) {
17                 if ("886".equals(line)) {
18                     break;
19                 }
20
21                 // 创建数据并打包
22                 byte[] bys = line.getBytes();
23                 // DatagramPacket dp = new DatagramPacket(bys, bys.length,
24                 // InetAddress.getByName("192.168.12.92"), 12345);
25                 DatagramPacket dp = new DatagramPacket(bys, bys.length,
26                         InetAddress.getByName("192.168.12.255"), 12306);
27
28                 // 发送数据
29                 ds.send(dp);
30             }
31
32             // 释放资源
33             ds.close();
34         } catch (IOException e) {
35             e.printStackTrace();
36         }
37     }
38
39 }
接收端:
 1 public class ReceiveThread implements Runnable {
 2     private DatagramSocket ds;
 3
 4     public ReceiveThread(DatagramSocket ds) {
 5         this.ds = ds;
 6     }
 7
 8     @Override
 9     public void run() {
10         try {
11             while (true) {
12                 // 创建一个包裹
13                 byte[] bys = new byte[1024];
14                 DatagramPacket dp = new DatagramPacket(bys, bys.length);
15
16                 // 接收数据
17                 ds.receive(dp);
18
19                 // 解析数据
20                 String ip = dp.getAddress().getHostAddress();
21                 String s = new String(dp.getData(), 0, dp.getLength());
22                 System.out.println("from " + ip + " data is : " + s);
23             }
24         } catch (IOException e) {
25             e.printStackTrace();
26         }
27     }
28
29 }
启动发送和接收线程:
 1 /*
 2  * 通过多线程改进刚才的聊天程序,这样我就可以实现在一个窗口发送和接收数据了
 3  */
 4 public class ChatRoom {
 5     public static void main(String[] args) throws IOException {
 6         DatagramSocket dsSend = new DatagramSocket();
 7         DatagramSocket dsReceive = new DatagramSocket(12306);
 8
 9         SendThread st = new SendThread(dsSend);
10         ReceiveThread rt = new ReceiveThread(dsReceive);
11
12         Thread t1 = new Thread(st);
13         Thread t2 = new Thread(rt);
14
15         t1.start();
16         t2.start();
17     }
18 }
2:TCP协议实现用多线程使用多个客户端上传文件:
客户端:
 1 public class UploadClient {
 2     public static void main(String[] args) throws IOException {
 3         // 创建客户端Socket对象
 4         Socket s = new Socket("192.168.12.92", 11111);
 5
 6         // 封装文本文件
 7         // BufferedReader br = new BufferedReader(new FileReader(
 8         // "InetAddressDemo.java"));
 9         BufferedReader br = new BufferedReader(new FileReader(
10                 "ReceiveDemo.java"));
11         // 封装通道内流
12         BufferedWriter bw = new BufferedWriter(new OutputStreamWriter(
13                 s.getOutputStream()));
14
15         String line = null;
16         while ((line = br.readLine()) != null) { // 阻塞
17             bw.write(line);
18             bw.newLine();
19             bw.flush();
20         }
21
22         // Socket提供了一个终止,它会通知服务器你别等了,我没有数据过来了
23         s.shutdownOutput();
24
25         // 接收反馈
26         BufferedReader brClient = new BufferedReader(new InputStreamReader(
27                 s.getInputStream()));
28         String client = brClient.readLine(); // 阻塞
29         System.out.println(client);
30
31         // 释放资源
32         br.close();
33         s.close();
34     }
35 }
服务端:
 1 public class UploadServer {
 2     public static void main(String[] args) throws IOException {
 3         // 创建服务器Socket对象
 4         ServerSocket ss = new ServerSocket(11111);
 5
 6         while (true) {
 7             Socket s = ss.accept();
 8             new Thread(new UserThread(s)).start();
 9         }
10     }
11 }