Cas服务器允许用户为每个Service自定义登陆等UI外观,但需要尊着Cas定于的规则:
一、为Service配置theme(主题)
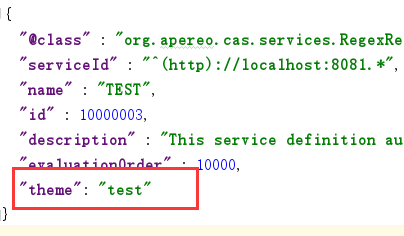
在《Cas 服务器 Service(Cas客户端)注册信息维护》中的 TEST-10000003.json 配置中增加 "theme": "test"
以上配置为该Service指定了要应用的主题为test,所以当以http://localhost:8081为域名的Cas客户端来请求登陆时,将展示test主题登陆UI。
二、建立theme(主题)资源
现在已经假定test主题,下面就要把该主题实现出来。要实现cas theme先要了解cas对theme实现的基本规则:
1、css、js等theme用到的静态资源,应放置在:srcmain esourcesstatic hemes主题名称目录下

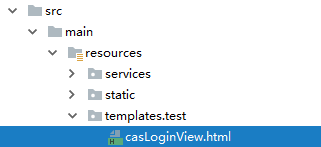
2、theme用到的web视图资源,应放置在:srcmain esources emplates主题名称目录下

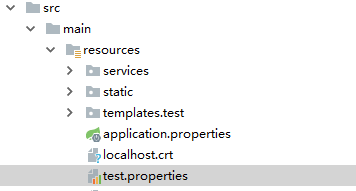
3、theme配置文件,应放置在:srcmain esources下,并命名为:主题名称.properties(或主题名称.yml)

注:只要用户按照上述规则完成资源文件的实现后,cas服务器将自动加载对应theme资源应用到Service。
三、编写theme资源文件内容
1、theme配置文件(test.properties)内容
css.file=/themes/test/css/test.css
pageTitle=Test主题演示
2、css样式表(test.css)内容
h3 {
    color: red;
}
3、Web视图(casLoginView.html)内容
<!DOCTYPE html>
<html>

<head>
    <meta charset="UTF-8" />
    <meta name="viewport" content="width=device-width, initial-scale=1" />
    <meta http-equiv="X-UA-Compatible" content="IE=edge" />
    <title th:text="${#themes.code('pageTitle')}"></title>
    <link rel="stylesheet" th:href="@{${#themes.code('css.file')}}" />
</head>

<body>
<h3 th:text="${#themes.code('pageTitle')}"></h3>
<div>
    <form method="post" th:object="${credential}">
        <div th:if="${#fields.hasErrors('*')}"><span th:each="err : ${#fields.errors('*')}" th:utext="${err}" />
        </div>
        <h4 th:utext="#{screen.welcome.instructions}"></h4>
        <section class="row">
            <label for="username" th:utext="#{screen.welcome.label.netid}" />
            <div th:unless="${openIdLocalId}">
                <input class="required" id="username" size="25" tabindex="1" type="text" th:disabled="${guaEnabled}" th:field="*{username}" th:accesskey="#{screen.welcome.label.netid.accesskey}" autocomplete="off" th:value="casuser" />
            </div>
        </section>
        <section class="row">
            <label for="password" th:utext="#{screen.welcome.label.password}" />
            <div>
                <input class="required" type="password" id="password" size="25" tabindex="2" th:accesskey="#{screen.welcome.label.password.accesskey}" th:field="*{password}" autocomplete="off" th:value="Mellon" />
            </div>
        </section>
        <section>
            <input type="hidden" name="execution" th:value="${flowExecutionKey}" />
            <input type="hidden" name="_eventId" value="submit" />
            <input type="hidden" name="geolocation" />
            <input class="btn btn-submit btn-block" name="submit" accesskey="l" th:value="#{screen.welcome.button.login}" tabindex="6" type="submit" />
        </section>
    </form>
</div>
</body>

</html>
注:关于cas web视图的语法,不在该文范围之内。要了解具体语法涵义,请自行百度。
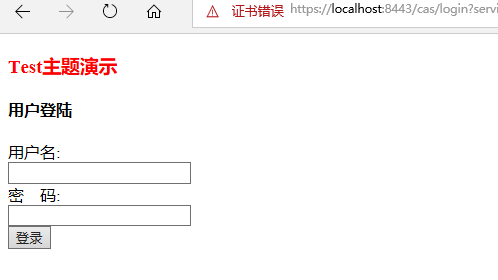
四、运行测试

注:需要Cas客户端进行访问测试,单纯浏览器访问无法呈现该主题。
