要使用ZStack就不得不先了解ZStack的OSAL工作原理
http://blog.csdn.net/qinpeng_zbdx/article/details/20990797
http://wenku.baidu.com/link?url=OILW1kTqP0nnNnLmuiCa9v...
了解事情的本质后,操作就很简单了
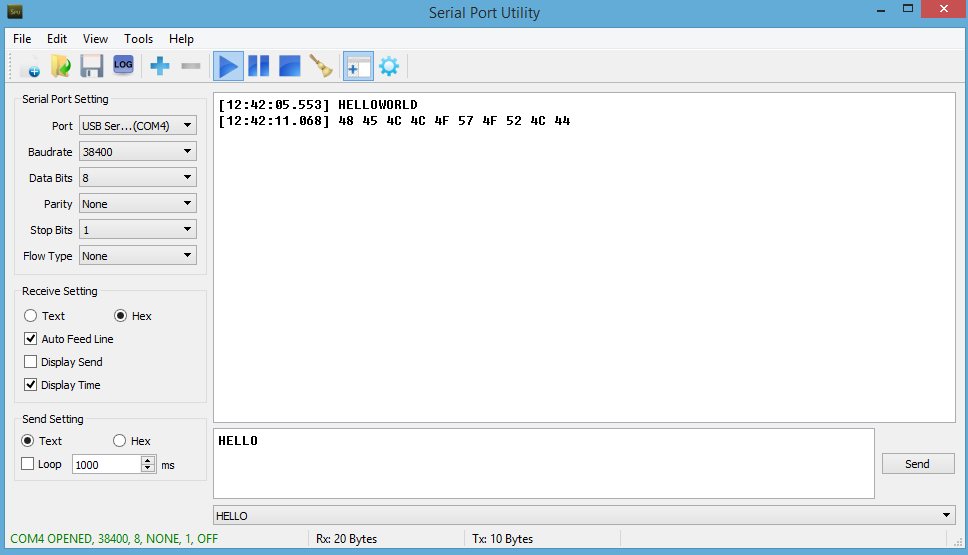
根据这篇博客可以很清楚的了解如何在ZStack下使用CC2530开发板进行串口通信
http://home.eeworld.com.cn/my/space-uid-530276-blogid-227205.html
在基于ZigBee协议的应用开发中,用户只需要实现应用程序框架即可。
在APP层,整个程序要实现的功能都在这三个文件里
YourName.c,YourName.h 和OSAL_YourName.c 文件
在YourName.c文件里,定义了这两个函数:
YourName_Init( task_id )函数 -- 初始化
YourName_ProcessEvent( task_id, events )函数 -- 判断由参数传递的事件类型,然后执行相应的事件处理函数
OSAL_YourName.c 中有两个重要的东西
数组taskArr:存放着所有任务的事件处理函数的地址
函数osalInitTasks:所有的初始化工作都在这里完成,自动分配给每个任务一个ID
const pTaskEventHandlerFn tasksArr[] = {
  macEventLoop,
  nwk_event_loop,
  Hal_ProcessEvent,
#if defined( MT_TASK )
  MT_ProcessEvent,
#endif
  APS_event_loop,
#if defined ( ZIGBEE_FRAGMENTATION )
  APSF_ProcessEvent,
#endif
  ZDApp_event_loop,
#if defined ( ZIGBEE_FREQ_AGILITY ) || defined ( ZIGBEE_PANID_CONFLICT )
  ZDNwkMgr_event_loop,
#endif
  SerialApp_ProcessEvent
};
void osalInitTasks( void ) { uint8 taskID = 0; tasksEvents = (uint16 *)osal_mem_alloc( sizeof( uint16 ) * tasksCnt); osal_memset( tasksEvents, 0, (sizeof( uint16 ) * tasksCnt)); macTaskInit( taskID++ ); nwk_init( taskID++ ); Hal_Init( taskID++ ); #if defined( MT_TASK ) MT_TaskInit( taskID++ ); #endif APS_Init( taskID++ ); #if defined ( ZIGBEE_FRAGMENTATION ) APSF_Init( taskID++ ); #endif ZDApp_Init( taskID++ ); #if defined ( ZIGBEE_FREQ_AGILITY ) || defined ( ZIGBEE_PANID_CONFLICT ) ZDNwkMgr_Init( taskID++ ); #endif SerialApp_Init( taskID ); }
所有的任务状态都被初始化为0,代表现在没有需要相应的事件。
void SerialApp_Init( uint8 task_id )
{
  halUARTCfg_t uartConfig;

  SerialApp_TaskID = task_id;
  SerialApp_RxSeq = 0xC3;

  afRegister( (endPointDesc_t *)&SerialApp_epDesc );

  RegisterForKeys( task_id );

  uartConfig.configured           = TRUE;
  uartConfig.baudRate             = SERIAL_APP_BAUD;
  uartConfig.flowControl          = TRUE;
  uartConfig.flowControlThreshold = SERIAL_APP_THRESH;
  uartConfig.rx.maxBufSize        = SERIAL_APP_RX_SZ;
  uartConfig.tx.maxBufSize        = SERIAL_APP_TX_SZ;
  uartConfig.idleTimeout          = SERIAL_APP_IDLE;
  uartConfig.intEnable            = TRUE;
  uartConfig.callBackFunc         = SerialApp_CallBack;
  HalUARTOpen (SERIAL_APP_PORT, &uartConfig);

#if defined ( LCD_SUPPORTED )
  HalLcdWriteString( "SerialApp", HAL_LCD_LINE_2 );
#endif

  ZDO_RegisterForZDOMsg( SerialApp_TaskID, End_Device_Bind_rsp );
  ZDO_RegisterForZDOMsg( SerialApp_TaskID, Match_Desc_rsp );
}
static void SerialApp_CallBack(uint8 port, uint8 event) { (void)port; unsigned char Uartbuf[10]; unsigned char Outbuf[10]; Outbuf[0] = 'H'; Outbuf[1] = 'E'; Outbuf[2] = 'L'; Outbuf[3] = 'L'; Outbuf[4] = 'O'; Outbuf[5] = 'W'; Outbuf[6] = 'O'; Outbuf[7] = 'R'; Outbuf[8] = 'L'; Outbuf[9] = 'D'; char len; len=HalUARTRead(0,Uartbuf,10); if(len)//whatever it is { HalUARTWrite(0,Outbuf,10); len=0; } }
关于串口的配置在SerialApp_Init函数里uartConfig.callBackFunc 上边的那些,比特率之类的。
用ZStack安装路径里的SerialApp,改一改就能实现