目录:
Reactor(反应堆)和Proactor(前摄器)
《I/O模型之三:两种高性能 I/O 设计模式 Reactor 和 Proactor》
《【转】第8章 前摄器(Proactor):用于为异步事件多路分离和分派处理器的对象行为模式》
《Java NIO系列教程(八)JDK AIO编程》-- java AIO的proactor模式
《Java NIO系列教程(七) selector原理 Epoll版的Selector》--java NIO的Reactor模式
NIO2.0引入了新的异步通道的概念,并提供了异步文件通道和异步套接字通道的实现。异步通道提供两种方式获取获取操作结果。
- 通过java.util.concurrent.Future类来表示异步操作的结果;
- 在执行异步操作的时候传入一个java.nio.channels。
CompletionHandler接口的实现类作为操作完成的回调。
NIO2.0的异步套接字通道是真正的异步非阻塞I/O,它对应UNIX网络编程中的事件驱动I/O(AIO),它不需要通过多路复用器(Selector)对注册的通道进行轮询操作即可实现异步读写,从而简化了NIO的编程模型。
一、异步通道API
1.1、AsynchronousChannel接口
java.nio.channels.AsynchronousChannel:标记一个channel支持异步IO操作。有主要的三个实现类:AsynchronousFileChannel,AsynchronousSocketChannel, and AsynchronousServerSocketChannel。
1.2、AsynchronousChannelGroup
package java.nio.channels; public abstract class AsynchronousChannelGroup { public static AsynchronousChannelGroup withFixedThreadPool(int nThreads, ThreadFactory threadFactory); public static AsynchronousChannelGroup withCachedThreadPool(ExecutorService executor,int initialSize); public static AsynchronousChannelGroup withThreadPool(ExecutorService executor); }
1.3、CompletionHandler:用户处理器
Reactor:send(msg) -> 消息队列是否为空,如果为空 -> 向Reactor注册OP_WRITE,然后返回 -> Reactor select -> 触发Writable,通知用户线程去处理 ->先注销Writable(很多人遇到的cpu 100%的问题就在于没有注销),处理Writeable,如果没有完全写入,继续注册OP_WRITE。注意到,写入的工作还是用户线程在处理。
Proactor:send(msg) -> 消息队列是否为空,如果为空,发起read异步调用,并注册CompletionHandler,然后返回。 -> 操作系统负责将你的消息写入,并返回结果(写入的字节数)给Proactor -> Proactor派发CompletionHandler。可见,写入的工作是操作系统在处理,无需用户线程参与。事实上在aio的API 中,AsynchronousChannelGroup就扮演了Proactor的角色。
CompletionHandler有三个方法,分别对应于处理成功、失败、被取消(通过返回的Future)情况下的回调处理:
package java.nio.channels;

public interface CompletionHandler<V,A> {

    void completed(V result, A attachment);

    void failed(Throwable exc, A attachment);
}
其中的泛型参数V表示IO调用的结果,而A是发起调用时传入的attchment。
以一个简单监听服务端为例,基本过程是:
1. 启动一个服务端通道
2. 定义一个事件处理器,用户事件完成的时候处理,如消费数据。
3. 向系统注册一个感兴趣的事件,如接受数据,并把事件完成的处理器传递给系统。
4. 都已经交待完毕,可以只管继续做自己的事情了,操作系统在完成事件后通过其他的线程会自动调用处理器完成事件处理。
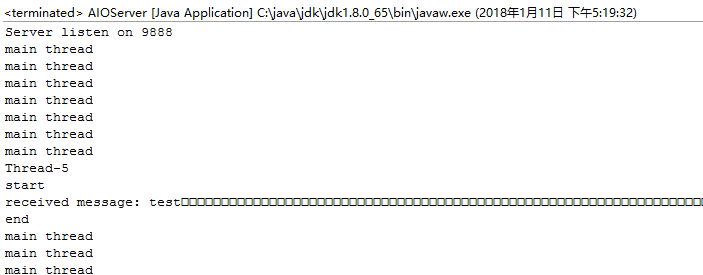
以下用一个例子来简单实现,一个服务端和客户端。服务端监听客户端的消息,并打印出来。
package com.dxz.springsession.nio.demo5;

import java.io.IOException;
import java.net.InetSocketAddress;
import java.nio.ByteBuffer;
import java.nio.channels.AsynchronousServerSocketChannel;
import java.nio.channels.AsynchronousSocketChannel;
import java.nio.channels.CompletionHandler;
import java.util.concurrent.ExecutionException;
import java.util.concurrent.Future;
import java.util.concurrent.TimeUnit;
import java.util.concurrent.TimeoutException;

public class AIOServer {
    public final static int PORT = 9888;
    private AsynchronousServerSocketChannel server;

    public AIOServer() throws IOException {
        server = AsynchronousServerSocketChannel.open().bind(new InetSocketAddress(PORT));
    }

    public void startWithFuture() throws InterruptedException, ExecutionException, TimeoutException {
        System.out.println("Server listen on " + PORT);
        Future<AsynchronousSocketChannel> future = server.accept();
        AsynchronousSocketChannel socket = future.get();
        ByteBuffer readBuf = ByteBuffer.allocate(1024);
        readBuf.clear();
        socket.read(readBuf).get(100, TimeUnit.SECONDS);
        readBuf.flip();
        System.out.printf("received message:" + new String(readBuf.array()));
        System.out.println(Thread.currentThread().getName());

    }

    public void startWithCompletionHandler() throws InterruptedException, ExecutionException, TimeoutException {
        System.out.println("Server listen on " + PORT);
        // 注册事件和事件完成后的处理器
        server.accept(null, new CompletionHandler<AsynchronousSocketChannel, Object>() {
            final ByteBuffer buffer = ByteBuffer.allocate(1024);

            public void completed(AsynchronousSocketChannel result, Object attachment) {
                System.out.println(Thread.currentThread().getName());
                System.out.println("start");
                try {
                    buffer.clear();
                    result.read(buffer).get(100, TimeUnit.SECONDS);
                    buffer.flip();
                    System.out.println("received message: " + new String(buffer.array()));
                } catch (InterruptedException | ExecutionException e) {
                    System.out.println(e.toString());
                } catch (TimeoutException e) {
                    e.printStackTrace();
                } finally {

                    try {
                        result.close();
                        server.accept(null, this);
                    } catch (Exception e) {
                        System.out.println(e.toString());
                    }
                }

                System.out.println("end");
            }

            @Override
            public void failed(Throwable exc, Object attachment) {
                System.out.println("failed: " + exc);
            }
        });
        // 主线程继续自己的行为
        while (true) {
            System.out.println("main thread");
            Thread.sleep(1000);
        }

    }

    public static void main(String args[]) throws Exception {
        new AIOServer().startWithCompletionHandler();
    }
}

//客户端
package com.dxz.springsession.nio.demo5;

import java.net.InetSocketAddress;
import java.nio.ByteBuffer;
import java.nio.channels.AsynchronousSocketChannel;

public class AIOClient {

    public static void main(String... args) throws Exception {
        AsynchronousSocketChannel client = AsynchronousSocketChannel.open();
        client.connect(new InetSocketAddress("localhost", 9888));
        client.write(ByteBuffer.wrap("test".getBytes())).get();
    }
}

示例2:
import java.io.IOException;

public class TimeServer {

    public static void main(String[] args) throws IOException {
        int port = 8080;
        if (args != null && args.length > 0) {
            try {
                port = Integer.valueOf(args[0]);
            } catch (NumberFormatException e) {
                // 采用默认值
            }
        }
        //首先创建异步的时间服务器处理类,然后启动线程将AsyncTimeServerHandler启动
        AsyncTimeServerHandler timeServer = new AsyncTimeServerHandler(port);
        new Thread(timeServer, "AIO-AsyncTimeServerHandler-001").start();
    }
}


import java.io.IOException;
import java.net.InetSocketAddress;
import java.nio.ByteBuffer;
import java.nio.channels.AsynchronousServerSocketChannel;
import java.nio.channels.AsynchronousSocketChannel;
import java.nio.channels.CompletionHandler;
import java.util.concurrent.CountDownLatch;


public class AsyncTimeServerHandler implements Runnable {


    CountDownLatch latch;
    AsynchronousServerSocketChannel asynchronousServerSocketChannel;

    public AsyncTimeServerHandler(int port) {
        //在构造方法中,我们首先创建一个异步的服务端通道AsynchronousServerSocketChannel,
        //然后调用它的bind方法绑定监听端口,如果端口合法且没被占用,绑定成功,打印启动成功提示到控制台。
        try {
            asynchronousServerSocketChannel = AsynchronousServerSocketChannel.open();
            asynchronousServerSocketChannel.bind(new InetSocketAddress(port));
            System.out.println("The time server is start in port : " + port);
        } catch (IOException e) {
            e.printStackTrace();
        }
    }

    @Override
    public void run() {
        //在线程的run方法中,初始化CountDownLatch对象,
        //它的作用是在完成一组正在执行的操作之前,允许当前的线程一直阻塞。
        //在本例程中,我们让线程在此阻塞,防止服务端执行完成退出。
        //在实际项目应用中,不需要启动独立的线程来处理AsynchronousServerSocketChannel,这里仅仅是个demo演示。
        latch = new CountDownLatch(1);
        doAccept();
        try {
            latch.await();
        } catch (InterruptedException e) {
            e.printStackTrace();
        }
    }

    //用于接收客户端的连接,由于是异步操作,
    //我们可以传递一个CompletionHandler<AsynchronousSocketChannel,? super A>类型的handler实例接收accept操作成功的通知消息,
    //在本例程中我们通过AcceptCompletionHandler实例作为handler来接收通知消息,
    public void doAccept() {
        asynchronousServerSocketChannel.accept(this, new CompletionHandler<AsynchronousSocketChannel, AsyncTimeServerHandler>() {
            @Override
            public void completed(AsynchronousSocketChannel result,
                                  AsyncTimeServerHandler attachment) {
                //我们从attachment获取成员变量AsynchronousServerSocketChannel,然后继续调用它的accept方法。
                //在此可能会心存疑惑:既然已经接收客户端成功了,为什么还要再次调用accept方法呢?
                //原因是这样的:当我们调用AsynchronousServerSocketChannel的accept方法后,
                //如果有新的客户端连接接入,系统将回调我们传入的CompletionHandler实例的completed方法,
                //表示新的客户端已经接入成功,因为一个AsynchronousServerSocket Channel可以接收成千上万个客户端,
                //所以我们需要继续调用它的accept方法,接收其他的客户端连接,最终形成一个循环。
                //每当接收一个客户读连接成功之后,再异步接收新的客户端连接。
                attachment.asynchronousServerSocketChannel.accept(attachment, this);
                //链路建立成功之后,服务端需要接收客户端的请求消息,
                //创建新的ByteBuffer,预分配1M的缓冲区。
                ByteBuffer buffer = ByteBuffer.allocate(1024);
                //通过调用AsynchronousSocketChannel的read方法进行异步读操作。
                //下面我们看看异步read方法的参数。
                //ByteBuffer dst:接收缓冲区,用于从异步Channel中读取数据包;
                //A attachment:异步Channel携带的附件,通知回调的时候作为入参使用;
                //CompletionHandler<Integer,? super A>:接收通知回调的业务handler,本例程中为ReadCompletionHandler。
                result.read(buffer, buffer, new ReadCompletionHandler(result));
            }

            @Override
            public void failed(Throwable exc, AsyncTimeServerHandler attachment) {
                exc.printStackTrace();
                attachment.latch.countDown();
            }
        });
    }

}

import java.io.IOException;
import java.io.UnsupportedEncodingException;
import java.nio.ByteBuffer;
import java.nio.channels.AsynchronousSocketChannel;
import java.nio.channels.CompletionHandler;

public class ReadCompletionHandler implements CompletionHandler<Integer, ByteBuffer> {

    private AsynchronousSocketChannel channel;

    public ReadCompletionHandler(AsynchronousSocketChannel channel) {
        //将AsynchronousSocketChannel通过参数传递到ReadCompletion Handler中当作成员变量来使用
        //主要用于读取半包消息和发送应答。本例程不对半包读写进行具体说明
        if (this.channel == null)
            this.channel = channel;
    }

    @Override
    public void completed(Integer result, ByteBuffer attachment) {
        //读取到消息后的处理,首先对attachment进行flip操作,为后续从缓冲区读取数据做准备。
        attachment.flip();
        //根据缓冲区的可读字节数创建byte数组
        byte[] body = new byte[attachment.remaining()];
        attachment.get(body);
        try {
            //通过new String方法创建请求消息,对请求消息进行判断,
            //如果是"QUERY TIME ORDER"则获取当前系统服务器的时间,
            String req = new String(body, "UTF-8");
            System.out.println("The time server receive order : " + req);
            String currentTime = "QUERY TIME ORDER".equalsIgnoreCase(req) ? new java.util.Date(
                    System.currentTimeMillis()).toString() : "BAD ORDER";
            //调用doWrite方法发送给客户端。
            doWrite(currentTime);
        } catch (UnsupportedEncodingException e) {
            e.printStackTrace();
        }
    }

    private void doWrite(String currentTime) {
        if (currentTime != null && currentTime.trim().length() > 0) {
            //首先对当前时间进行合法性校验,如果合法,调用字符串的解码方法将应答消息编码成字节数组,
            //然后将它复制到发送缓冲区writeBuffer中,
            byte[] bytes = (currentTime).getBytes();
            ByteBuffer writeBuffer = ByteBuffer.allocate(bytes.length);
            writeBuffer.put(bytes);
            writeBuffer.flip();
            //最后调用AsynchronousSocketChannel的异步write方法。
            //正如前面介绍的异步read方法一样,它也有三个与read方法相同的参数,
            //在本例程中我们直接实现write方法的异步回调接口CompletionHandler。
            channel.write(writeBuffer, writeBuffer,
                    new CompletionHandler<Integer, ByteBuffer>() {
                        @Override
                        public void completed(Integer result, ByteBuffer buffer) {
                            //对发送的writeBuffer进行判断,如果还有剩余的字节可写,说明没有发送完成,需要继续发送,直到发送成功。
                            if (buffer.hasRemaining())
                                channel.write(buffer, buffer, this);
                        }

                        @Override
                        public void failed(Throwable exc, ByteBuffer attachment) {
                            //关注下failed方法,它的实现很简单,就是当发生异常的时候,对异常Throwable进行判断,
                            //如果是I/O异常,就关闭链路,释放资源,
                            //如果是其他异常,按照业务自己的逻辑进行处理,如果没有发送完成,继续发送.
                            //本例程作为简单demo,没有对异常进行分类判断,只要发生了读写异常,就关闭链路,释放资源。
                            try {
                                channel.close();
                            } catch (IOException e) {
                                // ingnore on close
                            }
                        }
                    });
        }
    }

    @Override
    public void failed(Throwable exc, ByteBuffer attachment) {
        try {
            this.channel.close();
        } catch (IOException e) {
            e.printStackTrace();
        }
    }
}
客户端代码示例:
public class TimeClient {

    public static void main(String[] args) {
        int port = 8080;
        //通过一个独立的I/O线程创建异步时间服务器客户端handler,
        //在实际项目中,我们不需要独立的线程创建异步连接对象,因为底层都是通过JDK的系统回调实现的.
        new Thread(new AsyncTimeClientHandler("127.0.0.1", port), "AIO-AsyncTimeClientHandler-001").start();
    }
}

import java.io.IOException;
import java.io.UnsupportedEncodingException;
import java.net.InetSocketAddress;
import java.nio.ByteBuffer;
import java.nio.channels.AsynchronousSocketChannel;
import java.nio.channels.CompletionHandler;
import java.util.concurrent.CountDownLatch;

public class AsyncTimeClientHandler implements CompletionHandler<Void, AsyncTimeClientHandler>, Runnable {

    private AsynchronousSocketChannel client;
    private String host;
    private int port;
    private CountDownLatch latch;

    //首先通过AsynchronousSocketChannel的open方法创建一个新的AsynchronousSocketChannel对象。
    public AsyncTimeClientHandler(String host, int port) {
        this.host = host;
        this.port = port;
        try {
            client = AsynchronousSocketChannel.open();
        } catch (IOException e) {
            e.printStackTrace();
        }
    }

    @Override
    public void run() {
        //创建CountDownLatch进行等待,防止异步操作没有执行完成线程就退出。
        latch = new CountDownLatch(1);
        //通过connect方法发起异步操作,它有两个参数,
        //A attachment:AsynchronousSocketChannel的附件,用于回调通知时作为入参被传递,调用者可以自定义;
        //CompletionHandler<Void,? super A> handler:异步操作回调通知接口,由调用者实现。
        client.connect(new InetSocketAddress(host, port), this, this);
        try {
            latch.await();
        } catch (InterruptedException e1) {
            e1.printStackTrace();
        }
        try {
            client.close();
        } catch (IOException e) {
            e.printStackTrace();
        }
    }

    //异步连接成功之后的方法回调——completed方法
    @Override
    public void completed(Void result, AsyncTimeClientHandler attachment) {
        //创建请求消息体,对其进行编码,然后复制到发送缓冲区writeBuffer中,
        //调用Asynchronous SocketChannel的write方法进行异步写。
        //与服务端类似,我们可以实现CompletionHandler <Integer, ByteBuffer>接口用于写操作完成后的回调。
        byte[] req = "QUERY TIME ORDER".getBytes();
        ByteBuffer writeBuffer = ByteBuffer.allocate(req.length);
        writeBuffer.put(req);
        writeBuffer.flip();
        client.write(writeBuffer, writeBuffer,
                new CompletionHandler<Integer, ByteBuffer>() {
                    @Override
                    public void completed(Integer result, ByteBuffer buffer) {
                        //如果发送缓冲区中仍有尚未发送的字节,将继续异步发送,如果已经发送完成,则执行异步读取操作。
                        if (buffer.hasRemaining()) {
                            client.write(buffer, buffer, this);
                        } else {
                            //客户端异步读取时间服务器服务端应答消息的处理逻辑
                            ByteBuffer readBuffer = ByteBuffer.allocate(1024);
                            //调用AsynchronousSocketChannel的read方法异步读取服务端的响应消息。
                            //由于read操作是异步的,所以我们通过内部匿名类实现CompletionHandler<Integer,ByteBuffer>接口,
                            //当读取完成被JDK回调时,构造应答消息。
                 client.read(readBuffer,readBuffer, new CompletionHandler<Integer, ByteBuffer>() {
                                        @Override
                                        public void completed(Integer result,ByteBuffer buffer) {
                                            //从CompletionHandler的ByteBuffer中读取应答消息,然后打印结果。
                                            buffer.flip();
                                            byte[] bytes = new byte[buffer.remaining()];
                                            buffer.get(bytes);
                                            String body;
                                            try {
                                                body = new String(bytes,"UTF-8");
                                                System.out.println("Now is : " + body);
                                                latch.countDown();
                                            } catch (UnsupportedEncodingException e) {
                                                e.printStackTrace();
                                            }
                                        }

                                        @Override
                                        public void failed(Throwable exc, ByteBuffer attachment) {
                                            //当读取发生异常时,关闭链路,
                                            //同时调用CountDownLatch的countDown方法让AsyncTimeClientHandler线程执行完毕,客户端退出执行。
                                            try {
                                                client.close();
                                                latch.countDown();
                                            } catch (IOException e) {
                                                // ingnore on close
                                            }
                                        }
                                    });
                        }
                    }

                    @Override
                    public void failed(Throwable exc, ByteBuffer attachment) {
                        try {
                            client.close();
                            latch.countDown();
                        } catch (IOException e) {
                            // ingnore on close
                        }
                    }
                });
    }

    @Override
    public void failed(Throwable exc, AsyncTimeClientHandler attachment) {
        exc.printStackTrace();
        try {
            client.close();
            latch.countDown();
        } catch (IOException e) {
            e.printStackTrace();
        }
    }
}
需要指出的是,正如之前的NIO例程,我们并没有完整的处理网络的半包读写,在对例程进行功能测试的时候没有问题,但是,如果对代码稍加改造,进行压力或者性能测试,就会发现输出结果存在问题。
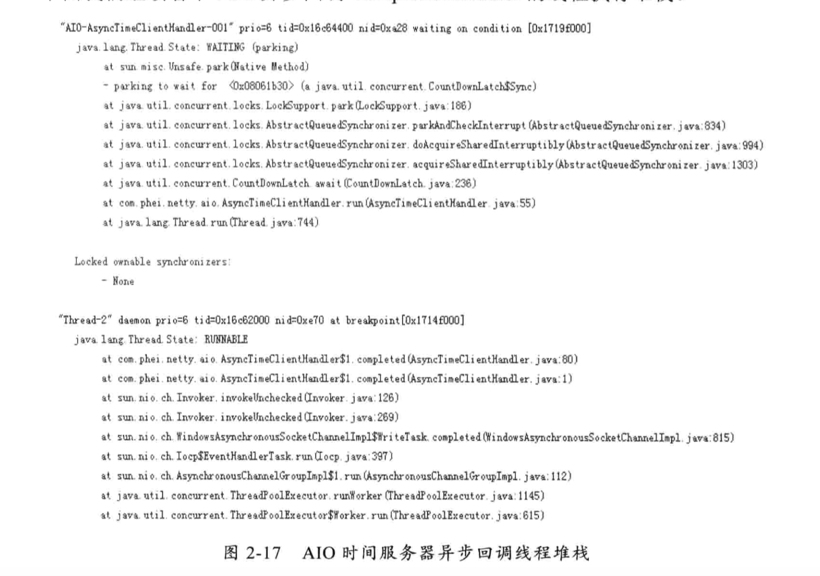
通过打印线程堆栈的方式看下JDK回调异步Channel CompletionHandler的调用情况:

从“Thread-2”线程堆栈中可以发现,JDK底层通过线程池ThreadPoolExecutor来执行回调通知,异步回调通知类由sun.nio.ch.AsynchronousChannelGroupImpl实现,它经过层层调用,最终回调com.phei.netty.aio.AsyncTimeClientHandler$1.completed方法,完成回调通知。
由此我们也可以得出结论:异步SocketChannel是被动执行对象,我们不需要像NIO编程那样创建一个独立的I/O线程来处理读写操作。对于AsynchronousServerSocketChannel和AsynchronousSocketChannel,它们都由JDK底层的线程池负责回调并驱动读写操作。
正因为如此,基于NIO2.0新的异步非阻塞Channel进行编程比NIO编程更为简单。
