继续上次的笔记, 继续完善csdn博文的提取.
发现了非常好的模块. html2docx
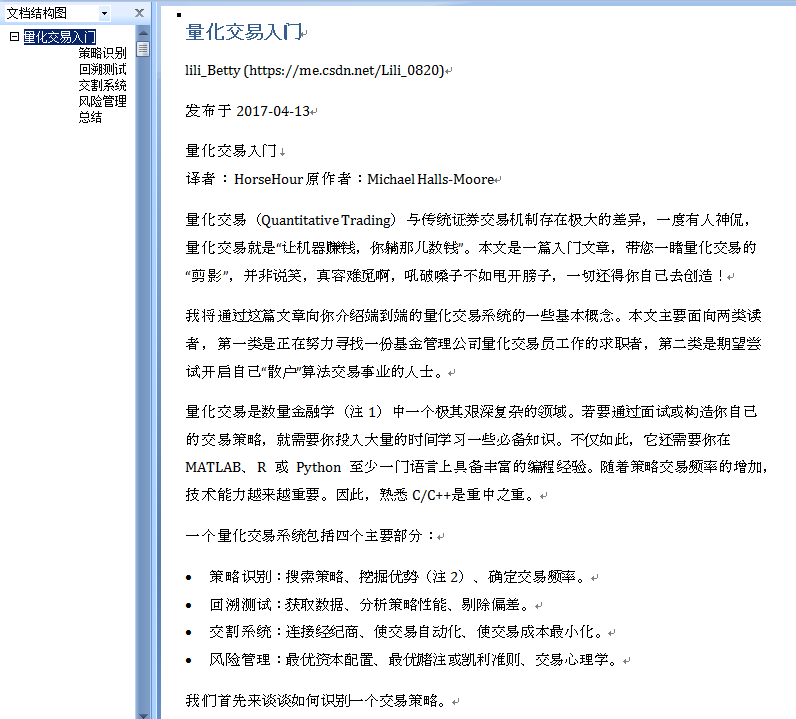
结果展示:
运行之后, 直接生成docx文档. 截个图如下:
结果已经基本满意了!!!
在编写过程中的一些感想.
-
获取网站响应:
决定放弃requests, 采用 selenium.webdriver.
后者就是模拟浏览器操作. 可以应对许多需要登录的, 防止爬取的网站
超时控制(等待网站响应), 操作网页等功能也非常强大. -
定位页面元素:
在定位页面元素方面: 有太多的方法可以选择. 最后决定就用一种. webdriver方法.
放弃etree, BeautifulSoup, 还有直接用re模块的提取. -
好好学习并掌握webdriver一种办法, 就可以了. 它的功能已经非常强大了,
也支持用xpath来锁定页面元素. -
webdriver支持 网页面里注入javascript脚本来完成任务. (网络开发里的前端技术)
-
为了与html2docx衔接, 这里利用了
selenium.webdriver.WebElemnt.get_attribute('outHTML')方法获取元素的html
BeautifulSoup对象的prettify()方法, 来生成合法的完整的页面元素的html源码.
代码:
import os; type(os)
import time; type(time)
import re
anys = '.*?' # 任意长的字符串, 贪婪型的

import random; type(random)

#import requests
#from lxml import etree
from selenium import webdriver
chrome_options = webdriver.ChromeOptions()
chrome_options.binary_location = r'C:UsersAdministratorAppDataRoaming360se6Application360se.exe'
chrome_options.add_argument(r'--lang=zh-CN') # 这里添加一些启动的参数

import logging
logging.basicConfig(level=logging.INFO,
    format= '%(asctime)s - %(name)s - %(levelname)s : %(message)s',
    #format='%(asctime)s %(filename)s [line:%(lineno)d] %(levelname)s %(message)s',
    )
logger = logging.getLogger(__name__)

#logger.info("Start print log")
#logger.debug("Do something")
#logger.warning("Something maybe fail.")
#logger.info("Finish")

from bs4 import BeautifulSoup
from html2docx import html2docx


from selenium.webdriver.support.ui import WebDriverWait
from selenium.webdriver.common.by import By
from selenium.webdriver.support import expected_conditions as EC
type(By)
type(EC)

def itm(): return int(time.time())

def insert_title(title:'html w/o Body tag',
                 article:'html with Body tag'):
    '''在article这个完整的合法的html网页里, 在它的头部插入标题部分(title).
    标题部分: 包括文章标题行+作者行+发布日期
    '''
    merged = re.sub('(<html>
s*<body>)',
            '<html>
 <body>
' + title,
            article,
            flags=re.S,)
    return merged


def get_it_wait_untill(browser, element_func='title', sleep_time=80, arg=''):
    '''
    selenium内核的锁定页面元素, 然后取之. 比如:
        获取网页标题
        获取整个网页的源文件
        获取指定页面元素:
            by_id
            by_xpath
    Example:
        >>> get_it_wait_untill(browser, 'title')
        >>> get_it_wait_untill(browser, 'page_source')
        >>> get_it_wait_untill(browser, element_func='find_element_by_id',
                        arg='content_views',
                        )
        >>> get_it_wait_untill(browser, element_func='find_element_by_xpath',
                        arg='//section[@class="content article-content"]',
                        )
    '''
    prop = str(type(getattr(browser, element_func)))
    #python的很多内置的函数, 是使用C语言写出来的,要看C语言的源代码

    if prop == "<class 'str'>":
        element = WebDriverWait(browser, sleep_time).until(
                lambda x: getattr(x, element_func)
                )
    #elif callable(getattr(browser, element_func)):
    elif prop == "<class 'method'>":
        element = WebDriverWait(browser, sleep_time).until(
                lambda x: getattr(x, element_func)(arg)
                )

    return element


def get_csdn_blog(
        url='https://blog.csdn.net/Lili_0820/article/details/70155949'
        ,
        sleep_time=40
        ,
        ):
    '''
    爬取csdn blog文章
    参数:
    url: str,
    sleep_time: int, wait time in seconds
    Example:
        >>> get_csdn_blog()
    '''
    logger.info(f'当前网页的url: {url}')
    browser = webdriver.Chrome(options=chrome_options)
    browser.implicitly_wait(200)
    #timeout_wait = WebDriverWait(browser, 2*5) # 10sec
    browser.get(url)
    timeout_wait = WebDriverWait(browser, sleep_time) # 10sec;
    type(timeout_wait)

    '''
    我们需要确保: 网页信息已经全部加载, 否则可能提取不到有用信息.

    Sets a sticky timeout to implicitly wait for an element to be found,
    or a command to complete.
    This method only needs to be called one time per session.
    当浏览器(webdriver实例)在定位元素的时候,
    我们可以设置一个隐式的超时等待时间,
    如果超过这个设定的时间还不能锁定元素, 那么就报错或者继续执行.
    本方法在整个对话期内, 只需调用一次.

    '''
    title = WebDriverWait(browser, sleep_time).until(lambda x: x.title)
    logger.info(f'提取网页标题: {title}')

    html= WebDriverWait(browser, sleep_time).until(lambda x: x.page_source)
    #html = browser.page_source
    #需要花点时间
    #time.sleep(sleep_time) # 太粗暴简单了

    title      = browser.find_element_by_xpath('//h1[@class="title-article"]').text
    pub_date   = browser.find_element_by_xpath('//div[@class="article-bar-top"]').text
    author_url = browser.find_element_by_xpath('//div[@class="article-bar-top"] /a[1]').get_attribute('href')
    pub_date   = re.findall('
(.*?)阅读数.*?收藏', pub_date,re.S)[0]
    author, pub_date = re.findall('(.*?) (发布.*?) ', pub_date, re.S)[0]

    insertion = f'''
    <h1> {title} </h1>
    <p> {author} ({author_url}) </p>
    <p> {pub_date} </p>
    '''

    content_we = browser.find_element_by_id('content_views') # selenium.webelement
    text = content_we.text; type(text)
    logger.info('网页源码的长度和博文的长度分别是: {1} {0}'.
          format(len(text), len(html))
    )
    content_html = content_we.get_attribute('outerHTML')
    content_html = BeautifulSoup(content_html, 'lxml').prettify()
    content_html = insert_title(insertion, content_html)

    # 规范化: 输出文件名
#    if '|' in title: title2=title.replace('|', '')
#    title2 = title2.replace('QuantStart','')
#    title2 = title2.replace(' ','_')
    outf=f'{title}_{itm()}.docx'
    buffer = html2docx(content_html, title=title)

    with open(outf, "wb") as fh: fh.write(buffer.getvalue())
    if os.path.exists(outf):  print( f'{outf} created!!!')


    # re方法
    '''
    pattern = 'id="content_views" class="markdown_views.*?>' +
        '(.*?)' +
        '<link href="https://csdnimg.cn/release/' +
        'phoenix/mdeditor/markdown_views'
    a = re.findall(pattern, html, re.S)
    a = a[0]
    a = re.findall(f'{anys}(<p>{anys})</div>{anys}', a, re.S)[0]
    '''

    #  etree方法
    '''
    tree = etree.HTML(html)
    cv_etree = tree.xpath('//div[@id="content_views"]')[0]
    text = cv_etree.xpath('*/text()')
    cv_html = etree.tostring(cv_etree, encoding='unicode')
    '''
    browser.close()
    browser.quit()
    #return a


if __name__=='__main__':
    pass
#    url='https://blog.csdn.net/Lili_0820/article/details/70155949'
#    get_csdn_blog(url, sleep_time=80)