static noinline int init_post(void)
    __releases(kernel_lock)
{
    /* need to finish all async __init code before freeing the memory */
    async_synchronize_full();
    free_initmem();
    unlock_kernel();
    mark_rodata_ro();
    system_state = SYSTEM_RUNNING;
    numa_default_policy();

    if (sys_open((const char __user *) "/dev/console", O_RDWR, 0) < 0)
        printk(KERN_WARNING "Warning: unable to open an initial console.
");

    (void) sys_dup(0);
    (void) sys_dup(0);

    current->signal->flags |= SIGNAL_UNKILLABLE;

    if (ramdisk_execute_command) {
        run_init_process(ramdisk_execute_command);
        printk(KERN_WARNING "Failed to execute %s
",
                ramdisk_execute_command);
    }

    /*
     * We try each of these until one succeeds.
     *
     * The Bourne shell can be used instead of init if we are
     * trying to recover a really broken machine.
     */
    if (execute_command) {
        run_init_process(execute_command);
        printk(KERN_WARNING "Failed to execute %s.  Attempting "
                    "defaults...
", execute_command);
    }
    run_init_process("/sbin/init");
    run_init_process("/etc/init");
    run_init_process("/bin/init");
    run_init_process("/bin/sh");

    panic("No init found.  Try passing init= option to kernel.");
}
I don't have a 2.4 kernel tree any more, and I'm not a "C" programmer,
but in 2.6.11, the kernel source file init/main.c includes these lines:
    /*
     * We try each of these until one succeeds.
     *
     * The Bourne shell can be used instead of init if we are
     * trying to recover a really broken machine.
     */

    if (execute_command)
        run_init_process(execute_command);

    run_init_process("/sbin/init");
    run_init_process("/etc/init");
    run_init_process("/bin/init");
    run_init_process("/bin/sh");

    panic("No init found.  Try passing init= option to kernel.");

So the kernel looks for "/bin/bash,", doesn't find it, and tries
/sbin/init as normal. That works, and init (and Fedora) loads as usual.
打开标准输入/输出/错误#
Linux首先打开标准输入scanf,标准输出printf,标准错误err
if (sys_open((const char __user *) "/dev/console", O_RDWR, 0) < 0)
    printk(KERN_WARNING "Warning: unable to open an initial console.
");

(void) sys_dup(0);	//这个是复制的意思
(void) sys_dup(0);
这里的sys_dup(0)表示复制打开的第0个文件,也就是/dev/console,也就是说准输入scanf,标准输出printf,标准错误err都定位到/dev/console这个文件,这个文件被称为终端,他可以是串口或者液晶键盘组合等
执行init进程#
接下来会处理U-boot传递进来的命令行参数
//run_init_process 一般会正确执行不会返回的程序
if (execute_command) {
    run_init_process(execute_command);
    printk(KERN_WARNING "Failed to execute %s.  Attempting "
           "defaults...
", execute_command);
}

run_init_process("/sbin/init");
run_init_process("/etc/init");
run_init_process("/bin/init");
run_init_process("/bin/sh");

panic("No init found.  Try passing init= option to kernel.");
我们搜索下execute_command,发现如下定义,很明显和kernel源码分析中的命令行参数类似
static int __init init_setup(char *str)
{
	unsigned int i;

	execute_command = str;
	/*
	 * In case LILO is going to boot us with default command line,
	 * it prepends "auto" before the whole cmdline which makes
	 * the shell think it should execute a script with such name.
	 * So we ignore all arguments entered _before_ init=... [MJ]
	 */
	for (i = 1; i < MAX_INIT_ARGS; i++)
		argv_init[i] = NULL;
	return 1;
}
__setup("init=", init_setup);
也是设置一个段属性固定的结构体
#define __setup(str, fn)
	__setup_param(str, fn, fn, 0)

#define __setup_param(str, unique_id, fn, early)
	static char __setup_str_##unique_id[] __initdata = str;
	static struct obs_kernel_param __setup_##unique_id
		__attribute_used__
		__attribute__((__section__(".init.setup")))
		__attribute__((aligned((sizeof(long)))))
		= { __setup_str_##unique_id, fn, early }
也就是构造了一个和root=/dev/mtdblock3类似的
static char __setup_str_init_dev_setup[] __initdata = "init=";
static struct obs_kernel_param __setup_init_dev_setup
    __attribute_used__
    __attribute__((__section__(".init.setup")))
	__attribute__((aligned((sizeof(long)))))
    ={
    	__setup_str_init_dev_setup,root_init_setup,init_dev_setup,0
 	}

这个结构体的原型如下
struct obs_kernel_param
{
	const char *str;
	int (*setup_func)(char *);
	int early;
};
也就是说execute_command=/linuxrc,因为u-boot传递的参数是init=/linuxrc,程序会使用run_init_process(execute_command);来处理这个命令行
注意 函数run_init_process一般会正确执行不会返回的程序,也就是说如果能够正确执行u-boot传递的参数,将不会执行以下
run_init_process("/sbin/init");	//如果命令行参数不正确才会执行这个应用程序
run_init_process("/etc/init");
run_init_process("/bin/init");
run_init_process("/bin/sh");

panic("No init found.  Try passing init= option to kernel.");
Early boot messages in the host terminal
console=ttyS0
If you want to see early boot logs, you should pass console=ttyS0 parameter to a Linux kernel command line:
qemu-system-x86_64 -nographic -kernel vmlinuz -hda wheezy.img -append "root=/dev/sda console=ttyS0"
qemu-system-x86_64 -serial stdio -kernel vmlinuz -hda wheezy.img -append "root=/dev/sda console=ttyS0"
qemu-system-x86_64 -serial stdio wheezy.qcow2
 # 1. Wait for a GRUB menu to show.
 # 2. Press `e`.
 # 3. Find the line starting with "linux".
 # 4. Add "console=ttyS0".
qemu-system-x86_64 -serial stdio -kernel vmlinuz -hda wheezy.img -append "root=/dev/sda console=ttyS0":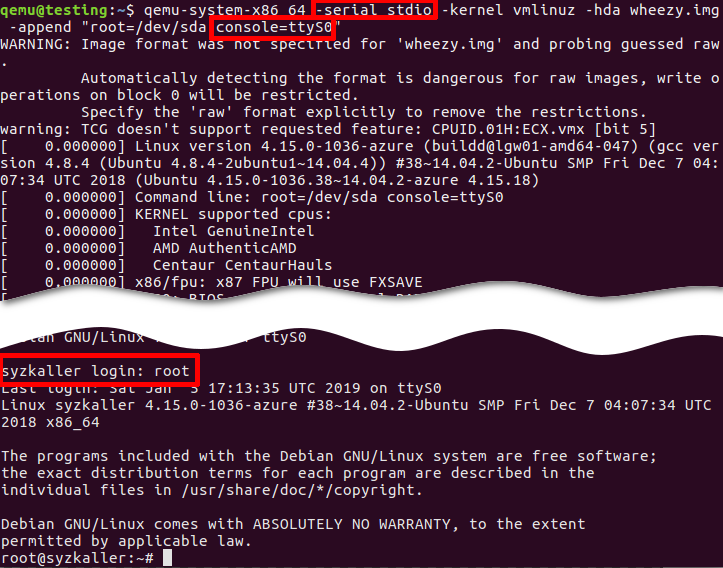
- -serial stdio or -nographic redirects input/output to the current terminal.
- -append "root=/dev/sda console=ttyS0":
console=ttyS0forces the guest kernel to send output to the first UART serial port ttyS0, which is redirected to the host by the-serial stdiooption, androot=/dev/sdapoints the kernel to use a /dev/sda device to load the wheezy.img.
Other options:
- -kernel vmlinuz loads the kernel from the local "./vmlinuz" file.
- -hda wheezy.img is a raw image which is suitable for booting with vmlinuz binary (wheezy.qcow2 won't be recognized in the block device).
root@(none):/# /lib/systemd/systemd
Trying to run as user instance, but the system has not been booted with systemd.
root@(none):/# stat /proc/1/exe
stat: cannot stat '/proc/1/exe': No such file or directory
root@(none):/# mount -t proc /proc
mount: /proc: can't find in /etc/fstab.
root@(none):/# stat /proc/1/exe
stat: cannot stat '/proc/1/exe': No such file or directory
root@(none):/#  /lib/systemd/systemd --version
systemd 237
+PAM +AUDIT +SELINUX +IMA +APPARMOR +SMACK +SYSVINIT +UTMP +LIBCRYPTSETUP +GCRYPT +GNUTLS +ACL +XZ +LZ4 +SECCOMP +BLKID +ELFUTILS +KMOD -IDN2 +IDN -PCRE2 default-hierarchy=hybrid
root@(none):/#
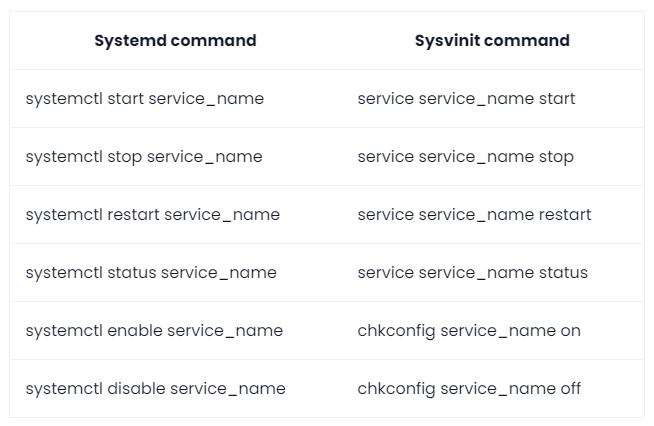
如果你按照网上的一些教程,使用systemd命令,如sudo systemctl start。
令你惊讶的是,该命令的结果是这样的错误。
System has not been booted with systemd as init system (PID 1). Can't operate.
原因:您的Linux系统没有使用systemd。
原因是你想用systemd命令来管理Linux上的服务,但你的系统并没有使用systemd,(很可能)使用的是经典的SysV init(sysvinit)系统。
但这怎么可能呢?你使用的是Ubuntu,教程也是针对同一版本的Ubuntu。为什么你不能用呢?
如果你在Windows里面用WSL使用Ubuntu,那么你的系统就会有SysV而不是systemd,当你运行systemctl命令时,你的系统就会抱怨(针对Linux系统的systemd init系统)。
如何知道你使用的是哪个init系统?你可以使用这个命令来知道与PID 1(系统上运行的第一个进程)相关联的进程名称。
ps -p 1 -o comm=
它应该在输出中显示systemd或sysv(或类似的东西)。
如何解决'System has not been booted with systemd'错误?
答案很简单,就是不要使用systemctl命令,而是使用等同的sysvinit命令。相反,可以使用对应的sysvinit命令。
这并不复杂,而且这两个命令的语法有些相似。
这张表应该可以帮助你。
stat /proc/1/exe
  File: /proc/1/exe -> /lib/systemd/systemd
  Size: 0               Blocks: 0          IO Block: 1024   symbolic link
Device: 4h/4d   Inode: 44217       Links: 1
Access: (0777/lrwxrwxrwx)  Uid: (    0/    root)   Gid: (    0/    root)
Access: 2020-12-09 19:00:04.238819522 +0800
Modify: 2020-09-24 18:06:04.184000000 +0800
Change: 2020-09-24 18:06:04.184000000 +0800
 Birth: -
Enabling the Linux Serial Console
Most Linux users nowadays have long forgotten the occasional necessity that was at one point the ubiquitous interface to access a terminal based operating system. Modern tunneling interfaces such as SSH and VNC now provide a better means for most use cases, but a serial interface still comes in handy especially in cases when there are issues with the networking configuration, the server has been compromised, or simply when hosting providers want an easy way to access their client server interfaces from the hypervisor. In any case, enabling the serial terminal within a Linux virtual machine is a simple, efficient, and effective tool for server access.

Some Linux variants make enabling this service easier than others. Below are the steps for how to able the ttyS0 terminal in several popular Linux distributions.

Debian
Enabling the serial terminal in Debian requires an additional GRUB parameter to be added to /etc/default/grub file like so.

Old:

GRUB_CMDLINE_LINUX_DEFAULT=""
New:

GRUB_CMDLINE_LINUX_DEFAULT="console=ttyS0 console=tty0"
After the change run grub-mkconfig -o /boot/grub/grub.cfg to regenerate the GRUB configuration and then reboot the server.

NOTE: On newer versions of debian you can run update-grub instead of the grub-mkconfig command.

After the server boots back up you should have access to the ttyS0 serial interface.

Ubuntu
Ubuntu makes the serial console very easy to access. No GRUB parameter changes are necessary. One merely needs to enable the service to begin using the ttyS0 serial console.

sudo systemctl start serial-getty@ttyS0.service
sudo systemctl enable serial-getty@ttyS0.service
And that's it! You should now be able to access the ttyS0 serial interface for your Ubuntu server.

RHEL/CentOS 7
Setting up the serial console for RHEL/CentOS 7 is also a simple process. There should be a systemd template file /lib/systemd/system/serial-getty@.service for the TTYS0 service already existing on the server. You must use the template to create the systemd service, configure it, and then set it to run automatically.

cp /lib/systemd/system/serial-getty@.service /etc/systemd/system/serial-getty@ttyS0.service
After that you will need to edit the file contents to resemble the following:

[Service]
ExecStart=-/sbin/agetty --keep-baud 115200,38400,9600 %I ttyS0
Type=idle
Then you will need to create a symlink to the service file and reload the systemd daemon list before starting and enabling the serial console:

ln -s /etc/systemd/system/serial-getty@ttyS0.service /etc/systemd/system/getty.target.wants/
systemctl daemon-reload
systemctl start serial-getty@ttyS0.service
systemctl enable serial-getty@ttyS0.service
Once all that is finished you should now be able to use the ttyS0 serial console on RHEL/CentOS 7!
想到的解决办法是在内核启动是参数init=/bin/bash,这样内核启动后不是执行init,而是跳过init gettty login直接执行bash,这样的话没有执行login
,系统也就没有启用任何一个用户,这是的控制台就是超级用户权限,这是使用命令adduser将用户添加到sudoer中就可以了,这样该普通用户就可以获取超级用户权限了
root@ubuntu:/# ls /sbin/init  -al
lrwxrwxrwx 1 root root 20 Apr 20  2018 /sbin/init -> /lib/systemd/systemd
root@ubuntu:/# systemctl list-units
UNIT                      LOAD   ACTIVE     SUB       DESCRIPTION

proc-sys-fs-binfmt_misc.automount loaded active     waiting   Arbitrary Exe
cutable File Formats File System Automount Point
dev-vda1.device           loaded activating tentative /dev/vda1

-.mount                   loaded active     mounted   Root Mount
dev-hugepages.mount       loaded active     mounted   Huge Pages File System
dev-mqueue.mount          loaded active     mounted   POSIX Message Queue File S
ystem
etc-resolv.conf.mount     loaded active     mounted   /etc/resolv.conf
run-katax2dcontainers-sandbox-shm.mount loaded active     mounted   /run/kata-c
ontainers/sandbox/shm
run-katax2dcontainers-shared-containers.mount loaded active     mounted   /run/
kata-containers/shared/containers
run-sandboxx2dns-ipc.mount loaded active     mounted   /run/sandbox-ns/ipc

run-sandboxx2dns-uts.mount loaded active     mounted   /run/sandbox-ns/uts

sys-fs-fuse-connections.mount loaded active     mounted   FUSE Control File Syst
em
tmp.mount                 loaded active     mounted   Temporary Directory (
/tmp)
systemd-ask-password-console.path loaded active     waiting   Dispatch Pass
word Requests to Console Directory Watch
init.scope                loaded active     running   System and Service Ma
nagere--
kata-agent.service        loaded active     running   Kata Containers Agent
Openvmi-Container-Manager.service loaded active     running   Openvmi Container
Manager
Openvmi-Xvfb-Manger.service loaded active     running   Openvmi Xvfb Manger

systemd-journal-flush.service loaded active     exited    Flush Journal to Persi
stent Storage
systemd-journald.service  loaded active     running   Journal Service
systemd-modules-load.service loaded active     exited    Load Kernel Modules

systemd-remount-fs.service loaded active     exited    Remount Root and Kernel F
ile Systems
systemd-sysctl.service    loaded active     exited    Apply Kernel Variables
systemd-tmpfiles-setup-dev.service loaded active     exited    Create Stati
c Device Nodes in /dev
-.slice                   loaded active     active    Root Slice
system.slice              loaded active     active    System Slice

dbus.socket               loaded active     listening D-Bus System Message Bus S
ocket
systemd-initctl.socket    loaded active     listening /dev/initctl Compatibility
 Named Pipe
systemd-journald-dev-log.socket loaded active     running   Journal Socket (/dev
/log)
systemd-journald.socket   loaded active     running   Journal Socket

basic.target              loaded active     active    Basic System
cryptsetup.target         loaded active     active    Local Encrypted Volumes
kata-containers.target    loaded active     active    Kata Containers Agent Targ
et
local-fs-pre.target       loaded active     active    Local File Systems (Pre)
local-fs.target           loaded active     active    Local File Systems
paths.target              loaded active     active    Paths
slices.target             loaded active     active    Slices
sockets.target            loaded active     active    Sockets
swap.target               loaded active     active    Swap
sysinit.target            loaded active     active    System Initialization
timers.target             loaded active     active    Timers

apt-daily-upgrade.timer   loaded active     waiting   Daily apt upgrade and clea
n activities
apt-daily.timer           loaded active     waiting   Daily apt download activit
ies
fstrim.timer              loaded active     waiting   Discard unused blocks once
 a week
motd-news.timer           loaded active     waiting   Message of the Day
systemd-tmpfiles-clean.timer loaded active     waiting   Daily Cleanup of Tempor
ary Directories

LOAD   = Reflects whether the unit definition was properly loaded.
ACTIVE = The high-level unit activation state, i.e. generalization of SUB.
SUB    = The low-level unit activation state, values depend on unit type.

45 loaded units listed. Pass --all to see loaded but inactive units,
too.
To show all installed unit files use 'systemctl list-unit-files'.
root@ubuntu:/#
root@ubuntu:/#
root@ubuntu:/#
root@ubuntu:/#
root@ubuntu:/#
root@ubuntu:/#
root@ubuntu:/#
root@ubuntu:/#
root@ubuntu:/#
root@ubuntu:/#
root@ubuntu:/#
root@ubuntu:/# systemctl list-units | grep kata
run-katax2dcontainers-sandbox-shm.mount       loaded active     mounted         /run/kata-containers/sandbox/shm
run-katax2dcontainers-shared-containers.mount loaded active     mounted         /run/kata-containers/shared/containers
kata-agent.service                             loaded active     running         Kata Containers Agent
kata-containers.target                         loaded active     active          Kata Containers Agent Target
root@ubuntu:/#