在web设计中,使用一种井井有条的方法来展示数据是十分重要的,这样用户就可以很清晰的理解网站所展示的数据结构和内容,使用有序列表就是实现数据有组织的展示的一种简单方法。
如果你需要更加深入地控制有序列表数字的样式,你可能会觉得必须通过增加更多的 html DOM 结构或者通过 JavaScript 才能做到。幸运的是,使用 CSS计数器 可以更加容易的解决这个问题。
在这篇教程中,我们将学习到什么是 CSS计数器 和一些使用案例。
有序列表的问题
当你写了一个如下的有序列表,浏览器会自动在列表项前面加上数字
<ol>
  <li>My First Item</li>
  <li>My Second Item</li>
  <li>My Third Item</li>
</ol>
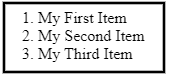
这看起来很好,但是它不允许你对数字进行样式调整。假如,你需要把列表前的数字放进一个圆圈里来修饰列表,你该怎么做呢?
一种方法是完全删除列表,并自己手动添加数字。
<div>
  <span>1</span> My First Item
</div>
<div>
  <span>2</span> My Second Item
</div>
<div>
  <span>3</span> My Third Item
</div>
div {
  margin-bottom:10px;
}
div span {
  display:inline-flex;
  align-items:center;
  justify-content:center;
  25px;
  height:25px;
  border-radius:50%;
  background-color:#000;
  color:#fff;
}
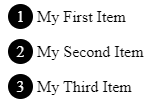
这确实是我们想要做的效果,但是也有一些缺点。首先,手动添加数字是很麻烦的。如果你需要更改一个编号,你必须一个接一个地改变它们。面对这种情况,你可以使用 JavaScript 动态添加 <span> 标签来解决这些问题,但这会为 DOM 添加更多的节点,从而导致大量内存占用。
在大多数情况下,最好使用CSS计数器。让我们来看看原因。
CSS计数器简介
CSS计数器是网页范围变量,其值可以使用 CSS 规则更改。
首先,使用 counter-reset 属性设置计数器。list-number 是此处使用的变量名。
div.list {
  counter-reset: list-number;
}
接着,使用 counter-increment属性来增加计数器的值。
div.list div {
  counter-increment: list-number;
}
现在,每次出现 div.listdiv 元素时,list-number 变量都会增加一。
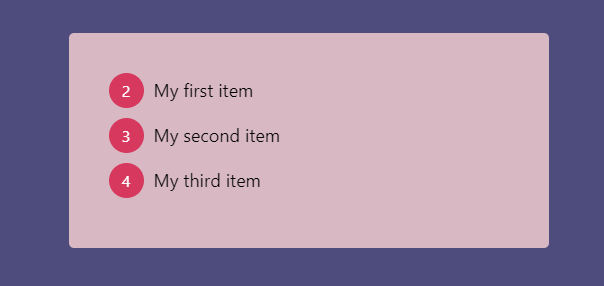
最后,使用含有设置 content属性和 counter()函数的 :before 伪元素来展示数字。
div.list div:before {
  content: counter(list-number);
}
这里是完整代码:
<div class="list">
  <div>My first item</div>
  <div>My second item</div>
  <div>My third item</div>
</div>
div.list {
  counter-reset: list-number;
}
/** 可以在:before 为元素中使用 counter-increment **/
div.list div:before {
  counter-increment: list-number;
  content: counter(list-number);
}
现在我们还没有完全达到目标。让我们对 :before 伪元素进行样式设计,使其看起来更好。
div.list div:before {
  counter-increment: list-number;
  content: counter(list-number);

  margin-right: 10px;
  margin-bottom:10px;
  35px;
  height:35px;
  display:inline-flex;
  align-items:center;
  justify-content: center;
  font-size:16px;
  background-color:#d7385e;
  border-radius:50%;
  color:#fff;
}
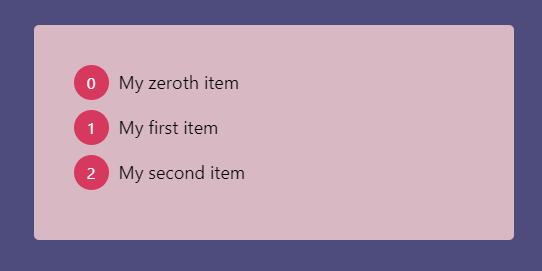
修改起始数字
默认情况下,counter-reset 会将计数器设置为 0。当第一个 counter-increment 被调用后它的起始变为1 可以通过将一个整数作为 counter-reset 函数的第二个参数来设置初始值。
div.list {
  counter-reset: list-number 1;
}
如果你想从 0 开始,可以将初始值设置为 -1。
div.list {
  counter-reset: list-number -1;
}
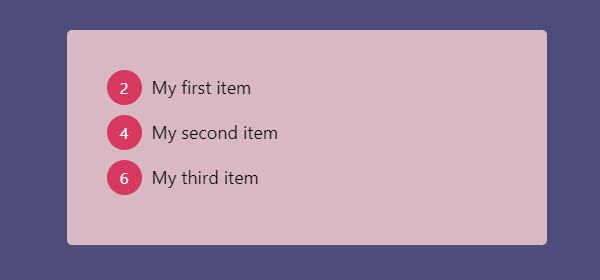
更改增量值
默认情况下,counter-increment 会使计数器的值增加一。就像 counter-reset 一样,你可以定义 counter-increment 属性的偏移值。
在此示例中,counter-reset 将 list-number 设置为 0。每次调用 counter-increment 时,list-number 数值都会增加 2,因此,你将会看到列表序为 2、4 和 6。
div.list {
  counter-reset: list-number;
}
div.list div:before {
  counter-increment: list-number 2;
  // other styles
}
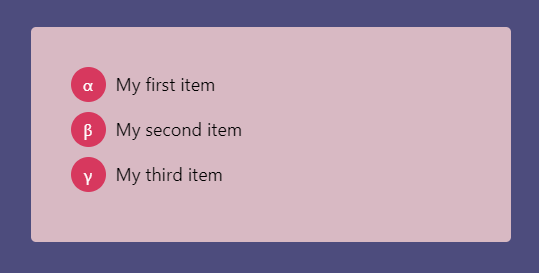
计数器格式
counter() 函数可以有两个参数:counter-name 和 counter-format。对于第二个参数,你可以使用任何有效的列表类型值,包括:
decimal(e.g., 1, 2, 3…)lower-latin(e.g., a, b, c…)lower-roman(e.g., i, ii, iii…)
默认值为数字。
例如,如果你像我一样科学,你可以使用 lower-greek 小写希腊字母作为编号的值。
div.list div:before {
  counter-increment: list-number;
  content: counter(list-number, lower-greek);
  // ... other styles
}
计数器嵌套
使用嵌套订单列表时,始终以这种格式显示编号:
如果您需要子列表项目的数字编号(例如,1.1),您可以使用具有 counters() 功能的 CSS计数器。
<ol>
  <li>
     My First Item
    <ol>
      <li>My Nested First Item</li>
      <li>My Nested Second Item</li>
    </ol>
  </li>
  <li>My Second Item</li>
</ol>
ol {
  list-style-type:none;
  counter-reset:list;
}
ol li:before {
    counter-increment:list;
    content: counters(list, ".") ". ";
}
注意,我们使用的是 counters() 函数,而不是 counter() 函数。
counters() 函数的第二个参数是连接字符串。它还可以有第三个参数来设置格式(例如,希腊数字或罗马数字)。
带标题的嵌套计数器
元素,如 <h1>,<h2> 不嵌套在文档中。它们以不同的元素出现,但仍代表一种层次结构。下面介绍如何将嵌套数字设置到标题中:
body {
  counter-reset:h1;
}
h1 {
  counter-reset:h2;
}
h1:before {
  counter-increment: h1;
  content: counter(h1) ". ";
}
h2:before {
  counter-increment:h2;
  content: counter(h1) "." counter(h2) ". ";
}
每次找到<h1>时,<h2>计数器都会重置。<h2> 在文档中获得的编号和 <h1> 相关。
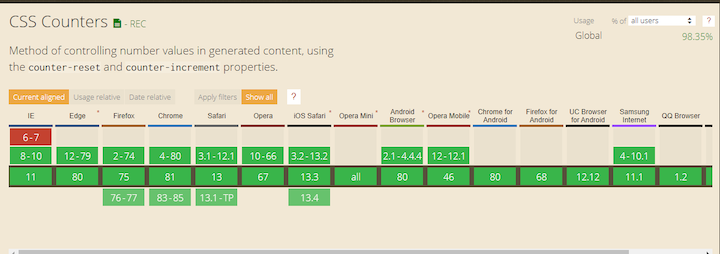
Browser support
值得庆幸的是,CSS 计数器自与 CSS2 一起推出以来,得到了浏览器的广泛支持。虽然在内容以外的属性中使用 counter() 函数仍然是实验性的,但你可以毫不犹豫地执行本教程中涵盖的所有例子。
一个简单挑战
您准备好迎接涉及CSS计数器的简单挑战了吗?
使用 CSS计数器在 10 行代码中显示 1 到 1000 及其罗马字符。
如果你被难倒了,下面是你如何做到这一点:
要创建 1000 个 div 元素,可以使用以下内容。
for (var i = 0; i < 1000; i++) {
  document.body.appendChild( document.createElement("div") );
}
CSS计数器:
body {
  counter-reset:number;
}
div:before {
  counter-increment:number;
  content: counter(number) " => " counter(number, lower-roman);
}
结论
CSS 计数器在 CSS 中是一个鲜为人知的功能,但您会惊讶于它们派上用场的频率。在此教程中,我们讨论了如何以及何时使用 CSS 计数器,并展示了一些示例。
以下是我们使用的属性列表。
| 属性 | 用法 |
|---|---|
| counter-reset | 重置(或创建)给定值计数器(默认0) |
| counter-increment | 通过给定偏移增加给定计数器(默认值 1) |
| counter(counter-name, counter-format) | 从给定格式获取计数器的价值 |
| counters(counter-name, counter-string, counter-format) | 从给定格式获取嵌套计数器的价值 |
CSS计数器 虽然很酷。但有一件事需要明白的是,所有计数器都是全局性的。如果你在一个有很多 CSS 文件的大型项目中使用,你可能无法找到它们的创建、重置和增量位置。不要过度使用它们,一定要使用描述性名称的计数器,以避免冲突。
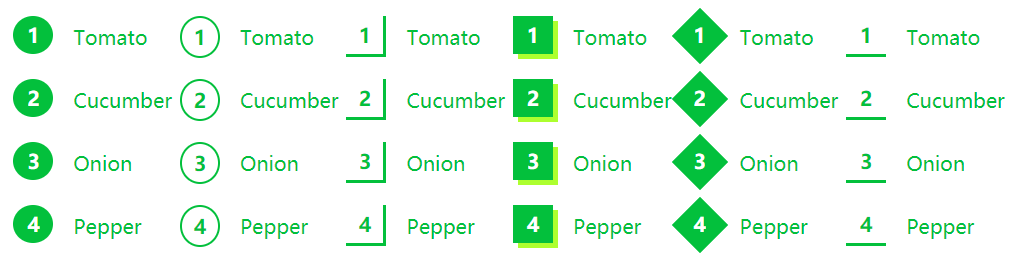
一些实战例子
<!DOCTYPE html>
<html lang="en">
<head>
  <meta charset="UTF-8">
  <meta name="viewport" content="width=device-width, initial-scale=1.0">
  <title>CSS计数器</title>
  <style>
    html {
      box-sizing: border-box;
      font-size: 62.5%;
    }

    *,
    *::before,
    *:after {
      box-sizing: inherit;
    }

    body {
      font-family: Rambla, sans-serif;
      font-size: 2rem;
      line-height: 1.5;
      color: #03c03c;
    }

    h1 {
      text-align: center;
    }

    .wrapper {
      margin: 0 auto;
       85%;
      display: -webkit-box;
      display: -webkit-flex;
      display: -ms-flexbox;
      display: flex;
      -webkit-justify-content: space-around;
      -ms-flex-pack: distribute;
      justify-content: space-around;
    }

    @media (max- 1100px) {
      .wrapper {
        -webkit-box-orient: vertical;
        -webkit-box-direction: normal;
        -webkit-flex-direction: column;
        -ms-flex-direction: column;
        flex-direction: column;
        -webkit-box-align: center;
        -webkit-align-items: center;
        -ms-flex-align: center;
        align-items: center;
      }
    }

    ol {
      counter-reset: li;
      margin: 20px 0;
      padding-left: 0;
    }

    ol>li {
      position: relative;
      margin: 0 0 25px 2em;
      padding: 4px 8px 4px 20px;
      list-style: none;
    }

    ol>li::before {
      content: counter(li);
      counter-increment: li;
      position: absolute;
      top: -2px;
      left: -2em;
       2em;
      margin-right: 8px;
      padding: 4px;
      font-weight: bold;
      text-align: center;
    }

    li ol,
    li ul {
      margin-top: 6px;
    }

    ol ol li:last-child {
      margin-bottom: 0;
    }

    .disc>li::before {
      color: white;
      background-color: #03c03c;
      border-radius: 50%;
    }

    .circle>li::before {
      color: #03c03c;
      border: solid 2px #03c03c;
      border-radius: 50%;
    }

    .angle>li::before {
      color: #03c03c;
      border-right: solid 3px #03c03c;
      border-bottom: solid 3px #03c03c;
    }

    .shadow>li::before {
      color: white;
      background: #03c03c;
      box-shadow: 5px 5px 0 0 greenyellow;
    }

    .rombo>li {
      margin-bottom: 25px;
    }

    .rombo>li::before {
      color: white;
      z-index: 2;
    }

    .rombo>li::after {
      position: absolute;
      top: -2px;
      left: -2em;
       2em;
      margin-right: 8px;
      padding: 4px;
      background-color: #03c03c;
      height: 2em;
      -webkit-transform: rotate(45deg);
      -ms-transform: rotate(45deg);
      transform: rotate(45deg);
      content: '';
      z-index: 1;
    }

    .underline>li::before {
      border-bottom: solid 3px #03c03c;
    }
  </style>
</head>

<body>
  <h1>Styling Ordered List Numbers</h1>
  <div class="wrapper">
    <ol class="disc">
      <li>Tomato</li>
      <li>Cucumber</li>
      <li>Onion</li>
      <li>Pepper</li>
    </ol>
    <ol class="circle">
      <li>Tomato</li>
      <li>Cucumber</li>
      <li>Onion</li>
      <li>Pepper</li>
    </ol>
    <ol class="angle">
      <li>Tomato</li>
      <li>Cucumber</li>
      <li>Onion</li>
      <li>Pepper</li>
    </ol>
    <ol class="shadow">
      <li>Tomato</li>
      <li>Cucumber</li>
      <li>Onion</li>
      <li>Pepper</li>
    </ol>
    <ol class="rombo">
      <li>Tomato</li>
      <li>Cucumber</li>
      <li>Onion</li>
      <li>Pepper</li>
    </ol>
    <ol class="underline">
      <li>Tomato</li>
      <li>Cucumber</li>
      <li>Onion</li>
      <li>Pepper</li>
    </ol>
  </div>
  <a href="https://css-tricks.com/custom-list-number-styling/">更多例子</a>
</body>
</html>
更多优秀案例
https://css-tricks.com/custom-list-number-styling/
文章地址:https://www.cnblogs.com/dragonir/p/14475600.html 作者:dragonir