一:Swagger2 的 maven 依赖
   <!-- swagger2 -->
        <dependency>
            <groupId>io.springfox</groupId>
            <artifactId>springfox-swagger2</artifactId>
            <version>2.9.2</version>
        </dependency>
        <dependency>
            <groupId>io.springfox</groupId>
            <artifactId>springfox-swagger-ui</artifactId>
            <version>2.9.2</version>
        </dependency>
二:Swagger2 的配置
使用 Swagger2 需要进行配置,Spring Boot 中对 Swagger2 的配置非常方便,新建一个配置类,
Swagger2 的配置类上除了添加必要的 @Configuration 注解外,还需要添加 @EnableSwagger2 注解。
package com.example.config;

import com.example.entity.Area;
import org.springframework.context.annotation.Bean;
import org.springframework.context.annotation.Configuration;
import springfox.documentation.builders.ApiInfoBuilder;
import springfox.documentation.builders.PathSelectors;
import springfox.documentation.builders.RequestHandlerSelectors;
import springfox.documentation.service.ApiInfo;
import springfox.documentation.service.Contact;
import springfox.documentation.spi.DocumentationType;
import springfox.documentation.spring.web.plugins.Docket;
import springfox.documentation.swagger2.annotations.EnableSwagger2;

/**
 * @description:
 * @author: tlj
 * @time: 2021/8/25 15:39
 */
@Configuration
@EnableSwagger2
public class SwaggerConfig {
    @Bean
    public Docket createRestApi(){
        return new Docket(DocumentationType.SWAGGER_2)
                // 指定构建api文档的详细信息的方法:apiInfo()
                .apiInfo(apiInfo())
                .select()
                // 指定要生成api接口的包路径,这里把controller作为包路径,生成controller 中的所有接口
                .apis(RequestHandlerSelectors.basePackage("com.example.controller"))
                .paths(PathSelectors.any())
                .build();
    }

    /**
    *  构建api文档的详细信息
    *
    */
    private ApiInfo apiInfo() {
        Area area;
        return new ApiInfoBuilder()
                // 设置页面标题
                .title("拖拉机的接口")
                // 设置接口描述
                .description("学习用")
                // 设置联系方式
                .contact(new Contact("地址","https://www.cnblogs.com/dragon-lan/","xxx@qq.com"))
                // 设置版本
                .version("1.0")
                // 构建
                .build();
    }

}
上面已经配置好了 Swagger2 了。现在可以测试一下配置有没有生效,启动项目,在浏览器中输入localhost:8080/swagger-ui.html ,即可看到 swagger2 的接口页面,如下图所示,说明Swagger2集成成功(注:端口号是自己项目中application.yml中配置的项目的端口号)
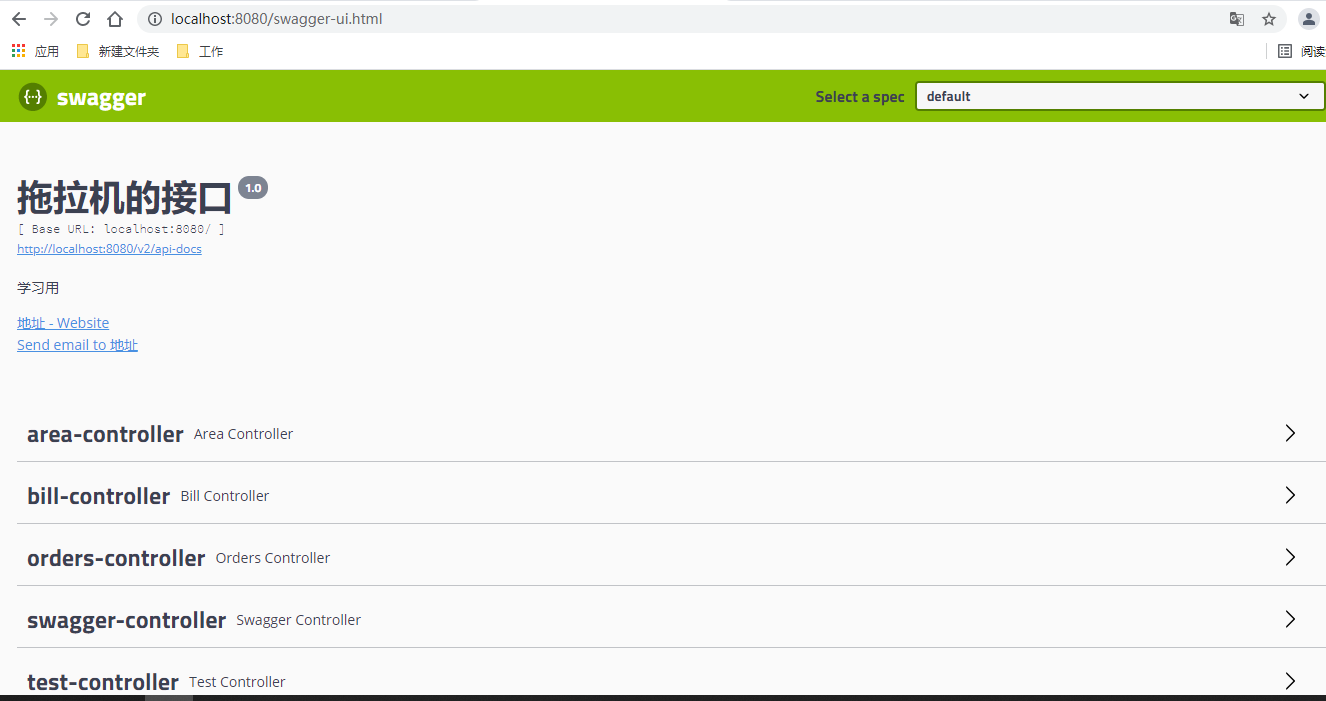
结合该图,对照上面的 Swagger2 配置文件中的配置,可以很明确的知道配置类中每个方法的作用。这样就很容易理解和掌握 Swagger2 中的配置了,也可以看出,其实 Swagger2 配置很简单。
三:Swagger2 的使用
1、实体类注解
package com.example.entity;

import io.swagger.annotations.ApiModel;
import io.swagger.annotations.ApiModelProperty;
import lombok.AllArgsConstructor;
import lombok.Data;
import lombok.NoArgsConstructor;

/**
 * @description:
 * @author: tlj
 * @time: 2021/8/25 15:53
 */
@Data
@AllArgsConstructor
@NoArgsConstructor
@ApiModel(value = "用户实体类")
public class User {
    @ApiModelProperty(value = "用户唯一标识")
    private Long id;

    @ApiModelProperty(value = "用户名")
    private  String username;

    @ApiModelProperty(value = "用户密码")
    private String password;
}
解释下 @ApiModel 和 @ApiModelProperty 注解:
@ApiModel 注解用于实体类,表示对类进行说明,用于参数用实体类接收。
@ApiModelProperty 注解用于类中属性,表示对 model 属性的说明或者数据操作更改。
2、Controller 类中相关注解
package com.example.controller;

import com.example.common.ApiResult;
import com.example.common.ResposeResult;
import com.example.entity.User;
import io.swagger.annotations.Api;
import io.swagger.annotations.ApiOperation;
import io.swagger.annotations.ApiParam;
import org.springframework.web.bind.annotation.*;


/**
 * @description:
 * @author: tlj
 * @time: 2021/8/25 15:57
 */
@RestController
@RequestMapping("/swagger")
@Api(value = "Swagger2 在线接口文档")
public class SwaggerController {

    @GetMapping("/get/{id}")
    @ApiOperation(value = "根据用户标识获取用户信息")
    public ResposeResult getUserInfo(@PathVariable @ApiParam(value = "用户唯一标识") Long id) {
        User user = new User(id, "铁路局", "123456");
        return new ResposeResult(user);
    }

    @PostMapping("/insert")
    @ApiOperation(value = "添加用户信息")
    public ResposeResult insert(@RequestBody @ApiParam(value = "用户信息") User user) {
        return new ResposeResult();
    }
}
我们来学习一下 @Api 、 @ApiOperation 和 @ApiParam 注解。
@Api 注解用于类上,表示标识这个类是 swagger 的资源。
@ApiOperation 注解用于方法,表示一个 http 请求的操作。
@ApiParam 注解用于参数上,用来标明参数信息。
以上是 Swagger 中最常用的5 个注解,接下来运行一下项目工程,在浏览器中输入 localhost:8080/swagger-ui.html 看一下Swagger 页面的接口状态。
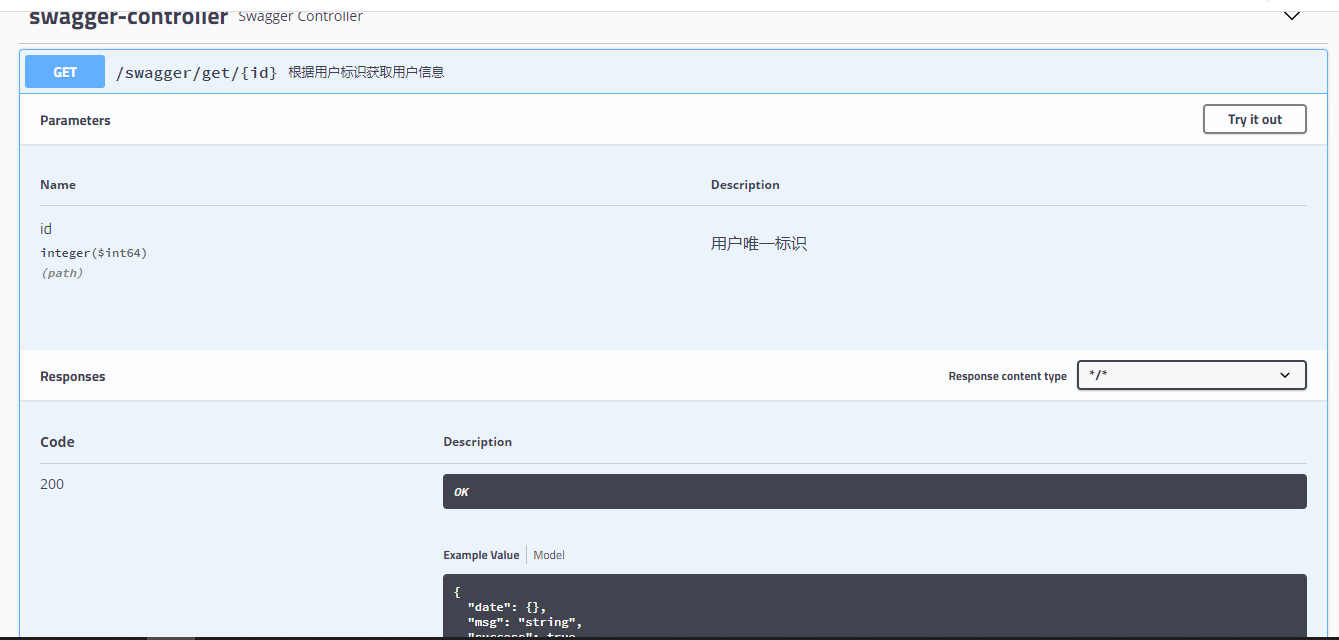
可以看到页面非常详细的显示了类的各个信息
四:完结撒花。。。