Run you first gpio-ps interrupt application
To run a gpio interrupt application, you should set the direction of specified pin and interrupt detect logic. Then route the gpio interrupt to scu gic module. And then route the scu gic to cpu exception table. This is the main plot.
Configure GpioPs module
-
Set the gpio pin as input and disable output enable switch
-
Init gpio ps module:
-
XGpioPs GpioPs;

XGpioPs_Config* pGpioPSCfg;

pGpioPsCfg=XGpioPs_LookupConfig(XPAR_XGPIOPS_0_DEVICE_ID);

XGpioPs_CfgInitialize(&GpioPs,pGpioPsCfg,pGpioPsCfg->BaseAddr);
-
- Disable Output(actually, gpio pin input is always enabled and what you need to do is just disable the output)
XGpioPs_SetOutputEnablePin(&GpioPs,50,0x0) ; //0 to disable output.
-
- Set interrupt detect logic
XGpioPs_SetIntrTypePin(&GpioPs,50,XGPIOPS_IRQ_EDGE_RISING);
- Set interrupt handler
-
- Create a interrupt handler
voidGpioPsHandler(void *CallBackRef, int Bank, u32 Status)

{

    XGpioPs* pGpioPs=(XGpioPs*)CallBackRef;

    pGpioPs->IntrDisablePin(pGpioPs,50);

     xil_printf("GpioPs Handler running…");

    pGpioPs->IntrEnablePin(pGpioPs,50);

}
-
- Connect the handler to gpio module
XGpioPs_SetCallbackHandler(&GpioPs,(void*)&GpioPs,GpioHandler);
As we maybe need to use the function of gpio, so we need to use the instance: GpioPs , that is, transform the parameter as a void pointer:
XGpioPs* pGpioPs=(XGpioPs*)CallBackRef;
-
- Enable Gpio interrupt
XGpioPS_IntrEnablePin(&GpioPs,50);
Configure Scu Gic module
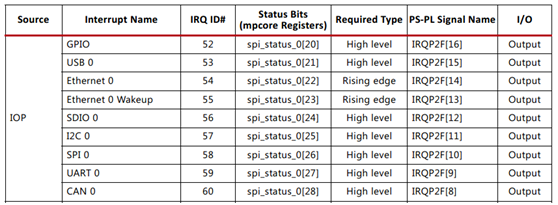
The interrupt ID of gpiops module is #52, so 52 stands for the gpio interrupt.
-
Init a SCU GIC instance
XScuGic ScuGic;

XScuGic_Config* pScuGicCfg;

pScuGicCfg=XScuGic_LookupConfig(XPAR_SCUGIC_SINGLE_DEVICE_ID);

XScuGic_CfgInitialize(&ScuGic,pScuGicCfg,pScuGicCfg->CpuBaseAddress);

XScuGic_Disable(&ScuGic,52);
-
Set the interrupt trigger type
NOTICE: as the each interrupt route to gic module has a fixed interrupt signal, so you need to specifies the trigger types of scu gic module.
The trigger type is different from the gpio interrupt trigger type. The gpio interrupt trigger type is user-specified , but the interrupt signal route to scu gic module is a fixed trigger type. Refer to ug585-zynq-7000-TRM.pdf page 189 for more details:
XScuGic_SetPriorityTriggerType(&ScuGic,52,0xa0,0x01);
The 3th parameter range from 0 to 0xFF, the less , the prior of the interrupt.
The 4th parameter as shown:
|
Software interrupt |
Read only |
0x02 |
|
Private peripheral interrupt |
Read only |
B01 for high level B11 for rising edge |
|
Shared peripheral interrupt |
LSB Read only |
B01 for high level B11 for rising edge |
-
Connect the GpioPs handler to Exception table
XScuGic_Connect(&ScuGic,52,(Xil_ExceptionHandler)XGpioPs_IntrHandler,(void*)&GpioPs);
-
Enable the #52 Interupt in Scu Gic
XScuGic_Enable(&ScuGic,52);
Configure the Exception Table
-
Init the Exception instance
Xil_ExceptionInit();
-
Connect the ScuGic to exception table
Xil_ExceptionRegisterHandler(XIL_EXCEPTION_ID_IRQ_INT,(Xil_ExceptionHandler)XScuGic_IntrruptHandler,&ScuGic);
-
Enable the XIL_EXCEPTION_ID_IRQ_INT exception
Xil_ExceptionEnable();
Now press the Button BTN8 on the Zedboard, just enjoy the message from console!
Remember to configure the STDIO Connection. Otherwise , nothing print as you press.

This is the exciting console print message:
Appendix:
Whole main.c contents:
#include<stdio.h>
#include"platform.h"
#include"xgpiops.h"
#include"xil_exception.h"
#include"xscugic.h"
void GpioPsHandler(void *CallBackRef, int Bank, u32 Status)
{
XGpioPs* pGpioPs=(XGpioPs*)CallBackRef;
XGpioPs_IntrDisablePin(pGpioPs,50);
xil_printf("GpioPs Handler running…");
XGpioPs_IntrEnablePin(pGpioPs,50);
}
int main()
{
init_platform();
XGpioPs GpioPs;
XGpioPs_Config* pGpioPsCfg;
pGpioPsCfg=XGpioPs_LookupConfig(XPAR_XGPIOPS_0_DEVICE_ID);
XGpioPs_CfgInitialize(&GpioPs,pGpioPsCfg,pGpioPsCfg->BaseAddr);
XGpioPs_SetOutputEnablePin(&GpioPs,50,0x0) ;
XGpioPs_SetIntrTypePin(&GpioPs,50,XGPIOPS_IRQ_TYPE_EDGE_RISING);
XGpioPs_SetCallbackHandler(&GpioPs,(void*)&GpioPs,GpioPsHandler);
XGpioPs_IntrEnablePin(&GpioPs,50);
XScuGic ScuGic;
XScuGic_Config* pScuGicCfg;
pScuGicCfg=XScuGic_LookupConfig(XPAR_SCUGIC_SINGLE_DEVICE_ID);
XScuGic_CfgInitialize(&ScuGic,pScuGicCfg,pScuGicCfg->CpuBaseAddress);
XScuGic_Disable(&ScuGic,52);
XScuGic_SetPriorityTriggerType(&ScuGic,52,0xa0,0x01);
XScuGic_Connect(&ScuGic,52,(Xil_ExceptionHandler)XGpioPs_IntrHandler,(void*)&GpioPs);
XScuGic_Enable(&ScuGic,52);
Xil_ExceptionInit();
Xil_ExceptionRegisterHandler(XIL_EXCEPTION_ID_IRQ_INT,(Xil_ExceptionHandler)XScuGic_InterruptHandler,&ScuGic);
Xil_ExceptionEnable();
xil_printf("Gpio interrupt test, press BTN8 on zedboard. ");
while(1)
{
u32 data;
XGpioPs_SetOutputEnablePin(&GpioPs,0x10,0x0);
data=XGpioPs_ReadPin(&GpioPs,0x10);
XGpioPs_SetIntrTypePin(&GpioPs,0x10,XGPIOPS_IRQ_TYPE_EDGE_FALLING);
data=XGpioPs_IntrGetStatus(&GpioPs,1);
XGpioPs_IntrClear(&GpioPs,1,0xFFFFFFFF);
data=XGpioPs_IntrGetStatus(&GpioPs,1);
data=XGpioPs_ReadPin(&GpioPs,0x10);
}
return 0;
}
NOTICE:
I have type some code in the main loop while(1), you can debug into the loop to see the value change of data.
You will notice a existing interrupt pending on the pin 5th. No matter what you configure the pin , the interrupt always occurs.
Why?