在web.xml中配置shiro的filter
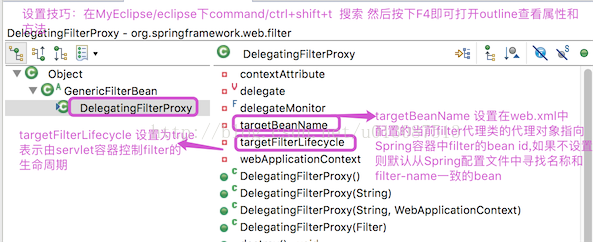
在web系统中,shiro也通过filter进行拦截,filter拦截器后将操作权交给Spring中配置的filterChain(过滤器链),shiro提供很多filter。要使用代理filter类DelegatingFilterProxy
<!-- shiro的filter -->
    <!-- shiro过滤器,DelegatingFilterProxy通过代理模式将Spring容器中的bean和filter关联起来 -->
    <filter>
        <filter-name>shiroFilter</filter-name>
        <filter-class>org.springframework.web.filter.DelegatingFilterProxy</filter-class>
        <!-- 设置targetFilterLifecycle为true 由servlet控制filter生命周期 -->
        <init-param>
            <param-name>targetFilterLifecycle</param-name>
            <param-value>true</param-value>
        </init-param>
        <!-- 设置Spring容器filter的bean id,如果不设置则在Spring注册的bean中查找与filter-name一致的bean -->
        <init-param>
            <param-name>targetBeanName</param-name>
            <param-value>shiroFilter</param-value>
        </init-param>
    </filter>
    <filter-mapping>
        <filter-name>shiroFilter</filter-name>
        <url-pattern>/*</url-pattern>
    </filter-mapping>
applicationContext-shiro.xml
<!-- web.xml中shiro的filter对应的bean -->
<!-- Shiro的web过滤器 -->
<bean id="shiroFilter" class="org.apache.shiro.spring.web.ShiroFilterFactoryBean">
<property name="securityManager" ref="securityManager"/>
<!-- loginUrl认证提交地址,如果没有认证将会请求此地址进行认证,请求此地址将由formAuthenticationFilter进行表单认证 -->
<property name="loginUrl" value="/login.action"/>
<!-- 认证成功统一跳转到first.action,建议不配置,默认情况下,shiro认证成功后自动跳转上一个请求路径 -->
<property name="successUrl" value="/first.action"/>
<!-- 通过unauthorizedUrl 指定没有权限操作时的跳转页面 -->
<property name="unauthorizedUrl" value="/refuse.jsp"/>
<!-- 过滤器链定义,从上向下执行,一般将/**放在最下边 -->
<property name="filterChainDefinitions">
<value>
<!-- 退出拦截,请求logout.action执行退出操作 shiro自动清除Session-->
/logout.action = logout
<!-- 无权访问页面 anon表示可以匿名访问 -->
/refuse.jsp = anon
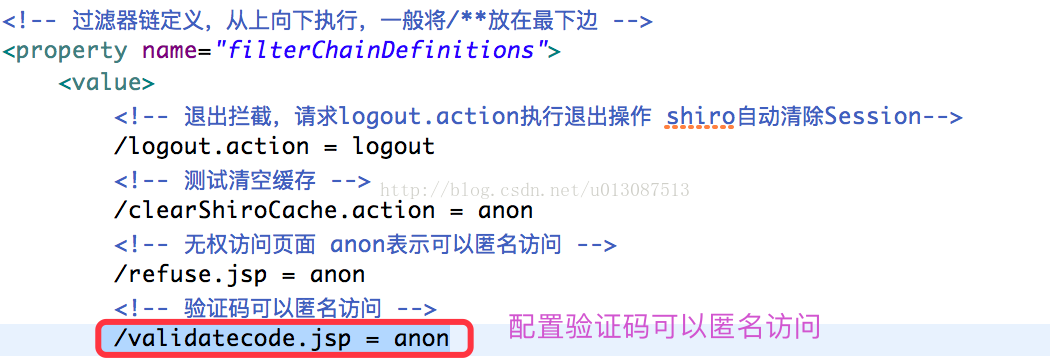
<!-- 验证码可以匿名访问 -->
/validatecode.jsp = anon
<!-- perms[xx] 表示有xx权限才可以访问 -->
/item/queryItem.action = perms[item:query]
/item/editItem.action = perms[item:edit]
<!-- 对静态资源设置匿名访问 -->
/js/** = anon
/images/** = anon
/styles/** = anon
<!-- /** = authc 表示所有的URL都必须认真通过才可以进行访问-->
/** = authc
</value>
</property>
</bean>
<!-- 安全管理器 -->
<bean id="securityManager" class="org.apache.shiro.web.mgt.DefaultWebSecurityManager">
<property name="realm" ref="customRealm" />
</bean>
<!-- 自定义Realm -->
<bean id="customRealm" class="liuxun.ssm.shiro.CustomRealm"/>
第二中加入cas配置------applicationContext-shiro.xml
<?xml version="1.0" encoding="UTF-8"?>
<beans xmlns="http://www.springframework.org/schema/beans"
       xmlns:xsi="http://www.w3.org/2001/XMLSchema-instance"
       xmlns:context="http://www.springframework.org/schema/context"
       xmlns:jdbc="http://www.springframework.org/schema/jdbc"
       xmlns:jee="http://www.springframework.org/schema/jee"
       xmlns:tx="http://www.springframework.org/schema/tx"
       xmlns:aop="http://www.springframework.org/schema/aop"
       xmlns:util="http://www.springframework.org/schema/util"
       xsi:schemaLocation="http://www.springframework.org/schema/beans http://www.springframework.org/schema/beans/spring-beans.xsd
                               http://www.springframework.org/schema/context http://www.springframework.org/schema/context/spring-context.xsd
                               http://www.springframework.org/schema/jdbc http://www.springframework.org/schema/jdbc/spring-jdbc.xsd
                               http://www.springframework.org/schema/jee http://www.springframework.org/schema/jee/spring-jee.xsd

                               http://www.springframework.org/schema/tx http://www.springframework.org/schema/tx/spring-tx.xsd
                               http://www.springframework.org/schema/aop http://www.springframework.org/schema/aop/spring-aop.xsd
                               http://www.springframework.org/schema/util http://www.springframework.org/schema/util/spring-util.xsd http://www.springframework.org/schema/data/elasticsearch http://www.springframework.org/schema/data/elasticsearch/spring-elasticsearch.xsd"
       default-lazy-init="false">
    <description>Shiro公共配置</description>

    <bean id="shiroCasRealm" class="com.dousnl.framework.security.ShiroRealm">
        <property name="cachingEnabled" value="true" />
        <property name="authenticationCachingEnabled" value="true" />
        <property name="authenticationCacheName" value="authenticationCache" />
        <!-- cas  integration start-->
        <!-- 配置cas服务器地址 -->
        <property name="casServerUrlPrefix" value="http://${sso.server.url}/cas" />
        <!-- 客户端的回调地址设置,必须和上面的shiro-cas过滤器casFilter拦截的地址一致 -->
        <property name="casService" value="http://${shxm.server.url}/index/success" />
        <!-- cas integration end-->
        <!-- <property name="userService" ref="userService" />
        <property name="userAuthService" ref="userAuthService" /> -->
    </bean>
    <bean id="casSubjectFactory" class="org.apache.shiro.cas.CasSubjectFactory" />
    <bean id="rememberMeCookie" class="org.apache.shiro.web.servlet.SimpleCookie">
        <constructor-arg value="rememberMe" />
        <property name="httpOnly" value="true" />
        <property name="maxAge" value="604800" /><!-- 保存7天 --><!-- 单位为秒 --><!-- 最小为30分钟 -->
    </bean>
    <!-- rememberMe管理器 -->
    <bean id="rememberMeManager" class="org.apache.shiro.web.mgt.CookieRememberMeManager">
        <property name="cipherKey"
                  value="#{T(org.apache.shiro.codec.Base64).decode('4AvVhmFLUs0KTA3Kprsdag==')}" />
        <property name="cookie" ref="rememberMeCookie" />
    </bean>
    <!-- 会话管理器 -->
    <bean id="sessionManager"
          class="org.apache.shiro.web.session.mgt.ServletContainerSessionManager">
    </bean>
    <!-- 用户授权信息Cache, 采用EhCache -->
    <!-- 缓存管理器 使用Ehcache实现 -->
    <bean id="shiroEhcacheManager" class="org.apache.shiro.cache.ehcache.EhCacheManager">
        <property name="cacheManagerConfigFile" value="classpath:ehcache/ehcache-shiro.xml"/>
    </bean>
    <!-- 安全管理器 -->
    <bean id="securityManager" class="org.apache.shiro.web.mgt.DefaultWebSecurityManager">
        <property name="realm" ref="shiroCasRealm" />
        <!-- 解决sessionid问题  本地化 -->
        <property name="sessionMode" value="native"/>

        <property name="cacheManager" ref="shiroEhcacheManager" />
        <property name="sessionManager" ref="sessionManager" />
        <property name="rememberMeManager" ref="rememberMeManager" />
        <property name="subjectFactory" ref="casSubjectFactory" />
    </bean>

    <!-- shiro-cas登录过滤器 -->
    <bean id="casFilter" class="org.apache.shiro.cas.CasFilter">
        <!-- 配置验证错误时的失败页面 ,这里配置为登录页面 -->
        <property name="failureUrl" value="http://${sso.server.url}/cas/login?service=http://${shxm.server.url}/login" />
    </bean>
    <!-- 退出登录过滤器 -->
    <bean id="logoutFilter" class="org.apache.shiro.web.filter.authc.LogoutFilter">
        <property name="redirectUrl" value="http://${sso.server.url}/cas/logout?service=http://${shxm.server.url}/login" />
    </bean>

    <!-- Shiro生命周期处理器 -->
    <bean id="lifecycleBeanPostProcessor" class="org.apache.shiro.spring.LifecycleBeanPostProcessor" />

    <bean class="org.springframework.beans.factory.config.MethodInvokingFactoryBean">
        <property name="staticMethod" value="org.apache.shiro.SecurityUtils.setSecurityManager" />
        <property name="arguments" ref="securityManager" />
    </bean>

    <!-- 后台配置管理 -->
    <bean id="shiroFilter" class="org.apache.shiro.spring.web.ShiroFilterFactoryBean">
        <property name="securityManager" ref="securityManager" />
        <!-- cas  integration start-->
        <!-- 设定角色的登录链接,这里为cas登录页面的链接可配置回调地址 -->
        <property name="loginUrl" value="http://${sso.server.url}/cas/login?service=http://${shxm.server.url}/index/success" />
        <!-- cas integration end-->
        <property name="successUrl" value="/index/success" />
        <!-- <property name="unauthorizedUrl" value="/admin/unauthorized" /> -->
        <property name="filters">
            <util:map>
                <!-- <entry key="authc" value-ref="captchaAuthenticationFilter" />
                <entry key="logout" value-ref="adminLogoutFilter" />
                <entry key="session" value-ref="onlineSessionFilter" /> -->
                <entry key="casFilter" value-ref="casFilter" />
                <entry key="logout" value-ref="logoutFilter" />
            </util:map>
        </property>
        <property name="filterChainDefinitions">
            <value>
                /index/success = casFilter
                /static/** = anon
                /logout = logout
                /** = user
                <!-- /admin/** =session,user
                /shiro-cas = user
                /fieldDef/** = user
                /mouldClass/** = user
                /mouldConfig/** = user
                /mouldDatil/** = user
                /mouldDef/** = user
                /check/** = user
                /expenseAppForm/** = user
                /reportForm/** = user
                /bzCheckController/** = user -->
            </value>
        </property>
        <!-- spel语言 -->
        <!-- <property name="filterChainDefinitionMap"
                  value="#{filterChainDefinitionService.loadFilterChains()}" /> -->
    </bean>
</beans>
自定义Realm模拟测试
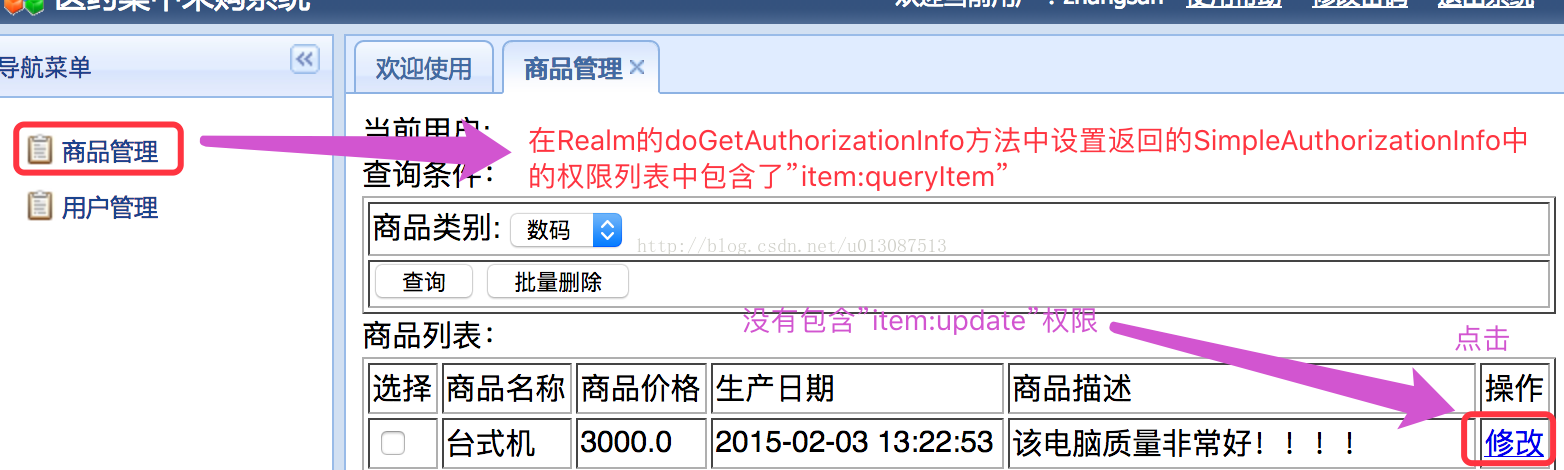
此Realm先不从数据库查询权限数据,当前需要先将shiro整合完成。package liuxun.ssm.shiro; import java.util.ArrayList; import java.util.List; import org.apache.shiro.authc.AuthenticationException; import org.apache.shiro.authc.AuthenticationInfo; import org.apache.shiro.authc.AuthenticationToken; import org.apache.shiro.authc.SimpleAuthenticationInfo; import org.apache.shiro.authc.UsernamePasswordToken; import org.apache.shiro.authz.AuthorizationInfo; import org.apache.shiro.authz.SimpleAuthorizationInfo; import org.apache.shiro.realm.AuthorizingRealm; import org.apache.shiro.subject.PrincipalCollection; import liuxun.ssm.po.ActiveUser; import liuxun.ssm.po.SysPermission; public class CustomRealm extends AuthorizingRealm { // 设置Realm名称 @Override public void setName(String name) { super.setName("CustomRealm"); } // 支持UsernamePasswordToken @Override public boolean supports(AuthenticationToken token) { return token instanceof UsernamePasswordToken; } // 用于认证 @Override protected AuthenticationInfo doGetAuthenticationInfo(AuthenticationToken token) throws AuthenticationException { // 从token中获取用户身份信息 String username = (String) token.getPrincipal(); // 拿着username从数据库中进行查询 // .... // 如果查询不到返回null if (!username.equals("zhangsan")) { return null; } // 获取从数据库查询出来的用户密码 String password = "123"; // 这里使用静态数据进行测试 // 根据用户id从数据库中取出菜单 // ...先使用静态数据 List<SysPermission> menus = new ArrayList<SysPermission>(); SysPermission sysPermission_1 = new SysPermission(); sysPermission_1.setName("商品管理"); sysPermission_1.setUrl("/item/queryItem.action"); SysPermission sysPermission_2 = new SysPermission(); sysPermission_2.setName("用户管理"); sysPermission_2.setUrl("/user/query.action"); menus.add(sysPermission_1); menus.add(sysPermission_2); // 构建用户身份信息 ActiveUser activeUser = new ActiveUser(); activeUser.setUserid(username); activeUser.setUsername(username); activeUser.setUsercode(username); activeUser.setMenus(menus); // 返回认证信息由父类AuthenticationRealm进行认证 SimpleAuthenticationInfo simpleAuthenticationInfo = new SimpleAuthenticationInfo(activeUser, password, this.getName()); return simpleAuthenticationInfo; } // 用于授权 @Override protected AuthorizationInfo doGetAuthorizationInfo(PrincipalCollection principals) { //获取身份信息 ActiveUser activeUser = (ActiveUser) principals.getPrimaryPrincipal(); //用户id String userid = activeUser.getUserid(); // 根据用户id从数据库中查询权限数据 // ...这里使用静态数据模拟 List<String> permissions = new ArrayList<String>(); permissions.add("item:query"); permissions.add("item:update"); //将权限信息封装为AuthorizationInfo SimpleAuthorizationInfo simpleAuthorizationInfo = new SimpleAuthorizationInfo(); //基于资源权限的访问控制 for (String permission : permissions) { simpleAuthorizationInfo.addStringPermission(permission); } // 如果基于角色进行访问控制 // for (String role : roles) { // simpleAuthorizationInfo.addRole(role); // } return simpleAuthorizationInfo; } }
登录
(1) 登录原理
使用FormAuthenticationFilter过滤器实现,原理如下:
当用户没有认证时,请求loginUrl进行认证,用户身份和用户密码提交数据到loginUrl,FormAuthorizationFilter拦截去除request中的username和password(两个参数名称是可以配置的),FormAuthorizationFilter调用Realm传入一个token(username和password),realm认证时根据username查询用户信息(在ActiveUser中存储,包括userid、usercode、username、menus) 如果查询不到,Realm返回null,FormAuthorizationFilter向request域中填充了一个参数"shiroLoginFailure" 记录了异常信息。
(2) 登录页面
由于FormAuthorizationFilter的用户身份和密码的input的默认值(username和password),修改页面中账号和密码的input的name属性为username和password。
(3)控制器登录代码的实现,如下:
---------------------
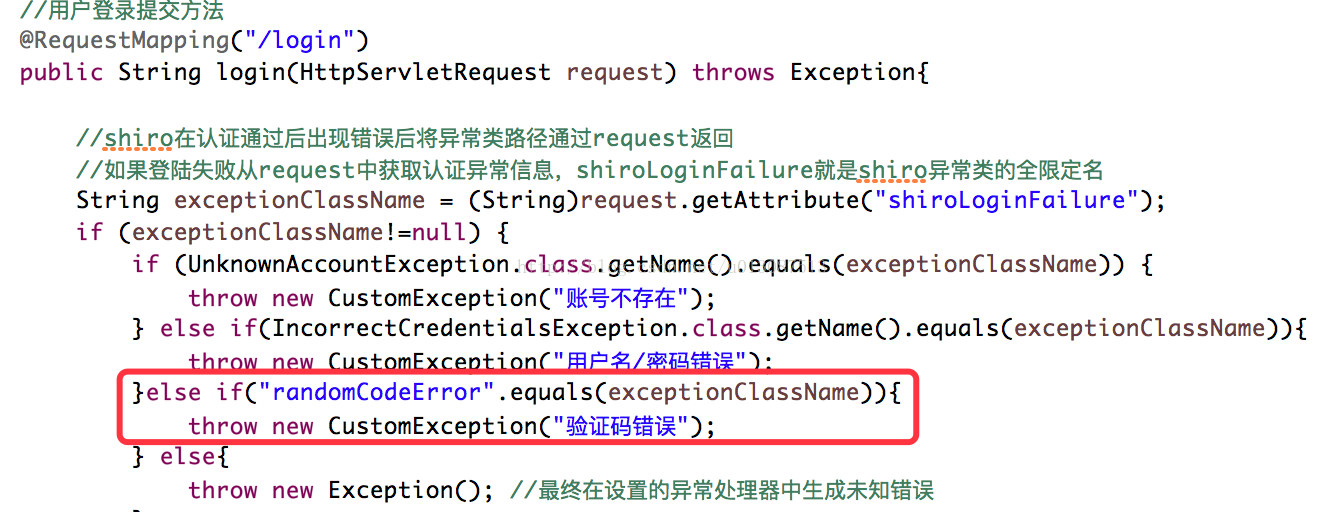
//用户登录提交方法
    @RequestMapping("/login")
    public String login(HttpServletRequest request) throws Exception{

        //shiro在认证通过后出现错误后将异常类路径通过request返回
        //如果登陆失败从request中获取认证异常信息,shiroLoginFailure就是shiro异常类的全限定名
        String exceptionClassName = (String)request.getAttribute("shiroLoginFailure");
        if (exceptionClassName!=null) {
            if (UnknownAccountException.class.getName().equals(exceptionClassName)) {
                throw new CustomException("账号不存在");
            } else if(IncorrectCredentialsException.class.getName().equals(exceptionClassName)){
                throw new CustomException("用户名/密码错误");
            }else {
                throw new Exception(); //最终在设置的异常处理器中生成未知错误
            }
        }
        //此方法不处理登录成功(认证成功)的情况
        //如果登录失败还到login页面
        return "login";
    }
首页
1.认证成功后用户菜单在首页显示(从activeUser获取)//系统首页 @RequestMapping("/first") public String first(Model model)throws Exception{ //主体 Subject subject = SecurityUtils.getSubject(); //身份 ActiveUser activeUser = (ActiveUser) subject.getPrincipal(); model.addAttribute("activeUser", activeUser); return "/first"; }
退出
由于使用shiro的sessionManager,不用开发退出功能,使用shiro的logout拦截器即可。也就是说不用我们去实现退出,只要去访问一个退出的url(该 url是可以不存在),由LogoutFilter拦截住,清除session。所以可以屏蔽退出相关的控制器代码。
<!-- 退出拦截,请求logout.action执行退出操作 -->
/logout.action = logout
无权限页面refuse.jsp
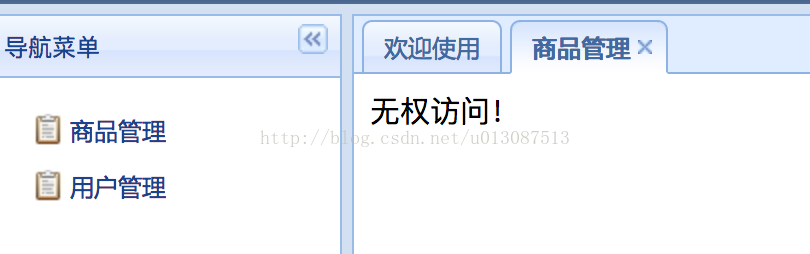
当用户无操作权限,shiro将跳转到refuse.jsp页面。
<!-- 通过unauthorizedUrl 指定没有权限操作时的跳转页面 -->
<property name="unauthorizedUrl" value="/refuse.jsp"/>
授权过滤器测试
使用PermissionsAuthorizationFilter
在applicationContext-shiro.xml中配置url所对应的权限。
测试流程:
1、在applicationContext-shiro.xml中配置filter规则
<!--商品查询需要商品查询权限 -->
/item/queryItem.action = perms[item:query]
2、用户在认证通过后,请求/items/queryItems.action
3、被PermissionsAuthorizationFilter拦截,发现需要“item:query”权限
4、PermissionsAuthorizationFilter调用realm中的doGetAuthorizationInfo获取数据库中正确的权限
5、PermissionsAuthorizationFilter对item:query 和从realm中获取权限进行对比,如果“item:query”在realm返回的权限列表中,授权通过。如果授权失败,跳转到refuse.jsp
页面如下:
--------------------- 
问题总结
1、在applicationContext-shiro.xml中配置过虑器链接,需要将全部的url和权限对应起来进行配置,比较发麻不方便使用。
2、每次授权都需要调用realm查询数据库,对于系统性能有很大影响,可以通过shiro缓存来解决。
shiro过滤器总结
过滤器简称 对应的java类
anon org.apache.shiro.web.filter.authc.AnonymousFilter
authc org.apache.shiro.web.filter.authc.FormAuthenticationFilter
authcBasic org.apache.shiro.web.filter.authc.BasicHttpAuthenticationFilter
perms org.apache.shiro.web.filter.authz.PermissionsAuthorizationFilter
port org.apache.shiro.web.filter.authz.PortFilter
rest org.apache.shiro.web.filter.authz.HttpMethodPermissionFilter
roles org.apache.shiro.web.filter.authz.RolesAuthorizationFilter
ssl org.apache.shiro.web.filter.authz.SslFilter
user org.apache.shiro.web.filter.authc.UserFilter
logout org.apache.shiro.web.filter.authc.LogoutFilter
过滤器配置示例详解:
anon:例如/admins/**=anon 没有参数,表示可以匿名访问。
authc:例如/admins/user/**=authc 表示需要认证(登录)才能使用,FormAuthenticationFilter是表单认证,没有参数。
roles:例如/admins/user/**=roles[admin],参数可以写多个,多个时必须加引号,并且参数之间用逗号隔开,,当有多个参数时,例如/admin/user/**=roles["admin,geust"],每个参数通过才算通过,相当于hasAllRoles()方法。
perms:例如/admins/user/**=perms[user:add:*],参数可以写多个,多个时必须加引号,并且参数之间用逗号分隔,例如/admins/user/**=perms["user:add:*,user:modiffy:*"],当有多个参数时必须每个参数都通过才算通过,相当于isPermittedAll()方法。
rest:例如/admins/user/**=rest[user],根据请求的方法,相当于/admins/user/**=perms[user:method],其中method为post,get,put,delete等 rest 即restful,就是用于对restful风格的设计进行权限管理。
port:例子/admins/user/**=port[8081],当请求的url的端口不是8081是跳转到schemal://serverName:8081?queryString,其中schmal是协议http或https等,serverName是你访问的host,8081是url配置里port的端口,queryString是你访问的url里的?后面的参数。
authcBasic:例如/admins/user/**=authcBasic没有参数表示httpBasic认证
ssl:例子/admins/user/**=ssl没有参数,表示安全的url请求,协议为https
user:例如/admins/user/**=user没有参数表示必须存在用户, 身份认证通过或通过记住我认证通过的可以访问,当登入操作时不做检查
注意:anon、authcBasic、authc、user是认证过滤器,perms、roles、ssl、rest、port是授权过滤器
URL表达式说明:
(1)URL目录是基于HttpServletRequest.getContextPath()此目录设置。
(2)URL可以使用通配符,** 代表任意子目录
(3)shiro验证URL时,URL匹配成功便不再不再继续匹配查找。所以要注意配置文件中的URL顺序,尤其是在使用通配符时。
过滤器链定义说明:
(1)一个URL可以配置多个Filter,使用逗号隔开。
(2)当设置多个过滤器时,全部验证通过,才视为通过。
(3)部分过滤器可以指定参数,如perms、roles
认证
需求
修改realm的doGetAuthenticationInfo方法,从数据库中查询用户,realm返回的用户信息中包括(MD5加密后的串和salt),实现让shiro进行散列串的校验。
添加凭证匹配器
添加凭证匹配器实现MD5加密校验,修改applicationContext-shiro.xml 修改内容如下:
<!-- 自定义Realm -->
    <bean id="customRealm" class="liuxun.ssm.shiro.CustomRealm">
        <!-- 将凭证匹配器设置到realm中,realm按照凭证匹配器的要求进行散列 -->
        <property name="credentialsMatcher" ref="credentialsMatcher"/>
    </bean>

    <!-- 凭证匹配器 -->
    <bean id="credentialsMatcher" class="org.apache.shiro.authc.credential.HashedCredentialsMatcher">
        <property name="hashAlgorithmName" value="md5"/>
        <property name="hashIterations" value="1"/>
    </bean>
修改realm的认证方法
修改realm代码从数据库中查询用户身份信息,将sysService注入realm。
public class CustomRealm extends AuthorizingRealm {
    @Autowired
    private SysService sysService;

    // 设置Realm名称
    @Override
    public void setName(String name) {
        super.setName("CustomRealm");
    }

    // 支持UsernamePasswordToken
    @Override
    public boolean supports(AuthenticationToken token) {
        return token instanceof UsernamePasswordToken;
    }

    // 用于认证(从数据库中查询用户信息)
    @Override
    protected AuthenticationInfo doGetAuthenticationInfo(AuthenticationToken token) throws AuthenticationException {
        // 从token中获取用户身份信息
        String userCode = (String) token.getPrincipal();

        SysUser sysUser = null;
        try {
            sysUser = sysService.findSysUserByUserCode(userCode);
        } catch (Exception e) {
            e.printStackTrace();
        }

        //如果账号不存在则返回null
        if (sysUser == null) {
            return null;
        }

        //根据用户id取出菜单
        List<SysPermission> menus = null;
        try {
            menus = sysService.findMenuListByUserId(sysUser.getId());
        } catch (Exception e) {
            e.printStackTrace();
        }
        //用户密码
        String password = sysUser.getPassword();
        //盐
        String salt = sysUser.getSalt();

        //构建用户身份信息
        ActiveUser activeUser = new ActiveUser();
        activeUser.setUserid(sysUser.getId());
        activeUser.setUsername(sysUser.getUsername());
        activeUser.setUsercode(sysUser.getUsercode());
        activeUser.setMenus(menus);

        //将activeUser设置simpleAuthenticationInfo
        SimpleAuthenticationInfo simpleAuthenticationInfo = new SimpleAuthenticationInfo(activeUser, password,
                ByteSource.Util.bytes(salt), this.getName());
        return simpleAuthenticationInfo;
    }
        ......

}
// 用于授权(从数据库中查询授权信息)
    @Override
    protected AuthorizationInfo doGetAuthorizationInfo(PrincipalCollection principals) {
        //获取身份信息
        ActiveUser activeUser = (ActiveUser) principals.getPrimaryPrincipal();
        //用户id
        String userid = activeUser.getUserid();
        //获取用户权限
        List<SysPermission> permissionsList = null;
        try {
            permissionsList = sysService.findPermissionListByUserId(userid);
        } catch (Exception e) {
            e.printStackTrace();
        }
        //构建shiro授权信息
        SimpleAuthorizationInfo simpleAuthorizationInfo = new SimpleAuthorizationInfo();
        //单独定义一个集合
        List<String> permissions = new ArrayList<String>();
        for (SysPermission sysPermission : permissionsList) {
            //将数据库中的权限标签放入集合
            permissions.add(sysPermission.getPercode());
        }
        simpleAuthorizationInfo.addStringPermissions(permissions);

        return simpleAuthorizationInfo;
    }
对controller开启AOP
在springmvc.xml中配置shiro注解支持,可在controller方法中使用shiro注解配置权限<!-- 开启aop,对类代理 -->
<aop:config proxy-target-class="true"></aop:config>
<!-- 开启shiro注解支持 -->
<bean class="org.apache.shiro.spring.security.interceptor.AuthorizationAttributeSourceAdvisor">
<property name="securityManager" ref="securityManager" />
</bean>
权限注解控制
商品查询的controller方法添加权限(item:query)
// 查询商品列表信息 @RequestMapping("/queryItem") @RequiresPermissions("item:query") public ModelAndView queryItems(HttpServletRequest request) throws Exception {
// 方法返回字符串,字符串就是逻辑视图名,Model作用就是将数据填充到request域,在页面展示 @RequestMapping(value="/editItem",method={RequestMethod.GET}) @RequiresPermissions("item:update") public String editItems(Model model,Integer id) throws Exception{
商品修改提交
// 商品修改提交 // itemsQueryVo是包装类型的pojo @RequestMapping("/editItemSubmit") @RequiresPermissions("item:update") //注意:每个校验pojo的前边必须加@Validated, 每个校验的pojo后边必须加BindingResult接收错误信息 public String editItemSubmit(Model model,Integer id, @Validated(value={ValidGroup1.class}) @ModelAttribute(value="item")ItemsCustom itemsCustom, BindingResult bindingResult, // 上传图片 MultipartFile pictureFile ) throws Exception {
JSP标签控制
shiro标签介绍
Jsp页面添加:
<%@ tagliburi="http://shiro.apache.org/tags" prefix="shiro" %>
标签名称 标签条件(均是显示标签内容)
<shiro:authenticated> 登录之后
<shiro:notAuthenticated> 不在登录状态时
<shiro:guest> 用户在没有RememberMe时
<shiro:user> 用户在RememberMe时
<shiro:hasAnyRoles name="abc,123" > 在有abc或者123角色时
<shiro:hasRole name="abc"> 拥有角色abc
<shiro:lacksRole name="abc"> 没有角色abc
<shiro:hasPermission name="abc"> 拥有权限资源abc
<shiro:lacksPermission name="abc"> 没有abc权限资源
<shiro:principal> 显示用户身份名称
<shiro:principal property="username"/> 显示用户身份中的属性值
jsp页面添加标签
如果有商品修改权限 页面显示"修改链接"
<td>
<!-- 有item:update权限才显示修改链接,没有权限则不显示相当于if(hasPermission(item:update)) -->
<shiro:hasPermission name="item:update">
<a href="${pageContext.request.contextPath }/item/editItem.action?id=${item.id}">修改</a>
</shiro:hasPermission>
</td>
授权测试
(1) 当调用controller的一个方法,由于该 方法加了@RequiresPermissions("item:query") ,shiro调用realm获取数据库中的权限信息,看"item:query"是否在权限数据中存在,如果不存在就拒绝访问,如果存在就授权通过。
(2) 当展示一个jsp页面时,页面中如果遇到<shiro:hasPermission name="item:update">,shiro调用realm获取数据库中的权限信息,看item:update是否在权限数据中存在,如果不存在就拒绝访问,如果存在就授权通过。
问题:只要遇到注解或jsp标签的授权,都会调用realm方法查询数据库,需要使用缓存解决此问题。
shiro缓存
添加Ehcache的jar包

配置cacheManager
<!-- 安全管理器 -->
<bean id="securityManager" class="org.apache.shiro.web.mgt.DefaultWebSecurityManager">
<property name="realm" ref="customRealm" />
<!-- 注入缓存管理器 -->
<property name="cacheManager" ref="cacheManager"/>
</bean>
<!-- 缓存管理器 -->
<bean id="cacheManager" class="org.apache.shiro.cache.ehcache.EhCacheManager">
<property name="cacheManagerConfigFile" value="classpath:shiro-ehcache.xml"/>
</bean>
配置shiro-ehcache.xml
<ehcache xmlns:xsi="http://www.w3.org/2001/XMLSchema-instance" xsi:noNamespaceSchemaLocation="../config/ehcache.xsd"> <!--diskStore:缓存数据持久化的目录 地址 --> <diskStore path="/Users/liuxun/Desktop/ehcache" /> <defaultCache maxElementsInMemory="1000" maxElementsOnDisk="10000000" eternal="false" overflowToDisk="false" diskPersistent="false" timeToIdleSeconds="120" timeToLiveSeconds="120" diskExpiryThreadIntervalSeconds="120" memoryStoreEvictionPolicy="LRU"> </defaultCache> </ehcache>
清空缓存
如果用户正常退出,缓存自动清空。如果用户非正常退出,缓存自动清空。
如果修改了用户的权限,而用户不退出系统,旧的权限数据缓存在服务器,读取仍先从缓存获取权限数据,修改的权限无法立即生效。
需要手动进行编程实现:
在权限修改后调用realm的clearCache方法清除缓存。
下边的代码正常开发时要放在service中调用。
在service中,权限修改后调用realm的方法。
在自定义的Realm中定义clearCached方法
//清空缓存 public void clearCached(){ //清空所有用户的身份缓存信息 PrincipalCollection principals = SecurityUtils.getSubject().getPrincipals(); super.clearCache(principals); }
在权限修改后调用realm中的方法,realm已经由spring管理,所以从spring中获取realm实例,调用clearCached方法。
测试清除缓存controller方法
@Controller public class ClearShiroCache { //注入realm @Autowired private CustomRealm customRealm; @RequestMapping("/clearShiroCache") public String clearShiroCache(){ //清除缓存,如果按照标准写法是在Service中调用customRealm.clearCached(); customRealm.clearCached(); return "success"; } }
session管理
<!-- 安全管理器 -->
<bean id="securityManager" class="org.apache.shiro.web.mgt.DefaultWebSecurityManager">
<property name="realm" ref="customRealm" />
<!-- 注入缓存管理器 -->
<property name="cacheManager" ref="cacheManager"/>
<!-- 注入Session管理器 -->
<property name="sessionManager" ref="sessionManager"/>
</bean>
<!-- 会话管理器 -->
<bean id="sessionManager" class="org.apache.shiro.web.session.mgt.DefaultWebSessionManager">
<!-- Session的失效时长,单位:毫秒 -->
<property name="globalSessionTimeout" value="600000"/>
<!-- 删除失效的Session -->
<property name="deleteInvalidSessions" value="true"/>
</bean>
验证码
思路
shiro使用FormAuthenticationFilter进行表单认证,验证校验的功能应该加在FormAuthenticationFilter中,在认证之前进行验证码校验。
需要写FormAuthenticationFilter的子类,继承FormAuthenticationFilter,改写它的认证方法,在认证之前进行验证码校验。
自定义FormAuthenticationFilter
需要在验证账号和名称之前校验验证码
public class CustomFormAuthenticationFilter extends FormAuthenticationFilter { //原FormAuthenticationFilter的认证方法 @Override protected boolean onAccessDenied(ServletRequest request, ServletResponse response) throws Exception { //在这里进行验证码的校验 //从Session中获取正确的验证码 HttpServletRequest httpServletRequest = (HttpServletRequest) request; HttpSession session = httpServletRequest.getSession(); //取出Session中的验证码(正确的验证码) String validateCode = (String) session.getAttribute("validateCode"); //取出页面的验证码 //输入的验证和session中的验证进行对比 String randomcode = httpServletRequest.getParameter("randomcode"); if(randomcode!=null && validateCode!=null && !randomcode.equals(validateCode)){ //如果校验失败,将验证码错误失败信息,通过shiroLoginFailure设置到request中 httpServletRequest.setAttribute("shiroLoginFailure", "randomCodeError"); //拒绝访问,不再校验账号和密码 return true; } return super.onAccessDenied(request, response); } }
配置FormAuthenticationFilter
修改applicationContext-shiro.xml中对FormAuthenticationFilter的配置<bean id="shiroFilter" class="org.apache.shiro.spring.web.ShiroFilterFactoryBean"> <property name="securityManager" ref="securityManager"/> <!-- loginUrl认证提交地址,如果没有认证将会请求此地址进行认证,请求此地址将由formAuthenticationFilter进行表单认证 --> <property name="loginUrl" value="/login.action"/> <!-- 认证成功统一跳转到first.action,建议不配置,默认情况下,shiro认证成功后自动跳转上一个请求路径 --> <property name="successUrl" value="/first.action"/> <!-- 通过unauthorizedUrl 指定没有权限操作时的跳转页面 --> <property name="unauthorizedUrl" value="/refuse.jsp"/> <!-- 自定义filter配置 --> <property name="filters"> <map> <!-- 将自定义的FormAuthenticationFilter注入shiroFilter --> <entry key="authc" value-ref="authenticationFilter"/> </map> </property> ......
(2)formAuthenticationFilter定义
<!-- 自定义form认证过滤器 -->
<!-- 基于Form表单的身份认证过滤器,即使不配置也会注册此过滤器,表单中的用户账号、密码及loginurl将采用默认值,建议配置 -->
<bean id="authenticationFilter" class="liuxun.ssm.shiro.CustomFormAuthenticationFilter">
<!-- 表单中账号的input名称 -->
<property name="usernameParam" value="username"/>
<!-- 表单中密码的input名称 -->
<property name="passwordParam" value="password"/>
</bean>
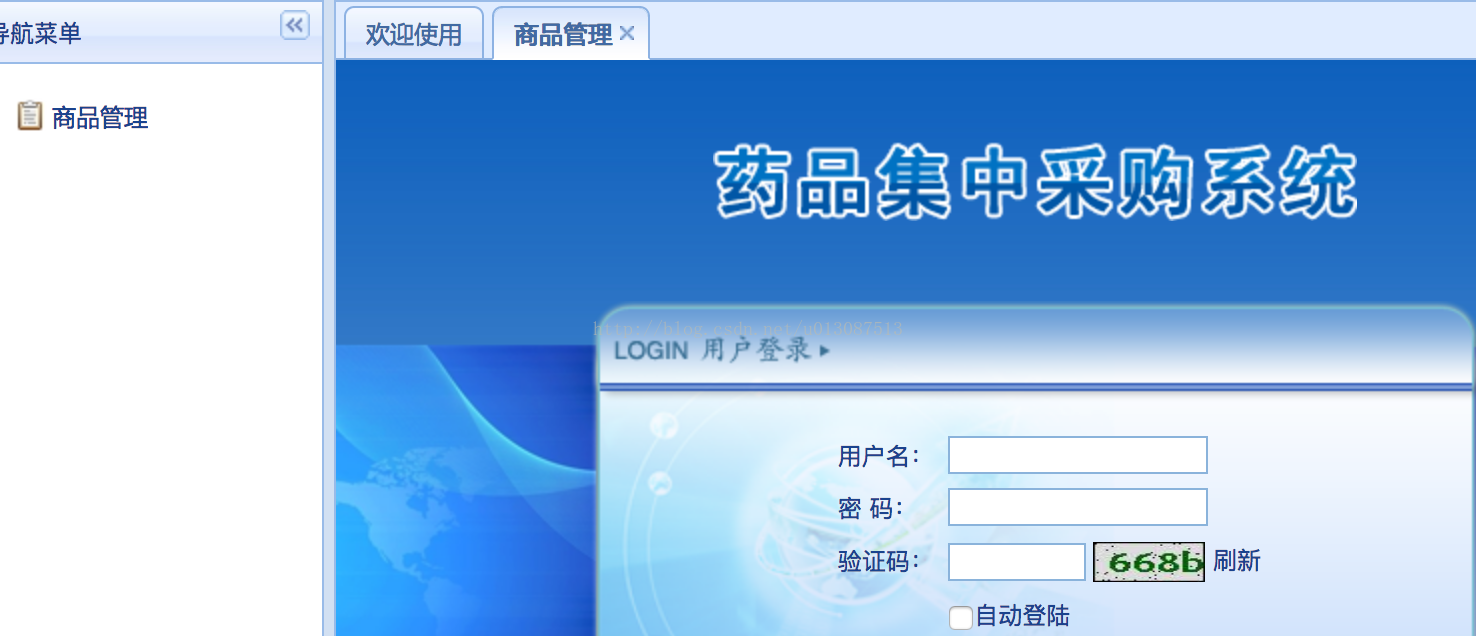
登录页面添加验证码
<TR>
<TD>验证码:</TD>
<TD><input id="randomcode" name="randomcode" size="8" /> <img
id="randomcode_img" src="${baseurl}validatecode.jsp" alt=""
width="56" height="20" align='absMiddle' /> <a
href=javascript:randomcode_refresh()>刷新</a>
</TD>
</TR>
配置validatecode.jsp匿名访问
在login.action对错误信息进行解析
记住我rememberme
用户身份实现Serializable序列化接口
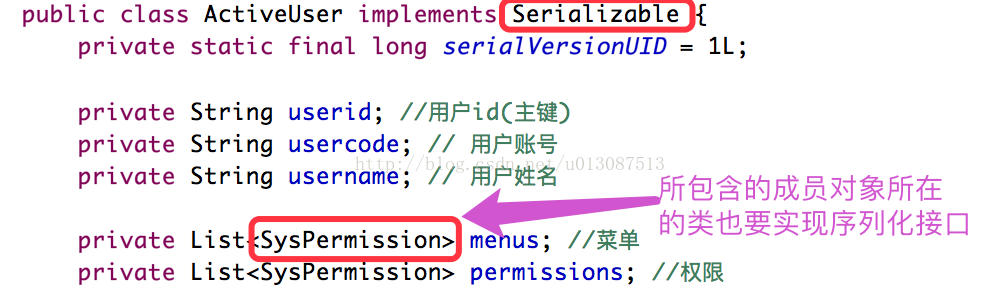
所以还需要将SySPermission类实现序列化接口

配置rememberMeManager
<!-- 安全管理器 -->
<bean id="securityManager" class="org.apache.shiro.web.mgt.DefaultWebSecurityManager">
<property name="realm" ref="customRealm" />
<!-- 注入缓存管理器 -->
<property name="cacheManager" ref="cacheManager"/>
<!-- 注入Session管理器 -->
<property name="sessionManager" ref="sessionManager"/>
<!-- 注入rememberMe管理器 -->
<property name="rememberMeManager" ref="rememberMeManager"/>
</bean>
<!-- rememberMeManager管理器,写cookie,取出cookie生成用户信息 -->
<bean id="rememberMeManager" class="org.apache.shiro.web.mgt.CookieRememberMeManager">
<property name="cookie" ref="rememberMeCookie"/>
</bean>
<!-- 记住我cookie -->
<bean id="rememberMeCookie" class="org.apache.shiro.web.servlet.SimpleCookie">
<!-- rememberMe是cookie的名称 -->
<constructor-arg value="rememberMe"/>
<!-- 记住我cookie的有效时间是30天 30*24*60*60 单位是秒 -->
<property name="maxAge" value="2592000"></property>
</bean>
FormAuthenticationFilter配置rememberMe
修改formAuthenticationFitler添加页面中“记住我checkbox”的input名称
<!-- 自定义form认证过滤器 -->
<!-- 基于Form表单的身份认证过滤器,即使不配置也会注册此过滤器,表单中的用户账号、密码及loginurl将采用默认值,建议配置 -->
<bean id="authenticationFilter" class="liuxun.ssm.shiro.CustomFormAuthenticationFilter">
<!-- 表单中账号的input名称 -->
<property name="usernameParam" value="username"/>
<!-- 表单中密码的input名称 -->
<property name="passwordParam" value="password"/>
<!-- 记住我input的名称 -->
<property name="rememberMeParam" value="rememberMe"/>
</bean>
登录页面加rememberMe组件
在login.jsp中添加"记住我"checkbox
<tr>
<TD></TD>
<td><input type="checkbox" name="rememberMe" />自动登陆</td>
</tr>
使用UserFilter
如果设置记住我,下次访问某些URL时可以不用登陆,将记住我即可访问的地址配置让UserFilter拦截。(因为用户身份信息已经存储在名称为rememberMe的cookie中,凡是需要身份认证才能访问的url都可以添加user配置)
注意:
user和authc过滤器的区别
user可以说是针对rememberMe来使用的,当为非匿名访问的某地址配置了user过滤器,那么通过rememberMe不通过登录认证也可直接访问,凡是没有配置user过滤器的URL,即使配置了rememberMe功能也必须通过登录认证才能访问,当然可以匿名访问的除外。/**=user 表示所有的地址都可通过rememberMe功能进行访问。
authc 表示通过身份信息认证的地址(包括rememberMe或登录实现认证)都可进行访问,范围更广。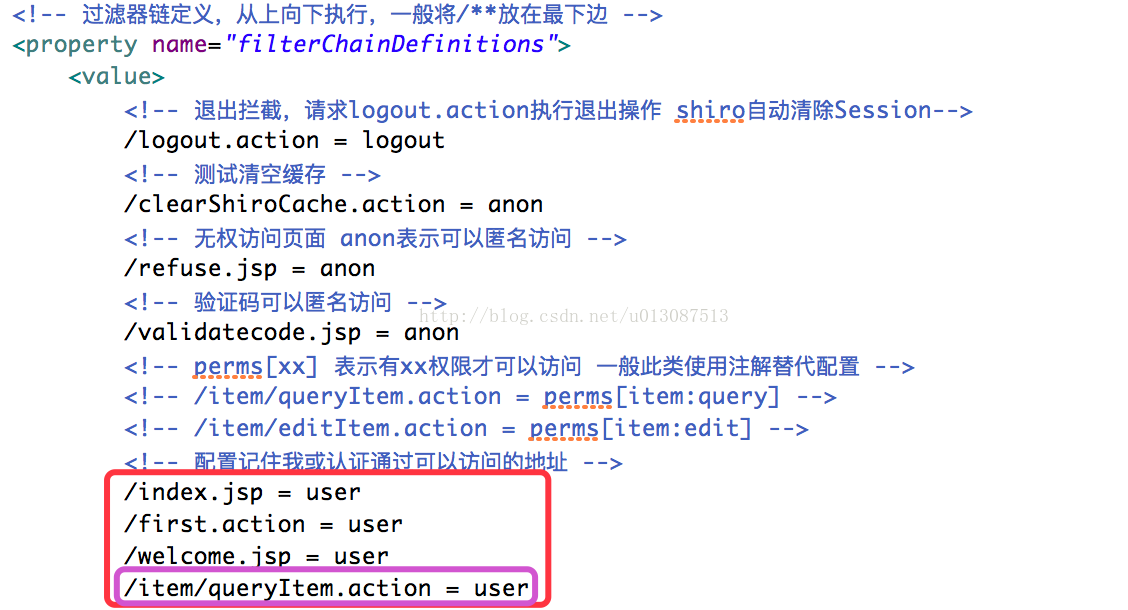
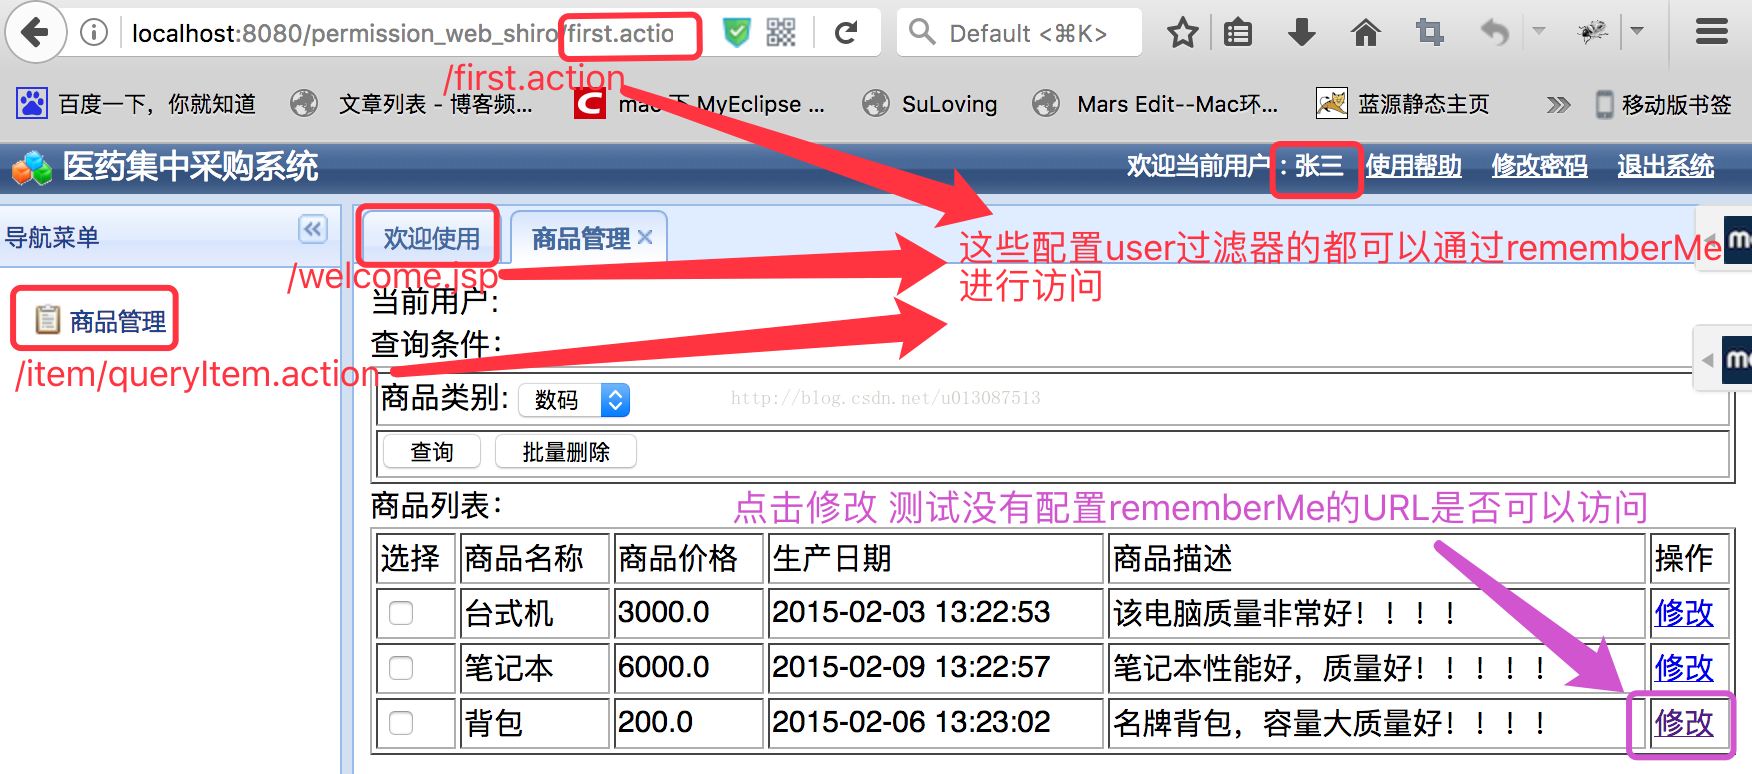
点击修改后效果如下:

再重新关闭浏览器 重新打开 可以发现商品的所有链接都可以通过rememberMe进行访问了

项目代码

<?xml version="1.0" encoding="UTF-8"?> <web-app xmlns:xsi="http://www.w3.org/2001/XMLSchema-instance" xmlns="http://java.sun.com/xml/ns/javaee" xmlns:web="http://java.sun.com/xml/ns/javaee/web-app_2_5.xsd" xsi:schemaLocation="http://java.sun.com/xml/ns/javaee http://java.sun.com/xml/ns/javaee/web-app_2_5.xsd" id="WebApp_ID" version="2.5"> <display-name>springmvc_mybatis_1</display-name> <!-- 配置Spring容器监听器 --> <context-param> <param-name>contextConfigLocation</param-name> <param-value>classpath:spring/applicationContext-*.xml</param-value> </context-param> <listener> <listener-class>org.springframework.web.context.ContextLoaderListener</listener-class> </listener> <!-- 前端控制器 --> <servlet> <servlet-name>springmvc</servlet-name> <servlet-class>org.springframework.web.servlet.DispatcherServlet</servlet-class> <!-- 加载springmvc配置 --> <init-param> <param-name>contextConfigLocation</param-name> <!-- 配置文件的地址 如果不配置contextConfigLocation, 默认查找的配置文件名称classpath下的:servlet名称+"-serlvet.xml" 即:springmvc-serlvet.xml --> <param-value>classpath:spring/springmvc.xml</param-value> </init-param> </servlet> <servlet-mapping> <servlet-name>springmvc</servlet-name> <!-- 可以配置/ ,此工程 所有请求全部由springmvc解析,此种方式可以实现 RESTful方式,需要特殊处理对静态文件的解析不能由springmvc解析 可以配置*.do或*.action,所有请求的url扩展名为.do或.action由springmvc解析,此种方法常用 不可以/*,如果配置/*,返回jsp也由springmvc解析,这是不对的。 --> <url-pattern>*.action</url-pattern> </servlet-mapping> <!-- shiro的filter --> <!-- shiro过滤器,DelegatingFilterProxy通过代理模式将Spring容器中的bean和filter关联起来 --> <filter> <filter-name>shiroFilter</filter-name> <filter-class>org.springframework.web.filter.DelegatingFilterProxy</filter-class> <!-- 设置targetFilterLifecycle为true 由servlet控制filter生命周期 --> <init-param> <param-name>targetFilterLifecycle</param-name> <param-value>true</param-value> </init-param> <!-- 设置Spring容器filter的bean id,如果不设置则在Spring注册的bean中查找与filter-name一致的bean --> <init-param> <param-name>targetBeanName</param-name> <param-value>shiroFilter</param-value> </init-param> </filter> <filter-mapping> <filter-name>shiroFilter</filter-name> <url-pattern>/*</url-pattern> </filter-mapping> <!-- post乱码处理 --> <filter> <filter-name>CharacterEncodingFilter</filter-name> <filter-class>org.springframework.web.filter.CharacterEncodingFilter</filter-class> <init-param> <param-name>encoding</param-name> <param-value>utf-8</param-value> </init-param> </filter> <filter-mapping> <filter-name>CharacterEncodingFilter</filter-name> <url-pattern>/*</url-pattern> </filter-mapping> <welcome-file-list> <welcome-file>index.html</welcome-file> <welcome-file>index.htm</welcome-file> <welcome-file>index.jsp</welcome-file> <welcome-file>default.html</welcome-file> <welcome-file>default.htm</welcome-file> <welcome-file>default.jsp</welcome-file> </welcome-file-list> </web-app>
applicationContext-shiro.xml
<?xml version="1.0" encoding="UTF-8"?> <beans xmlns="http://www.springframework.org/schema/beans" xmlns:xsi="http://www.w3.org/2001/XMLSchema-instance" xmlns:mvc="http://www.springframework.org/schema/mvc" xmlns:context="http://www.springframework.org/schema/context" xmlns:aop="http://www.springframework.org/schema/aop" xmlns:tx="http://www.springframework.org/schema/tx" xsi:schemaLocation="http://www.springframework.org/schema/beans http://www.springframework.org/schema/beans/spring-beans-3.2.xsd http://www.springframework.org/schema/mvc http://www.springframework.org/schema/mvc/spring-mvc-3.2.xsd http://www.springframework.org/schema/context http://www.springframework.org/schema/context/spring-context-3.2.xsd http://www.springframework.org/schema/aop http://www.springframework.org/schema/aop/spring-aop-3.2.xsd http://www.springframework.org/schema/tx http://www.springframework.org/schema/tx/spring-tx-3.2.xsd "> <!-- web.xml中shiro的filter对应的bean --> <!-- Shiro的web过滤器 --> <bean id="shiroFilter" class="org.apache.shiro.spring.web.ShiroFilterFactoryBean"> <property name="securityManager" ref="securityManager"/> <!-- loginUrl认证提交地址,如果没有认证将会请求此地址进行认证,请求此地址将由formAuthenticationFilter进行表单认证 --> <property name="loginUrl" value="/login.action"/> <!-- 认证成功统一跳转到first.action,建议不配置,默认情况下,shiro认证成功后自动跳转上一个请求路径 --> <property name="successUrl" value="/first.action"/> <!-- 通过unauthorizedUrl 指定没有权限操作时的跳转页面 --> <property name="unauthorizedUrl" value="/refuse.jsp"/> <!-- 自定义filter配置 --> <property name="filters"> <map> <!-- 将自定义的FormAuthenticationFilter注入shiroFilter --> <entry key="authc" value-ref="authenticationFilter"/> </map> </property> <!-- 过滤器链定义,从上向下执行,一般将/**放在最下边 --> <property name="filterChainDefinitions"> <value> <!-- 退出拦截,请求logout.action执行退出操作 shiro自动清除Session--> /logout.action = logout <!-- 测试清空缓存 --> /clearShiroCache.action = anon <!-- 无权访问页面 anon表示可以匿名访问 --> /refuse.jsp = anon <!-- 验证码可以匿名访问 --> /validatecode.jsp = anon <!-- perms[xx] 表示有xx权限才可以访问 一般此类使用注解替代配置 --> <!-- /item/queryItem.action = perms[item:query] --> <!-- /item/editItem.action = perms[item:edit] --> <!-- 配置记住我或认证通过可以访问的地址 --> /index.jsp = user /first.action = user /welcome.jsp = user <!-- /item/queryItem.action = user --> /item/** = user <!-- 对静态资源设置匿名访问 --> /js/** = anon /images/** = anon /styles/** = anon <!-- /** = authc 表示所有的URL都必须认真通过才可以进行访问--> /** = authc </value> </property> </bean> <!-- 安全管理器 --> <bean id="securityManager" class="org.apache.shiro.web.mgt.DefaultWebSecurityManager"> <property name="realm" ref="customRealm" /> <!-- 注入缓存管理器 --> <property name="cacheManager" ref="cacheManager"/> <!-- 注入Session管理器 --> <property name="sessionManager" ref="sessionManager"/> <!-- 注入rememberMe管理器 --> <property name="rememberMeManager" ref="rememberMeManager"/> </bean> <!-- 自定义Realm --> <bean id="customRealm" class="liuxun.ssm.shiro.CustomRealm"> <!-- 将凭证匹配器设置到realm中,realm按照凭证匹配器的要求进行散列 --> <property name="credentialsMatcher" ref="credentialsMatcher"/> </bean> <!-- 凭证匹配器 --> <bean id="credentialsMatcher" class="org.apache.shiro.authc.credential.HashedCredentialsMatcher"> <property name="hashAlgorithmName" value="md5"/> <property name="hashIterations" value="1"/> </bean> <!-- 缓存管理器 --> <bean id="cacheManager" class="org.apache.shiro.cache.ehcache.EhCacheManager"> <property name="cacheManagerConfigFile" value="classpath:shiro-ehcache.xml"/> </bean> <!-- 会话管理器 --> <bean id="sessionManager" class="org.apache.shiro.web.session.mgt.DefaultWebSessionManager"> <!-- Session的失效时长,单位:毫秒 --> <property name="globalSessionTimeout" value="600000"/> <!-- 删除失效的Session --> <property name="deleteInvalidSessions" value="true"/> </bean> <!-- 自定义form认证过滤器 --> <!-- 基于Form表单的身份认证过滤器,即使不配置也会注册此过滤器,表单中的用户账号、密码及loginurl将采用默认值,建议配置 --> <bean id="authenticationFilter" class="liuxun.ssm.shiro.CustomFormAuthenticationFilter"> <!-- 表单中账号的input名称 --> <property name="usernameParam" value="username"/> <!-- 表单中密码的input名称 --> <property name="passwordParam" value="password"/> <!-- 记住我input的名称 --> <property name="rememberMeParam" value="rememberMe"/> </bean> <!-- rememberMeManager管理器,写cookie,取出cookie生成用户信息 --> <bean id="rememberMeManager" class="org.apache.shiro.web.mgt.CookieRememberMeManager"> <property name="cookie" ref="rememberMeCookie"/> </bean> <!-- 记住我cookie --> <bean id="rememberMeCookie" class="org.apache.shiro.web.servlet.SimpleCookie"> <!-- rememberMe是cookie的名称 --> <constructor-arg value="rememberMe"/> <!-- 记住我cookie的有效时间是30天 30*24*60*60 单位是秒 --> <property name="maxAge" value="2592000"></property> </bean> </beans>
springmvc.xml中设计shiro注解的配置如下:
<!-- 开启aop,对类代理 -->
    <aop:config proxy-target-class="true"></aop:config>
    <!-- 开启shiro注解支持 -->
    <bean class="org.apache.shiro.spring.security.interceptor.AuthorizationAttributeSourceAdvisor">
        <property name="securityManager" ref="securityManager" />
    </bean>
shiro-ehcache.xml
<ehcache xmlns:xsi="http://www.w3.org/2001/XMLSchema-instance"
    xsi:noNamespaceSchemaLocation="../config/ehcache.xsd">
    <!--diskStore:缓存数据持久化的目录 地址  -->
    <diskStore path="/Users/liuxun/Desktop/ehcache" />
    <defaultCache
        maxElementsInMemory="1000"
        maxElementsOnDisk="10000000"
        eternal="false"
        overflowToDisk="true"
        diskPersistent="false"
        timeToIdleSeconds="120"
        timeToLiveSeconds="120"
        diskExpiryThreadIntervalSeconds="120"
        memoryStoreEvictionPolicy="LRU">
    </defaultCache>
</ehcache>
CustomRealm.java
package liuxun.ssm.shiro;

import java.util.ArrayList;
import java.util.List;

import org.apache.shiro.SecurityUtils;
import org.apache.shiro.authc.AuthenticationException;
import org.apache.shiro.authc.AuthenticationInfo;
import org.apache.shiro.authc.AuthenticationToken;
import org.apache.shiro.authc.SimpleAuthenticationInfo;
import org.apache.shiro.authc.UsernamePasswordToken;
import org.apache.shiro.authz.AuthorizationInfo;
import org.apache.shiro.authz.SimpleAuthorizationInfo;
import org.apache.shiro.cache.CacheManager;
import org.apache.shiro.realm.AuthorizingRealm;
import org.apache.shiro.subject.PrincipalCollection;
import org.apache.shiro.util.ByteSource;
import org.springframework.beans.factory.annotation.Autowired;

import liuxun.ssm.po.ActiveUser;
import liuxun.ssm.po.SysPermission;
import liuxun.ssm.po.SysUser;
import liuxun.ssm.service.SysService;

public class CustomRealm extends AuthorizingRealm {
    @Autowired
    private SysService sysService;

    // 设置Realm名称
    @Override
    public void setName(String name) {
        super.setName("CustomRealm");
    }

    // 支持UsernamePasswordToken
    @Override
    public boolean supports(AuthenticationToken token) {
        return token instanceof UsernamePasswordToken;
    }

    // 用于认证(使用静态数据模拟测试)
    /**@Override
    protected AuthenticationInfo doGetAuthenticationInfo(AuthenticationToken token) throws AuthenticationException {
        // 从token中获取用户身份信息
        String username = (String) token.getPrincipal();
        // 拿着username从数据库中进行查询
        // ....
        // 如果查询不到返回null
        if (!username.equals("zhangsan")) {
            return null;
        }
        // 获取从数据库查询出来的用户密码
        String password = "123"; // 这里使用静态数据进行测试
        // 根据用户id从数据库中取出菜单
        // ...先使用静态数据
        List<SysPermission> menus = new ArrayList<SysPermission>();
        SysPermission sysPermission_1 = new SysPermission();
        sysPermission_1.setName("商品管理");
        sysPermission_1.setUrl("/item/queryItem.action");
        SysPermission sysPermission_2 = new SysPermission();
        sysPermission_2.setName("用户管理");
        sysPermission_2.setUrl("/user/query.action");
        menus.add(sysPermission_1);
        menus.add(sysPermission_2);
        // 构建用户身份信息
        ActiveUser activeUser = new ActiveUser();
        activeUser.setUserid(username);
        activeUser.setUsername(username);
        activeUser.setUsercode(username);
        activeUser.setMenus(menus);
        // 返回认证信息由父类AuthenticationRealm进行认证
        SimpleAuthenticationInfo simpleAuthenticationInfo = new SimpleAuthenticationInfo(activeUser, password,
                this.getName());
        return simpleAuthenticationInfo;
    }
    // 用于授权(使用静态数据进行测试)
    @Override
    protected AuthorizationInfo doGetAuthorizationInfo(PrincipalCollection principals) {
        //获取身份信息
        ActiveUser activeUser = (ActiveUser) principals.getPrimaryPrincipal();
        //用户id
        String userid = activeUser.getUserid();
        // 根据用户id从数据库中查询权限数据
        // ...这里使用静态数据模拟
        List<String> permissions = new ArrayList<String>();
        permissions.add("item:query");
        permissions.add("item:update");

        //将权限信息封装为AuthorizationInfo
        SimpleAuthorizationInfo simpleAuthorizationInfo = new SimpleAuthorizationInfo();
        //基于资源权限的访问控制
        for (String permission : permissions) {
            simpleAuthorizationInfo.addStringPermission(permission);
        }
        // 如果基于角色进行访问控制
        // for (String role : roles) {
        // simpleAuthorizationInfo.addRole(role);
        // }

        return simpleAuthorizationInfo;
    }
    **/
    // 用于认证(从数据库中查询用户信息)
    @Override
    protected AuthenticationInfo doGetAuthenticationInfo(AuthenticationToken token) throws AuthenticationException {
        // 从token中获取用户身份信息
        String userCode = (String) token.getPrincipal();

        SysUser sysUser = null;
        try {
            sysUser = sysService.findSysUserByUserCode(userCode);
        } catch (Exception e) {
            e.printStackTrace();
        }

        //如果账号不存在则返回null
        if (sysUser == null) {
            return null;
        }

        //根据用户id取出菜单
        List<SysPermission> menus = null;
        try {
            menus = sysService.findMenuListByUserId(sysUser.getId());
        } catch (Exception e) {
            e.printStackTrace();
        }
        //用户密码
        String password = sysUser.getPassword();
        //盐
        String salt = sysUser.getSalt();

        //构建用户身份信息
        ActiveUser activeUser = new ActiveUser();
        activeUser.setUserid(sysUser.getId());
        activeUser.setUsername(sysUser.getUsername());
        activeUser.setUsercode(sysUser.getUsercode());
        activeUser.setMenus(menus);

        //将activeUser设置simpleAuthenticationInfo
        SimpleAuthenticationInfo simpleAuthenticationInfo = new SimpleAuthenticationInfo(activeUser, password,
                ByteSource.Util.bytes(salt), this.getName());
        return simpleAuthenticationInfo;
    }

    // 用于授权(从数据库中查询授权信息)
    @Override
    protected AuthorizationInfo doGetAuthorizationInfo(PrincipalCollection principals) {
        //获取身份信息
        ActiveUser activeUser = (ActiveUser) principals.getPrimaryPrincipal();
        //用户id
        String userid = activeUser.getUserid();
        //获取用户权限
        List<SysPermission> permissionsList = null;
        try {
            permissionsList = sysService.findPermissionListByUserId(userid);
        } catch (Exception e) {
            e.printStackTrace();
        }
        //构建shiro授权信息
        SimpleAuthorizationInfo simpleAuthorizationInfo = new SimpleAuthorizationInfo();
        //单独定义一个集合
        List<String> permissions = new ArrayList<String>();
        for (SysPermission sysPermission : permissionsList) {
            //将数据库中的权限标签放入集合
            permissions.add(sysPermission.getPercode());
        }
        simpleAuthorizationInfo.addStringPermissions(permissions);

        return simpleAuthorizationInfo;
    }

    //清除用户的授权信息


    //清空缓
    public void clearCached(){
        //清空所有用户的身份缓存信息
        PrincipalCollection principals = SecurityUtils.getSubject().getPrincipals();
        super.clearCache(principals);
    }

}
CustomFormAuthenticationFilter.java
package liuxun.ssm.shiro;

import javax.servlet.ServletRequest;
import javax.servlet.ServletResponse;
import javax.servlet.http.HttpServletRequest;
import javax.servlet.http.HttpSession;

import org.apache.shiro.web.filter.authc.FormAuthenticationFilter;
/**
 * 认证之前实现验证码校验
 * @author liuxun
 *
 */
public class CustomFormAuthenticationFilter extends FormAuthenticationFilter {

    //原FormAuthenticationFilter的认证方法
    @Override
    protected boolean onAccessDenied(ServletRequest request, ServletResponse response) throws Exception {
        //在这里进行验证码的校验

        //从Session中获取正确的验证码
        HttpServletRequest httpServletRequest = (HttpServletRequest) request;
        HttpSession session = httpServletRequest.getSession();
        //取出Session中的验证码(正确的验证码)
        String validateCode = (String) session.getAttribute("validateCode");

        //取出页面的验证码
        //输入的验证和session中的验证进行对比
        String randomcode = httpServletRequest.getParameter("randomcode");
        if(randomcode!=null && validateCode!=null && !randomcode.equals(validateCode)){
            //如果校验失败,将验证码错误失败信息,通过shiroLoginFailure设置到request中
            httpServletRequest.setAttribute("shiroLoginFailure", "randomCodeError");
            //拒绝访问,不再校验账号和密码
            return true;
        }
        return super.onAccessDenied(request, response);
    }

}
LoginController.java
package liuxun.ssm.controller;

import javax.servlet.http.HttpServletRequest;
import javax.servlet.http.HttpSession;

import org.apache.shiro.authc.IncorrectCredentialsException;
import org.apache.shiro.authc.UnknownAccountException;
import org.springframework.beans.factory.annotation.Autowired;
import org.springframework.stereotype.Controller;
import org.springframework.web.bind.annotation.RequestMapping;

import liuxun.ssm.exception.CustomException;
import liuxun.ssm.po.ActiveUser;
import liuxun.ssm.service.SysService;

/**
 * 登录和退出
 * @author liuxun
 *
 */
@Controller
public class LoginController {
    @Autowired
    private SysService sysService;

    //用户登录提交方法
    /*@RequestMapping("/login")
    public String login(HttpSession session,String randomcode,String usercode,String password) throws Exception{
        // 校验验证码,防止恶性攻击
        // 从Session中获取正确的验证码
        String validateCode = (String) session.getAttribute("validateCode");

        //输入的验证码和Session中的验证码进行对比
        if (!randomcode.equalsIgnoreCase(validateCode)) {
            //抛出异常
            throw new CustomException("验证码输入错误");
        }

        //调用Service校验用户账号和密码的正确性
        ActiveUser activeUser = sysService.authenticat(usercode, password);

        //如果Service校验通过,将用户身份记录到Session
        session.setAttribute("activeUser", activeUser);
        //重定向到商品查询页面
        return "redirect:/first.action";
    } */
    //用户登录提交方法
    @RequestMapping("/login")
    public String login(HttpServletRequest request) throws Exception{

        //shiro在认证通过后出现错误后将异常类路径通过request返回
        //如果登陆失败从request中获取认证异常信息,shiroLoginFailure就是shiro异常类的全限定名
        String exceptionClassName = (String)request.getAttribute("shiroLoginFailure");
        if (exceptionClassName!=null) {
            if (UnknownAccountException.class.getName().equals(exceptionClassName)) {
                throw new CustomException("账号不存在");
            } else if(IncorrectCredentialsException.class.getName().equals(exceptionClassName)){
                throw new CustomException("用户名/密码错误");
            }else if("randomCodeError".equals(exceptionClassName)){
                throw new CustomException("验证码错误");
            } else{
                throw new Exception(); //最终在设置的异常处理器中生成未知错误
            }
        }
        //此方法不处理登录成功(认证成功)的情况
        //如果登录失败还到login页面
        return "login";
    }

    //用户退出
    /*
    @RequestMapping("/logout")
    public String logout(HttpSession session) throws Exception{
        //session失效
        session.invalidate();
        //重定向到商品查询页面
        return "redirect:/first.action";
    }
    */
}
FirstAction.java
package liuxun.ssm.controller;

import java.util.List;

import javax.servlet.http.HttpSession;

import org.apache.shiro.SecurityUtils;
import org.apache.shiro.subject.Subject;
import org.springframework.stereotype.Controller;
import org.springframework.ui.Model;
import org.springframework.web.bind.annotation.RequestMapping;

import liuxun.ssm.po.ActiveUser;


@Controller
public class FirstAction {
    //系统首页
    @RequestMapping("/first")
    public String first(Model model)throws Exception{
        //主体
        Subject subject = SecurityUtils.getSubject();
        //身份
        ActiveUser activeUser = (ActiveUser) subject.getPrincipal();
        model.addAttribute("activeUser", activeUser);
        return "/first";
    }

    //欢迎页面
    @RequestMapping("/welcome")
    public String welcome(Model model)throws Exception{

        return "/welcome";

    }
}
其中基于原始的URL拦截(不使用shiro)的代码是屏蔽的代码 方便对比总结 所以没有删除