感谢作者分享:本文内容来源:https://blog.csdn.net/YangLiehui/article/details/98599253
org.springframewoek.core.io.classPathReource位于Spring核心core下,用于表达类路径下的资源
首先简单说明一下什么是classPath,顾名思义,就是存放*。class类文件路径,或者说ClassLoader加载类时为了找到*.class文件的路径。我们以一个web项目为例,发布后的目录结构大致如下:

对于部署在tomcat的WEB应用来说,/web-inf/classes 和web/inf/lib目录就是我们的classspath。
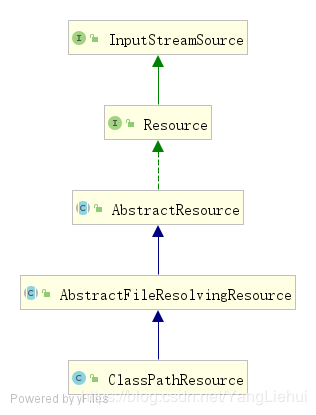
ClassPathResource是org.springframewoek.core.io.Resource接口的实现类可以使用ClassLoader 加载资源,支持转换为java.io.file对象(在jar文件中的资源除外)他的类继承关系图如下:

ClassPathResource类属性变量和类构造方法如下:
private final String path;
    @Nullable
    private ClassLoader classLoader;// 通过ClassLoader加载资源文件
    @Nullable
    private Class<?> clazz; // 通过Class类加载资源文件

    // 通过类路径创建resource
    public ClassPathResource(String path){...}

    // 通过类路径和给定的ClassLoader创建resource
    public ClassPathResource(String path, @Nullable ClassLoader classLoader){...}

    // 通过类路径和给定的Class类创建resource
    public ClassPathResource(String path, @Nullable Class<?> clazz){...}

    // 通过类路径和给定的ClassLoader或Class创建resource
    protected ClassPathResource(String path, @Nullable ClassLoader classLoader, @Nullable Class<?> clazz){...}
ClassPathResource的使用
Resource resource = new ClassPathResource("conf/custom-beans.xml");
System.out.println(resource.getURL());
System.out.println(resource.getFilename());
System.out.println(resource.getFile().getPath());
public static String readSpringResourceToString(String fileName) {
        String content = "";
        ClassPathResource cpr = new ClassPathResource("/" + fileName);
        try {
            byte[] bdata = FileCopyUtils.copyToByteArray(cpr.getInputStream());
            content = new String(bdata, StandardCharsets.UTF_8);
        } catch (FileNotFoundException efn) {
            logger.warn("File not found. {}", fileName);
        } catch (IOException e) {
            logger.error("Error reading file {}", fileName);
        }
        return content;
    }
//读取classpathresource文件中xml的方法。
感谢作者:下面内容转载自:https://blog.csdn.net/qq_34337272/article/details/80349017
文件IO的基石:Path
java7中文件IO发生了很大的变化,专门引入了很多新的类来取代原来的基于java.io.File文件IO操作方式
import java.nio.file.DirectoryStream;
import java.nio.file.FileSystem;
import java.nio.file.FileSystems;
import java.nio.file.Files;
import java.nio.file.Path;
import java.nio.file.Paths;
import java.nio.file.attribute.FileAttribute;
import java.nio.file.attribute.PosixFilePermission;
import java.nio.file.attribute.PosixFilePermissions;·

......等等
————————————————
我们将从下面几个方面来学习Path类:
- 创建一个Path
- File和Path之间的转换,File和URI之间的转换
- 获取Path的相关信息
- 移除Path中的冗余项
1.创建一个Path
创建Path实例可以通过Paths工具类的get()方法:
//使用绝对路径
Path path= Paths.get("c:\data\myfile.txt");
//使用相对路径
Path path = Paths.get("/home/jakobjenkov/myfile.txt");
//下面的创建路径和上面的创建路径是等效的。
Path path = FileSystems.getDefault().getPath("c:\data\myfile.txt");
//获取当前的相对路径
  Path currentRelativePath = Paths.get("");
//转化为绝对路径
currentRelativeDir = currentRelativePath.toAbsolutePath().toString();
//Path读取文件
public static String readFileToString(String fileName) {
        String content = null;
        InputStream in = null;
        try {
            in = new FileInputStream(currentRelativeDir + fileName);
            content = IOUtils.toString(in, StandardCharsets.UTF_8);
            in.close(); // close errors are handled
        } catch (Exception e) {
            logger.warn("Error reading file {}, try to read it from jar", currentRelativeDir + fileName, e);
            content = readSpringResourceToString(fileName);
        } finally {
            IOUtils.closeQuietly(in);
        }
//classPathResource  读取文件
public static String readSpringResourceToString(String fileName) {
        String content = "";
        ClassPathResource cpr = new ClassPathResource("/" + fileName);
        try {
            byte[] bdata = FileCopyUtils.copyToByteArray(cpr.getInputStream());
            content = new String(bdata, StandardCharsets.UTF_8);
        } catch (FileNotFoundException efn) {
            logger.warn("File not found. {}", fileName);
        } catch (IOException e) {
            logger.error("Error reading file {}", fileName);
        }
        return content;
    }
2. File 和path之间的相互转换
        File file = new File("C:/my.ini");
        Path p1 = file.toPath();
        p1.toFile();
        file.toURI();
3.获取Path相关信息
 //使用Paths工具类的get()方法创建
        Path path = Paths.get("D:\XMind\bcl-java.txt");
/*        //使用FileSystems工具类创建
        Path path2 = FileSystems.getDefault().getPath("c:\data\myfile.txt");*/
        System.out.println("文件名:" + path.getFileName());
        System.out.println("名称元素的数量:" + path.getNameCount());
        System.out.println("父路径:" + path.getParent());
        System.out.println("根路径:" + path.getRoot());
        System.out.println("是否是绝对路径:" + path.isAbsolute());
        //startsWith()方法的参数既可以是字符串也可以是Path对象
        System.out.println("是否是以为给定的路径D:开始:" + path.startsWith("D:\") );
4. 一处冗余项目
某些时候在我们需要处理Path路径中可能会有一个或两个点
-.表示当前目录
-..表示父母了或者上衣级目录
下面通过实例来完成使用Path中的normalize()和toRealPath()把.和..移除
//.表示的是当前目录
        Path currentDir = Paths.get(".");
        System.out.println(currentDir.toAbsolutePath());//输出C:UsersAdministratorNIODemo.
        Path currentDir2 = Paths.get(".\NIODemo.iml");
        System.out.println("原始路径格式:"+currentDir2.toAbsolutePath());
        System.out.println("执行normalize()方法之后:"+currentDir2.toAbsolutePath().normalize());
        System.out.println("执行toRealPath()方法之后:"+currentDir2.toRealPath());

        //..表示父目录或者说是上一级目录:
        Path currentDir3 = Paths.get("..");
        System.out.println("原始路径格式:"+currentDir3.toAbsolutePath());
        System.out.println("执行normalize()方法之后:"+currentDir3.toAbsolutePath().normalize());
        System.out.println("执行toRealPath()方法之后:"+currentDir3.toRealPath());
C:UsersAdministratorNIODemo.
原始路径格式:C:UsersAdministratorNIODemo.NIODemo.iml
执行normalize()方法之后:C:UsersAdministratorNIODemoNIODemo.iml
执行toRealPath()方法之后:C:UsersAdministratorNIODemoNIODemo.iml
原始路径格式:C:UsersAdministratorNIODemo..
执行normalize()方法之后:C:UsersAdministrator
执行toRealPath()方法之后:C:UsersAdministrator
————————————————
二:拥抱Files
Files是一个工具类,内部提供了很多方法。
 创建文件/文件夹
Path target2 = Paths.get("C:\mystuff.txt");
        try {
            if(!Files.exists(target2))
                Files.createFile(target2);
        } catch (IOException e) {
            e.printStackTrace();
        }
创建文件夹:
 Path path = Paths.get("D://data//test");

    try {
        Path newDir = Files.createDirectories(path);
    } catch(FileAlreadyExistsException e){
        // the directory already exists.
    } catch (IOException e) {
        //something else went wrong
        e.printStackTrace();
    }
删除文件或目录
Path path = Paths.get("data/subdir/logging-moved.properties");

try {
    Files.delete(path);
} catch (IOException e) {
    //deleting file failed
    e.printStackTrace();
}
把一个文件从一个地址复制到另一个位置
Path sourcePath      = Paths.get("data/logging.properties");
Path destinationPath = Paths.get("data/logging-copy.properties");

try {
    Files.copy(sourcePath, destinationPath);
} catch(FileAlreadyExistsException e) {
    //destination file already exists
} catch (IOException e) {
    //something else went wrong
    e.printStackTrace();
}
获取文件属性
Path path = Paths.get("D:\XMind\bcl-java.txt");
        System.out.println(Files.getLastModifiedTime(path));
        System.out.println(Files.size(path));
        System.out.println(Files.isSymbolicLink(path));
        System.out.println(Files.isDirectory(path));
        System.out.println(Files.readAttributes(path, "*"));

遍历一个文件夹
 Path dir = Paths.get("D:\Java");
        try(DirectoryStream<Path> stream = Files.newDirectoryStream(dir)){
            for(Path e : stream){
                System.out.println(e.getFileName());
            }
        }catch(IOException e){

        }
遍历整个文件目录:

public class WorkFileTree {

    public static void main(String[] args) throws IOException{
        Path startingDir = Paths.get("D:\apache-tomcat-9.0.0.M17");
        List<Path> result = new LinkedList<Path>();
        Files.walkFileTree(startingDir, new FindJavaVisitor(result));
        System.out.println("result.size()=" + result.size());
    }

    private static class FindJavaVisitor extends SimpleFileVisitor<Path>{
        private List<Path> result;
        public FindJavaVisitor(List<Path> result){
            this.result = result;
        }
        @Override
        public FileVisitResult visitFile(Path file, BasicFileAttributes attrs){
            if(file.toString().endsWith(".java")){
                result.add(file.getFileName());
            }
            return FileVisitResult.CONTINUE;
        }
    }
}
遍历整个目录:该代码涉及的很巧妙,研究该涉及模式
1 检查给定的Path在文件系统中是否存在通过 Files.exists() 检测文件路径是否存在:
Path path = Paths.get("D:\XMind\bcl-java.txt");
boolean pathExists = Files.exists(path, new LinkOption[]{LinkOption.NOFOLLOW_LINKS}); System.out.println(pathExists);//true123456注意Files.exists()的的第二个参数。它是一个数组,这个参数直接影响到Files.exists()如何确定一个路径是否存在。在本例中,这个数组内包含了LinkOptions.NOFOLLOW_LINKS,表示检测时不包含符号链接文件。
2 创建文件/文件夹创建文件:通过 Files.createFile() 创建文件,
Path target2 = Paths.get("C:\mystuff.txt"); try { if(!Files.exists(target2)) Files.createFile(target2); } catch (IOException e) { e.printStackTrace(); }1234567创建文件夹:
通过 Files.createDirectory() 创建文件夹通过 Files.createDirectories() 创建文件夹Files.createDirectories()会首先创建所有不存在的父目录来创建目录,而Files.createDirectory()方法只是创建目录,如果它的上级目录不存在就会报错。比如下面的程序使用Files.createDirectory() 方法创建就会报错,这是因为我的D盘下没有data文件夹,加入存在data文件夹的话则没问题。
Path path = Paths.get("D://data//test");
try { Path newDir = Files.createDirectories(path); } catch(FileAlreadyExistsException e){ // the directory already exists. } catch (IOException e) { //something else went wrong e.printStackTrace(); }123456789103 删除文件或目录通过 Files.delete()方法 可以删除一个文件或目录:
Path path = Paths.get("data/subdir/logging-moved.properties");
try { Files.delete(path);} catch (IOException e) { //deleting file failed e.printStackTrace();}123456784 把一个文件从一个地址复制到另一个位置通过Files.copy()方法可以吧一个文件从一个地址复制到另一个位置
Path sourcePath = Paths.get("data/logging.properties");Path destinationPath = Paths.get("data/logging-copy.properties");
try { Files.copy(sourcePath, destinationPath);} catch(FileAlreadyExistsException e) { //destination file already exists} catch (IOException e) { //something else went wrong e.printStackTrace();}1234567891011copy操作还可可以强制覆盖已经存在的目标文件,只需要将上面的copy()方法改为如下格式:
Files.copy(sourcePath, destinationPath, StandardCopyOption.REPLACE_EXISTING);125 获取文件属性 Path path = Paths.get("D:\XMind\bcl-java.txt"); System.out.println(Files.getLastModifiedTime(path)); System.out.println(Files.size(path)); System.out.println(Files.isSymbolicLink(path)); System.out.println(Files.isDirectory(path)); System.out.println(Files.readAttributes(path, "*"));123456结果:
2016-05-18T08:01:44Z18934falsefalse{lastAccessTime=2017-04-12T01:42:21.149351Z, lastModifiedTime=2016-05-18T08:01:44Z, size=18934, creationTime=2017-04-12T01:42:21.149351Z, isSymbolicLink=false, isRegularFile=true, fil123456 遍历一个文件夹 Path dir = Paths.get("D:\Java"); try(DirectoryStream<Path> stream = Files.newDirectoryStream(dir)){ for(Path e : stream){ System.out.println(e.getFileName()); } }catch(IOException e){
}12345678结果:
apache-maven-3.5.0Eclipseintellij ideaJarJDKMarvenRespositoryMyEclipse 2017 CINodejsRedisDesktopManagersolr-7.2.112345678910上面是遍历单个目录,它不会遍历整个目录。遍历整个目录需要使用:Files.walkFileTree().Files.walkFileTree()方法具有递归遍历目录的功能。
7 遍历整个文件目录:walkFileTree接受一个Path和FileVisitor作为参数。Path对象是需要遍历的目录,FileVistor则会在每次遍历中被调用。
FileVisitor需要调用方自行实现,然后作为参数传入walkFileTree().FileVisitor的每个方法会在遍历过程中被调用多次。如果不需要处理每个方法,那么可以继承它的默认实现类SimpleFileVisitor,它将所有的接口做了空实现。
public class WorkFileTree {
public static void main(String[] args) throws IOException{ Path startingDir = Paths.get("D:\apache-tomcat-9.0.0.M17"); List<Path> result = new LinkedList<Path>(); Files.walkFileTree(startingDir, new FindJavaVisitor(result)); System.out.println("result.size()=" + result.size()); }
private static class FindJavaVisitor extends SimpleFileVisitor<Path>{ private List<Path> result; public FindJavaVisitor(List<Path> result){ this.result = result; } @Override public FileVisitResult visitFile(Path file, BasicFileAttributes attrs){ if(file.toString().endsWith(".java")){ result.add(file.getFileName()); } return FileVisitResult.CONTINUE; } }}1234567891011121314151617181920212223上面这个例子输出了我的D:apache-tomcat-9.0.0.M17也就是我的Tomcat安装目录下以.java结尾文件的数量。
结果:————————————————版权声明:本文为CSDN博主「Guide哥」的原创文章,遵循CC 4.0 BY-SA版权协议,转载请附上原文出处链接及本声明。原文链接:https://blog.csdn.net/qq_34337272/java/article/details/80349017