SNMP:“简单网络管理协议”,用于网络管理的协议。SNMP用于网络设备的管理。SNMP的工作方式:管理员需要向设备获取数据,所以SNMP提供了“读”操作;管理员需要向设备执行设置操作,所以SNMP提供了“写”操作;设备需要在重要状况改变的时候,向管理员通报事件的发生,所以SNMP提供了“Trap”操作。
什么是 MIB?
MIB 是描述被管理设备上的参数的数据结构。如前所述,管理一个设备,就是利用 SNMP 协议,通过网络对被管理设备上的参数进行 get 和 set 操作。
SNMP MIB 是定义了这个设备都有哪些信息可以被收集,哪些trap的触发条件可以被定义,只有符合TRAP触发条件的事件才被发送出去
snmpget 命令
[root@vStack ~]# snmpget -v 2c -c public localhost system.sysDescr.0
SNMPv2-MIB::sysDescr.0 = STRING: Linux vStack 3.10.0-327.el7.x86_64 #1 SMP Thu Nov 19 22:10:57 UTC 2015 x86_64
snmpbulkwalk 命令
[root@vStack ~]# snmpbulkwalk -v 2c -c public 127.0.0.1 .1.3.6.1.2.1.1
SNMPv2-MIB::sysDescr.0 = STRING: Linux vStack 3.10.0-327.el7.x86_64 #1 SMP Thu Nov 19 22:10:57 UTC 2015 x86_64
SNMPv2-MIB::sysObjectID.0 = OID: NET-SNMP-MIB::netSnmpAgentOIDs.10
DISMAN-EVENT-MIB::sysUpTimeInstance = Timeticks: (290108) 0:48:21.08
SNMPv2-MIB::sysContact.0 = STRING: Root <root@localhost> (configure /etc/snmp/snmp.local.conf)
SNMPv2-MIB::sysName.0 = STRING: vStack
SNMPv2-MIB::sysLocation.0 = STRING: Unknown (edit /etc/snmp/snmpd.conf)
SNMPv2-MIB::sysORLastChange.0 = Timeticks: (4) 0:00:00.04
SNMPv2-MIB::sysORID.1 = OID: SNMP-MPD-MIB::snmpMPDCompliance
SNMPv2-MIB::sysORID.2 = OID: SNMP-USER-BASED-SM-MIB::usmMIBCompliance
SNMPv2-MIB::sysORID.3 = OID: SNMP-FRAMEWORK-MIB::snmpFrameworkMIBCompliance
SNMPv2-MIB::sysORID.4 = OID: SNMPv2-MIB::snmpMIB
SNMPv2-MIB::sysORID.5 = OID: TCP-MIB::tcpMIB
SNMPv2-MIB::sysORID.6 = OID: IP-MIB::ip
SNMPv2-MIB::sysORID.7 = OID: UDP-MIB::udpMIB
SNMPv2-MIB::sysORID.8 = OID: SNMP-VIEW-BASED-ACM-MIB::vacmBasicGroup
SNMPv2-MIB::sysORID.9 = OID: SNMP-NOTIFICATION-MIB::snmpNotifyFullCompliance
SNMPv2-MIB::sysORID.10 = OID: NOTIFICATION-LOG-MIB::notificationLogMIB
SNMPv2-MIB::sysORDescr.1 = STRING: The MIB for Message Processing and Dispatching.
SNMPv2-MIB::sysORDescr.2 = STRING: The management information definitions for the SNMP User-based Security Model.
SNMPv2-MIB::sysORDescr.3 = STRING: The SNMP Management Architecture MIB.
SNMPv2-MIB::sysORDescr.4 = STRING: The MIB module for SNMPv2 entities
SNMPv2-MIB::sysORDescr.5 = STRING: The MIB module for managing TCP implementations
SNMPv2-MIB::sysORDescr.6 = STRING: The MIB module for managing IP and ICMP implementations
SNMPv2-MIB::sysORDescr.7 = STRING: The MIB module for managing UDP implementations
SNMPv2-MIB::sysORDescr.8 = STRING: View-based Access Control Model for SNMP.
SNMPv2-MIB::sysORDescr.9 = STRING: The MIB modules for managing SNMP Notification, plus filtering.
SNMPv2-MIB::sysORDescr.10 = STRING: The MIB module for logging SNMP Notifications.
SNMPv2-MIB::sysORUpTime.1 = Timeticks: (3) 0:00:00.03
SNMPv2-MIB::sysORUpTime.2 = Timeticks: (3) 0:00:00.03
SNMPv2-MIB::sysORUpTime.3 = Timeticks: (3) 0:00:00.03
SNMPv2-MIB::sysORUpTime.4 = Timeticks: (3) 0:00:00.03
SNMPv2-MIB::sysORUpTime.5 = Timeticks: (3) 0:00:00.03
SNMPv2-MIB::sysORUpTime.6 = Timeticks: (3) 0:00:00.03
SNMPv2-MIB::sysORUpTime.7 = Timeticks: (3) 0:00:00.03
SNMPv2-MIB::sysORUpTime.8 = Timeticks: (3) 0:00:00.03
SNMPv2-MIB::sysORUpTime.9 = Timeticks: (4) 0:00:00.04
SNMPv2-MIB::sysORUpTime.10 = Timeticks: (4) 0:00:00.04
snmpbulkwalk命令: 获取snmp服务器的mib-2各种资讯,snmpbulkwalk用于通过SNMPv2 的SNMP GET BULK请求命令与其它网络实体通信,只能用于snmpv2,速度快于snmpwalk
snmptrap 命令
[root@vStack snmp]# snmptrap
No hostname specified.
USAGE: snmptrap [OPTIONS] AGENT TRAP-PARAMETERS

  Version:  5.7.2
  Web:      http://www.net-snmp.org/
  Email:    net-snmp-coders@lists.sourceforge.net

OPTIONS:
  -h, --help        display this help message
  -H            display configuration file directives understood
  -v 1|2c|3        specifies SNMP version to use
  -V, --version        display package version number
SNMP Version 1 or 2c specific
  -c COMMUNITY        set the community string
SNMP Version 3 specific
  -a PROTOCOL        set authentication protocol (MD5|SHA)
  -A PASSPHRASE        set authentication protocol pass phrase
  -e ENGINE-ID        set security engine ID (e.g. 800000020109840301)
  -E ENGINE-ID        set context engine ID (e.g. 800000020109840301)
  -l LEVEL        set security level (noAuthNoPriv|authNoPriv|authPriv)
  -n CONTEXT        set context name (e.g. bridge1)
  -u USER-NAME        set security name (e.g. bert)
  -x PROTOCOL        set privacy protocol (DES|AES)
  -X PASSPHRASE        set privacy protocol pass phrase
  -Z BOOTS,TIME        set destination engine boots/time
General communication options
  -r RETRIES        set the number of retries
  -t TIMEOUT        set the request timeout (in seconds)
Debugging
  -d            dump input/output packets in hexadecimal
  -D[TOKEN[,...]]    turn on debugging output for the specified TOKENs
               (ALL gives extremely verbose debugging output)
General options
  -m MIB[:...]        load given list of MIBs (ALL loads everything)
  -M DIR[:...]        look in given list of directories for MIBs
    (default: /root/.snmp/mibs:/usr/share/snmp/mibs)
  -P MIBOPTS        Toggle various defaults controlling MIB parsing:
              u:  allow the use of underlines in MIB symbols
              c:  disallow the use of "--" to terminate comments
              d:  save the DESCRIPTIONs of the MIB objects
              e:  disable errors when MIB symbols conflict
              w:  enable warnings when MIB symbols conflict
              W:  enable detailed warnings when MIB symbols conflict
              R:  replace MIB symbols from latest module
  -O OUTOPTS        Toggle various defaults controlling output display:
              0:  print leading 0 for single-digit hex characters
              a:  print all strings in ascii format
              b:  do not break OID indexes down
              e:  print enums numerically
              E:  escape quotes in string indices
              f:  print full OIDs on output
              n:  print OIDs numerically
              q:  quick print for easier parsing
              Q:  quick print with equal-signs
              s:  print only last symbolic element of OID
              S:  print MIB module-id plus last element
              t:  print timeticks unparsed as numeric integers
              T:  print human-readable text along with hex strings
              u:  print OIDs using UCD-style prefix suppression
              U:  don't print units
              v:  print values only (not OID = value)
              x:  print all strings in hex format
              X:  extended index format
  -I INOPTS        Toggle various defaults controlling input parsing:
              b:  do best/regex matching to find a MIB node
              h:  don't apply DISPLAY-HINTs
              r:  do not check values for range/type legality
              R:  do random access to OID labels
              u:  top-level OIDs must have '.' prefix (UCD-style)
              s SUFFIX:  Append all textual OIDs with SUFFIX before parsing
              S PREFIX:  Prepend all textual OIDs with PREFIX before parsing
  -L LOGOPTS        Toggle various defaults controlling logging:
              e:           log to standard error
              o:           log to standard output
              n:           don't log at all
              f file:      log to the specified file
              s facility:  log to syslog (via the specified facility)

              (variants)
              [EON] pri:   log to standard error, output or /dev/null for level 'pri' and above
              [EON] p1-p2: log to standard error, output or /dev/null for levels 'p1' to 'p2'
              [FS] pri token:    log to file/syslog for level 'pri' and above
              [FS] p1-p2 token:  log to file/syslog for levels 'p1' to 'p2'
  -C APPOPTS        Set various application specific behaviour:
              i:  send an INFORM instead of a TRAP

  -v 1 TRAP-PARAMETERS:
     enterprise-oid agent trap-type specific-type uptime [OID TYPE VALUE]...
  or
  -v 2 TRAP-PARAMETERS:
     uptime trapoid [OID TYPE VALUE] ...
[root@vStack snmp]#
snmptrap的命令行格式如下:
  snmptrap -v [2c|3] [COMMON OPTIONS]        uptime      trap-oid                [OID TYPE VALUE]
$ snmptrap -v 2c     -c public 127.0.0.1:162 ""         .1.3.6.1.4.1.2021.251.1  sysLocation.0 s "test"
$ snmptrap -v 2c     -c public 127.0.0.1:162 "12345678" .1.3.6.1.4.1.2021.251.1  sysLocation.0 s "test"
  snmptrap -v [2c|3] [COMMON OPTIONS]        uptime      trap-oid                [OID TYPE VALUE]
$ snmptrap -v 2c     -c public 127.0.0.1:162 ""         .1.3.6.1.4.1.2021.251.1  sysLocation.0 s "test"
$ snmptrap -v 2c     -c public 127.0.0.1:162 "12345678" .1.3.6.1.4.1.2021.251.1  sysLocation.0 s "test"
SNMP的MIB详解
1.MIB管理信息库
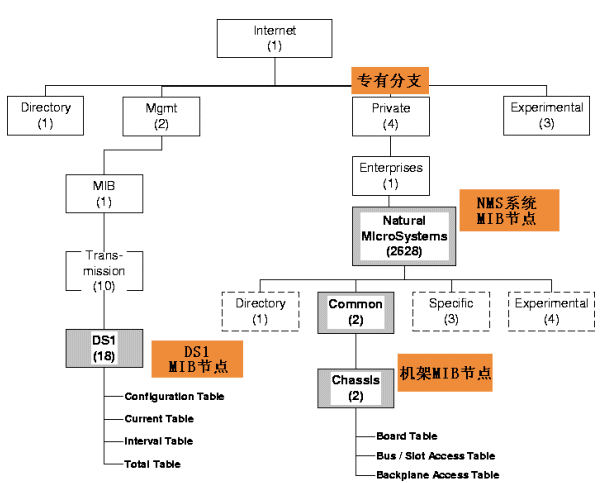
IETF规定的管理信息库MIB(由中定义了可访问的网络设备及其属性,由对象识别符(OID:Object Identifier)唯一指定。MIB是一个树形结构,SNMP协议消息通过遍历MIB树形目录中的节点来访问网络中的设备。
下图给出了NMS系统中SNMP可访问网络设备的对象识别树(OID:Object Identifier)结构。

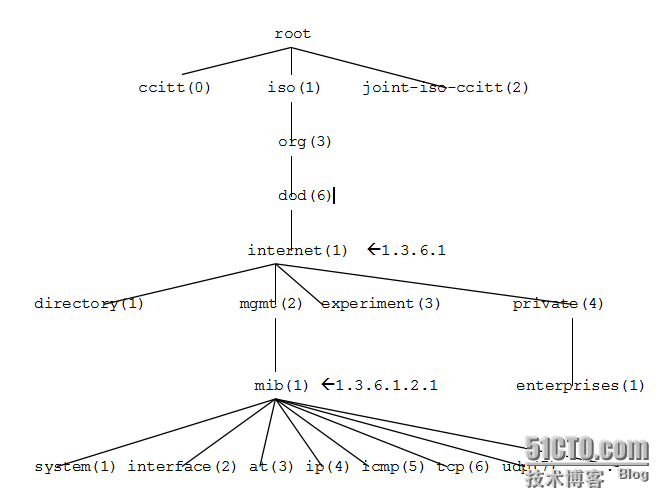
上图中的节点是从internet开始的,其实上面还有几个节点请看下图。

pysnmp:
>>> from pysnmp.entity.rfc3413.oneliner import cmdgen
>>> errorIndication, errorStatus, errorIndex, varBinds = cmdgen.CommandGenerator().getCmd( cmdgen.CommunityData('my-agent', 'public', 0), cmdgen.UdpTransportTarget(('localhost', 161)), (1,3,6,1,2,1,1,1,0) )
>>> varBinds
[(ObjectName('1.3.6.1.2.1.1.1.0'), OctetString('Linux devstack 3.10.0-514.26.2.el7.x86_64 #1 SMP Tue Jul 4 15:04:05 UTC 2017 x86_64'))]
>>>
snmptranslate 命令
将 MIB OIDs 的两种表现形式 ( 数字及文字 ) 相互转换。并显示 MIB 的内容与结构,如下所示:
[root@devstack ~]# snmptranslate -On SNMPv2-MIB::sysUpTime.0
.1.3.6.1.2.1.1.3.0
[root@devstack ~]# snmptranslate .1.3.6.1.2.1.1.3.0
DISMAN-EVENT-MIB::sysUpTimeInstance
[root@devstack ~]#
snmptranslate -Tp iso.org.dod.internet.mgmt.mib-2 #用snmptranslate打印从指定OID(.1.3.6.1.2.1)开始一直到该OID(.1.3.6.1.2.1)所属的 MIB 子树末端的树型结构信息
snmptranslate -Ta #用snmptranslate导出所有已经加载的 MIB 的数据,每个对象一行
snmptranslate -Tl #用snmptranslate导出所有已经加载的 MIB 的对象,并且输出完整的 oid 路径
snmptranslate -To #用snmptranslate导出已经加载的所有 MIB 的数字格式的 oid ,不含值和类型,仅仅有 oid 而已
snmptranslate -Ts #用snmptranslate只输出文字格式的 OID 名称而已
2, 处理自定义trap
编写两个mib文件,包括snmp1和snmp2两种trap
Snmp1的mib:TRAP-TEST-MIB.txt:
TRAP-TEST-MIB DEFINITIONS ::= BEGIN

       IMPORTS ucdExperimental FROM UCD-SNMP-MIB;

 demotraps OBJECT IDENTIFIER ::= { ucdExperimental 990 }

 demo-trap TRAP-TYPE

       STATUS current

       ENTERPRISE demotraps

       VARIABLES { sysLocation }

       DESCRIPTION "This is just a demo"

       ::= 17

 END
Snmp2的mib:NOTIFICATION-TEST-MIB.txt:
NOTIFICATION-TEST-MIB DEFINITIONS ::= BEGIN

       IMPORTS ucdavis FROM UCD-SNMP-MIB;

 demonotifs OBJECT IDENTIFIER ::= { ucdavis 991 }

 demo-notif NOTIFICATION-TYPE

         STATUS current

         OBJECTS { sysLocation }

         DESCRIPTION "Just a test notification"

         ::= { demonotifs 17 }

 END
然后放入到mibs文件夹中
在manager端敲入命令:
snmptrap -v 2c -c public 127.0.0.1:162 "" NOTIFICATION-TEST-MIB::demo-notif SNMPv2-MIB::sysLocation.0 s "just here"
agent端输出:
Received 96 bytes from UDP: [127.0.0.1]:44858
0000: 30 5E 02 01  01 04 06 70  75 62 6C 69  63 A7 51 02    0^.....public.Q.
0016: 04 7D BA 0E  AA 02 01 00  02 01 00 30  43 30 10 06    .}.........0C0..
0032: 08 2B 06 01  02 01 01 03  00 43 04 00  89 19 29 30    .+.......C....)0
0048: 18 06 0A 2B  06 01 06 03  01 01 04 01  00 06 0A 2B    ...+...........+
0064: 06 01 04 01  8F 65 87 5F  11 30 15 06  08 2B 06 01    .....e._.0...+..
0080: 02 01 01 06  00 04 09 6A  75 73 74 20  68 65 72 65    .......just here

2008-11-11 10:22:27 localhost [UDP: [127.0.0.1]:44858]:
DISMAN-EVENT-MIB::sysUpTimeInstance = Timeticks: (8984873) 1 day, 0:57:28.73
SNMPv2-MIB::snmpTrapOID.0 = OID: NOTIFICATION-TEST-MIB::demo-notif       SNMPv2-MIB::sysLocation.0 = STRING: just here
sh: log_it: command not found
其中just here就是我们想要的结果.
3, 自己编写处理trap脚本
建立root/bin/traps文件,输入以下内容:
#!/bin/sh
read host
read ip
vars=
while read oid val
do
    if [ "$vars" = "" ]
    then
        vars="$oid = $val"
    else
        vars="$vars, $oid = $val"
    fi
done
echo trap: $1 $host $ip $vars
在manager的snmptrapd.conf加入以下几行:
traphandle SNMPv2-MIB::coldStart     /root/bin/traps cold
traphandle SNMPv2-MIB::warmStart    /root/bin/traps  warm
traphandle IF-MIB::linkDown          /root/bin/traps down
traphandle IF-MIB::linkUp            /root/bin/traps up

traphandle SNMPv2-MIB::authenticationFailure  /root/bin/traps auth
# this one is deprecated
traphandle .1.3.6.1.6.3.1.1.5.6 /root/bin/traps egp-neighbor-loss
在 manage 端 发送 trap
snmptrap -v 1 -c public 127.0.0.1:162 TRAP-TEST-MIB::demotraps 127.0.0.1 2 0 "" IF-MIB::ifIndex i 1
snmptrap -v 2c -c public 127.0.0.1:162 "" NOTIFICATION-TEST-MIB::demo-notif SNMPv2-MIB::sysLocation.0 s "just here"
TRAP-TEST-MIB::demotraps 自定义mib 文件中的
agent端输出:
Received 96 bytes from UDP: [127.0.0.1]:44858
0000: 30 5E 02 01  01 04 06 70  75 62 6C 69  63 A7 51 02    0^.....public.Q.
0016: 04 7D BA 0E  AA 02 01 00  02 01 00 30  43 30 10 06    .}.........0C0..
0032: 08 2B 06 01  02 01 01 03  00 43 04 00  89 19 29 30    .+.......C....)0
0048: 18 06 0A 2B  06 01 06 03  01 01 04 01  00 06 0A 2B    ...+...........+
0064: 06 01 04 01  8F 65 87 5F  11 30 15 06  08 2B 06 01    .....e._.0...+..
0080: 02 01 01 06  00 04 09 6A  75 73 74 20  68 65 72 65    .......just here

2008-11-11 10:22:27 localhost [UDP: [127.0.0.1]:44858]:
DISMAN-EVENT-MIB::sysUpTimeInstance = Timeticks: (8984873) 1 day, 0:57:28.73
SNMPv2-MIB::snmpTrapOID.0 = OID: NOTIFICATION-TEST-MIB::demo-notif       SNMPv2-MIB::sysLocation.0 = STRING: just here
sh: log_it: command not found
其中just here就是我们想要的结果.
4, 让agent自动产生trap
配置agent的snmpd.conf,加入以下几行:(参考:
http://www.net-snmp.org/wiki/index.php/FAQ:Agent_17):
# From: http://www.net-snmp.org/wiki/index.php/FAQ:Agent_17
# send v1 traps
trapsink   127.0.0.1:162
# also send v2 traps
trap2sink  127.0.0.1:162
informsink 127.0.0.1:162
手动启动前台显示 snmptrapd 进行,显示消息
[root@vStack ~]# snmptrapd -d -f -Lo
NET-SNMP version 5.7.2

Received 72 byte packet from UDP: [127.0.0.1]:51751->[127.0.0.1]:162
0000: 30 46 02 01  01 04 06 70  75 62 6C 69  63 A7 39 02    0F.....public.9.
0016: 04 60 A5 1A  1E 02 01 00  02 01 00 30  2B 30 0F 06    .`.........0+0..
0032: 08 2B 06 01  02 01 01 03  00 43 03 06  1E B7 30 18    .+.......C....0.
0048: 06 0A 2B 06  01 06 03 01  01 04 01 00  06 0A 2B 06    ..+...........+.
0064: 01 04 01 8F  65 81 7B 01                              ....e.{.

2017-08-28 10:27:59 localhost [UDP: [127.0.0.1]:51751->[127.0.0.1]:162]:
DISMAN-EVENT-MIB::sysUpTimeInstance = Timeticks: (401079) 1:06:50.79    SNMPv2-MIB::snmpTrapOID.0 = OID: UCD-SNMP-MIB::ucdStart
sh: page_me: 未找到命令
通过命令查看出 mib 文件保存的位置:
[root@vStack snmp]# snmptrap -v 2c -c public 127.0.0.1:162 "" NOTIFICATION-TEST-MIB::demo-notif SNMPv2-MIB::sysLocation.0 s "just here"
MIB search path: /root/.snmp/mibs:/usr/share/snmp/mibs
Cannot find module (NOTIFICATION-TEST-MIB): At line 0 in (none)
NOTIFICATION-TEST-MIB::demo-notif: Unknown Object Identifier
链接: http://freeloda.blog.51cto.com/2033581/1306743/
用SNMP实现对大型网络的轻松管理 http://guojiping.blog.51cto.com/5635432/985885
