1. redis事务
redis是单线程来处理所有client请求的。
multi命令:将命令放入队列中,直到遇到exec命令,再开始执行队列中的命令。
- 结果打包返回。
- 事务中的写操作不能依赖事务中的读操作。
- 事务中的一个命令失败,并不回滚其他命令。
discard命令:来取消事务。
CAS(check and set):watch命令,被watch的key,在exec之前发生改变,则exec退出返回nil
2. pipeline
除了可以利用mget,mset之类的命令来一次处理多条key,来减少网络传输外,也可以使用pipeline。
pipeline方式打包命令发送,redis会缓存所有命令的执行结果,消耗内存直到最后一次返回,所以并非一次打包命令越多越好。
public static void usePipeline(){
        try{
            jedis = new Jedis(HOST, PORT);
            jedis.auth("password");
            Pipeline pl = jedis.pipelined();
            pl.rpush("nn", "my");
            pl.rpush("nn", "name");
            pl.rpush("nn", "is");
            pl.rpush("nn", "chai");
            pl.rpush("nn", "dorothy");
            pl.lrange("nn", 0, 4);
            System.out.println(pl.syncAndReturnAll().toString());
        }catch(Exception e){
            e.printStackTrace();
        }
    }
3. 发布订阅pub/sub
如下是订阅者的代码:
@Test
    public void pubsubTest(){
        String cmd = "auth password
subscribe news.share news.blog
";
        try{
            Socket socket = new Socket(HOST,PORT);
            InputStream in = socket.getInputStream();
            OutputStream out = socket.getOutputStream();
            out.write(cmd.getBytes());
            byte[] buffer = new byte[1024];
            while(true){
                int readCount = in.read(buffer);
                System.out.write(buffer,0,readCount);
                System.out.println("-----------------");
            }
        }catch(Exception e){
            e.printStackTrace();
        }
    }
客户端直接订阅方式如下:
redis> psubscribe news.*
Reading messages... (press Ctrl-c to quit)
1. "psubscribe"
2. "news.*"
3. (integer) 1
客户端发布消息如下:(返回2表示有2个连接接收了此消息)
redis> publish news.share "share a link
http://www.google.com"
(integer) 2
redis> publish news.blog "I post a blog"
(integer) 2
Java程序接收到的消息:
*3
$9
subscribe
$10
news.share
:1
*3
$9
subscribe
$9
news.blog
:2
--------------------------------------
*3
$7
message
$10
news.share
$34
share a link http://www.google.com
--------------------------------------
*3
$7
message
$9
news.blog
$13
I post a blog
--------------------------------------
- For Simple Strings the first byte of the reply is "+"
- For Errors the first byte of the reply is "-"
- For Integers the first byte of the reply is ":"
- For Bulk Strings the first byte of the reply is "$"
- For Arrays the first byte of the reply is "
*"
4. redis持久化
4.1 Snapshotting
快照是默认的持久化方式,默认文件名为dump.rdb,开启子进程完成快照保存。
可以在redis.conf修改配置定时完成快照。默认配置如下:
- save 900 1 #900 s内如果有1个key被修改
- save 300 10 #300s内如果有10个key被修改
- save 60 10000
也可以使用save和bgsave命令完成快照。save调用主线程完成快照保存,所以会阻塞client。
每次持久化都会将数据全部写入到磁盘一次,而不是增量的只同步脏数据。
4.2 Append-only file
比snapshotting有更好的持久化效果。将所有命令通过write函数追加到文件中(默认是appendonly.aof。
appendonly yes //启用aof
# appendfsync always //性能差,但可以保证完全的持久化,不会丢失数据。
appendfsync everysec //每秒缓存一次
# appendfsync no //完全依赖os,持久化没保证。
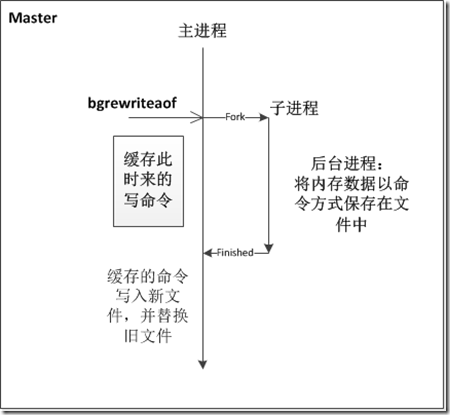
为了压缩aof文件,使用bgrewriteaof命令,开启子进程,将内存中的数据以命令的方式写入文件,并替换原来的文件。
5. 主从复制Master/Slave
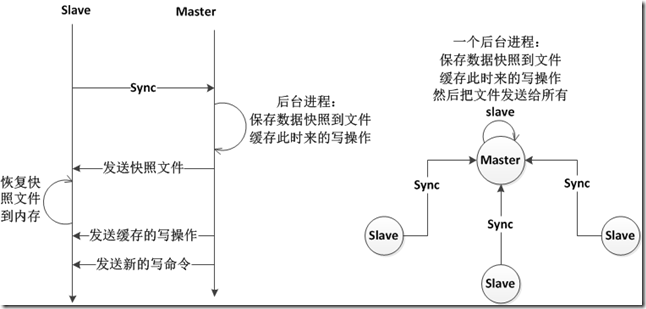
- master可有多个slave,slave直接可互连,成网状结构。
- 同步时,master不阻塞,slave阻塞不能处理client的请求。
- 注释掉save,禁用master的数据持久化,在slave上配置数据持久化。
- slave可以用作备份冗余,或者分担读请求。
配置slave很简单,只需要在slave的配置文件中加入如下:
slaveof 192.168.1.1 6379 #指定master的ip和端口
6. 虚拟内存
不使用os提供的虚拟内存的原因:http://antirez.com/post/redis-virtual-memory-story.html
- redis对象可能被分配到多个os页面上,一个对象被使用,会覆盖多个页面。
- redis可以把交换到磁盘的对象压缩。
配置如下:
vm-enabled yes #开启
vm-swap-file /tmp/redis.swap #交换出的对象保存的文件路径
vm-max-memory 1000000 #redis使用内存上限
vm-page-size 32 # 页面大小32字节
vm-pages 134217728 #交换文件大小 = vm-page-size * vm-pages
vm-max-threads 4 #一般等于cpu核数
当vm-max-threads 为0时,master阻塞来处理对象的换入换出。
当vm-max-threads 不为0时,master不阻塞,只在换入时阻塞请求换入key的client。

