有时候,我们需要应用程序在状态内显示一些通知信息,这时我们就需要使用Notification来完成这一工作。也许我们会想到以前经常使用的Toast来通知用户。虽然Notification与Toast都可以起到通知、提醒的作用,其实这两者还是有很大不同的。在android中,Notification是通过NotificationManager进行统一管理的,而Toast使用Toast.makeToast即可显示。另外,Notification可以长久的显示在系统的状态栏内,但是Toast只能暂时显示一段时间。
现在我们开始讨论创建Notification的一般步骤。
首先,我们需要通过getSystemService方法获得一个NotificationManager对象。
NotificationManager nfManager = (NotificationManager) getSystemService(NOTIFICATION_SERVICE);
然后,要想显示一个Notification,我们还需一个PendingIntent,由于PendingIntent由android系统负责维护,可以防止在应用程序关闭的时候系统自动销毁Notification对象。
PendingIntent intent = PendingIntent.getActivity(MainActivity.this, 0, getIntent(), 0);
然后,通过Notification.Builder创建一个Notification对象。
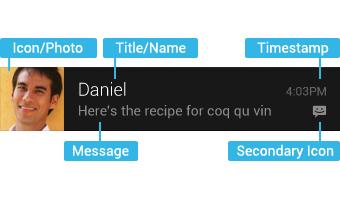
Notification notification = new Notification.Builder(MainActivity.this)
             .setSmallIcon(android.R.drawable.ic_dialog_email) // 设置Icon
             .setTicker("你有一封新邮件")                        // 设置接收时滚动通知
             .setContentTitle("邮件主题:这是第" + notiID + "封邮件")// 设置Title
             .setContentText("邮件内容:")// 设置Message
             .setContentIntent(intent)   // 设置用于显示的Intent
             .setNumber(notiID)          // 设置右下角Number
             .getNotification();         //API 11可以使用getNotificatin()
                                         // API 16及之后使用 build()
notification.flags = Notification.FLAG_AUTO_CANCEL;      // 点击自动消失
最后,通过NotificationManager来显示Notification即可。
nfManager.notify(notiID++, notification); // notiID定义了通知的编号,notification为通知的内容
如果想销毁显示的Notification可以使用NotificationManager提供的方法。
nfManager.cancel(notiID);  // 销毁编号为notiID的通知
nfManager.cancelAll();     // 销毁所有通知
完整代码如下:
import android.app.Activity;
import android.app.Notification;
import android.app.NotificationManager;
import android.app.PendingIntent;
import android.os.Bundle;
import android.view.View;
import android.widget.Button;


public class MainActivity extends Activity {

    private NotificationManager nfManager;
    private Button btnNoti;
    private Button btnClear;
    private int notiID;

        @Override
        protected void onCreate (Bundle savedInstanceState) {
            super.onCreate(savedInstanceState);
            setContentView(R.layout.activity_main);

            notiID = 1;
            nfManager = (NotificationManager) getSystemService(NOTIFICATION_SERVICE);
            btnNoti = (Button)findViewById(R.id.brnNoti);
            btnNoti.setOnClickListener(new View.OnClickListener() {
                @Override
                public void onClick(View view) {
                    PendingIntent intent = PendingIntent.getActivity(MainActivity.this, 0, getIntent(), 0);
                    Notification notification = new Notification.Builder(MainActivity.this)
                            .setSmallIcon(android.R.drawable.ic_dialog_email) // 设置Icon
                            .setTicker("你有一封新邮件")                      // 设置接收时滚动通知
                            .setContentTitle("邮件主题:这是第" + notiID + "封邮件")// 设置Title
                            .setContentText("邮件内容:")// 设置Message
                            .setContentIntent(intent)   // 设置用于显示的Intent
                            .setNumber(notiID)          // 设置右下角Number
                            .getNotification();         //API 11可以使用getNotificatin()
                                                        // API 16及之后使用 build()
                    notification.flags = Notification.FLAG_AUTO_CANCEL;      // 点击自动消失
                    nfManager.notify(notiID++, notification);
                }
            });

            btnClear = (Button)findViewById(R.id.btnClear);
            btnClear.setOnClickListener(new View.OnClickListener() {
                @Override
                public void onClick(View view) {
                    nfManager.cancel(notiID --);
//                    nfManager.cancelAll();
                }
            });
    }
}