1.表格(UITableView)与表格控制器(UITableViewController)
UITableView是iOS开发中常见的UI控件,本质是一个列表(单列的表格)。UITableView允许自由控制行的控件,包括在表格行中添加多个字控件。UITableView继承了UIScrollView,具有UIScrollView的功能,这个UIScrollView主要封装了UITableViewCell单元格控件,因此UITableView默认可以对单元格进行滚动。默认情况下,所有UITableViewController实例被自动设为UIScrollView委托。
UITableView支持设置的属性:
- Style 指定表格的风格
- Plain 普通风格
- Grouped 分组风格
- Separator 指定表格行之间分割条的样式
- 分隔条样式: 可以选择Single Line (单线) 和Single Line Etched
- 分隔条颜色:
- Selection 控制表格的选择风格
- No Selection
- Single Selection
- Multiple Selection
- Editing 控制表格处于编辑状态是否允许选择,
- No Selection During Editing: 编辑状态不允许选中
- Single Selection During Editing: 编辑状态只允许单选
- Multiple Selection During Editing: 允许多选
可以通过下面的属性或方法来设置表格控件的外观:
- style 只读属性,返回表格的样式
- rowHeight:用于设置或返回表格的行高。建议用
tableView:heightForRowAtIndexPath:方法设置行高 - separatorStyle:用于设置或返回表格的分隔条样式
- separatorColor:设置分隔条的颜色
- backgroundView:返回或设置表格的背景控件
- tableHeaderView:该属性可设置或返回表格的页眉控件
- tableFooterView:页脚控件
- -numberOfRowsInSection:返回指定分区包含的行数
- -numberOfSections:返回表格所包含的分区数
UITableViewDataSource
- -tableView:cellForRowAtIndexPath:必需,返回UITableViewCell对象作为指定IndexPath对应表格的控件
- -tableView:numberOfRowsInSection:必需,返回的NSInteger决定指定分区包含的表格行数量
- -numberOfSectionsInTableVIew:可选,返回的NSInteger决定该表格所包含的分区数量。默认只包含一个分区
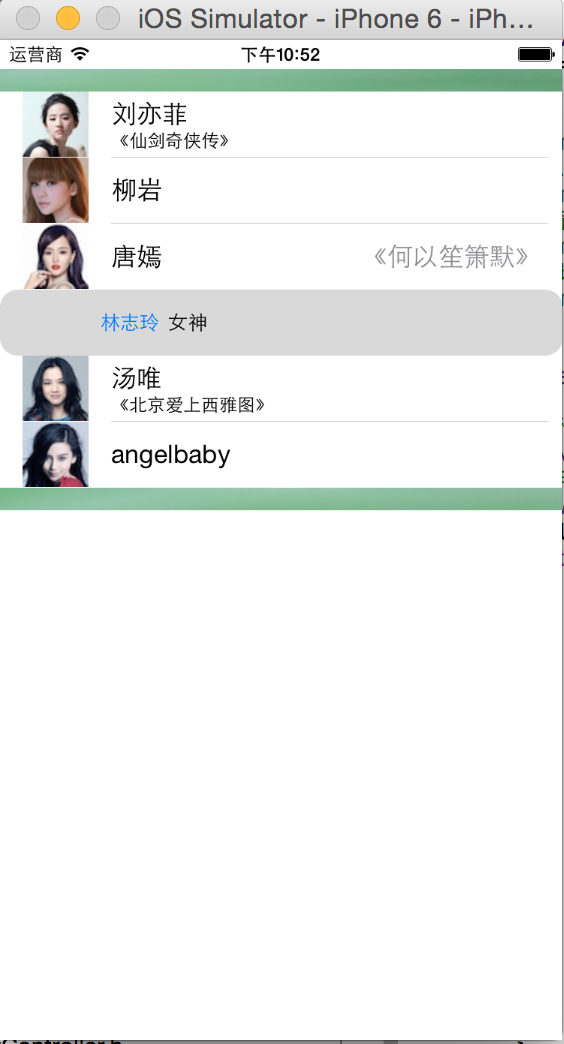
实例1. 简单表格
#import "SimpleTableViewController.h"

@interface SimpleTableViewController ()
@property (weak, nonatomic) IBOutlet UITableView *simpleTable;
@property (strong,nonatomic) NSArray * actors;
@property(strong,nonatomic) NSArray * details;
@property (strong ,nonatomic) NSArray* actorsImg;
@end

@implementation SimpleTableViewController

@synthesize actors;
@synthesize details;
@synthesize actorsImg;

-(void) viewDidLoad
{
    [super viewDidLoad];
    actors = [NSArray arrayWithObjects:@"刘亦菲",@"柳岩",@"唐嫣",@"林志玲",@"汤唯",@"angelbaby", nil];
    details = [NSArray arrayWithObjects:@"《仙剑奇侠传》",@"主持人",@"《何以笙箫默》",@"女神",@"《北京爱上西雅图》",@"《奔跑吧,兄弟》", nil];

    actorsImg = [NSArray arrayWithObjects:@"lyf.jpg", @"ly.jpg",@"ty.jpg",@"lzl.jpg", @"tw.jpg",@"ab.jpg", nil];
    //为TableView设置DataSource
    self.simpleTable.dataSource = self;
    //设置页眉
    self.simpleTable.tableHeaderView = [[UIImageView alloc ] initWithImage:[UIImage imageNamed:@"header.png"]];
    //设置页脚
    self.simpleTable.tableFooterView = [[UIImageView alloc] initWithImage:[UIImage imageNamed:@"footer.png"]];
}

-(UITableViewCell*) tableView:(UITableView *)tableView cellForRowAtIndexPath:(NSIndexPath *)indexPath
{
    //为表格行定义一个静态字符作为标识符
    static NSString* cellId = @"cellId";
    //从可重用表格行的队列中取出一个表格行
    UITableViewCell * cell = [tableView dequeueReusableCellWithIdentifier:cellId];
    if (cell == nil) {
        switch (indexPath.row %4) {
            case 0:
                cell = [[UITableViewCell alloc]
                        initWithStyle:UITableViewCellStyleSubtitle reuseIdentifier:cellId];
                break;
            case 1:
                cell = [[UITableViewCell alloc]
                        initWithStyle:UITableViewCellStyleDefault reuseIdentifier:cellId];
                break;
            case 2:
                cell = [[UITableViewCell alloc]
                        initWithStyle:UITableViewCellStyleValue1 reuseIdentifier:cellId];
                break;
            case 3:
                cell = [[UITableViewCell alloc]
                        initWithStyle:UITableViewCellStyleValue2 reuseIdentifier:cellId];
                break;
            default:
                break;
        }
    }
    //将单元格的边框设置为圆角
    cell.layer.cornerRadius = 12;
    cell.layer.masksToBounds = YES;
    //从IndexPath参数中获取当前行的行号
    NSUInteger rowNo = indexPath.row;
    cell.textLabel.text = [actors objectAtIndex:rowNo];
    cell.imageView.image = [UIImage imageNamed:[actorsImg objectAtIndex:rowNo]];
    //高亮状态是的图片
    cell.imageView.highlightedImage = [UIImage imageNamed:@"1.jpg"];
    cell.detailTextLabel.text = [details objectAtIndex:rowNo];
    return cell;
}
//该方法的返回值决定分区宝航多个表格行
-(NSInteger) tableView:(UITableView *)tableView numberOfRowsInSection:(NSInteger)section
{
    //只有一个分区
    return actors.count;
}

@end
通过上面的代码,对UITableView进行简单的配置-dataSource/页眉/页脚。控制器实现了UITableViewDataSource协议中的两个方法,tableView:(UITableView *)tableView numberOfRowsInSection: 方法的返回值决定控件指定分区包含的表格行数量。方法(UITableViewCell*) tableView:(UITableView *)tableView cellForRowAtIndexPath:返回UITableVIewCell,将作为指定IndexPath对应表格行的UI控件,每个表格行都是一个UITableViewCell。
UITableViewCell包含的撒个配置属性:
- textLabel:标题
- detailTextLabel: 详细内容
- image 左边的图标
访问表格控件的表格行和分区的方法:
-cellForRowAtIndexPath:返回表格指定NSIndexPath对应的表格行-indexPathForCell:指定表格行对应的NSIndexPath-indexPathForRowAtPoint:返回表格中指定点所在NSIndexPath-indexPathsForRowsInRect:指定区域内所有NSIndexPath组成的数组-visibleCells:所有可见区域内的表格行组成的数组-indexPathsForVisibleRows:可见区域内的表格行对应的NSIndexPath组成的数组
控制表格控件的滚动:
-scrollToRowAtIndexPath:atScrollPosition:animated:控制表格滚动到指定NSIndexPath对应的表格行的顶端、中间、下方-scrollToNearestSelectedRowAtScrollPosition:animated:控制表格滚动到选择表格行的顶部、中间或下方
1.1 单元格的选中
UITableView 配置表格选中状态的属性:
allowsSelection是否允许被选中allowsMultipleSelection允许被多选allowsSelectionDuringEditing编辑时是否允许被选中allowMultipleSelectionDruingEditing编辑时允许多选
操作选中行的方法:
-indexPathForSelectedRow:获取选中行的IndexPath-indexPathsForSelectedRows:获取选中行的IndexPath组成的数组-selectRowAtIndexPath:animated:scrollPosition:控制表格选中指定NSIndexPath对应的表格行,最后一个参数控制是否滚动到被选中行的顶端、中间、底部-deselectRowAtIndexPath:animated:取消选中
响应表格行的选中事件,需哟啊实现委托对象UITableViewDelegate
-tableView:willSelectRowAtIndexPath:-tableView:disSelectRowAtIndexPath:-tableView:willDeselectRowAtIndexPath:-tableView:didDeselectRowAtIndexPath:
1.2 定制表格行
可以通过如下方式定制表格行:
- 继承UITableViewCell定制表格行
- 使用动态单元格定制表格行
- 利用xib文件定义表格行
实例:继承UITableViewCell定制表格行
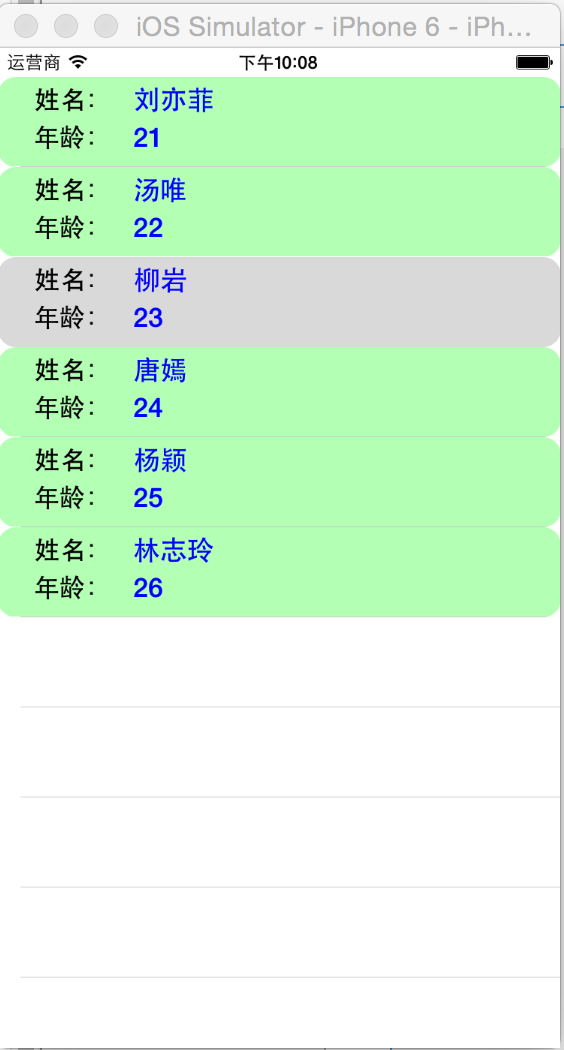
主要实现逻辑:
在类接口定义部分定义两个Label用于外部访问
#import <UIKit/UIKit.h>

@interface BookTableCellViewController :UIViewController<UITableViewDataSource,UITableViewDelegate>
@property (weak, nonatomic) IBOutlet UITableView *diyTableCell;

@end
在类实现部分,重写initWithStyle 方法:
-(id) initWithStyle:(UITableViewCellStyle)style reuseIdentifier:(NSString *)reuseIdentifier
{
    self  = [super initWithStyle:style reuseIdentifier:reuseIdentifier];
    if(self){
        UIColor * bgColor = [UIColor colorWithRed:0.7 green:1.0 blue:0.7 alpha:1.0];
        self.contentView.backgroundColor = bgColor;
        UILabel* nameLabel = [[UILabel alloc]
                              initWithFrame:CGRectMake(5, 5, 70, 20)];
        nameLabel.text=@"姓名:";
        nameLabel.textAlignment = NSTextAlignmentRight;
        nameLabel.font = [UIFont boldSystemFontOfSize:17];
        nameLabel.backgroundColor = [UIColor clearColor];
        [self.contentView addSubview:nameLabel];
        UILabel* ageLabel = [[UILabel alloc]
                             initWithFrame:CGRectMake(5, 30, 70, 20)];
        ageLabel.text = @"年龄:";
        ageLabel.textAlignment = NSTextAlignmentRight;
        ageLabel.font = [UIFont boldSystemFontOfSize:17];

        ageLabel.backgroundColor = [UIColor clearColor];

        [self.contentView addSubview:ageLabel];

        self.nameTxt = [[UILabel alloc]
                        initWithFrame:CGRectMake(90, 5, 180, 20)];
        self.nameTxt.textAlignment = NSTextAlignmentLeft;
        self.nameTxt.font = [UIFont boldSystemFontOfSize:18];
        self.nameTxt.textColor = [UIColor blueColor];
        [self.contentView addSubview:self.nameTxt];

        self.ageTxt = [[UILabel alloc]
                        initWithFrame:CGRectMake(90, 30, 180, 20)];
        self.ageTxt.textAlignment = NSTextAlignmentLeft;
        self.ageTxt.font = [UIFont boldSystemFontOfSize:18];
        self.ageTxt.textColor = [UIColor blueColor];
        [self.contentView addSubview:self.ageTxt];
    }
    return self;
}
控制器类实现UITableViewDataSource,UITableViewDelegate,
-(UITableViewCell*) tableView:(UITableView *)tableView cellForRowAtIndexPath:(NSIndexPath *)indexPath
{
    static NSString* cellId = @"cellId";
    BookTableCell* cell = [tableView dequeueReusableCellWithIdentifier:cellId];
    if (cell == nil) {
        cell = [[BookTableCell alloc]
                initWithStyle:UITableViewCellStyleDefault reuseIdentifier:cellId];
    }
    NSUInteger rowNo = indexPath.row;
    cell.layer.cornerRadius = 12;
    cell.layer.masksToBounds = YES;

    cell.nameTxt.text = [nameList objectAtIndex:rowNo];
    cell.ageTxt.text = [ageList objectAtIndex:rowNo];
    return cell;
}
使用动态单元格原型定制表格行
Storyboard允许直接在UITableView设计单元格的外观。
将一个UITableView拖入界面设计文件中,选中UITableView,在XCode属性检查器面板,将Content列表框设为Dynamic Prototypes(表明使用动态单元格),并将Prototype Cells 设为2,表示设计两个动态单元格原型.

指定两个表格航原型,设计器重由2个空白行,开发者可以通过该空白航来设计表格的表格行原型,可以向表格航原型中添加任意的UI控件。需要注意两点:
- 为表格行原型的Identifier指定一个 字符串属性值
- 一个表格航原型中添加的所有UI控件需要指定互补相同的Tag属性值
试图实现部分:
NSArray* lanList;

-(void) viewDidLoad
{
    [super viewDidLoad];
    self.mytable.dataSource = self;
    lanList = [NSArray arrayWithObjects:@"速度与激情",@"复仇者联盟",@"神盾局",@"吸血鬼日记",@"阿甘正传", nil];
}

-(NSInteger) tableView:(UITableView *)tableView numberOfRowsInSection:(NSInteger)section
{
    return lanList.count;
}

-(UITableViewCell*) tableView:(UITableView *)tableView cellForRowAtIndexPath:(NSIndexPath *)indexPath
{
    NSInteger rowNo = indexPath.row;
    //根据行号的奇偶性使用不同的标示符
    NSString * identifier = rowNo%2 == 0?@"cell1":@"cell2";
    UITableViewCell * cell = [tableView dequeueReusableCellWithIdentifier:identifier forIndexPath:indexPath];
    UILabel* label = (UILabel*)[cell viewWithTag:1];
    label.text = [lanList objectAtIndex:rowNo];
    return cell;
}
效果图: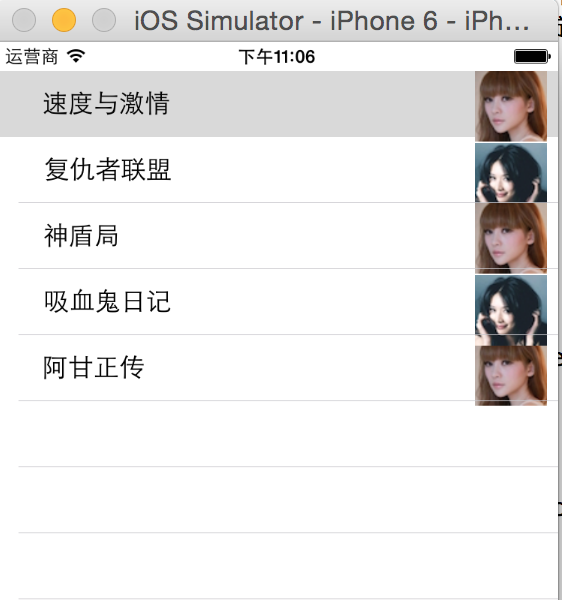
利用xib文件定制表格行
新建xib文件和UITableViewCell的子类,并进行关联,向xib文件中拖入对应的控件,并将孔家绑定在关联的类的头文件中,让应用程序访问表格行的控件。在控制器类的tableView:(UITableView *)tableView cellForRowAtIndexPath:方法中为UITableView注册表格行控件:tableView registerNib:nib forCellReuseIdentifier.
-(UITableViewCell*) tableView:(UITableView *)tableView cellForRowAtIndexPath:(NSIndexPath *)indexPath
{
    static NSString * cellId = @"cellId";
    static BOOL isRegist = NO;
    if (!isRegist) {
        //加载xib界面设计文件
        UINib* nib = [UINib nibWithNibName:@"TableCell" bundle:nil];
        //注册单元格
        [tableView registerNib:nib forCellReuseIdentifier:cellId];
        isRegist = YES;
    }
    XibTableCell * cell = [tableView dequeueReusableCellWithIdentifier:cellId];
    NSUInteger rowNo = indexPath.row;

    cell.layer.cornerRadius = 12;
    cell.layer.masksToBounds = YES;

    cell.xage.text = [xAges objectAtIndex:rowNo];
    cell.xname.text = [ xActors objectAtIndex:rowNo];

    return cell;
}

-(void)tableView:(UITableView *)tableView willDisplayCell:(UITableViewCell *)cell forRowAtIndexPath:(NSIndexPath *)indexPath
{
    UIColor* greenColor = [UIColor colorWithRed:0.7 green:1.0 blue:0.7 alpha:1.0];
    UIColor* redColor = [UIColor colorWithRed:1.0 green:0.7 blue:0.7 alpha:1.0];
    cell.backgroundColor= indexPath.row%2 ? greenColor:redColor;

    ((XibTableCell*)cell).xname.backgroundColor = [UIColor clearColor];
    ((XibTableCell*)cell).xage.backgroundColor = [UIColor clearColor];

}
1.3 编辑表格
UITableView支持对表格行执行移动、删除和插入操作。提供了editing属性来判断表格控件是否处于编辑状态。使用setEdinting:animated:方法来切换表格编辑状态。
-beginUpdates:-endUpdated:-insertRowsAtIndexPaths:withRowAnimation:-deleteRowsAtIndexPaths:withRowAnimation:-moveRowAtIndexPath:toIndexPath:-insertSections:withRowAnimation:-deleteSections:withRowAnimation:moveSection:toSection:将制定分区移动到另一个位置
为了动态编辑表格,必须实现UITableVIew对应的dataSource对象中的如下方法:
-tableView:canEidtRowAtIndePath:返回指定表格行是否可编辑-tableVIew:commitEditingStyle:forRowAtIndexPath:对指定表格行编辑完成是触发-tableView:canMoveRowAtIndexPath:指定表格行是否可移动-tableView:moveRowAtIndexPath:toIndexPath:告诉dataSource将指定的表格行移动到另一个位置
UITableViewDelegate协议 也定义了如下方法:
-tableView:willBeginEditintRowAtIndexPath:开始编辑表格行时触发-tableView:didEndEditingRowAtIndexPath:完成编辑表格行时触发-tableView:editingStyleForRowAtIndexPath:返回值决定了表格行的编辑状态-tableView:titleFOrDeleteConfirmationButtonForRowAtIndexPath:返回的NSString将作为删除指定表格时确定按钮的文本-tableView:shouldIndentWhileEditingRowAtIndexPath:返回的BOOL值决定指定表格行处于编辑时,表格行是否应该缩进。默认缩进
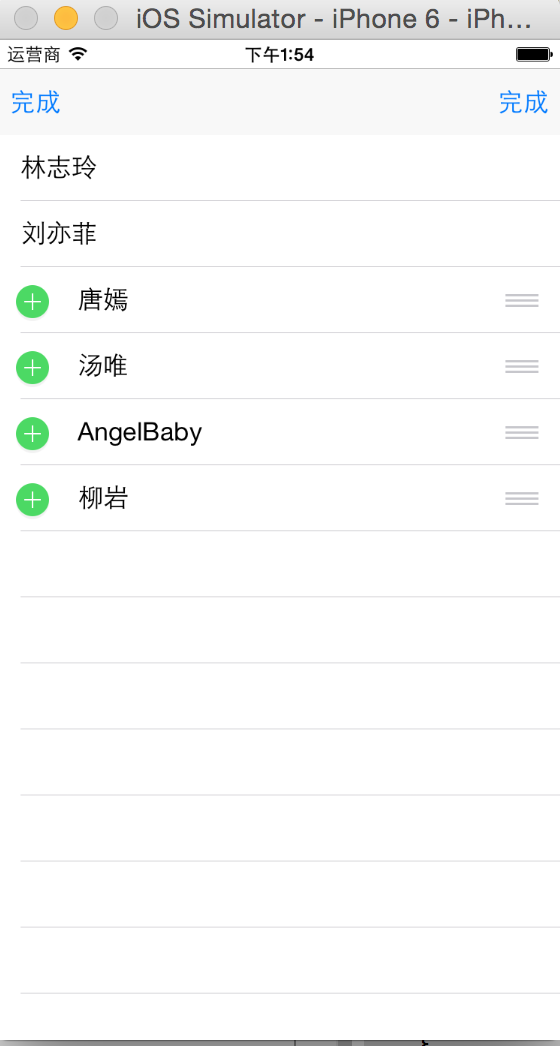
实例:编辑表格,实现添加、删除、移动表格行
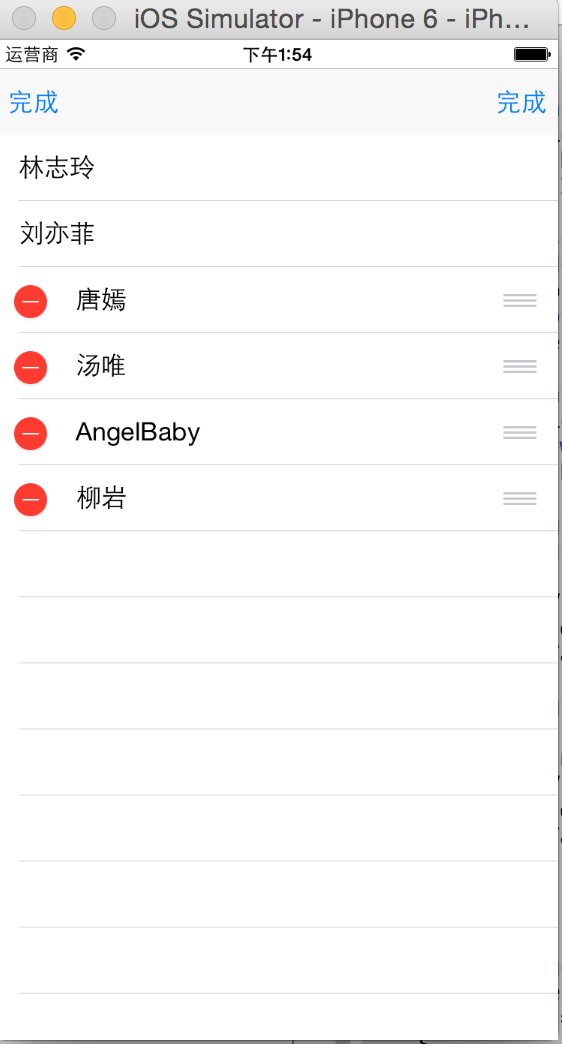
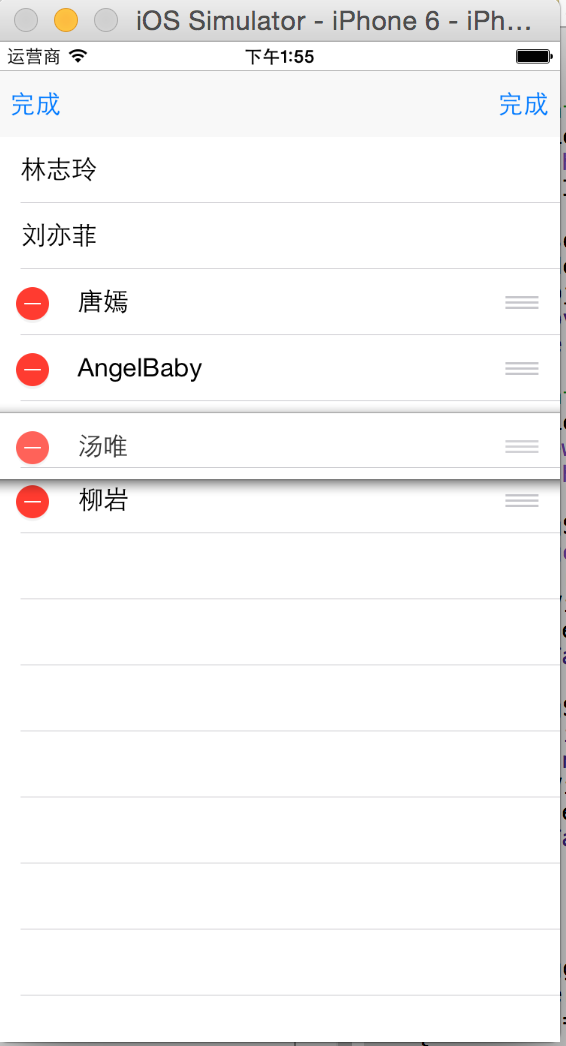
@implementation EditTableViewController

NSMutableArray* mList;
NSUInteger action;//记录正在执行的操作,0-删除,1-插入

-(void) viewDidLoad
{
    [super viewDidLoad];
    //初始化NSMutableArray
    mList = [[NSMutableArray alloc] initWithObjects:@"林志玲",@"刘亦菲",@"唐嫣",@"汤唯",@"AngelBaby",@"柳岩", nil];
    action = 0;
    self.mTable.delegate = self;
    self.mTable.dataSource = self;
}

//表格表格多少行
-(NSInteger) tableView:(UITableView *)tableView numberOfRowsInSection:(NSInteger)section
{
    return [mList count];
}

-(UITableViewCell*) tableView:(UITableView *)tableView cellForRowAtIndexPath:(NSIndexPath *)indexPath
{
    static NSString * cellId = @"moveCell";
    UITableViewCell* cell = [tableView dequeueReusableCellWithIdentifier:cellId];
    if(cell == nil)
    {
        cell = [[UITableViewCell alloc]
                initWithStyle:UITableViewCellStyleDefault reuseIdentifier:cellId];
    }
    NSInteger rowNo = indexPath.row;
    cell.textLabel.text = [mList objectAtIndex:rowNo];
    return cell;
}
//UITableViewDelegate协议定义的方法,决定单元格的编辑状态
-(UITableViewCellEditingStyle) tableView:(UITableView *)tableView editingStyleForRowAtIndexPath:(NSIndexPath *)indexPath
{
    return action == 0 ? UITableViewCellEditingStyleDelete:UITableViewCellEditingStyleInsert;
}

//UITableViewDelegate协议定义的方法。
//该方法的返回值作为删除指定表格行时确定按钮的文本
-(NSString *) tableView:(UITableView *)tableView titleForDeleteConfirmationButtonForRowAtIndexPath:(NSIndexPath *)indexPath
{
    return @"确认删除";
}

//UITableViewDataSource定义,决定行是否可编辑
-(BOOL) tableView:(UITableView *)tableView canEditRowAtIndexPath:(NSIndexPath *)indexPath
{
    if([[mList objectAtIndex:[indexPath row]] isEqualToString:@"林志玲"])
    {
        return NO;
    }
    if (indexPath.row ==1) {
        return NO;
    }
    return YES;
}
//UITableViewDataSource协议定义,移动完成时触发
-(void) tableView:(UITableView *)tableView moveRowAtIndexPath:(NSIndexPath *)sourceIndexPath toIndexPath:(NSIndexPath *)destinationIndexPath
{
    NSInteger sourceRowno = [sourceIndexPath row];
    NSInteger destRowNo = [destinationIndexPath row];
    id targetObj = [mList objectAtIndex:sourceRowno];
    [mList removeObjectAtIndex:sourceRowno];
    [mList insertObject:targetObj atIndex:destRowNo];
}
//UITableViewDataSource协议定义的方法,编辑完成时触发
-(void) tableView:(UITableView *)tableView commitEditingStyle:(UITableViewCellEditingStyle)editingStyle forRowAtIndexPath:(NSIndexPath *)indexPath
{
    if (editingStyle == UITableViewCellEditingStyleDelete) {
        NSInteger rowNo = [indexPath row];
        [mList removeObjectAtIndex:rowNo];
        [tableView deleteRowsAtIndexPaths:[NSArray arrayWithObject:indexPath] withRowAnimation:UITableViewRowAnimationAutomatic];
    }
    if (editingStyle == UITableViewCellEditingStyleInsert) {
        [mList insertObject:[mList objectAtIndex:indexPath.row] atIndex:indexPath.row +1];
        [tableView insertRowsAtIndexPaths:[NSArray arrayWithObject:indexPath] withRowAnimation:UITableViewRowAnimationAutomatic];
    }
}


- (IBAction)toggleClick:(UIBarButtonItem *)sender {
    if ([[sender title] isEqualToString:@"删除"]) {
        action = 0;
    }
    else{
        action =1;
    }
    [self.mTable setEditing:!self.mTable.editing animated:YES];
    if (self.mTable.editing) {
        self.maddBn.title = @"完成";
        self.mdeleteBn.title=@"完成";
    }
    else{
        self.maddBn.title = @"添加";
        self.mdeleteBn.title=@"删除";
    }
}
@end
1.4 多分区表格以及分区索引
如果希望UITableView生成的表格控件包含更多的分区,需要为表格的dataSource对象实现更多的方法。
-numberOfSectionsInTableView:返回值设置表格包含多少个分区-sectionIndexTitlesForTableView:返回值用于在表格右边建立一列浮动的索引-tableView:titleForHeaderInSection:返回值决定指定分区的页眉-tableView:titleForFooterInSection:返回值决定指定分区的页脚
示例:多分区表格
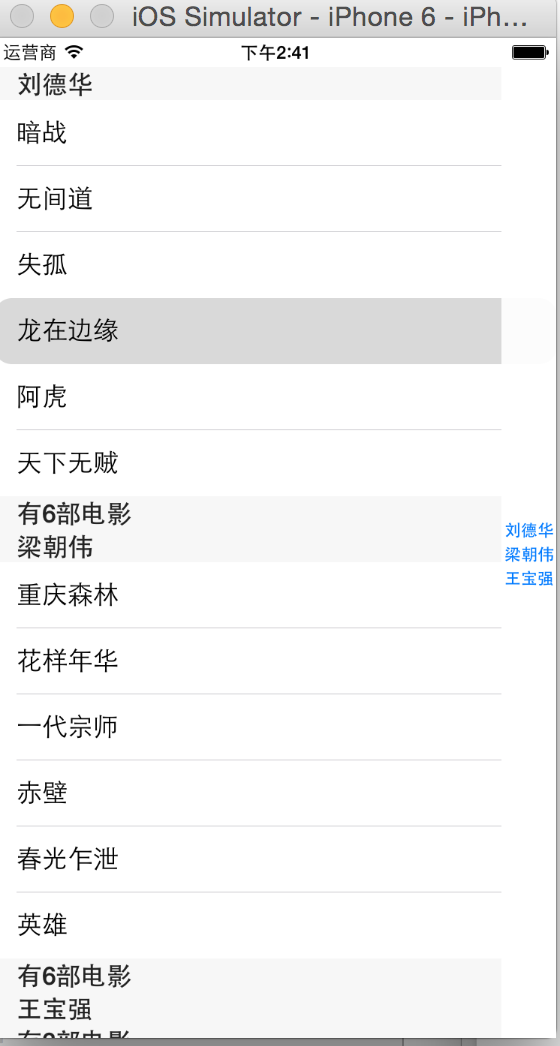
@implementation MultiSectionViewController
NSDictionary* tableData ;
NSArray* keyList;

-(void) viewDidLoad
{
    [super viewDidLoad];
    tableData = [NSDictionary dictionaryWithObjectsAndKeys:
                 [NSArray arrayWithObjects:@"暗战",@"无间道",@"失孤",@"龙在边缘",@"阿虎", @"天下无贼",nil],@"刘德华",
                 [NSArray arrayWithObjects:@"人在囧途",@"泰囧",@"一个人的武林", nil],@"王宝强",
                 [NSArray arrayWithObjects:@"重庆森林",@"花样年华",@"一代宗师",@"赤壁",@"春光乍泄",@"英雄", nil],@"梁朝伟",
                 nil];
    keyList = [[tableData allKeys] sortedArrayUsingSelector:@selector(compare:)];
    self.msTable.dataSource = self;
    self.msTable.delegate = self;
}

//UITableViewDataSource ,返回表格包含多个个分区
-(NSInteger) numberOfSectionsInTableView:(UITableView *)tableView
{
    return keyList.count;
}

//UITableViewDataSource, 返回值决定指定分区包含多少个元素
-(NSInteger) tableView:(UITableView *)tableView numberOfRowsInSection:(NSInteger)section
{
    NSString* key = [keyList objectAtIndex:section];

    return [[tableData objectForKey:key] count];
}

-(UITableViewCell*) tableView:(UITableView *)tableView cellForRowAtIndexPath:(NSIndexPath *)indexPath
{
    NSUInteger sectionNo = indexPath.section;
    NSUInteger rowNo = indexPath.row;
    NSString* key = [keyList objectAtIndex:sectionNo];
    static NSString* cellId = @"cellId";
    UITableViewCell* cell = [tableView dequeueReusableCellWithIdentifier:cellId];
    if (cell == nil) {
        cell = [[UITableViewCell alloc]
                initWithStyle:UITableViewCellStyleDefault reuseIdentifier:cellId];
    }
    cell.layer.cornerRadius = 12;
    cell.layer.masksToBounds = YES;
    cell.textLabel.text = [[tableData objectForKey:key] objectAtIndex:rowNo];
    return cell;
}
//UITableViewDataSource,返回值用于在表格右边建立一列浮动的索引
-(NSArray*)sectionIndexTitlesForTableView:(UITableView *)tableView
{
    return keyList;
}

-(NSString*) tableView:(UITableView *)tableView titleForHeaderInSection:(NSInteger)section
{
    return [keyList objectAtIndex:section];
}
-(NSString*) tableView:(UITableView *)tableView titleForFooterInSection:(NSInteger)section
{
    NSString* key = [keyList objectAtIndex:section];
    return [NSString stringWithFormat:@"有%d部电影",[[tableData objectForKey:key] count] ];
}

@end
示例: 刷新表格
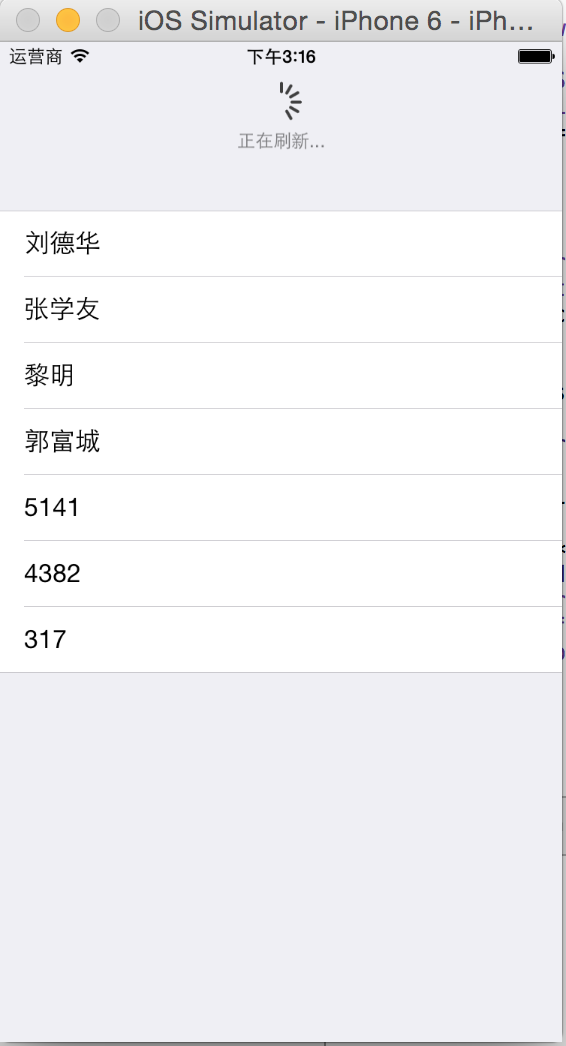
#import <UIKit/UIKit.h>

@interface RefreshTableViewController : UITableViewController

@end
@implementation RefreshTableViewController
    NSMutableArray* list;
-(void)viewDidLoad
{
    [super viewDidLoad];
    list = [[NSMutableArray alloc] initWithObjects:@"刘德华",@"张学友",@"黎明",@"郭富城", nil];
    //设置refreshControl属性,
    self.refreshControl = [[UIRefreshControl alloc] init];
    self.refreshControl.tintColor = [UIColor grayColor];
    self.refreshControl.attributedTitle = [[NSAttributedString alloc] initWithString:@"下拉刷新"];
    [self.refreshControl addTarget:self action:@selector(refreshData) forControlEvents:UIControlEventValueChanged];
}

-(NSInteger) tableView:(UITableView *)tableView numberOfRowsInSection:(NSInteger)section
{
    return  list.count;
}
-(UITableViewCell*) tableView:(UITableView *)tableView cellForRowAtIndexPath:(NSIndexPath *)indexPath
{
    static NSString* cellId = @"cell1";
    UITableViewCell * cell = [tableView dequeueReusableCellWithIdentifier:cellId];
    if(cell == nil)
    {
        cell = [[UITableViewCell alloc]
                initWithStyle:UITableViewCellStyleDefault reuseIdentifier:cellId];
    }
    NSInteger rowNo = [indexPath row];
    cell.textLabel.text = [list objectAtIndex:rowNo];
    return  cell;
}

-(void)refreshData
{
     [self performSelector:@selector(handleData) withObject:nil  afterDelay:2];
}
-(void) handleData
{
    NSString* randstr = [NSString stringWithFormat:@"%d",arc4random()%10000];
    [list addObject:randstr];
    self.refreshControl.attributedTitle = [[NSAttributedString alloc] initWithString:@"正在刷新..."];
    [self.refreshControl endRefreshing];
    [self.tableView reloadData];
}
@end
调用 该控制器
 AppDelegate* d = [UIApplication sharedApplication].delegate;
 d.window.rootViewController= [[RefreshTableViewController alloc] initWithStyle:UITableViewStyleGrouped];