最近浏览了不少网站的图片裁切效果,大部分的做法如下图所示(借用一张脚本之家的图片),通过改变裁切框的大小来选取合适的位置。
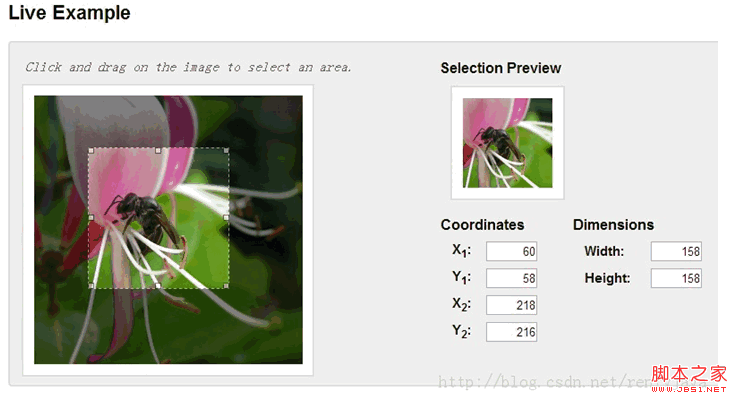
但本文介绍的是另外一种裁切方式,裁切框由开发者决定,图片大小由用户决定,通过缩放、拖动图片来选取合适位置,并且在这一过程中始终保持图片宽高比,demo如下。
这样做法主要有以下优点:
- 裁切框的宽高与跟实际使用的处宽高比一致,防止出现图片变形问题
- 不限制图片的显示大小,保证图片原始比例,通过缩放可得到原始尺寸
- 对于局部的裁切更加友好,比如截取一张高清图片中很小的一个部位,我们只需将图片放大并拖动到裁切框内即可,而其他方式需要将裁切框调整的非常小,不利于用户操作
说完了有点也该说说缺点,缺点就是难度增大了一个数量级。。。。
主要实现思路:
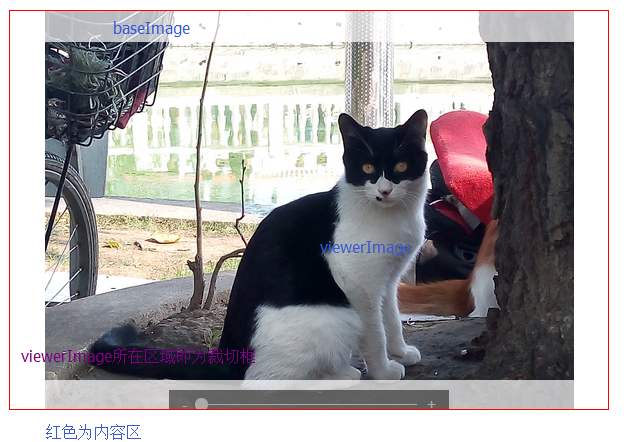
- 将两张图片绝对定位
- 一张放在裁切框内一张放在裁切框外并设置透明效果,裁切框overflow为hidden
- 鼠标操作过程中时刻保持两张图片的绝对同步。

 1 <div class="jimu-crop-image" data-dojo-attach-point="cropSection">
 2     <div class="viewer-box" data-dojo-attach-point="viewerBox">
 3         <div class="viewer-content" data-dojo-attach-point="viewerContent">
 4             <img class="viewer-image hide-image" data-dojo-attach-point="viewerImage" src="">
 5         </div>
 6         <img class="base-image hide-image" data-dojo-attach-point="baseImage" data-dojo-attach-event="mousedown:_onViewerMouseDown,mouseup:_onViewerMouseUp">
 7
 8         <div class="controller">
 9             <div class="zoom-out" data-dojo-attach-event="click:_onZoomOutClick">-</div>
10             <div class="slider" data-dojo-attach-point="sliderNode">
11                 <div class="button" data-dojo-attach-point="sliderButton" data-dojo-attach-event="mousedown:_onSliderMouseDown,mouseup:_onSliderMouseUp"></div>
12                 <div class="horizontal"></div>
13             </div>
14             <div class="zoom-in" data-dojo-attach-event="click:_onZoomInClick">+</div>
15         </div>
16     </div>
17 </div>
初始工作:
首先在postCreate中绑定document的mousemove跟mousedown事件,在鼠标离开工作区后仍可以继续拖动或缩放。startup中利用计时器获取image的原始宽度,据此来判断图片是否加载完毕。不熟悉dojo的道友只要知道postCreate会在startup之前执行即可。
postCreate: function() {
    this._dragingHandlers = [];
    this.setImageSrc(this.imageSrc);
    this.own(on(this.ownerDocument, 'mousemove', lang.hitch(this, '_onMouseMove')));
    this.own(on(this.ownerDocument, 'mouseup', lang.hitch(this, '_onMouseUp')));
    this.loadingImg.src = require.toUrl('jimu') + '/images/loading.gif';
},
startup: function() {
    var timeOut = /data:image/(.*);base64/.test(this.imageSrc) ? 50 : 500;
    var tic = lang.hitch(this, function() {
        var imageStyle = this._getComputedStyle(this.baseImage);
        var imageWidth = parseFloat(imageStyle.width);
        console.log('image width', imageWidth);
        // debugger;
        if (isFinite(imageWidth) && imageWidth > 0) {
            this._init();
            html.setStyle(this.loadingImg, 'display', 'none');
        } else {
            setTimeout(tic, timeOut);
        }
    });
    setTimeout(tic, timeOut);
},
_init函数做了以下几件事:
1、获取图片的原始尺寸,后续计算缩放因子时会用到
var cropSectionStyle = this._getComputedStyle(this.cropSection);
var cropSectionContentBox = html.getContentBox(this.cropSection);
var imageStyle = this._getComputedStyle(this.baseImage);
var imageWidth = parseFloat(imageStyle.width) || this.baseImage.offsetWidth;
var imageHeight = parseFloat(imageStyle.height) || this.baseImage.offsetHeight;
var imageRadio = imageWidth / imageHeight;
this._maxImageWidth = imageWidth;
this._maxImageHeight = imageHeight;
if (imageHeight < this.realHeight && imageWidth < this.realWidth) {
    alert('image is too smaller to display');
    return;
2、在保证裁切区域宽高比的情况下,让裁切区域尽量的填满工作区。
这里裁切工作最重要的就是防止图片变形,所以只要保证宽高比一致可以将裁切区域适当放大。cropSectionContentBox是当前工作区的content区域,假设用户设置裁切框的宽度大于高度,对于实际出现在页面中的裁切框宽、高,我们从数值较小的高度来找起,找到合适的高度将宽度按原比例放大即可。
如果将裁切框高度设置与工作区高度相同,判断裁切区宽度是否超出工作区,没有则裁切区高度等于工作区高度。若超过,则在0~cropSectionContentBox.h中找一个数,保证在该高度下,裁切区宽度尽量接近工作区。这样我们找到一个可以尽量覆盖工作区的裁切框。
高度大于宽度时的处理类似。
//create a box which keep the ratio of width and height to full fill the content of popup
this.idealWidth = this.realWidth;
this.idealHeight = this.realHeight;
this.ratio = this.ratio ? this.ratio : this.realWidth / this.realHeight;
var _ratio = this.ratio;
if (this.ratio >= 1) {
    if (cropSectionContentBox.h * this.ratio <= cropSectionContentBox.w) {
        this.idealHeight = cropSectionContentBox.h;
        this.idealWidth = cropSectionContentBox.h * this.ratio;
    } else {
        this.idealHeight = this._findProperlyValue(0, cropSectionContentBox.h, cropSectionContentBox.w - 5, function(p) {
            return p * _ratio;
        });
        this.idealWidth = this.idealHeight * this.ratio;
    }
} else {
    if (cropSectionContentBox.w / this.ratio <= cropSectionContentBox.h) {
        this.idealWidth = cropSectionContentBox.w;
        this.idealHeight = cropSectionContentBox.w / this.ratio;
    } else {
        this.idealWidth = this._findProperlyValue(0, cropSectionContentBox.w, cropSectionContentBox.h - 5, function(p) {
            return p / _ratio;
        });
        this.idealHeight = this.idealWidth / this.ratio;
    }
}
3、保持图片原始宽高比的前提下,让图片尽量接近裁切框
该过程与上文将裁切框尽量填充工作区的处理类似,区别在上上文是填充这里是覆盖,所以判断条件要变一下。如果图片宽度大于高度,寻找一个高度使得断按比例缩放后的宽度是否能够覆盖裁切框的宽度,首先考虑裁切框高度,不满足的话从0~idealWidth中找到一个值;这里不用担心图片超出工作区,只需要找到一个合适高度即可。
// keep original ratio of image
if (imageRadio >= 1) {
    if (this.idealHeight * imageRadio >= this.idealWidth) {
        html.setStyle(this.viewerImage, 'height', this.idealHeight + 'px');
        html.setStyle(this.baseImage, 'height', this.idealHeight + 'px');
    } else {
        var properlyHeight = this._findProperlyValue(0, this.idealWidth, this.idealWidth, function(p) {
            return p * imageRadio;
        });
        html.setStyle(this.viewerImage, 'height', properlyHeight + 'px');
        html.setStyle(this.baseImage, 'height', properlyHeight + 'px');
    }
} else {
    if (this.idealWidth / imageRadio >= this.idealHeight) {
        html.setStyle(this.viewerImage, 'width', this.idealWidth + 'px');
        html.setStyle(this.baseImage, 'width', this.idealWidth + 'px');
    } else {
        var properlyWidth = this._findProperlyValue(0, this.idealHeight, this.idealHeight, function(p) {
            return p / imageRadio;
        });
        html.setStyle(this.viewerImage, 'width', properlyWidth + 'px');
        html.setStyle(this.baseImage, 'width', properlyWidth + 'px');
    }
}
3、以上计算完成后设置图片初始位置,让裁切框相对图片居中
imageStyle = this._getComputedStyle(this.baseImage);
imageWidth = parseFloat(imageStyle.width) || this.baseImage.offsetWidth;
imageHeight = parseFloat(imageStyle.height) || this.baseImage.offsetHeight;
this._minImageWidth = imageWidth;
this._minImageHeight = imageHeight;
this._currentImageWidth = imageWidth;
this._currentImageHeight = imageHeight;
this._currentTop = -(imageHeight - this.idealHeight) / 2;
this._currentLeft = -(imageWidth - this.idealWidth) / 2;
html.setStyle(this.baseImage, {
    top: this._currentTop + 'px',
    left: this._currentLeft + 'px'
});
html.setStyle(this.viewerImage, {
    top: this._currentTop + 'px',
    left: this._currentLeft + 'px'
});
4、如果原始裁切区域很小,经过上述步骤后工作区内的裁切框会比原始框大,这时上传一张小图片,在工作区内这张图片有可能被拉伸,这种情况下隐藏缩放功能
//sometimes zoomratio < 1; it's should be not allowed to zoom
this._zoomRatio = this._maxImageWidth / this._minImageWidth;
if (this._zoomRatio < 1) {
    html.setStyle(this.zoomController, 'display', 'none');
}
if (!this._latestPercentage) {
    this._latestPercentage = 0;
}
第一个重要过程结束了,这是整个过程的完整代码:

  1 _init: function() {
  2                 var cropSectionStyle = this._getComputedStyle(this.cropSection);
  3                 var cropSectionContentBox = html.getContentBox(this.cropSection);
  4                 var imageStyle = this._getComputedStyle(this.baseImage);
  5                 var imageWidth = parseFloat(imageStyle.width) || this.baseImage.offsetWidth;
  6                 var imageHeight = parseFloat(imageStyle.height) || this.baseImage.offsetHeight;
  7                 var imageRadio = imageWidth / imageHeight;
  8
  9                 this._maxImageWidth = imageWidth;
 10                 this._maxImageHeight = imageHeight;
 11
 12                 if (imageHeight < this.realHeight && imageWidth < this.realWidth) {
 13                     alert('image is too smaller to display');
 14                     return;
 15                 }
 16
 17                 //create a box which keep the ratio of width and height to full fill the content of popup
 18                 this.idealWidth = this.realWidth;
 19                 this.idealHeight = this.realHeight;
 20
 21                 this.ratio = this.ratio ? this.ratio : this.realWidth / this.realHeight;
 22                 var _ratio = this.ratio;
 23                 if (this.ratio >= 1) {
 24                     if (cropSectionContentBox.h * this.ratio <= cropSectionContentBox.w) {
 25                         this.idealHeight = cropSectionContentBox.h;
 26                         this.idealWidth = cropSectionContentBox.h * this.ratio;
 27                     } else {
 28                         this.idealHeight = this._findProperlyValue(0, cropSectionContentBox.h, cropSectionContentBox.w - 5, function(p) {
 29                             return p * _ratio;
 30                         });
 31                         this.idealWidth = this.idealHeight * this.ratio;
 32                     }
 33                 } else {
 34                     if (cropSectionContentBox.w / this.ratio <= cropSectionContentBox.h) {
 35                         this.idealWidth = cropSectionContentBox.w;
 36                         this.idealHeight = cropSectionContentBox.w / this.ratio;
 37                     } else {
 38                         this.idealWidth = this._findProperlyValue(0, cropSectionContentBox.w, cropSectionContentBox.h - 5, function(p) {
 39                             return p / _ratio;
 40                         });
 41                         this.idealHeight = this.idealWidth / this.ratio;
 42                     }
 43                 }
 44
 45                 html.setStyle(this.viewerBox, {
 46                      this.idealWidth + 'px',
 47                     height: this.idealHeight + 'px'
 48                 });
 49
 50                 var paddingTop = Math.abs((parseFloat(cropSectionStyle.height) - this.idealHeight) / 2);
 51                 html.setStyle(this.cropSection, {
 52                     'paddingTop': paddingTop + 'px',
 53                     'paddingBottom': paddingTop + 'px'
 54                 });
 55
 56                 // keep original ratio of image
 57                 if (imageRadio >= 1) {
 58                     if (this.idealHeight * imageRadio >= this.idealWidth) {
 59                         html.setStyle(this.viewerImage, 'height', this.idealHeight + 'px');
 60                         html.setStyle(this.baseImage, 'height', this.idealHeight + 'px');
 61                     } else {
 62                         var properlyHeight = this._findProperlyValue(0, this.idealWidth, this.idealWidth, function(p) {
 63                             return p * imageRadio;
 64                         });
 65                         html.setStyle(this.viewerImage, 'height', properlyHeight + 'px');
 66                         html.setStyle(this.baseImage, 'height', properlyHeight + 'px');
 67                     }
 68                 } else {
 69                     if (this.idealWidth / imageRadio >= this.idealHeight) {
 70                         html.setStyle(this.viewerImage, 'width', this.idealWidth + 'px');
 71                         html.setStyle(this.baseImage, 'width', this.idealWidth + 'px');
 72                     } else {
 73                         var properlyWidth = this._findProperlyValue(0, this.idealHeight, this.idealHeight, function(p) {
 74                             return p / imageRadio;
 75                         });
 76                         html.setStyle(this.viewerImage, 'width', properlyWidth + 'px');
 77                         html.setStyle(this.baseImage, 'width', properlyWidth + 'px');
 78                     }
 79                 }
 80
 81                 query('.hide-status', this.domNode).removeClass('hide-status');
 82
 83                 imageStyle = this._getComputedStyle(this.baseImage);
 84                 imageWidth = parseFloat(imageStyle.width) || this.baseImage.offsetWidth;
 85                 imageHeight = parseFloat(imageStyle.height) || this.baseImage.offsetHeight;
 86                 this._minImageWidth = imageWidth;
 87                 this._minImageHeight = imageHeight;
 88
 89                 this._currentImageWidth = imageWidth;
 90                 this._currentImageHeight = imageHeight;
 91
 92                 this._currentTop = -(imageHeight - this.idealHeight) / 2;
 93                 this._currentLeft = -(imageWidth - this.idealWidth) / 2;
 94                 html.setStyle(this.baseImage, {
 95                     top: this._currentTop + 'px',
 96                     left: this._currentLeft + 'px'
 97                 });
 98                 html.setStyle(this.viewerImage, {
 99                     top: this._currentTop + 'px',
100                     left: this._currentLeft + 'px'
101                 });
102                 //sometimes zoomratio < 1; it's should be not allowed to zoom
103                 this._zoomRatio = this._maxImageWidth / this._minImageWidth;
104
105                 if (this._zoomRatio < 1) {
106                     html.setStyle(this.zoomController, 'display', 'none');
107                 }
108
109                 if (!this._latestPercentage) {
110                     this._latestPercentage = 0;
111                 }
112             },
113
114             _findProperlyValue: function(start, end, value, formatter, tolerance) {
115                 tolerance = isFinite(tolerance) ? parseFloat(tolerance) : 1;
116                 value = value - tolerance < 0 || value + tolerance < 0 ? tolerance : value;
117                 var middle = (start + end) / 2;
118                 var formatterValue = formatter(middle);
119                 if (formatterValue <= value + tolerance && formatterValue >= value - tolerance) {
120                     return middle;
121                 } else if (formatterValue > value) {
122                     return this._findProperlyValue(start, middle, value, formatter);
123                 } else if (formatterValue < value) {
124                     return this._findProperlyValue(middle, end, value, formatter);
125                 }
126             },
平移与缩放:
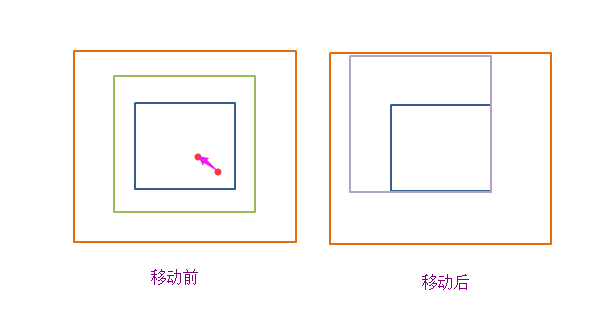
平移的过程比较简单,只需要记录移动过程中鼠标的相对位置变化,不断改变图片左上角的left跟top即可,在dragstart跟selectstart事件中preventDefault防止出现元素被选中变蓝。

_resetImagePosition: function(clientX, clientY) {
                var delX = clientX - this._currentX;
                var delY = clientY - this._currentY;

                if (this._currentTop + delY >= 0) {
                    html.setStyle(this.baseImage, 'top', 0);
                    html.setStyle(this.viewerImage, 'top', 0);
                    this._currentY = clientY;
                    this._currentTop = 0;
                } else if (this._currentTop + delY <= this._maxOffsetTop) {
                    html.setStyle(this.baseImage, 'top', this._maxOffsetTop + 'px');
                    html.setStyle(this.viewerImage, 'top', this._maxOffsetTop + 'px');
                    this._currentY = clientY;
                    this._currentTop = this._maxOffsetTop;
                } else {
                    html.setStyle(this.baseImage, 'top', this._currentTop + delY + 'px');
                    html.setStyle(this.viewerImage, 'top', this._currentTop + delY + 'px');
                    this._currentY = clientY;
                    this._currentTop += delY;
                }

                if (this._currentLeft + delX >= 0) {
                    html.setStyle(this.baseImage, 'left', 0);
                    html.setStyle(this.viewerImage, 'left', 0);
                    this._currentX = clientX;
                    this._currentLeft = 0;
                } else if (this._currentLeft + delX <= this._maxOffsetLeft) {
                    html.setStyle(this.baseImage, 'left', this._maxOffsetLeft + 'px');
                    html.setStyle(this.viewerImage, 'left', this._maxOffsetLeft + 'px');
                    this._currentX = clientX;
                    this._currentLeft = this._maxOffsetLeft;
                } else {
                    html.setStyle(this.baseImage, 'left', this._currentLeft + delX + 'px');
                    html.setStyle(this.viewerImage, 'left', this._currentLeft + delX + 'px');
                    this._currentX = clientX;
                    this._currentLeft += delX;
                }
            },
缩放的主要原则就是保持裁剪框的中心点在缩放前后的相对位置不变。
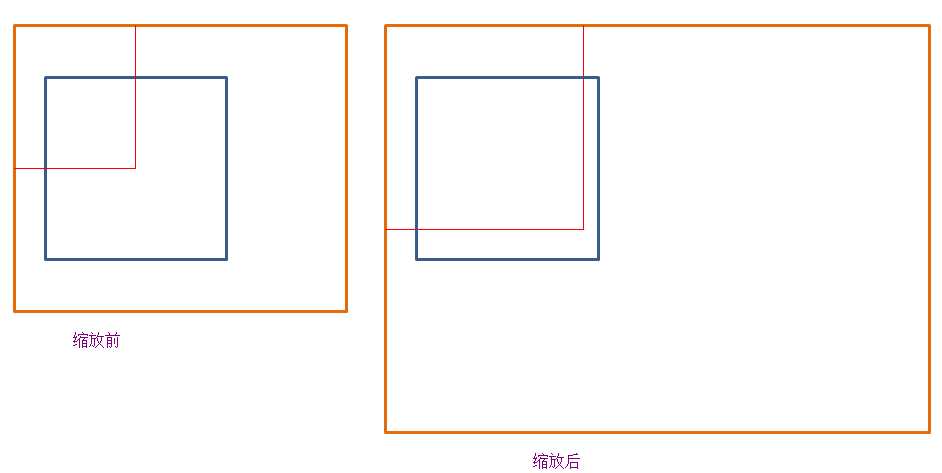
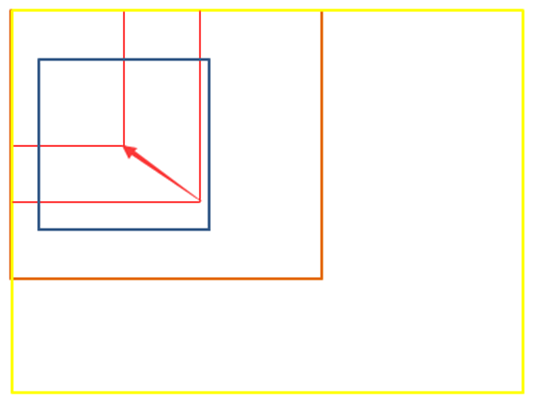
为了将缩放后的原裁切框的中心点移回原位,我们需要计算两中值:图片大小变化量,图片左上角移动量。
var delImageWidth = this._minImageWidth * (this._zoomRatio - 1) * leftPercentage / 100;
var delImageHeight = this._minImageHeight * (this._zoomRatio - 1) * leftPercentage / 100;

var imageStyle = html.getComputedStyle(this.baseImage);
                this._currentLeft = parseFloat(imageStyle.left);
                this._currentTop = parseFloat(imageStyle.top);
var delImageLeft = (Math.abs(this._currentLeft) + this.idealWidth / 2) *
                    ((this._minImageWidth + delImageWidth) / this._currentImageWidth - 1);
var delImageTop = (Math.abs(this._currentTop) + this.idealHeight / 2) *
                    ((this._minImageWidth + delImageWidth) / this._currentImageWidth - 1);
其中_zoomRatio = _maxImageWidth / _minImageWidth; _maxImageWidth为图片原始大小,_minImageWidth是让图片接近裁切框的最小宽度。
leftPercentage为滑动按钮相对滑动条的位移百分比。
_currentLeft、_currentTop是本次缩放前图片相对裁切框的绝对位置(position:absolute)。
_currentImageWidth、_currentImageHeight是本次缩放前图片的大小。
剩下要做的是防止裁切框内出现空白现象,假设用户放大图片,将图片拖放到边界与裁切框边界重合,这时缩小图片的话裁切框内便会出现空白。为了防止这种情况我们也需要做相应处理。
当图片左上边界与裁切框左上边界重合时,无论如何缩小,image的left、top始终为零,只改变图片大小。
当图片右下边界与裁切框右下边界重合时,根据图片大小与裁切框大小可以计算出合适的left跟top

//prevent image out the crop box
                if (leftPercentage - _latestPercentage >= 0) {
                    console.log('zoomin');
                    html.setStyle(this.baseImage, {
                        top: this._currentTop -delImageTop + 'px',
                        left: this._currentLeft -delImageLeft + 'px'
                    });
                    html.setStyle(this.viewerImage, {
                        top: this._currentTop -delImageTop + 'px',
                        left: this._currentLeft -delImageLeft + 'px'
                    });
                } else {
                    console.log('zoomout');
                    var top = 0;
                    var left = 0;
                    if (this._currentTop - delImageTop >= 0) {
                        top = 0;
                    } else if (this._currentTop - delImageTop +
                        this._minImageHeight + delImageHeight <=
                        this.idealHeight) {
                        top = this.idealHeight - this._minImageHeight - delImageHeight;
                    } else {
                        top = this._currentTop - delImageTop;
                    }
                    console.log(this._currentLeft, delImageLeft);
                    if (this._currentLeft - delImageLeft >= 0) {
                        left = 0;
                    } else if (this._currentLeft - delImageLeft +
                        this._minImageWidth + delImageWidth <=
                        this.idealWidth) {
                        left =this.idealWidth - this._minImageWidth - delImageWidth;
                    } else {
                        left = this._currentLeft - delImageLeft;
                    }

                    html.setStyle(this.baseImage, {
                        top: top + 'px',
                        left: left + 'px'
                    });
                    html.setStyle(this.viewerImage, {
                        top: top + 'px',
                        left: left + 'px'
                    });
                }
以上便是客户端的实现思路。全部代码也已放在github中,浏览器支持:现代浏览器和ie8+
服务器端使用nodejs+express框架,主要代码如下:

 1 /**********
 2 body: {
 3   imageString: base64 code
 4   maxSize: w,h
 5   cropOptions: w,h,t,l
 6 }
 7 ************/
 8 exports.cropImage = function(req, res) {
 9   var base64Img = req.body.imageString;
10   if(!/^data:image/.*;base64,/.test(base64Img)){
11     res.send({
12       success: false,
13       message: 'Bad base64 code format'
14     });
15   }
16   var fileFormat = base64Img.match(/^data:image/(.*);base64,/)[1];
17   var base64Data = base64Img.replace(/^data:image/.*;base64,/, "");
18   var maxSize = req.body.maxSize;
19   maxSize = maxSize.split(',');
20   var cropOptions = req.body.cropOptions;
21   cropOptions = cropOptions.split(',');
22
23   try{
24     var buf = new Buffer(base64Data, 'base64');
25     var jimp = new Jimp(buf, 'image/' + fileFormat, function() {
26       var maxW = parseInt(maxSize[0], 10);
27       var maxH = parseInt(maxSize[1], 10);
28       var cropW = parseInt(cropOptions[0], 10);
29       var cropH = parseInt(cropOptions[1], 10);
30       var cropT = parseInt(cropOptions[2], 10);
31       var cropL = parseInt(cropOptions[3], 10);
32       this.resize(maxW, maxH)
33       .crop(cropT, cropL, cropW, cropH);
34     });
35
36     jimp.getBuffer('image/' + fileFormat, function(b) {
37       var base64String = "data:image/" + fileFormat + ";base64," + b.toString('base64');
38       res.send({
39         success: true,
40         source: base64String
41       });
42     });
43   }catch(err) {
44     logger.error(err);
45     res.send({
46       success: false,
47       message: 'unable to complete operations'
48     });
49   }
50 };
