一、爬虫系列之第1章-requests模块
爬虫简介
概述

近年来,随着网络应用的逐渐扩展和深入,如何高效的获取网上数据成为了无数公司和个人的追求,在大数据时代,谁掌握了更多的数据,谁就可以获得更高的利益,而网络爬虫是其中最为常用的一种从网上爬取数据的手段。
网络爬虫,即Web Spider,是一个很形象的名字。如果把互联网比喻成一个蜘蛛网,那么Spider就是在网上爬来爬去的蜘蛛。网络蜘蛛是通过网页的链接地址来寻找网页的。从网站某一个页面(通常是首页)开始,读取网页的内容,找到在网页中的其它链接地址,然后通过这些链接地址寻找下一个网页,这样一直循环下去,直到把这个网站所有的网页都抓取完为止。如果把整个互联网当成一个网站,那么网络蜘蛛就可以用这个原理把互联网上所有的网页都抓取下来。
爬虫的价值
互联网中最有价值的便是数据,比如天猫商城的商品信息,链家网的租房信息,雪球网的证券投资信息等等,这些数据都代表了各个行业的真金白银,可以说,谁掌握了行业内的第一手数据,谁就成了整个行业的主宰,如果把整个互联网的数据比喻为一座宝藏,那我们的爬虫课程就是来教大家如何来高效地挖掘这些宝藏,掌握了爬虫技能, 你就成了所有互联网信息公司幕后的老板,换言之,它们都在免费为你提供有价值的数据。
爬虫的基本流程

在爬虫的基本流程中,最难的不是解析数据,而是发送请求。为什么这么说呢?因为某些页面做了防爬虫机制,你连访问,都访问不了,那么剩下的流程就走不通了!
预备知识
HTTP请求由三部分组成,分别是:请求行,消息报头,请求正文。
HTTP响应也是由三个部分组成,分别是:状态行,消息报头,相应正文。
httpbin
如果一个人想学习爬虫技术,我会首先推荐他学会使用httpbin!
httpbin(官网|github)是一个很不错测试工具,你可以放心大胆的黑他,而不用担心他报复你。他有点像一个蜜罐,时刻等待着你的光临,然后根据你的请求,给你返回你想要的东西
直接访问页面: http://httpbin.org/get
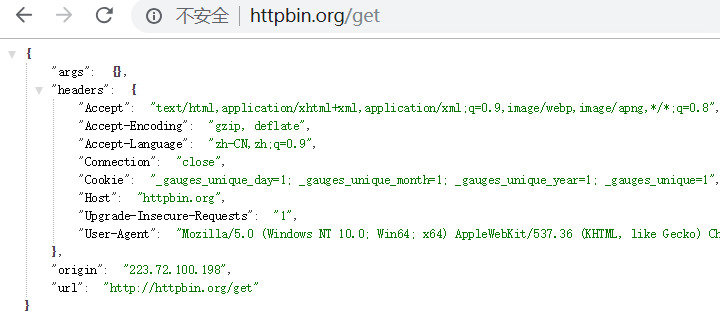
它将你的请求信息,直接展示到页面中!
args 表示get参数
headers 表示请求头
origin 表示 你所在网络运营商的公网IP地址
url 表示访问的url
带一个参数

requests模块
Requests 是使用 Apache2 Licensed 许可证的 HTTP 库。用 Python 编写,真正的为人类着想。
Python 标准库中的 urllib2 模块提供了你所需要的大多数 HTTP 功能,但是它的 API 太渣了。它是为另一个时代、另一个互联网所创建的。它需要巨量的工作,甚至包括各种方法覆盖,来完成最简单的任务。
在Python的世界里,事情不应该这么麻烦。
Requests 使用的是 urllib3,因此继承了它的所有特性。Requests 支持 HTTP 连接保持和连接池,支持使用 cookie 保持会话,支持文件上传,支持自动确定响应内容的编码,支持国际化的 URL 和 POST 数据自动编码。现代、国际化、人性化。
(以上转自Requests官方文档)
安装
pip install requests
基本语法
requests模块支持的请求:

import requestsrequests.get("http://httpbin.org/get")
requests.post("http://httpbin.org/post")
requests.put("http://httpbin.org/put")
requests.delete("http://httpbin.org/delete")
requests.head("http://httpbin.org/get")
requests.options("http://httpbin.org/get")
上面列举了几种请求方式,最常用的还是get和post
get请求
1. 基本请求
import requests response=requests.get('https://www.jd.com/',)with open("jd.html","wb") as f:
f.write(response.content)
2. 含参数请求
import requests
response=requests.get('https://s.taobao.com/search?q=手机')
response=requests.get('https://s.taobao.com/search',params={"q":"美女"})
直接访问: https://s.taobao.com/search?q=手机
这样是没有问题,但是后面的条件是动态的。应该使用params,即使有多个参数,它会自动拼接url。
举例:
import requestsres = requests.get("https://s.taobao.com/search",
params={"q": "美女"},
headers={
'User-Agent': 'Mozilla/5.0 (Windows NT 6.1; WOW64) AppleWebKit/537.36 (KHTML, like Gecko) Chrome/62.0.3202.75 Safari/537.36',
})with open("res.html", "wb") as f:
print(res.text)
f.write(res.content)
使用Pycharm打开res.html,效果如下:

3. 含请求头请求
示例1:
import requests
response=requests.get('https://dig.chouti.com/',
                      headers={
                         'User-Agent':'Mozilla/5.0 (Windows NT 6.1; WOW64) AppleWebKit/537.36 (KHTML, like Gecko) Chrome/62.0.3202.75 Safari/537.36',
                              }
                      )
示例2:


import requestsres=requests.post('https://www.lagou.com/jobs/positionAjax.json',
headers={
'Referer':"https://www.lagou.com/jobs/list_python",
'User-Agent': 'Mozilla/5.0 (Windows NT 6.1; WOW64) AppleWebKit/537.36 (KHTML, like Gecko) Chrome/63.0.3239.132 Safari/537.36',}, data</span>=<span style="color: #000000;">{ </span><span style="color: #800000;">'</span><span style="color: #800000;">first</span><span style="color: #800000;">'</span><span style="color: #000000;">:True, </span><span style="color: #800000;">'</span><span style="color: #800000;">pn</span><span style="color: #800000;">'</span>:2<span style="color: #000000;">, </span><span style="color: #800000;">'</span><span style="color: #800000;">kd</span><span style="color: #800000;">'</span>:<span style="color: #800000;">'</span><span style="color: #800000;">java高级开发</span><span style="color: #800000;">'</span><span style="color: #000000;"> }, params</span>=<span style="color: #000000;">{ </span><span style="color: #800000;">'</span><span style="color: #800000;">gj</span><span style="color: #800000;">'</span>: <span style="color: #800000;">'</span><span style="color: #800000;">3年及以下</span><span style="color: #800000;">'</span><span style="color: #000000;">, </span><span style="color: #800000;">'</span><span style="color: #800000;">px</span><span style="color: #800000;">'</span>: <span style="color: #800000;">'</span><span style="color: #800000;">default</span><span style="color: #800000;">'</span><span style="color: #000000;">, </span><span style="color: #800000;">'</span><span style="color: #800000;">yx</span><span style="color: #800000;">'</span>: <span style="color: #800000;">'</span><span style="color: #800000;">25k-50k</span><span style="color: #800000;">'</span><span style="color: #000000;">, </span><span style="color: #800000;">'</span><span style="color: #800000;">city</span><span style="color: #800000;">'</span>: <span style="color: #800000;">'</span><span style="color: #800000;">北京</span><span style="color: #800000;">'</span><span style="color: #000000;">, </span><span style="color: #800000;">'</span><span style="color: #800000;">needAddtionalResult</span><span style="color: #800000;">'</span><span style="color: #000000;">: False, </span><span style="color: #800000;">'</span><span style="color: #800000;">isSchoolJob</span><span style="color: #800000;">'</span><span style="color: #000000;">: 0 } )comapines_list=res.json()
print(comapines_list)
4. 含cookies请求
import uuid import requestsurl = 'http://httpbin.org/cookies'
cookies = dict(sbid=str(uuid.uuid4()))res = requests.get(url, cookies=cookies)
print(res.json())
等同于,下面的代码
import uuid import requestsurl = 'http://httpbin.org/cookies'
cookies = {"sbid":str(uuid.uuid4())}res = requests.get(url, cookies=cookies)
print(res.json())
执行输出:
{'cookies': {'sbid': 'f51b0553-2fdc-49ee-a52d-f6fb7472d9ac'}}
比如某些网站,需要携带cookie,否则就拦截!
5. request.session()
import requests# res=requests.get("https://www.zhihu.com/explore")
print(res.cookies.get_dict())
session = requests.session() res1 = session.get("https://www.zhihu.com/explore") print(session.cookies.get_dict()) res2 = session.get("https://www.zhihu.com/question/30565354/answer/463324517", cookies={"abs": "123"})
举例:
import requestsres = requests.get("https://www.zhihu.com/explore")
print(res.cookies.get_dict()) # 查看响应体携带的cookie
执行输出:
{'_xsrf': 'QHfkaGFpX6OxaDGFcyJq8IeaEJWyYlDz', 'tgw_l7_route': '29b95235203ffc15742abb84032d7e75'}
比如一个网站,有3个页面,分别是a,b,c。
访问a时,响应返回 cookie为1。访问b时,响应返回 cookie为2。
当访问c时,必须要同时具有cookie为1和2的记录。否则拦截掉!
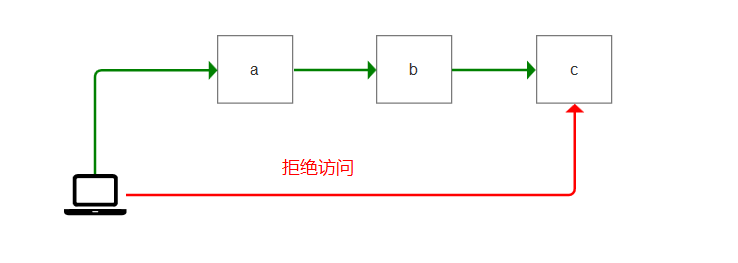
也就是说:必须要先访问a,b之后,才能访问c。
那么这个session的作用在于,每次访问的网页,只要响应信息,携带了cookie。它就会存储到session对象中!
那么我们使用下面的代码,就可以访问c页面了
import requestssession = requests.session()
res1 = session.get("https://www.xx.com/a")
res2 = session.get("https://www.xx.com/b")
res3 = session.get("https://www.xx.com/c")
print(session.cookies.get_dict())
post请求
1. data参数
requests.post()用法与requests.get()完全一致,特殊的是requests.post()多了一个data参数,用来存放请求体数据
response=requests.post("http://httpbin.org/post",params={"a":"10"}, data={"name":"yuan"})
举例:
直接访问post页面,是被拦截的。因为浏览器访问是get请求
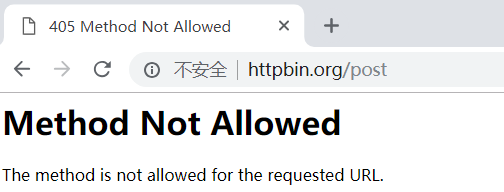
使用post访问访问
import requestsres2 = requests.post(url='http://httpbin.org/post',headers={},cookies={},params={'a': "1"},data={"a":1234})
print(res2.text)
执行输出:
{
  "args": {
    "a": "1"
  },
  "data": "",
  "files": {},
  "form": {
    "a": "1234"
  },
  "headers": {
    "Accept": "*/*",
    "Accept-Encoding": "gzip, deflate",
    "Connection": "close",
    "Content-Length": "6",
    "Content-Type": "application/x-www-form-urlencoded",
    "Host": "httpbin.org",
    "User-Agent": "python-requests/2.19.1"
  },
  "json": null,
  "origin": "223.72.99.154",
  "url": "http://httpbin.org/post?a=1"
}
data为什么是空的呢?
是因为content-type,上面的代码,默认的请求头是:application/x-www-form-urlencoded,它只会放到form里面
如果要data里面有数据,必须是application/json才行!
2. 发送json数据
import requests res1 = requests.post(url='http://httpbin.org/post', data={'name': 'yuan'}) # 没有指定请求头,#默认的请求头:application/x-www-form-urlencoed print(res1.json())res2 = requests.post(url='http://httpbin.org/post', json={'age': "22", }) # 默认的请求头:application/json)
print(res2.json())
举例:
import requests
res2 = requests.post(url='http://httpbin.org/post', json={'age': "22", })  # 默认的请求头:application/json)
print(res2.text)
执行输出:
{
  "args": {},
  "data": "{"age": "22"}",
  "files": {},
  "form": {},
  "headers": {
    "Accept": "*/*",
    "Accept-Encoding": "gzip, deflate",
    "Connection": "close",
    "Content-Length": "13",
    "Content-Type": "application/json",
    "Host": "httpbin.org",
    "User-Agent": "python-requests/2.19.1"
  },
  "json": {
    "age": "22"
  },
  "origin": "223.72.100.198",
  "url": "http://httpbin.org/post"
}
data里面,就有数据了!
json={'age': "22", } 这句代码,它做了2件事情。
1. 指定content-type 为 application/json
2. 对数据做json序列化
response对象
(1) 常见属性
import requests
respone=requests.get('https://sh.lianjia.com/ershoufang/')
# respone属性
print(respone.text)
print(respone.content)
print(respone.status_code)
print(respone.headers)
print(respone.cookies)
print(respone.cookies.get_dict())
print(respone.cookies.items())
print(respone.url)
print(respone.history)
print(respone.encoding)
举例1:
import requests
response = requests.get('https://www.jd.com')
print(response)
执行输出:
<Response [200]>
它返回的是一个 Response对象
举例2:
import requests
response = requests.get('https://www.jd.com')
print(response.status_code)
执行输出:200
举例3:
import requests
response = requests.get('https://www.jd.com')
print(response.url)
执行输出: https://www.jd.com/
举例4:
import requests
response = requests.get('https://www.jd.com')
print(response.text)
print(type(response.text))  # str
执行输出:
<!DOCTYPE HTML> <html lang="zh-CN"> <head> <meta charset="UTF-8"> <title>京东(JD.COM)-正品低价、品质保障、配送及时、轻松购物!</title> ...</body>
</html><class 'str'>
可以发现,response.text 它是一个字符串
从网络接收过来的,一定是字节流。response.text 将它转化成了字符串!
举例5:
import requests
response = requests.get('https://www.jd.com')
print(response.encoding)  # utf-8,目标网站编码
执行输出:utf-8
不是所有网站都是utf-8,比如汽车之家
import requests
response = requests.get('https://www.autohome.com.cn/beijing/')
print(response.encoding)  # gb2312
执行输出:gb2312
它的网站编码是使用gb2312的!那么我们保持这个网站时,必须使用gb2312编码,否则数据是乱码的!
举例6:
import requests
response = requests.get('https://www.jd.com/')
print(response.content)  # 源数据(字节流)
执行输出:
b'<!DOCTYPE HTML>
<html lang="zh-CN">
<head>
 ... </body>
</html>
'
它返回的是字节流,不存在于编码问题!
举例7:
import requests response = requests.get('https://www.jd.com/')with open("jd.html","w") as f:
f.write(response.text)
执行输出:
UnicodeEncodeError: 'gbk' codec can't encode character 'ue600' in position 79125: illegal multibyte sequence
为什么会报错呢?
因为with open调用的是windows系统默认的编码,它的编码是gbk。而jd.com使用的是utf-8编码!
所以在使用gbk保存时,会报错!
所以,为了解决这个问题。with open必须指定编码为utf-8
import requests response = requests.get('https://www.jd.com/')with open("jd.html","w",encoding="utf-8") as f:
f.write(response.text)
再次执行,就不会报错了!
使用Pycharm打开本地的jd.html,效果和官网是一摸一样的!

举例8:
比如访问一个网站,可能会有301跳转

比如访问,链接网的二手房信息
使用http访问
http://bj.lianjia.com/ershoufang/
会跳转到https页面
https://bj.lianjia.com/ershoufang/
举例:
import requests
res = requests.get("http://bj.lianjia.com/ershoufang/")print(res.history[0].url)
print(res.url)
执行输出:
http://bj.lianjia.com/ershoufang/
https://bj.lianjia.com/ershoufang/
那么通过histroy,就可以得到访问历史了!它能得到重定向之前的url
(2) 编码问题
import requests
response=requests.get('http://www.autohome.com/news')
#response.encoding='gb2312' #汽车之家网站返回的页面内容为gb2312编码的,而requests的默认编码为ISO-8859-1,如果不设置成gbk则中文乱码
with open("res.html","w") as f:
    f.write(response.text)
执行报错:
UnicodeEncodeError: 'gbk' codec can't encode character 'xa1' in position 76: illegal multibyte sequence
更改代码
import requests
response=requests.get('http://www.autohome.com/news')
response.encoding='gbk' #汽车之家网站返回的页面内容为gb2312编码的,而requests的默认编码为ISO-8859-1,如果不设置成gbk则中文乱码
with open("res.html","w") as f:
    f.write(response.text)
执行代码,打开res.html,效果如下:
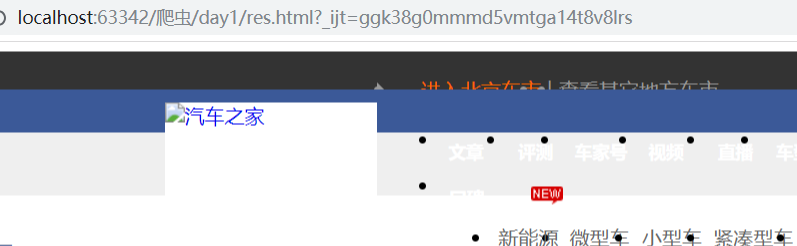
图片加载不出来,是因为做了防爬机制!
(3) 下载二进制文件(图片,视频,音频)
import requests
response=requests.get('http://bangimg1.dahe.cn/forum/201612/10/200447p36yk96im76vatyk.jpg')
with open("res.png","wb") as f:
    # f.write(response.content) # 比如下载视频时,如果视频100G,用response.content然后一下子写到文件中是不合理的
    for line in response.iter_content():
        f.write(line)
图片,视频,音频。都是二进制文件,必须使用wb模式写入。
response.iter_content() 表示,将响应体转换为迭代器。这样可以节省内存!缓解服务器压力!
(4) 解析json数据
import requests import jsonresponse=requests.get('http://httpbin.org/get')
res1=json.loads(response.text) #太麻烦
res2=response.json() #直接获取json数据
print(res1==res2)
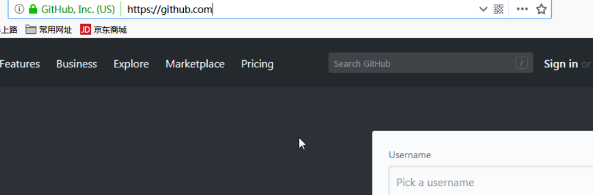
(5) Redirection and History
默认情况下,除了 HEAD, Requests 会自动处理所有重定向。可以使用响应对象的 history 方法来追踪重定向。Response.history 是一个 Response 对象的列表,为了完成请求而创建了这些对象。这个对象列表按照从最老到最近的请求进行排序。
>>> r = requests.get('http://github.com')
>>> r.url
'https://github.com/'
>>> r.status_code
200
>>> r.history
[<Response [301]>]
另外,还可以通过 allow_redirects 参数禁用重定向处理:
>>> r = requests.get('http://github.com', allow_redirects=False)
>>> r.status_code
301
>>> r.history
[]
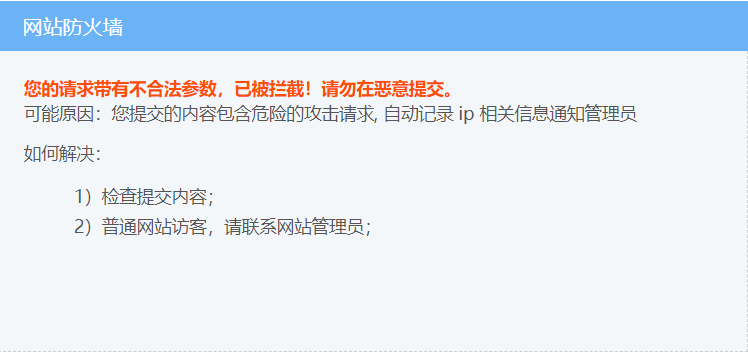
最简单的防爬机制
一般网站,最简单的防爬虫机制,就是判断user-agent是否存在。不存在,则认为是恶意访问,比如爬虫。它会拦截掉,返回一个错误页面!
举例:
比如,直接访问:抽屉热搜
import requests
res = requests.get("https://dig.chouti.com/")
with open("res.html","wb") as f:
    f.write(res.content)
使用Pycharm打开res.html,效果如下:
加一个user-agent就可以解决
import requests
res = requests.get("https://dig.chouti.com/",
             headers={
                     'User-Agent': 'Mozilla/5.0 (Windows NT 6.1; WOW64) AppleWebKit/537.36 (KHTML, like Gecko) Chrome/63.0.3239.132 Safari/537.36',
             },)
with open("res.html","wb") as f:
    f.write(res.content)
使用Pycharm打开res.html,效果如下:

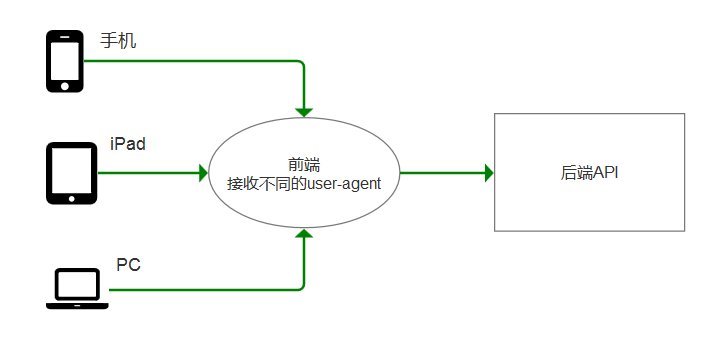
DRF为什么应用广泛
因为收,iPad,PC携带的user-agent是不一样的!前端根据不同的user-agent,返回不同的页面!
而后端API,针对同一个功能,返回的数据是统一的。
比如,访问jd.com,可以使用iPhone X访问

刷新页面,它会自动跳转到 m.jd.com
它的user-agent也变动了

应用案例
1、模拟GitHub登录,获取登录信息
import requests import re#请求1:
r1=requests.get('https://github.com/login')
r1_cookie=r1.cookies.get_dict() #拿到初始cookie(未被授权)
authenticity_token=re.findall(r'name="authenticity_token".?value="(.?)"',r1.text)[0] #从页面中拿到CSRF TOKEN
print("authenticity_token",authenticity_token)
#第二次请求:带着初始cookie和TOKEN发送POST请求给登录页面,带上账号密码
data={
'commit':'Sign in',
'utf8':'✓',
'authenticity_token':authenticity_token,
'login':'xx@xx.com',
'password':'xx'
}#请求2:
r2=requests.post('https://github.com/session',
data=data,
cookies=r1_cookie,
# allow_redirects=False
)
print(r2.status_code) #200
print(r2.url) #看到的是跳转后的页面:https://github.com/
print(r2.history) #看到的是跳转前的response:[<Response [302]>]
print(r2.history[0].text) #看到的是跳转前的response.text
with open("result.html","wb") as f:f.write(r2.content)</span></pre>
步骤解析
如果不登录,直接访问: https://github.com/
网页会提示,让你登录!
点击sign in,进入登录页面
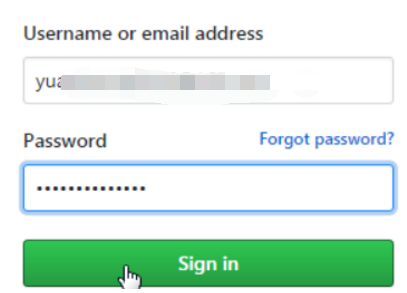
登录成功之后,跳转到首页:https://github.com/
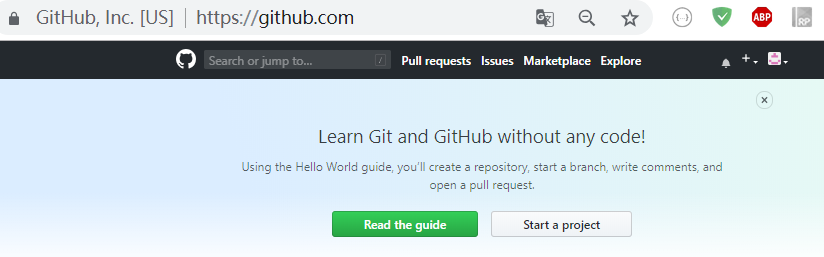
现在需要爬取页面:https://github.com/
那么直接用requests模块,访问 https://github.com/,是没有意义的!它肯定会拦截!
我们需要模拟 输入用户名和密码,点击 siin in按钮,进入首页的整个过程!
打开浏览器工具-->network,点击preserve log(保存记录)。
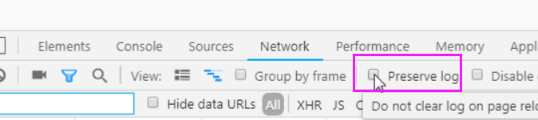
为什么要勾选这个呢?
因为登录之后,页面会刷新一次。所以network中的记录会被重新覆盖,那么我需要得到刷次之前的记录呢?
启用 preserve log,就可以看到了!
退出github账号,进入登录页面。打开浏览器工具,重新登录一次。查看network信息
这里面的 https://github.com/session,就是提交地址

再看响应信息中的Localtion,这就是调整地址。也就是首页!
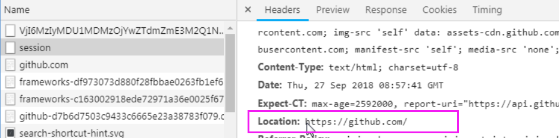
综上所述,我们就可以得出结论了!
模拟github登录示例
1. get 请求访问 https://github.com/login

2. post请求访问 https://github.com/session

3. get 请求访问 https://github.com/
正常登录,就是这3个过程!
有没有必要,从第一个位置,发送请求?
如果直接从 第二步开始,能访问到第三步,说明这样做可以。否则不可以!
测试一下吧,先来看From Data

它需要5个参数。密码是明文的,好吧,先不管它!
这3个,是干啥的呢?不管它,直接复制一下

因为是form表单,需要使用data参数。
import requestssession = requests.session()
res = requests.post("https://github.com/session",
data={
'commit': 'Sign in',
'utf8': '✓',
'authenticity_token': "u89SiiF6aFWFHSOboNVn8w/hbHQIcu0AeoJUTR+OLRP01noYZiCbpJL8E7rex29S5AkJz+w+Te47NC1PwjtXaA==",
'login': 'xx@xx.com',
'password': 'xx'
})with open("res.html","wb") as f:
f.write(res.content)
注意:需要改为自己的github账户
运行之后,使用Pycharm打开res.html,效果如下:
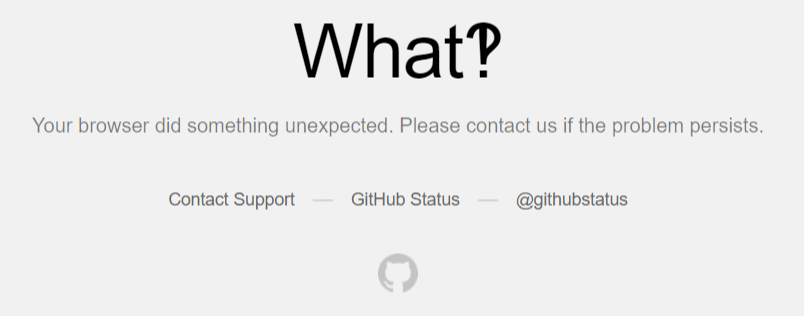
它提示访问非法,说明它已经知道你在爬取了!
怎么办呢?再加一个user-agent和Referer

修改代码
import requestssession = requests.session()
res = requests.post("https://github.com/session",
headers={
"Referer":"https://github.com/login",
"User-Agent":"Mozilla/5.0 (Windows NT 10.0; Win64; x64) AppleWebKit/537.36 (KHTML, like Gecko) Chrome/69.0.3497.81 Safari/537.36"
},
data={
'commit': 'Sign in',
'utf8': '✓',
'authenticity_token': "u89SiiF6aFWFHSOboNVn8w/hbHQIcu0AeoJUTR+OLRP01noYZiCbpJL8E7rex29S5AkJz+w+Te47NC1PwjtXaA==",
'login': 'xx@xx.com',
'password': 'xx'
})with open("res.html","wb") as f:
f.write(res.content)
执行代码,再次访问res.html。效果还是一样的!
既然请求头没有问题,那么就是数据有问题了!
打开login页面,搜索关键字 authenticity_token

刷新页面,再次查看

可以发现,它每次是不一样的!
注意:这个authenticity_token不是固定死的。每次访问页面,都是不一样的!
它和django的csrf组件,是一样的效果!
那么就卡在 token了。
只能往上推了,那就是登陆页面。
现在需要使用第一步了,必须找到token值
第一次请求:获取authenticity_token
第二次请求:模拟登录,成功重定向
获取authenticity_token
因为在页面上面,需要使用re模块来匹配
import requests import rer1=requests.get('https://github.com/login')
r1_cookie=r1.cookies.get_dict() #拿到初始cookie(未被授权)
authenticity_token=re.findall(r'name="authenticity_token".?value="(.?)"',r1.text)[0] #从页面中拿到CSRF TOKEN
print(authenticity_token)
执行输出:
hLpkfrH6C3kyxB5CXj5adhE0hNOJzmFa4Z++y6Et6+POSA3bw4bsBy/jfp/LFawCch6oWNEZxBF3sKjpw2oFig==
最终代码
import requests import resession = requests.session()
#请求1:
r1=requests.get('https://github.com/login')
r1_cookie=r1.cookies.get_dict() #拿到初始cookie(未被授权)
authenticity_token=re.findall(r'name="authenticity_token".?value="(.?)"',r1.text)[0] #从页面中拿到CSRF TOKEN
print(authenticity_token)
#第二次请求:带着初始cookie和TOKEN发送POST请求给登录页面,带上账号密码
res = requests.post("https://github.com/session",
headers={
"Referer":"https://github.com/login",
"User-Agent":"Mozilla/5.0 (Windows NT 10.0; Win64; x64) AppleWebKit/537.36 (KHTML, like Gecko) Chrome/69.0.3497.81 Safari/537.36"
},
data={
'commit': 'Sign in',
'utf8': '✓',
'authenticity_token': authenticity_token,
'login': 'xx@xx.com',
'password': 'xx'
},cookies=r1_cookie,)with open("res.html","wb") as f:
f.write(res.content)
效果如下:

这个,才是真正的首页
2、爬取豆瓣电影信息
import requestsimport re
import json
import time
from concurrent.futures import ThreadPoolExecutor
pool=ThreadPoolExecutor(50)def getPage(url):
response</span>=<span style="color: #000000;">requests.get(url) </span><span style="color: #0000ff;">return</span><span style="color: #000000;"> response.textdef parsePage(res):
com</span>=re.compile(<span style="color: #800000;">'</span><span style="color: #800000;"><div class="item">.*?<div class="pic">.*?<em .*?>(?P<id>d+).*?<span class="title">(?P<title>.*?)</span></span><span style="color: #800000;">'</span> <span style="color: #800000;">'</span><span style="color: #800000;">.*?<span class="rating_num" .*?>(?P<rating_num>.*?)</span>.*?<span>(?P<comment_num>.*?)评价</span></span><span style="color: #800000;">'</span><span style="color: #000000;">,re.S) iter_result</span>=<span style="color: #000000;">com.finditer(res) </span><span style="color: #0000ff;">return</span><span style="color: #000000;"> iter_resultdef gen_movie_info(iter_result):
for i in iter_result:
yield {
"id":i.group("id"),
"title":i.group("title"),
"rating_num":i.group("rating_num"),
"comment_num":i.group("comment_num"),
}def stored(gen):
with open("move_info.txt","a",encoding="utf8") as f:
for line in gen:
data=json.dumps(line,ensure_ascii=False)
f.write(data+" ")def spider_movie_info(url):
res=getPage(url)
iter_result=parsePage(res)
gen=gen_movie_info(iter_result)
stored(gen)def main(num):
url</span>=<span style="color: #800000;">'</span><span style="color: #800000;">https://movie.douban.com/top250?start=%s&filter=</span><span style="color: #800000;">'</span>%<span style="color: #000000;">num pool.submit(spider_movie_info,url) </span><span style="color: #008000;">#</span><span style="color: #008000;">spider_movie_info(url)</span>if name == 'main':
before=time.time()
count=0
for i in range(10):
main(count)
count+=25
after=time.time()</span><span style="color: #0000ff;">print</span>(<span style="color: #800000;">"</span><span style="color: #800000;">总共耗费时间:</span><span style="color: #800000;">"</span>,after-before)</pre>
今日作业
1. 爬取拉钩python的所有职位信息,爬取3页即可!(有一个隐藏的反扒机制)
2. 爬取链家二手房源信息,爬取3页即可!
本文参考链接:
https://www.cnblogs.com/yuanchenqi/articles/9449430.html
作业解析
拉钩
1. 爬取拉钩python的所有职位信息
打开拉勾网,打开浏览器工具,输入pythton,点击搜索
网页链接是这个
https://www.lagou.com/jobs/list_python?px=default&city=全国#filterBox
打开浏览器工具-->Network-->XHR
查看第一个链接,点击Preview,它返回的是一个json数据。
将数据一点点展开,result就是我们要的数据了

查看请求方式

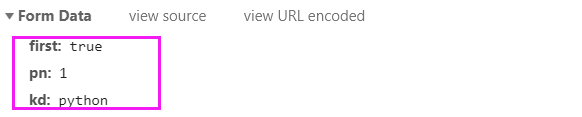
查看请求参数
pn:表示分页数,kd:表示搜索关键字
接下来,就可以直接上代码了
import requestsres = requests.post('https://www.lagou.com/jobs/positionAjax.json',
headers={
'Referer': "https://www.lagou.com/jobs/list_python",
'User-Agent': 'Mozilla/5.0 (Windows NT 6.1; WOW64) AppleWebKit/537.36 (KHTML, like Gecko) Chrome/63.0.3239.132 Safari/537.36',}, data</span>=<span style="color: #000000;">{ </span><span style="color: #800000;">'</span><span style="color: #800000;">first</span><span style="color: #800000;">'</span><span style="color: #000000;">: True, </span><span style="color: #800000;">'</span><span style="color: #800000;">pn</span><span style="color: #800000;">'</span>: 1, <span style="color: #008000;">#</span><span style="color: #008000;"> 页码</span> <span style="color: #800000;">'</span><span style="color: #800000;">kd</span><span style="color: #800000;">'</span>: <span style="color: #800000;">'</span><span style="color: #800000;">python</span><span style="color: #800000;">'</span> <span style="color: #008000;">#</span><span style="color: #008000;"> 关键字</span>},
params={
'px': 'default',
'city': '全国',
'needAddtionalResult': False,
}
)with open("lianjia.txt", "a", encoding="utf-8") as f:
f.write(res.text + " ")
参数解释:
我们要请求的地址是
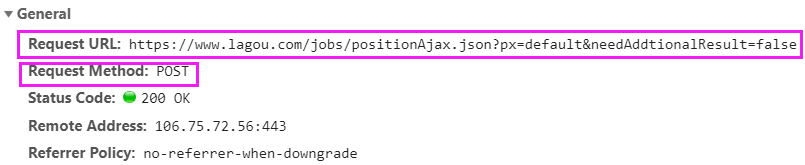
也就是这个
https://www.lagou.com/jobs/positionAjax.json?px=default&needAddtionalResult=false
因此,params参数,指定了参数px和needAddtionalResult
还有一个参数city,是从页面中获取的
https://www.lagou.com/jobs/list_python?px=default&city=全国#filterBox
headers指定了2个参数,Referer和User-Agent,是从这里获取的
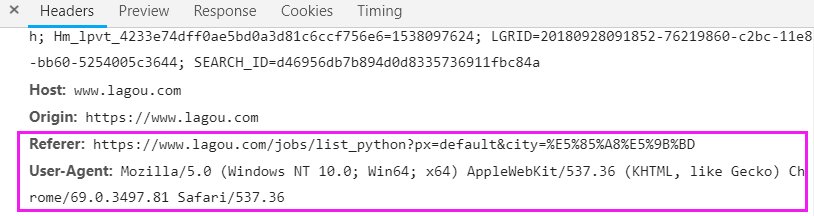
Referer 直接写前半段就可以了,后面的参数可以不要!
执行程序,查看lianjia.txt,它存储的就是一段json
再新建一个py文件,单独处理文件操作
import jsonwith open('lianjia.txt', encoding="utf-8") as f:
for line in f:
dic = json.loads(line)
for i in dic.get('content').get('positionResult').get('result'):
print(i.get('positionName'), i.get('city'), i.get('createTime'), i.get('salary'), i.get('workYear'),
i.get('education'), i.get('companyShortName'))
执行输出:
Python开发 上海 2018-09-26 14:43:36 13k-26k 3-5年 大专 德邦
...
将这2段代码,结合到一个py文件,最终代码如下:
import requests import time import jsonpage = [x for x in range(1, 4)] # 只爬取3页
for i in page:
res=requests.post('https://www.lagou.com/jobs/positionAjax.json',
headers={
'Referer':"https://www.lagou.com/jobs/list_python",
'User-Agent': 'Mozilla/5.0 (Windows NT 6.1; WOW64) AppleWebKit/537.36 (KHTML, like Gecko) Chrome/63.0.3239.132 Safari/537.36',}, data</span>=<span style="color: #000000;">{ </span><span style="color: #800000;">'</span><span style="color: #800000;">first</span><span style="color: #800000;">'</span><span style="color: #000000;">:True, </span><span style="color: #800000;">'</span><span style="color: #800000;">pn</span><span style="color: #800000;">'</span>:i, <span style="color: #008000;">#</span><span style="color: #008000;"> 页码</span> <span style="color: #800000;">'</span><span style="color: #800000;">kd</span><span style="color: #800000;">'</span>:<span style="color: #800000;">'</span><span style="color: #800000;">python</span><span style="color: #800000;">'</span> <span style="color: #008000;">#</span><span style="color: #008000;"> 关键字</span>},
params={
'px': 'default',
'city': '全国',
'needAddtionalResult': False,
}
)with open(</span><span style="color: #800000;">"</span><span style="color: #800000;">lianjia.txt</span><span style="color: #800000;">"</span>,<span style="color: #800000;">"</span><span style="color: #800000;">a</span><span style="color: #800000;">"</span>,encoding=<span style="color: #800000;">"</span><span style="color: #800000;">utf-8</span><span style="color: #800000;">"</span><span style="color: #000000;">) as f: f.write(res.text</span>+<span style="color: #800000;">"</span><span style="color: #800000;"> </span><span style="color: #800000;">"</span><span style="color: #000000;">) time.sleep(</span>5<span style="color: #000000;">)with open('lianjia.txt', encoding="utf-8") as f:
for line in f:
dic = json.loads(line)
for i in dic.get('content').get('positionResult').get('result'):
print(i.get('positionName'), i.get('city'), i.get('createTime'), i.get('salary'), i.get('workYear'),
i.get('education'), i.get('companyShortName'))
执行输出:
Python开发 上海 2018-09-26 14:43:36 13k-26k 3-5年 大专 德邦
...
拉钩网的防爬机制,不能访问的太频繁。否则会封锁IP,这里我暂停了5秒
还有一种升级方案,使用session访问,它是没有做限制的!
import requests import time import jsonpage = [x for x in range(1, 4)] # 只爬取3页
for i in page:
session = requests.session()
session.get("https://www.lagou.com/")
session.get("https://www.lagou.com/jobs/list_python")
res=session.post('https://www.lagou.com/jobs/positionAjax.json',
headers={
'Referer':"https://www.lagou.com/jobs/list_python",
'User-Agent': 'Mozilla/5.0 (Windows NT 6.1; WOW64) AppleWebKit/537.36 (KHTML, like Gecko) Chrome/63.0.3239.132 Safari/537.36',}, data</span>=<span style="color: #000000;">{ </span><span style="color: #800000;">'</span><span style="color: #800000;">first</span><span style="color: #800000;">'</span><span style="color: #000000;">:True, </span><span style="color: #800000;">'</span><span style="color: #800000;">pn</span><span style="color: #800000;">'</span>:i, <span style="color: #008000;">#</span><span style="color: #008000;"> 页码</span> <span style="color: #800000;">'</span><span style="color: #800000;">kd</span><span style="color: #800000;">'</span>:<span style="color: #800000;">'</span><span style="color: #800000;">python</span><span style="color: #800000;">'</span> <span style="color: #008000;">#</span><span style="color: #008000;"> 关键字</span>},
params={
# 'gj': '3年及以下',
'px': 'default',
# 'yx': '25k-50k',
'city': '北京',
'needAddtionalResult': False,
# 'isSchoolJob': 0
}
)with open('lianjia.txt', encoding="utf-8") as f: for line in f: dic = json.loads(line) for i in dic.get('content').get('positionResult').get('result'): print(i.get('positionName'), i.get('city'), i.get('createTime'), i.get('salary'), i.get('workYear'), i.get('education'), i.get('companyShortName'))with open(</span><span style="color: #800000;">"</span><span style="color: #800000;">lianjia.txt</span><span style="color: #800000;">"</span>,<span style="color: #800000;">"</span><span style="color: #800000;">a</span><span style="color: #800000;">"</span>,encoding=<span style="color: #800000;">"</span><span style="color: #800000;">utf-8</span><span style="color: #800000;">"</span><span style="color: #000000;">) as f: f.write(res.text</span>+<span style="color: #800000;">"</span><span style="color: #800000;"> </span><span style="color: #800000;">"</span><span style="color: #000000;">) </span><span style="color: #008000;">#</span><span style="color: #008000;"> time.sleep(5)</span>
执行脚本,效果同上!
链家
2. 爬取链家二手房源信息
这个网站,几乎没有XHR请求。无法直接得到我们想要的信息!它的信息,直接渲染到页面上了。
所以要获取房源信息,只有2个途径
1. 使用正则匹配
2. 使用模块或者框架解析html,比如BS和Xpath模块,还有scrapy
正则玩的不够6,模块和框架不会!。。。
安装PIL的坑
iptables不小心把127.0.0.1封了,导致redis连不上
python读取中文
不要在基类析构函数中调用纯虚函数,否则运行时会报错“pure virtual method called”
阿里云64位centos6.3系统上编译安装redis
Git
Easy Mock
Sortable
几个框架