本部分演示使用 Razor 页面上传文件。
本教程中的 Razor 页面 Movie 示例应用使用简单的模型绑定上传文件,非常适合上传小型文件。 有关流式传输大文件的信息,请参阅通过流式传输上传大文件。
在下列步骤中,向示例应用添加电影计划文件上传功能。 每个电影计划由一个 Schedule 类表示。 该类包括两个版本的计划。 其中一个版本 (PublicSchedule) 提供给客户。 另一个版本 (PrivateSchedule) 用于公司员工。 每个版本作为单独的文件进行上传。 本教程演示如何通过单个 POST 将两个文件上传至服务器。
添加 FileUpload 类
创建 Razor 页以处理一对文件上传。 添加 FileUpload 类(此类与页面绑定以获取计划数据)。 右键单击“Models”文件夹。 选择“添加” > “类”。 将类命名为“FileUpload”,并添加以下属性:
using Microsoft.AspNetCore.Http;
using System.ComponentModel.DataAnnotations;

namespace RazorPagesMovie.Models
{
    public class FileUpload
    {
        [Required]
        [Display(Name="Title")]
        [StringLength(60, MinimumLength = 3)]
        public string Title { get; set; }

        [Required]
        [Display(Name="Public Schedule")]
        public IFormFile UploadPublicSchedule { get; set; }

        [Required]
        [Display(Name="Private Schedule")]
        public IFormFile UploadPrivateSchedule { get; set; }
    }
}
此类有一个属性对应计划标题,另各有一个属性对应计划的两个版本。 3 个属性皆为必需属性,标题长度必须为 3-60 个字符。
添加用于上传文件的 helper 方法
为避免处理未上传计划文件时出现代码重复,请首先上传一个静态 helper 方法。 在此应用中创建一个“Utilities”文件夹,然后在“FileHelpers.cs”文件中添加以下内容。 helper 方法 ProcessFormFile 接受 IFormFile 和 ModelStateDictionary,并返回包含文件大小和内容的字符串。 检查内容类型和长度。 如果文件未通过验证检查,将向 ModelState 添加一个错误。
using System;
using System.ComponentModel.DataAnnotations;
using System.IO;
using System.Net;
using System.Reflection;
using System.Text;
using System.Threading.Tasks;
using Microsoft.AspNetCore.Http;
using Microsoft.AspNetCore.Mvc.ModelBinding;
using RazorPagesMovie.Models;

namespace RazorPagesMovie.Utilities
{
    public class FileHelpers
    {
        public static async Task<string> ProcessFormFile(IFormFile formFile, ModelStateDictionary modelState)
        {
            var fieldDisplayName = string.Empty;

            // Use reflection to obtain the display name for the model
            // property associated with this IFormFile. If a display
            // name isn't found, error messages simply won't show
            // a display name.
            MemberInfo property =
                typeof(FileUpload).GetProperty(formFile.Name.Substring(formFile.Name.IndexOf(".") + 1));

            if (property != null)
            {
                var displayAttribute =
                    property.GetCustomAttribute(typeof(DisplayAttribute)) as DisplayAttribute;

                if (displayAttribute != null)
                {
                    fieldDisplayName = $"{displayAttribute.Name} ";
                }
            }

            // Use Path.GetFileName to obtain the file name, which will
            // strip any path information passed as part of the
            // FileName property. HtmlEncode the result in case it must
            // be returned in an error message.
            var fileName = WebUtility.HtmlEncode(Path.GetFileName(formFile.FileName));

            if (formFile.ContentType.ToLower() != "text/plain")
            {
                modelState.AddModelError(formFile.Name,
                                         $"The {fieldDisplayName}file ({fileName}) must be a text file.");
            }

            // Check the file length and don't bother attempting to
            // read it if the file contains no content. This check
            // doesn't catch files that only have a BOM as their
            // content, so a content length check is made later after
            // reading the file's content to catch a file that only
            // contains a BOM.
            if (formFile.Length == 0)
            {
                modelState.AddModelError(formFile.Name, $"The {fieldDisplayName}file ({fileName}) is empty.");
            }
            else if (formFile.Length > 1048576)
            {
                modelState.AddModelError(formFile.Name, $"The {fieldDisplayName}file ({fileName}) exceeds 1 MB.");
            }
            else
            {
                try
                {
                    string fileContents;

                    // The StreamReader is created to read files that are UTF-8 encoded.
                    // If uploads require some other encoding, provide the encoding in the
                    // using statement. To change to 32-bit encoding, change
                    // new UTF8Encoding(...) to new UTF32Encoding().
                    using (
                        var reader =
                            new StreamReader(
                                formFile.OpenReadStream(),
                                new UTF8Encoding(encoderShouldEmitUTF8Identifier: false, throwOnInvalidBytes: true),
                                detectEncodingFromByteOrderMarks: true))
                    {
                        fileContents = await reader.ReadToEndAsync();

                        // Check the content length in case the file's only
                        // content was a BOM and the content is actually
                        // empty after removing the BOM.
                        if (fileContents.Length > 0)
                        {
                            return fileContents;
                        }
                        else
                        {
                            modelState.AddModelError(formFile.Name,
                                                     $"The {fieldDisplayName}file ({fileName}) is empty.");
                        }
                    }
                }
                catch (Exception ex)
                {
                    modelState.AddModelError(formFile.Name,
                                             $"The {fieldDisplayName}file ({fileName}) upload failed. " +
                                             $"Please contact the Help Desk for support. Error: {ex.Message}");
                    // Log the exception
                }
            }

            return string.Empty;
        }
    }
}
以上内容如果看不懂就不用看了,核心思想就是检查上传文件是否合乎要求。
将文件保存到磁盘(拓展内容,本案例未用到)
示例应用将文件内容保存到数据库字段。 若要将文件内容保存到磁盘,请使用文件流:
using (var fileStream = new FileStream(filePath, FileMode.Create))
{
    await formFile.CopyToAsync(fileStream);
}
将文件保存到 Azure Blob 存储(拓展内容,本案例未用到)
若要将文件内容上传到 Azure Blob 存储,请参阅使用 .NET 的 Azure Blob 存储入门。 本主题演示如何使用UploadFromStream 将文件流保存到 blob 存储。
添加 Schedule 类
右键单击“Models”文件夹。 选择“添加” > “类”。 将类命名为“Schedule”,并添加以下属性:
using System;
using System.Collections.Generic;
using System.ComponentModel.DataAnnotations;
using System.ComponentModel.DataAnnotations.Schema;

namespace RazorPagesMovie.Models
{
    public class Schedule
    {
        public int ID { get; set; }
        public string Title { get; set; }

        public string PublicSchedule { get; set; }

        [Display(Name = "Public Schedule Size (bytes)")]
        [DisplayFormat(DataFormatString = "{0:N1}")]
        public long PublicScheduleSize { get; set; }

        public string PrivateSchedule { get; set; }

        [Display(Name = "Private Schedule Size (bytes)")]
        [DisplayFormat(DataFormatString = "{0:N1}")]
        public long PrivateScheduleSize { get; set; }

        [Display(Name = "Uploaded (UTC)")]
        [DisplayFormat(DataFormatString = "{0:F}")]
        public DateTime UploadDT { get; set; }
    }
}
此类使用 Display 和 DisplayFormat 特性,呈现计划数据时,这些特性会生成友好型的标题和格式。
更新 MovieContext
在 MovieContext (Models/MovieContext.cs) 中为计划指定 DbSet:
using Microsoft.EntityFrameworkCore;

namespace RazorPagesMovie.Models
{
    public class MovieContext:DbContext
    {
        public MovieContext(DbContextOptions<MovieContext> options)
            : base(options)
        {
        }

        public DbSet<Movie> Movie { get; set; }
        public DbSet<Class> Class { get; set; }
        public DbSet<Schedule> Schedule { get; set; }
    }
}
将 Schedule 表添加到数据库
打开包管理器控制台 (PMC):“工具” > “NuGet 包管理器” > “包管理器控制台”。
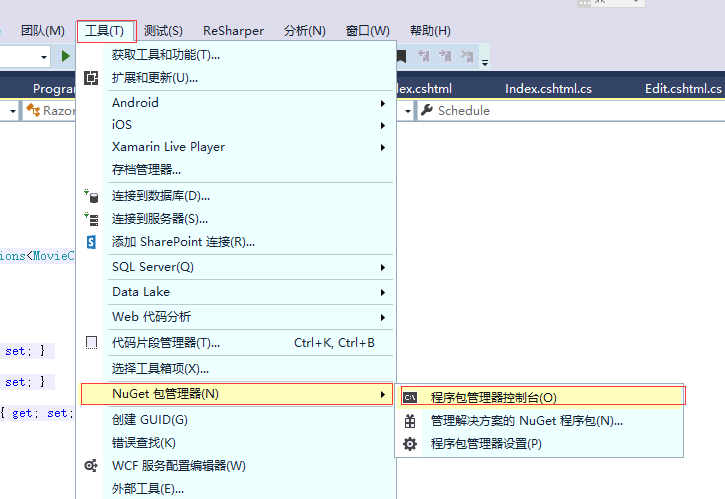
在 PMC 中执行以下命令。 这些命令将向数据库添加 Schedule 表:
Add-Migration AddScheduleTable
Update-Database
添加文件上传 Razor 页面
在“Pages”文件夹中创建“Schedules”文件夹。 在“Schedules”文件夹中,创建名为“Index.cshtml”的页面,用于上传具有如下内容的计划:
@page
@model RazorPagesMovie.Pages.Schedule.IndexModel
@{
    ViewData["Title"] = "Schedules";
}

<h2>Schedules</h2>
<hr />

<h3>Upload Schedules</h3>
<div class="row">
    <div class="col-md-4">
        <form method="post" enctype="multipart/form-data">
            <div class="form-group">
                <label asp-for="FileUpload.Title" class="control-label"></label>
                <input asp-for="FileUpload.Title" type="text" class="form-control" />
                <span asp-validation-for="FileUpload.Title" class="text-danger"></span>
            </div>
            <div class="form-group">
                <label asp-for="FileUpload.UploadPublicSchedule" class="control-label"></label>
                <input asp-for="FileUpload.UploadPublicSchedule" type="file" class="form-control" style="height:auto" />
                <span asp-validation-for="FileUpload.UploadPublicSchedule" class="text-danger"></span>
            </div>
            <div class="form-group">
                <label asp-for="FileUpload.UploadPrivateSchedule" class="control-label"></label>
                <input asp-for="FileUpload.UploadPrivateSchedule" type="file" class="form-control" style="height:auto" />
                <span asp-validation-for="FileUpload.UploadPrivateSchedule" class="text-danger"></span>
            </div>
            <input type="submit" value="Upload" class="btn btn-default" />
        </form>
    </div>
</div>

<h3>Loaded Schedules</h3>
<table class="table">
    <thead>
        <tr>
            <th></th>
            <th>
                @Html.DisplayNameFor(model => model.Schedule[0].Title)
            </th>
            <th>
                @Html.DisplayNameFor(model => model.Schedule[0].UploadDT)
            </th>
            <th class="text-center">
                @Html.DisplayNameFor(model => model.Schedule[0].PublicScheduleSize)
            </th>
            <th class="text-center">
                @Html.DisplayNameFor(model => model.Schedule[0].PrivateScheduleSize)
            </th>
        </tr>
    </thead>
    <tbody>
        @foreach (var item in Model.Schedule)
        {
            <tr>
                <td>
                    <a asp-page="./Delete" asp-route-id="@item.ID">Delete</a>
                </td>
                <td>
                    @Html.DisplayFor(modelItem => item.Title)
                </td>
                <td>
                    @Html.DisplayFor(modelItem => item.UploadDT)
                </td>
                <td class="text-center">
                    @Html.DisplayFor(modelItem => item.PublicScheduleSize)
                </td>
                <td class="text-center">
                    @Html.DisplayFor(modelItem => item.PrivateScheduleSize)
                </td>
            </tr>
        }
    </tbody>
</table>

@section Scripts {
    @{await Html.RenderPartialAsync("_ValidationScriptsPartial");}
}
每个窗体组包含一个 <label>,它显示每个类属性的名称。 FileUpload 模型中的 Display 特性提供这些标签的显示值。例如,UploadPublicSchedule 特性的显示名称通过 [Display(Name="Public Schedule")] 进行设置,因此呈现窗体时会在此标签中显示“Public Schedule”。
每个窗体组包含一个验证 <span>。 如果用户输入未能满足 FileUpload 类中设置的属性特性,或者任何 ProcessFormFile方法文件检查失败,则模型验证会失败。 模型验证失败时,会向用户呈现有用的验证消息。 例如,Title 属性带有 [Required] 和 [StringLength(60, MinimumLength = 3)] 注释。 用户若未提供标题,会接收到一条指示需要提供值的消息。如果用户输入的值少于 3 个字符或多于 60 个字符,则会接收到一条指示值长度不正确的消息。 如果提供不含内容的文件,则会显示一条指示文件为空的消息。
添加页面模型
将页面模型 (Index.cshtml.cs) 添加到“Schedules”文件夹中:
using System;
using System.Collections.Generic;
using System.Threading.Tasks;
using Microsoft.AspNetCore.Mvc;
using Microsoft.AspNetCore.Mvc.RazorPages;
using Microsoft.EntityFrameworkCore;
using RazorPagesMovie.Models;
using RazorPagesMovie.Utilities;

namespace RazorPagesMovie.Pages.Schedule
{
    public class IndexModel : PageModel
    {
        private readonly RazorPagesMovie.Models.MovieContext _context;

        public IndexModel(RazorPagesMovie.Models.MovieContext context)
        {
            _context = context;
        }

        [BindProperty]
        public FileUpload FileUpload { get; set; }

        public IList<Models.Schedule> Schedule { get; private set; }

        public async Task OnGetAsync()
        {
            Schedule = await _context.Schedule.AsNoTracking().ToListAsync();
        }

        public async Task<IActionResult> OnPostAsync()
        {
            // Perform an initial check to catch FileUpload class
            // attribute violations.
            if (!ModelState.IsValid)
            {
                Schedule = await _context.Schedule.AsNoTracking().ToListAsync();
                return Page();
            }

            var publicScheduleData =
                await FileHelpers.ProcessFormFile(FileUpload.UploadPublicSchedule, ModelState);

            var privateScheduleData =
                await FileHelpers.ProcessFormFile(FileUpload.UploadPrivateSchedule, ModelState);

            // Perform a second check to catch ProcessFormFile method
            // violations.
            if (!ModelState.IsValid)
            {
                Schedule = await _context.Schedule.AsNoTracking().ToListAsync();
                return Page();
            }

            var schedule = new Models.Schedule()
            {
                PublicSchedule = publicScheduleData,
                PublicScheduleSize = FileUpload.UploadPublicSchedule.Length,
                PrivateSchedule = privateScheduleData,
                PrivateScheduleSize = FileUpload.UploadPrivateSchedule.Length,
                Title = FileUpload.Title,
                UploadDT = DateTime.UtcNow
            };

            _context.Schedule.Add(schedule);
            await _context.SaveChangesAsync();

            return RedirectToPage("./Index");
        }
    }
}
页面模型(Index.cshtml.cs 中的 IndexModel)绑定 FileUpload 类:
[BindProperty]
public FileUpload FileUpload { get; set; }
此模型还使用计划列表 (IList<Schedule>) 在页面上显示数据库中存储的计划:
public IList<Models.Schedule> Schedule { get; private set; }
页面加载 OnGetAsync 时,会从数据库填充 Schedules,用于生成已加载计划的 HTML 表:
public async Task OnGetAsync()
{
    Schedule = await _context.Schedule.AsNoTracking().ToListAsync();
}
将窗体发布到服务器时,会检查 ModelState。 如果无效,会重新生成 Schedule,且页面会呈现一个或多个验证消息,陈述页面验证失败的原因。 如果有效,FileUpload 属性将用于“OnPostAsync”中,以完成两个计划版本的文件上传,并创建一个用于存储数据的新 Schedule 对象。 然后会将此计划保存到数据库:
        public async Task<IActionResult> OnPostAsync()
        {
            // Perform an initial check to catch FileUpload class
            // attribute violations.
            if (!ModelState.IsValid)
            {
                Schedule = await _context.Schedule.AsNoTracking().ToListAsync();
                return Page();
            }

            var publicScheduleData =
                await FileHelpers.ProcessFormFile(FileUpload.UploadPublicSchedule, ModelState);

            var privateScheduleData =
                await FileHelpers.ProcessFormFile(FileUpload.UploadPrivateSchedule, ModelState);

            // Perform a second check to catch ProcessFormFile method
            // violations.
            if (!ModelState.IsValid)
            {
                Schedule = await _context.Schedule.AsNoTracking().ToListAsync();
                return Page();
            }

            var schedule = new Models.Schedule()
            {
                PublicSchedule = publicScheduleData,
                PublicScheduleSize = FileUpload.UploadPublicSchedule.Length,
                PrivateSchedule = privateScheduleData,
                PrivateScheduleSize = FileUpload.UploadPrivateSchedule.Length,
                Title = FileUpload.Title,
                UploadDT = DateTime.UtcNow
            };

            _context.Schedule.Add(schedule);
            await _context.SaveChangesAsync();

            return RedirectToPage("./Index");
        }
链接文件上传 Razor 页面
打开“_Layout.cshtml”,然后向导航栏添加一个链接以访问文件上传页面:
            <div class="navbar-collapse collapse">
                <ul class="nav navbar-nav">
                    <li><a asp-page="/Index">Home</a></li>
                    <li><a asp-page="/About">About</a></li>
                    <li><a asp-page="/Contact">Contact</a></li>
                    <li><a asp-page="/Product">产品展示</a></li>
                    <li><a asp-page="/Movies/Index">RpMovie</a></li>
                    <li><a asp-page="/Schedule/Index">文件上传</a></li>
                </ul>
            </div>
现在可以运行看一下效果了
这里只能上传文本文件,还要注意.txt文件必须为Unicode文件类型,否则文件中带有汉字的话,上传后会提示错误消息
Error: Unable to translate bytes [D7] at index 0 from specified code page to Unicode.
解决方法:FileHelpers.cs文件中修改读取字符编码的格式为
                    using (
                        var reader =
                            new StreamReader(
                                formFile.OpenReadStream(),
                   new UTF32Encoding(false, false),//使用此字符编码
                                //new UTF8Encoding(encoderShouldEmitUTF8Identifier: false, throwOnInvalidBytes: true),//原字符编码
                                detectEncodingFromByteOrderMarks: true))

修改后上传文件中包含中文字符就没问题了。
添加计划删除确认页面
用户单击删除计划时,为其提供取消此操作的机会。 向“Schedules”文件夹添加删除确认页面 (Delete.cshtml):
@page "{id:int}"
@model RazorPagesMovie.Pages.Schedule.DeleteModel

@{
    ViewData["Title"] = "Delete Schedule";
}

<h2>Delete Schedule</h2>

<h3>Are you sure you want to delete this?</h3>
<div>
    <h4>Schedule</h4>
    <hr />
    <dl class="dl-horizontal">
        <dt>
            @Html.DisplayNameFor(model => model.Schedule.Title)
        </dt>
        <dd>
            @Html.DisplayFor(model => model.Schedule.Title)
        </dd>
        <dt>
            @Html.DisplayNameFor(model => model.Schedule.PublicScheduleSize)
        </dt>
        <dd>
            @Html.DisplayFor(model => model.Schedule.PublicScheduleSize)
        </dd>
        <dt>
            @Html.DisplayNameFor(model => model.Schedule.PrivateScheduleSize)
        </dt>
        <dd>
            @Html.DisplayFor(model => model.Schedule.PrivateScheduleSize)
        </dd>
        <dt>
            @Html.DisplayNameFor(model => model.Schedule.UploadDT)
        </dt>
        <dd>
            @Html.DisplayFor(model => model.Schedule.UploadDT)
        </dd>
    </dl>

    <form method="post">
        <input type="hidden" asp-for="Schedule.ID" />
        <input type="submit" value="Delete" class="btn btn-default" /> |
        <a asp-page="./Index">Back to List</a>
    </form>
</div>
页面模型 (Delete.cshtml.cs) 在请求的路由数据中加载由 id 标识的单个计划。 将“Delete.cshtml.cs”文件添加到“Schedules”文件夹:
using System;
using System.Collections.Generic;
using System.Linq;
using System.Threading.Tasks;
using Microsoft.AspNetCore.Mvc;
using Microsoft.AspNetCore.Mvc.RazorPages;
using Microsoft.EntityFrameworkCore;

namespace RazorPagesMovie.Pages.Schedule
{
    public class DeleteModel : PageModel
    {
        private readonly RazorPagesMovie.Models.MovieContext _context;

        public DeleteModel(RazorPagesMovie.Models.MovieContext context)
        {
            _context = context;
        }

        [BindProperty]
        public Models.Schedule Schedule { get; set; }

        public async Task<IActionResult> OnGetAsync(int? id)
        {
            if (id == null)
            {
                return NotFound();
            }

            Schedule = await _context.Schedule.SingleOrDefaultAsync(m => m.ID == id);

            if (Schedule == null)
            {
                return NotFound();
            }
            return Page();
        }

        public async Task<IActionResult> OnPostAsync(int? id)
        {
            if (id == null)
            {
                return NotFound();
            }

            Schedule = await _context.Schedule.FindAsync(id);

            if (Schedule != null)
            {
                _context.Schedule.Remove(Schedule);
                await _context.SaveChangesAsync();
            }

            return RedirectToPage("./Index");
        }
    }
}
OnPostAsync 方法按 id 处理计划删除:
public async Task<IActionResult> OnPostAsync(int? id)
{
    if (id == null)
    {
        return NotFound();
    }

    Schedule = await _context.Schedule.FindAsync(id);

    if (Schedule != null)
    {
        _context.Schedule.Remove(Schedule);
        await _context.SaveChangesAsync();
    }

    return RedirectToPage("./Index");
}
成功删除计划后,RedirectToPage 将返回到计划的“Index.cshtml”页面。
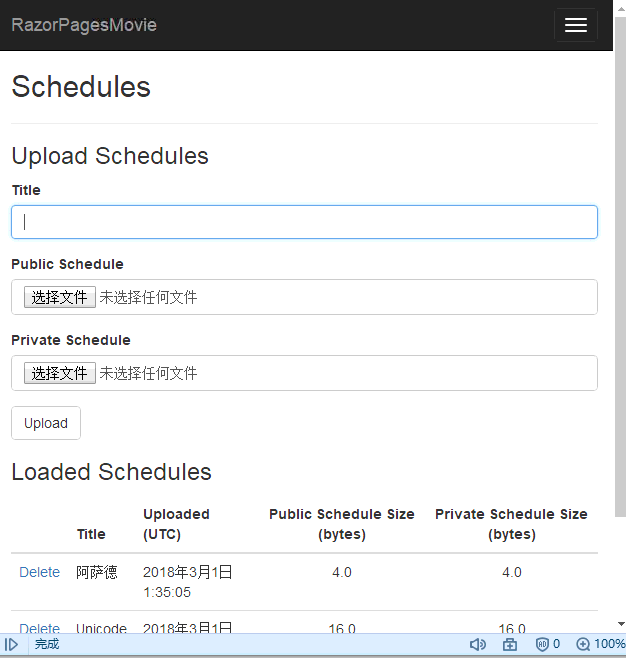
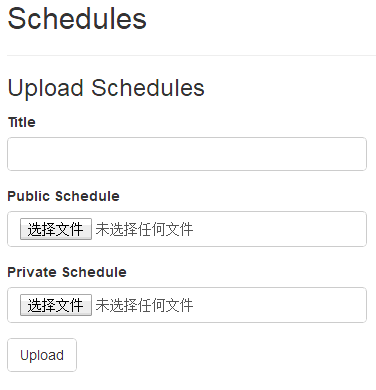
有效的 Schedules Razor 页面
页面加载时,计划标题、公用计划和专用计划的标签和输入将呈现提交按钮:
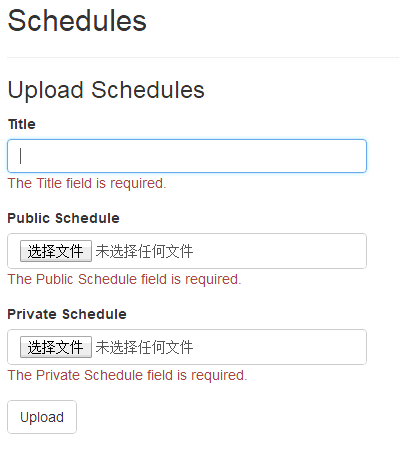
在不填充任何字段的情况下选择“上传”按钮会违反此模型上的 [Required] 特性。 ModelState 无效。 会向用户显示验证错误消息:
上传一个或多个计划时,“已加载计划”部分会显示已加载计划:

用户可单击该表中的“删除”链接以访问删除确认视图,并在其中选择确认或取消删除操作。
ASP.NET CORE RAZOR 到此结束
源代码
密码:rtr7