这里使用的的yum安装的
先关闭selinux和防火墙,然后重启服务器。
安装zabbix
#下载yum源
wget http://mirrors.aliyun.com/zabbix/zabbix/4.4/rhel/7/x86_64/zabbix-release-4.4-1.el7.noarch.rpm

#安装源码库
rpm -ivh zabbix-release-4.4-1.el7.noarch.rpm

#安装Zabbix部署包
yum -y install zabbix-agent zabbix-get zabbix-server-mysql zabbix-sender zabbix-web zabbix-web-mysql
安装数据库
#下载mysql源码包
wget http://dev.mysql.com/get/mysql57-community-release-el7-8.noarch.rpm

#安装mysql源
yum localinstall mysql57-community-release-el7-8.noarch.rpm -y

#安装MySQL5.7
yum install mysql-community-server -y

#启动服务
systemctl  enable --now mysqld

#修改root本地登录密码
#mysql安装完成之后,在/var/log/mysqld.log文件中给root生成了一个默认密码。通过下面的方式找到root默认密码.
[root@localhost ~]# grep 'password' /var/log/mysqld.log
2021-11-19T17:21:41.433493Z 1 [Note] A temporary password is generated for root@localhost: QjEg/pll6N(c

#登录mysql修改密码
#mysql5.7默认安装了密码安全检查插件(validate_password),默认密码检查策略要求密码必须包含:大小写字母、数字和特殊符号,并且长度不能少于8位
[root@localhost ~]# mysql -uroot -p
Enter password:
Welcome to the MySQL monitor.  Commands end with ; or \g.
Your MySQL connection id is 6
Server version: 5.7.36

Copyright (c) 2000, 2021, Oracle and/or its affiliates.

Oracle is a registered trademark of Oracle Corporation and/or its
affiliates. Other names may be trademarks of their respective
owners.

Type 'help;' or '\h' for help. Type '\c' to clear the current input statement.
mysql> set password = password('Passwd123!');
Query OK, 0 rows affected, 1 warning (0.00 sec)


#通过msyql环境变量可以查看密码策略的相关信息
mysql> show variables like '%password%';
+----------------------------------------+-----------------+
| Variable_name                          | Value           |
+----------------------------------------+-----------------+
| default_password_lifetime              | 0               |
| disconnect_on_expired_password         | ON              |
| log_builtin_as_identified_by_password  | OFF             |
| mysql_native_password_proxy_users      | OFF             |
| old_passwords                          | 0               |
| report_password                        |                 |
| sha256_password_auto_generate_rsa_keys | ON              |
| sha256_password_private_key_path       | private_key.pem |
| sha256_password_proxy_users            | OFF             |
| sha256_password_public_key_path        | public_key.pem  |
| validate_password_check_user_name      | OFF             |
| validate_password_dictionary_file      |                 |
| validate_password_length               | 8               |
| validate_password_mixed_case_count     | 1               |
| validate_password_number_count         | 1               |
| validate_password_policy               | MEDIUM          |
| validate_password_special_char_count   | 1               |
+----------------------------------------+-----------------+
validate_password_policy:密码策略,默认为MEDIUM策略
validate_password_dictionary_file:密码策略文件,策略为STRONG才需要
validate_password_length:密码最少长度
validate_password_mixed_case_count:大小写字符长度,至少1个
validate_password_number_count :数字至少1个
validate_password_special_char_count:特殊字符至少1个

#修改密码策略
在/etc/my.cnf文件添加validate_password_policy配置,指定密码策略
选择0(LOW),1(MEDIUM),2(STRONG)其中一种,选择2需要提供密码字典文件
validate_password_policy=0
如果不需要密码策略,添加my.cnf文件中添加如下配置禁用即可
validate_password = off
重新启动mysql服务使配置生效
修改/etc/my.cnf配置文件,在[mysqld]下添加编码配置
vim /etc/my.cnf
[mysqld]
character_set_server=utf8
init_connect='SET NAMES utf8'

#重启服务,查看数据库默认编码
systemctl restart mysqld

[root@localhost ~]# mysql -uroot -pPasswd123! -e "show variables like '%character%'"
mysql: [Warning] Using a password on the command line interface can be insecure.
+--------------------------+----------------------------+
| Variable_name            | Value                      |
+--------------------------+----------------------------+
| character_set_client     | utf8                       |
| character_set_connection | utf8                       |
| character_set_database   | utf8                       |
| character_set_filesystem | binary                     |
| character_set_results    | utf8                       |
| character_set_server     | utf8                       |
| character_set_system     | utf8                       |
| character_sets_dir       | /usr/share/mysql/charsets/ |
+--------------------------+----------------------------+

#创建zabbix数据库及其用户
mysql -uroot -pPasswd123! -e "create database zabbix default character set utf8 collate utf8_bin"
mysql -uroot -pPasswd123! -e "grant all on zabbix.* to 'zabbix'@'%' identified by 'zabbix'"

#测试zabbix用户是否能够连接
[root@localhost ~]# mysql -uzabbix -pzabbix
mysql: [Warning] Using a password on the command line interface can be insecure.
Welcome to the MySQL monitor.  Commands end with ; or \g.
Your MySQL connection id is 14
Server version: 5.7.36 MySQL Community Server (GPL)

Copyright (c) 2000, 2021, Oracle and/or its affiliates.

Oracle is a registered trademark of Oracle Corporation and/or its
affiliates. Other names may be trademarks of their respective
owners.

Type 'help;' or '\h' for help. Type '\c' to clear the current input statement.

mysql> show databases;
+--------------------+
| Database           |
+--------------------+
| information_schema |
| zabbix             |
+--------------------+
导入zabbix建库脚本
cd /usr/share/doc/zabbix-server-mysql-4.4.10/

zcat create.sql.gz| mysql -uzabbix -pzabbix zabbix
启动Zabbix Server
在zabbix_server.conf中编辑数据库配置
vim /etc/zabbix/zabbix_server.conf
#添加配置
DBHost=192.168.248.135
DBName=zabbix
DBUser=zabbix
DBPassword=zabbix

#启动服务
systemctl  enable --now zabbix-server
配置web GUI
#Zabbix前端的Apache配置文件位于/etc/httpd/conf.d/zabbix.conf
vim /etc/httpd/conf.d/zabbix.conf
..........................
    <IfModule mod_php5.c>
        php_value max_execution_time 300#最大脚本执行时长
        php_value memory_limit 128M #内存大小
        php_value post_max_size 16M
        php_value upload_max_filesize 2M
        php_value max_input_time 300
        php_value max_input_vars 10000
        php_value always_populate_raw_post_data -1
        # php_value date.timezone Europe/Riga  设置时区
        php_value date.timezone Asia/Shanghai #修改时区
        </IfModule>
....................

#启动服务
systemctl  enable --now httpd
安装grafana
官方:https://grafana.com/grafana/download
#下载包
 wget https://dl.grafana.com/enterprise/release/grafana-enterprise-7.1.1-1.x86_64.rpm

#安装
yum -y install grafana-enterprise-7.1.1-1.x86_64.rpm
#启动服务
systemctl  enable --now grafana-server
测试访问 ip:3000
默认用户和密码:admin admin

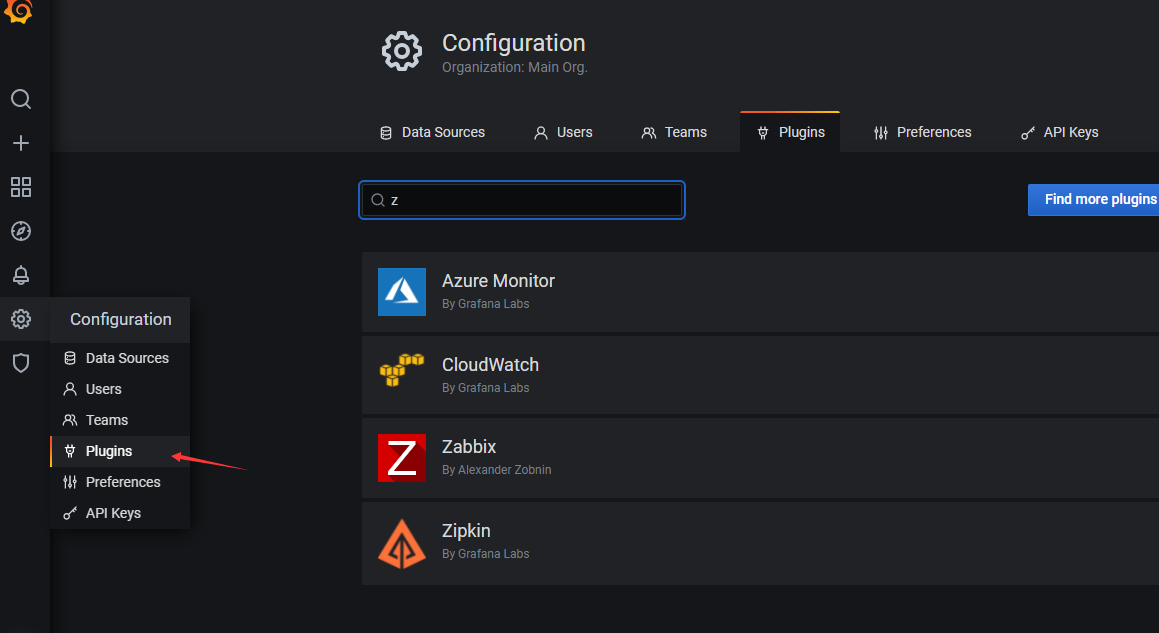
安装garfana-zabbix插件
#过滤出zabbix插件
[root@localhost ~]# grafana-cli plugins list-remote|grep zabbix
id: alexanderzobnin-zabbix-app version: 4.0.2

#安装zabbix插件
grafana-cli plugins install alexanderzobnin-zabbix-app

下载地址https://grafana.com/grafana/plugins/alexanderzobnin-zabbix-app/

[root@localhost ~]# ls /var/lib/grafana/plugins/
alexanderzobnin-zabbix-app-4.0.2.zip

#解压缩
cd /var/lib/grafana/plugins/
unzip alexanderzobnin-zabbix-app-4.0.2.zip

#重启grafana服务
 systemctl  restart grafana-server
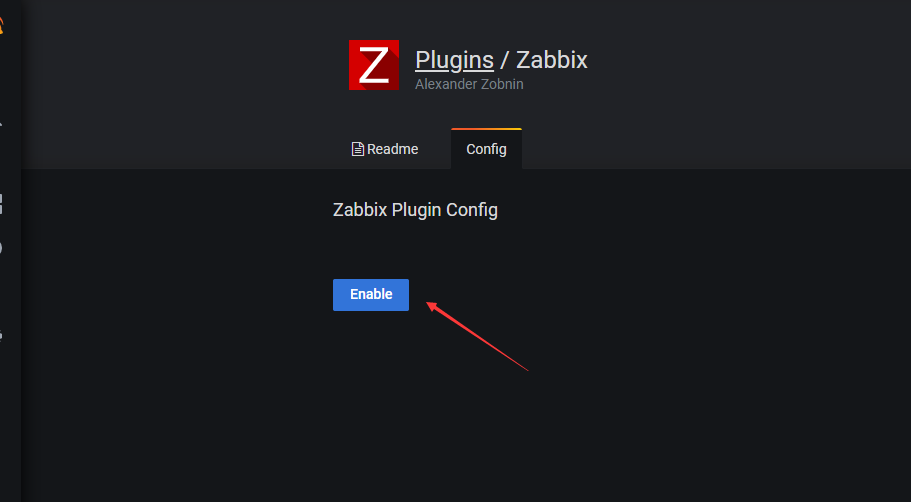
登录到grafana上,启用插件
添加新数据源
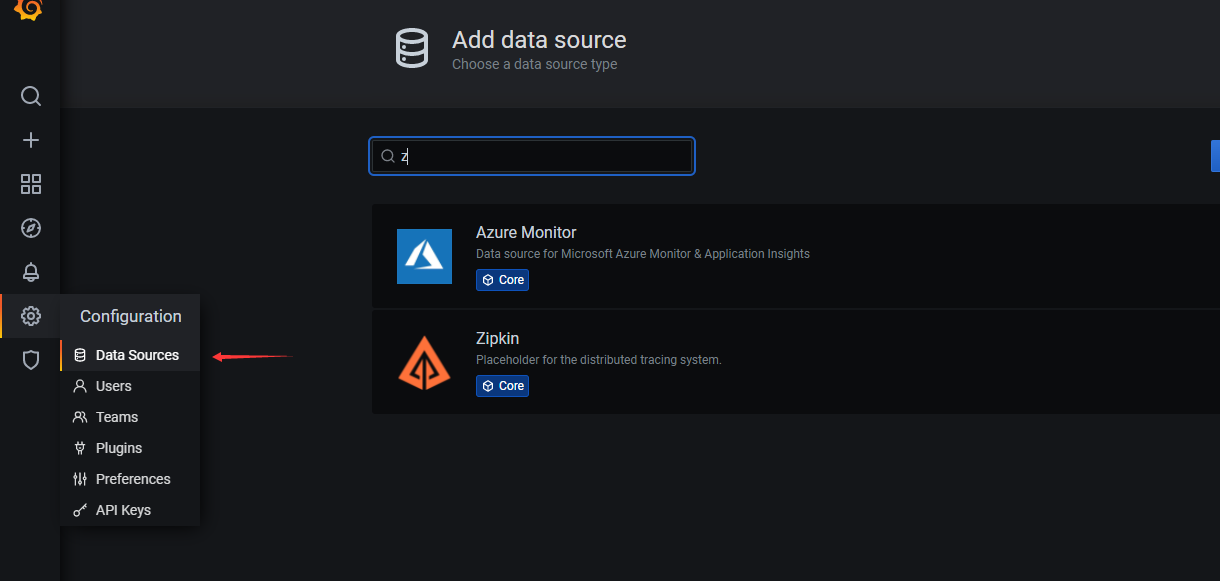
添加数据源时,会发现找不到zabbix 修改grafana的配置,将zabbix插件配置允许 找到 “;allow_loading_unsigned_plugins =“ 项,删掉 “;“ ,加上 “alexanderzobnin-zabbix-datasource“
vim /etc/grafana/grafana.ini
[plugins]
..........
allow_loading_unsigned_plugins = alexanderzobnin-zabbix-datasource

#重启服务
systemctl  restart grafana-server
再次添加就行
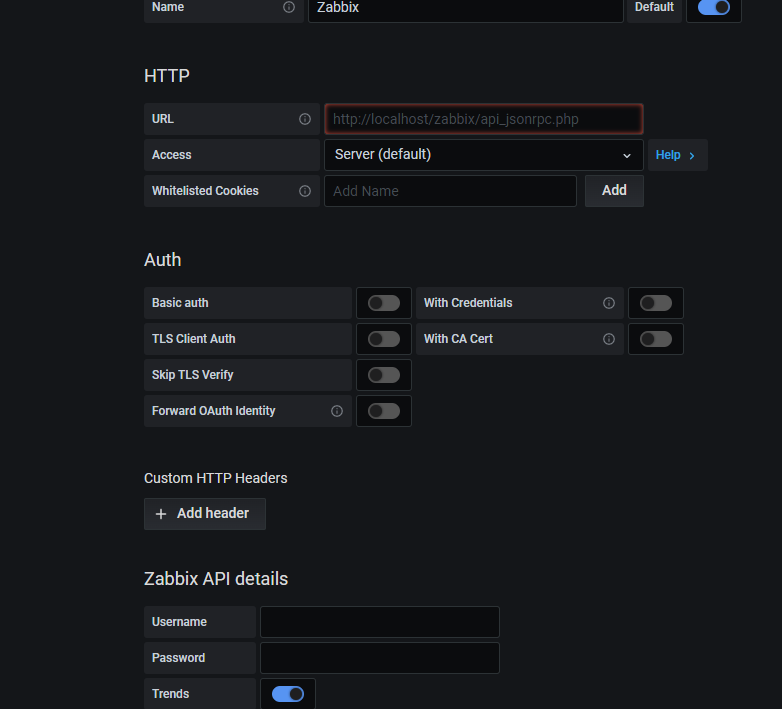
Name自定义,Type选择Zabbix,Url填写访问zabbix-web的url(http://ip/zabbix/api_jsonrpc.php),加上zabbix-api的php文件,Zabbix API details用户名密码需要在Zabbix-web页面中设置,也可以使用Zabbix的初始用户


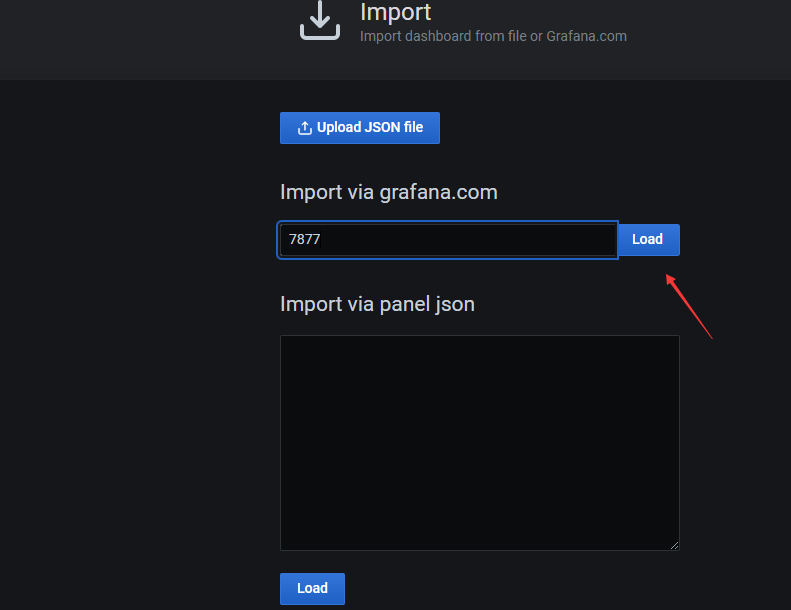
添加仪表盘
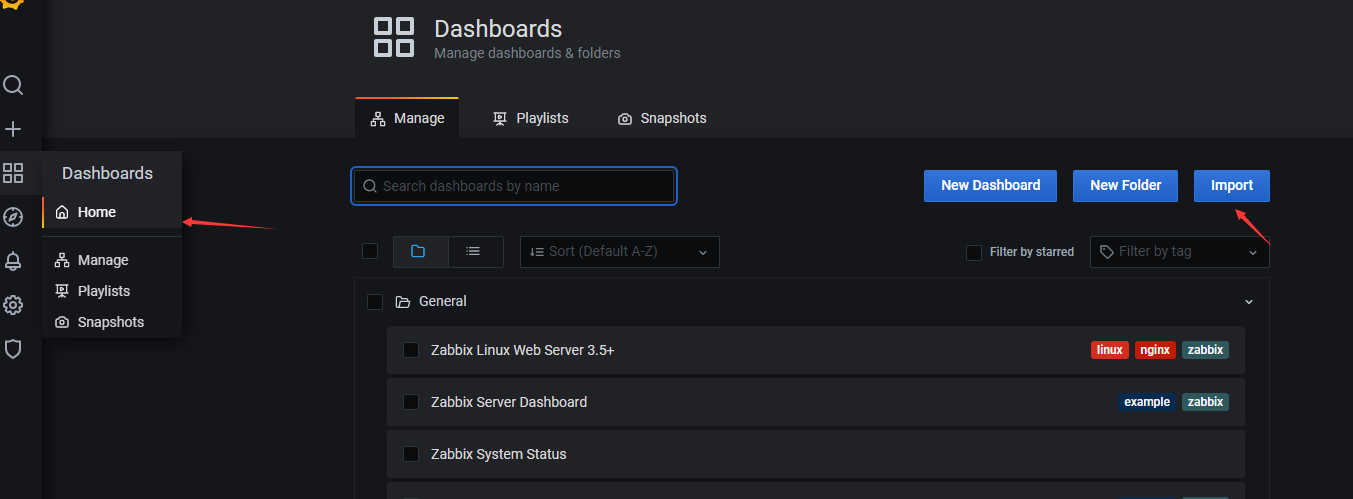
导入模板
可以通过访问 https://grafana.com/dashboards 来查看已有仪表盘模板,选取合适的使用
我这边已经导入了所以会有报错
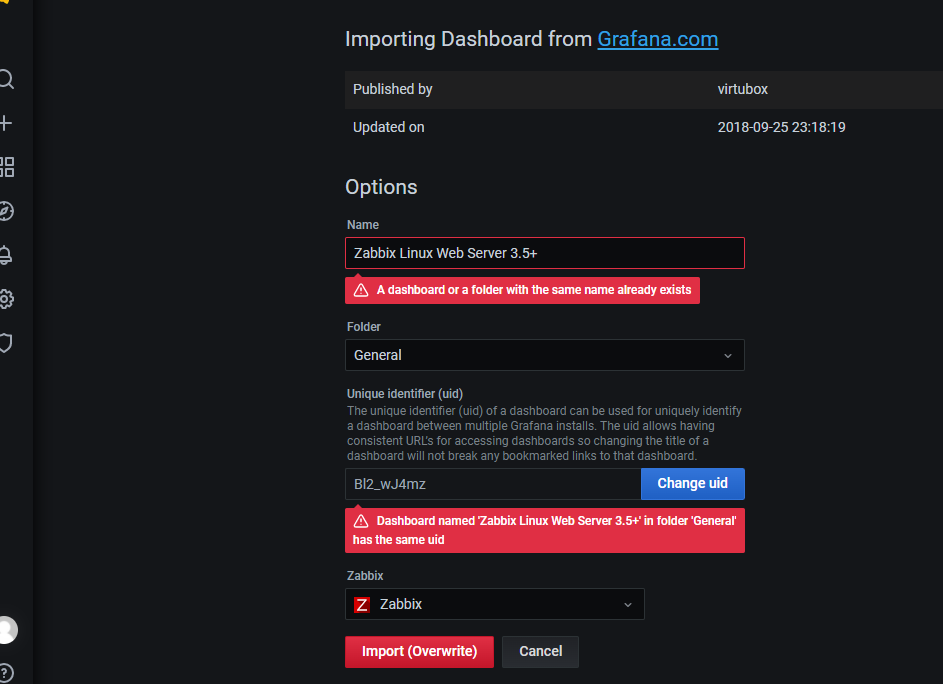
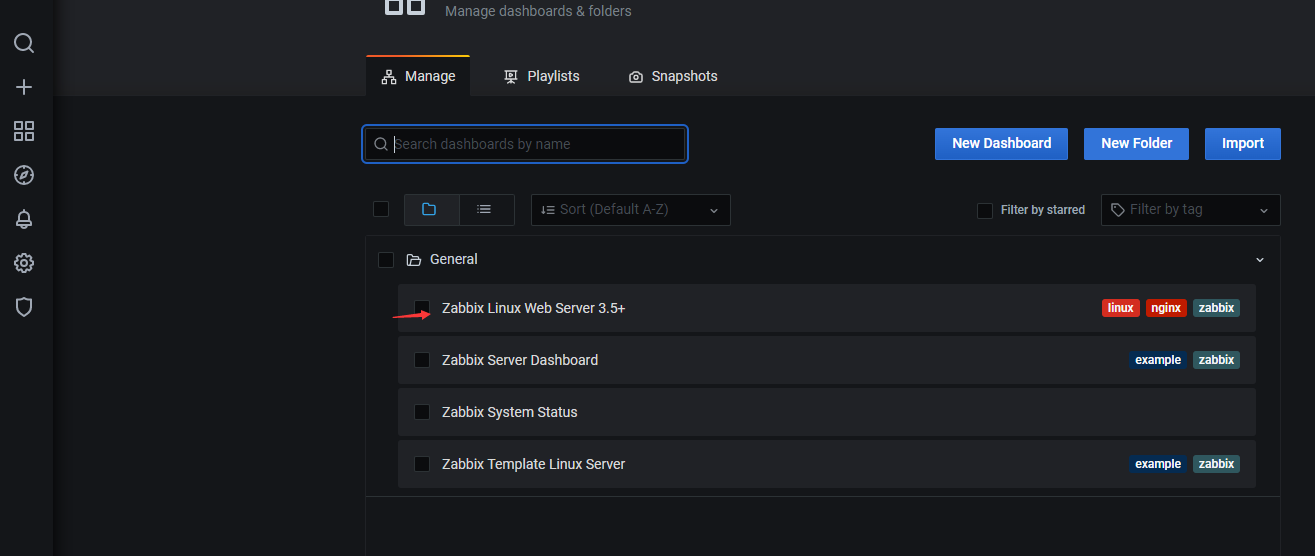
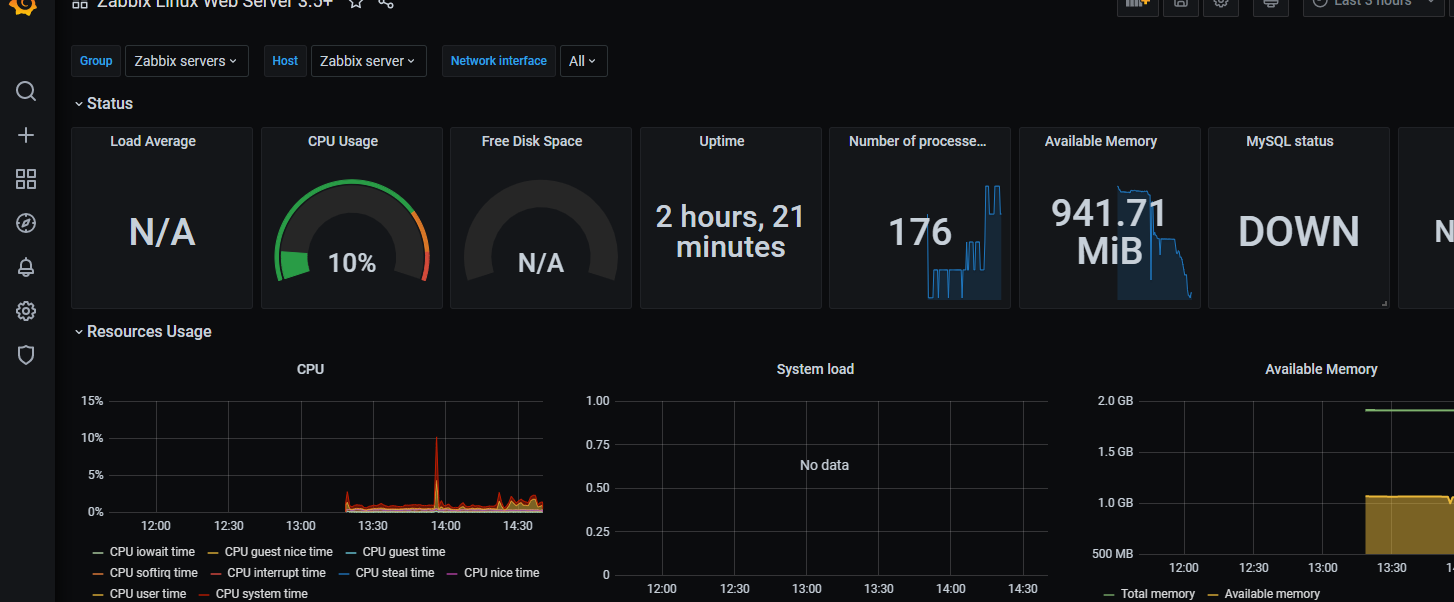
应用导入的模板
安装mysql可能碰到的问题
Downloading packages:
warning: /var/cache/yum/x86_64/7/mysql57-community/packages/mysql-community-libs-compat-5.7.37-1.el7.x86_64.rpm: Header V4 RSA/SHA256 Signature, key ID 3a79bd29: NOKEY
从 file:///etc/pki/rpm-gpg/RPM-GPG-KEY-mysql 检索密钥


源 "MySQL 5.7 Community Server" 的 GPG 密钥已安装,但是不适用于此软件包。请检查源的公钥 URL 是否配置正确。


#解决放发
gpg --export -a 3a79bd29 > 3a79bd29.asc
rpm --import 3a79bd29.asc
rpm --import https://repo.mysql.com/RPM-GPG-KEY-mysql-2022

#然后重新安装
yum install mysql-community-server