最近接手一个项目,新项目需要调用老项目的接口,但是老项目和新项目不再同一个域名下,所以必须进行跨域调用了,但是老项目又不能进行任何修改,所以jsonp也无法解决了,于是想到了使用了Httpclient来进行服务端的“跨域”来替代jsonp的客户端跨域方案。
上一篇博文中,详细剖析了jsonp的跨域原理,本文使用Httpclient来替代jsonp的客户端跨域方案。
先去 http://hc.apache.org/downloads.cgi 下载最新版httpclient。解压tutorial文件夹中有html和PDF的使用介绍。
下面实现从8888端口的html4项目中跨域访问8080端口的html5项目中的JsonServlet:
1)在html4中建立一个中间代理servelt和一个工具类,工具类代码如下:
import java.io.IOException;
import java.io.OutputStream;
import org.apache.http.HttpEntity;
import org.apache.http.StatusLine;
import org.apache.http.client.ClientProtocolException;
import org.apache.http.client.HttpResponseException;
import org.apache.http.client.methods.CloseableHttpResponse;
import org.apache.http.client.methods.HttpPost;
import org.apache.http.impl.client.CloseableHttpClient;
import org.apache.http.impl.client.HttpClients;

public class HttpUtil
{
	public static boolean returnResponseOfUrl(String url, OutputStream os)
	{
		CloseableHttpClient httpclient = HttpClients.createDefault();
		HttpPost httpPost = new HttpPost(url);
		CloseableHttpResponse response = null;
		try{
			response = httpclient.execute(httpPost);

			StatusLine statusLine = response.getStatusLine();
			HttpEntity entity = response.getEntity();
			if(statusLine != null && statusLine.getStatusCode() >= 300){
				throw new HttpResponseException(statusLine.getStatusCode(),
												statusLine.getReasonPhrase());
			}
			if(entity == null){
				throw new ClientProtocolException("response contains no content");
			}

			entity.writeTo(os);
			return true;
		}catch(IOException e){
			e.printStackTrace();
			return false;
		}finally{
			if(response != null){
				try{
					response.close();
				}catch(IOException e){
					e.printStackTrace();
				}
			}
		}
	}
}
中间代理servlet代码如下:
@WebServlet("/HttpclientServlet")
public class HttpclientServlet extends HttpServlet
{
	private static final long serialVersionUID = 1L;

    public HttpclientServlet()
    {
        super();
    }

	protected void doGet(HttpServletRequest request, HttpServletResponse response) throws ServletException, IOException
	{
		this.doPost(request, response);
	}

	protected void doPost(HttpServletRequest request, HttpServletResponse response) throws ServletException, IOException
	{
		String url = request.getParameter("url");
		if(url != null){
			if(!HttpUtil.returnResponseOfUrl(url, response.getOutputStream())){
				if(!HttpUtil.returnResponseOfUrl(url, response.getOutputStream())){	// 如果出错,再试一次
					// log.error("url:" + url);
				};
			}
		}
	}

}
html4项目中的访问页面代码如下:
<!doctype html>
<html>
<head>
	<meta charset="utf-8">
	<meta name="keywords" content="jsonp">
	<meta name="description" content="jsonp">
	<title>jsonp</title>
	<style type="text/css">
		*{margin:0;padding:0;}
		div{600px;height:100px;margin:20px auto;}
	</style>
</head>
<body>
	<div>
		<a href="javascript:;">jsonp测试</a>
	</div>

<script type="text/javascript" src="js/jquery-1.11.1.js"></script>
<script type="text/javascript">
$(function(){
	$("a").on("click", function(){
		$.ajax({
			type:"post",
			url:"http://localhost:8888/html4/HttpclientServlet?url="+ecodeURIComponent("http://localhost:8080/html5/JsonServlet"),
			success:function(data) {
				console.log(data);
				console.log(data.name);
				console.log(data.age);
				var user = JSON.parse(data);
				console.log(user.name);
				console.log(user.age);
			}
		});
	})
});
</script>
</body>
</html>
上面通过:url=http://localhost:8080/html5/JsonServlet 将我们最终要跨域访问的url地址传给自己服务器下的 HttpclientServlet. 然后在 HttpclientServlet 中使用httpclient访问 跨域 url 中的servlet,成功之后,将返回的结果返回给客户端。
html5项目中被 跨域 访问的servlet代码如下:
@WebServlet("/JsonServlet")
public class JsonServlet extends HttpServlet
{
    private static final long serialVersionUID = 4335775212856826743L;

    protected void doPost(HttpServletRequest request, HttpServletResponse response)
            throws ServletException, IOException
    {
        User user = new User();
        user.setName("yuanfang");
        user.setAge(100);
        Object obj = JSON.toJSON(user);

        System.out.println(user);            // com.tz.servlet.User@164ff87
        System.out.println(obj);            // {"age":100,"name":"yuanfang"}

        response.getWriter().println(obj);
    }

    protected void doGet(HttpServletRequest request, HttpServletResponse response)
            throws ServletException, IOException
    {
        this.doPost(request, response);
    }
}
启动8888和8080端口的tomcat,访问 http://localhost:8888/html4/jsonp.html ,结果如下:
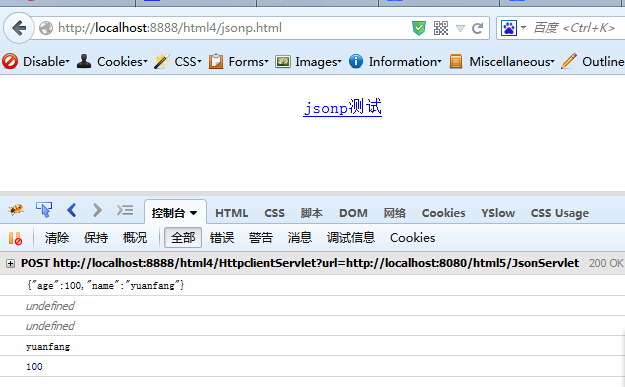
我们注意到第二和第三项都打印的是 undefined ,这是因为 中间代理的 HttpclientServlet,使用的是直接输出流的方式,所以最终返回的结果不是Json对象,而是字符串,所以需要使用 var user = JSON.parse(data); 来进行解析成 javascript对象就可以,所以第四和第五项都正常输出了结果。
如果想返回的是json对象,加一句代码 response.setContentType("text/json;charset=utf-8"); 就可以:
if(url != null){
    response.setContentType("text/json;charset=utf-8");
    if(!HttpUtil.returnResponseOfUrl(url, response.getOutputStream())){
	if(!HttpUtil.returnResponseOfUrl(url, response.getOutputStream())){	// 如果出错,再试一次
	    // log.error("url:" + url);
		};
	}
}
这样的话,浏览器在看到 contentType: "text/json;charset=utf-8" 时,它的js执行引擎会自动帮助我们将字符串解析成json对象。也就是相当于自动调用了 JSON.parse(data) 的效果。
简单吧 ^__^