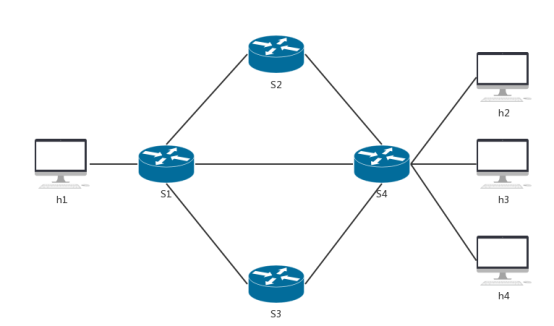
一.拓扑结构如下
二.建立拓扑的Python代码:
- 建立上述网络拓扑:
 from mininet.topo import Topo
   class MyTopo( Topo ):
        "Simple topology example."

      def __init__( self ):

     # Initialize topology
    Topo.__init__( self )
    s1 = self.addSwitch('s1')
    s2 = self.addSwitch('s2')
    s3 = self.addSwitch('s3')
    s4 = self.addSwitch('s4')

    h1 = self.addHost('h1')
    h2 = self.addHost('h2')
    h3 = self.addHost('h3')

    self.addLink(h1,s1)
    self.addLink(s1,s2)
    self.addLink(s1,s3)
    self.addLink(s2,s4)
    self.addLink(s3,s4)
    self.addLink(h2,s4)
    self.addLink(h3,s4)

    topos = { 'mytopo': ( lambda: MyTopo() ) }
- 负载均衡的实现:
import httplib2

import time
class OdlUtil:

url = ''
def __init__(self, host, port):

    self.url = 'http://' + host + ':' + str(port)
   def install_flow(self, container_name='default',username="admin", password="admin"):

   http = httplib2.Http()
   http.add_credentials(username, password)
   headers = {'Accept': 'application/json'}
   flow_name = 'flow_' + str(int(time.time()*1000))

   h1h2body1 ='{"flow": [{"id": "1","match": {"ethernet-match":'
              '{"ethernet-type": {"type": "2048"}},'
              '"ipv4-source":"10.0.0.1/32","ipv4-destination": "10.0.0.2/32"},'
              '"instructions": {"instruction": [{"order": "0",'
              '"apply-actions": {"action": [{"output-action": {'
              '"output-node-connector": "2"},"order": "0"}]}}]},'
              '"priority": "100","cookie": "1","table_id": "0"}]}'

   mh1h2body1 ='{"flow": [{"id": "1","match": {"ethernet-match":'
               '{"ethernet-type": {"type": "2048"}},'
               '"ipv4-source":"10.0.0.1/32","ipv4-destination": "10.0.0.2/32"},'
               '"instructions": {"instruction": [{"order": "0",'
               '"apply-actions": {"action": [{"output-action": {'
               '"output-node-connector": "2"},"order": "0"}]}}]},'
               '"priority": "102","cookie": "1","table_id": "0"}]}'

   h1h2body2 ='{"flow": [{"id": "2","match": {"ethernet-match":'
              '{"ethernet-type": {"type": "2048"}},'
              '"ipv4-source":"10.0.0.1/32","ipv4-destination": "10.0.0.2/32"},'
              '"instructions": {"instruction": [{"order": "0",'
              '"apply-actions": {"action": [{"output-action": {'
              '"output-node-connector": "3"},"order": "0"}]}}]},'
              '"priority": "99","cookie": "2","table_id": "0"}]}'

   mh1h2body2 ='{"flow": [{"id": "2","match": {"ethernet-match":'
               '{"ethernet-type": {"type": "2048"}},'
               '"ipv4-source":"10.0.0.1/32","ipv4-destination": "10.0.0.2/32"},'
               '"instructions": {"instruction": [{"order": "0",'
               '"apply-actions": {"action": [{"output-action": {'
               '"output-node-connector": "3"},"order": "0"}]}}]},'
               '"priority": "102","cookie": "2","table_id": "0"}]}'

   headers = {'Content-type': 'application/json'}
   num=0
   while num < 4 :
            response, content = http.request(uri='http://127.0.0.1:8181/restconf/config/opendaylight-inventory:nodes/node/openflow:1/flow-node-inventory:table/0/flow/3', body=mh1h2body1, method='PUT',headers=headers)

            time.sleep(0.1)

            response, content = http.request(uri='http://127.0.0.1:8181/restconf/config/opendaylight-inventory:nodes/node/openflow:1/flow-node-inventory:table/0/flow/3', body=h1h2body1, method='PUT',headers=headers)
            response, content = http.request(uri='http://127.0.0.1:8181/restconf/config/opendaylight-inventory:nodes/node/openflow:1/flow-node-inventory:table/0/flow/2', body=mh1h2body2, method='PUT',headers=headers)

            time.sleep(0.1)

            response, content = http.request(uri='http://127.0.0.1:8181/restconf/config/opendaylight-inventory:nodes/node/openflow:1/flow-node-inventory:table/0/flow/2', body=h1h2body2, method='PUT',headers=headers)

   print(content.decode())
   odl = OdlUtil('127.0.0.1','8181')
   odl.install_flow()
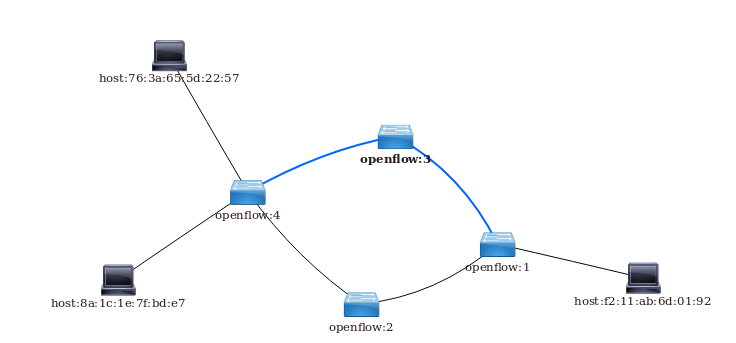
- 实现过程截图如下:


三.小组分工
主要负责搜集负载均衡相关资料和代码,以及建立网络拓扑。负载均衡实现效果的改进、后期视频的剪辑等。
四.课程总结
- 1.熟练掌握Linux操作系统的使用,初步了解SDN
软件定义网络网络虚拟化的一种实现方式,其核心技术OpenFlow通过将网络设备控制面与数据面分离开来,从而实现了网络流量的灵活控制,使网络作为管道变得更加智能。 - 2.初步掌握mininet的使用
用字符命令、可视化界面miniedit和Python脚本创建网络拓扑,其中Python脚本的编写能力还需要进一步的学习和提高,下面是用Python脚本生成一个Fat-tree型的拓扑
#!/usr/bin/python

"""Custom topology example
Adding the 'topos' dict with a key/value pair to generate our newly defined
topology enables one to pass in '--topo=mytopo' from the command line.
"""

from mininet.topo import Topo
from mininet.net import Mininet
from mininet.node import RemoteController,CPULimitedHost
from mininet.link import TCLink
from mininet.util import dumpNodeConnections

class MyTopo( Topo ):
    "Simple topology example."

    def __init__( self ):
        "Create custom topo."

        # Initialize topology
        Topo.__init__( self )
        L1 = 2
        L2 = L1 * 2
        L3 = L2
        c = []
        a = []
        e = []

        # add core ovs
        for i in range( L1 ):
                sw = self.addSwitch( 'c{}'.format( i + 1 ) )
                c.append( sw )

        # add aggregation ovs
        for i in range( L2 ):
                sw = self.addSwitch( 'a{}'.format( L1 + i + 1 ) )
                a.append( sw )

        # add edge ovs
        for i in range( L3 ):
                sw = self.addSwitch( 'e{}'.format( L1 + L2 + i + 1 ) )
                e.append( sw )

        # add links between core and aggregation ovs
        for i in range( L1 ):
                sw1 = c[i]
                for sw2 in a[i/2::L1/2]:
                # self.addLink(sw2, sw1, bw=10, delay='5ms', loss=10, max_queue_size=1000, use_htb=True)
                        self.addLink( sw2, sw1 )

        # add links between aggregation and edge ovs
        for i in range( 0, L2, 2 ):
                for sw1 in a[i:i+2]:
                    for sw2 in e[i:i+2]:
                        self.addLink( sw2, sw1 )

        #add hosts and its links with edge ovs
        count = 1
        for sw1 in e:
                for i in range(2):
                    host = self.addHost( 'h{}'.format( count ) )
                    self.addLink( sw1, host )
                    count += 1
topos = { 'mytopo': ( lambda: MyTopo() ) }
-
3.floodlight
生成拓扑并连接控制器floodlight,利用控制器floodlight查看图形拓扑,然后利用字符界面下发流表,实现各种网络拓扑的功能。 -
4.OpenDayLight
OpenDaylight以开源社区为主导,使用Java语言实现的的开源框架,旨在推动创新实施以及软件定义网络透明化。面对SDN型网络,OpenDaylight作为项目核心,拥有一套模块化、可插拔且极为灵活的控制器,还包含一套模块合集,能够执行需要快速完成的网络任务。
在课程中学习了基于ODl的流表下发和北向接口调用 -
5.负载均衡的设计和实现
如果存在根多的数据包同时通过网络连向一台服务器, 也就是凰络的速度比网络所连接的设备速度快的情况下,负载均衡技术是解决这个问题的有效方式。负载均衡是一种扩展现有网络设备和服务器的带宽、增加吞吐量、加强网络数据处理能力、提高网络的灵活性和可用性的技术。
这里给出实现负载均衡的两个例子。
负载均衡场景1:
这是参考场景中的一个例子,服务器h2 ,h3,h4上各自有不同的服务,h1是客户端。实现一个负载均衡的北向程序,当h2,h1,h3向h1传输数据时,北向应用根据链路的使用状况动态的调整路由规则。例如:s1-s4链路带宽充足情况下应默认s4-s1的传输路径,当剩余带宽不足的情况下应动态调整路由,使链路负载达到平衡。
我们这次实现的效果和此场景类似。
负载均衡场景2:
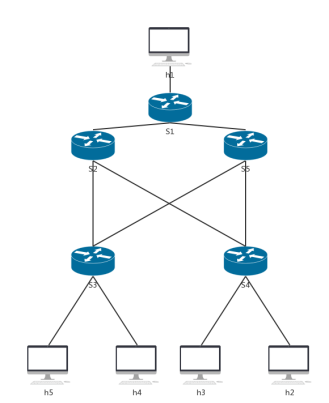
该拓扑是数据中心拓扑的一部分,其中h1是数据中心外的一台客户机,h2-h5是数据中心内的服务器,请根据该拓扑实现一个负载均衡的北向程序,实现h1访问数据中心中四台服务器时能根据链路状况动态改变路径。
这个例子相对比较复杂,实现起来也不容易,但是可以加深对负载均衡的理解。
通过查阅资料,实现负载均衡算法有:随机算法、轮询及加权轮询、最小连接及加权最小连接、哈希算法、IP地址散列、URL散列等
通过学习,对轮询法和随机法有了比较深刻的理解
轮询法:
public class RoundRobin
{

 private static Integer pos = 0;

 public static String getServer()
 {

     Map<String, Integer> serverMap =
             new HashMap<String, Integer>();
     serverMap.putAll(IpMap.serverWeightMap);

     Set<String> keySet = serverMap.keySet();
     ArrayList<String> keyList = new ArrayList<String>();
     keyList.addAll(keySet);

     String server = null;
     synchronized (pos)
     {
         if (pos > keySet.size())
             pos = 0;
         server = keyList.get(pos);
         pos ++;
     }

     return server;
  }
}
随机法:
public class Random
{
  public static String getServer()
  {

     Map<String, Integer> serverMap =
             new HashMap<String, Integer>();
     serverMap.putAll(IpMap.serverWeightMap);

     Set<String> keySet = serverMap.keySet();
     ArrayList<String> keyList = new ArrayList<String>();
     keyList.addAll(keySet);

     java.util.Random random = new java.util.Random();
     int randomPos = random.nextInt(keyList.size());

     return keyList.get(randomPos);
   }
}
另外,IP地址散列 算法的思想为:通过管理发送方IP和目的地IP地址的散列,将来自同一发送方的分组(或发送至同一目的地的分组)统一转发到相同服务器的算法。当客户端有一系列业务需要处理而必须和一个服务器反复通信时,该算法能够以流为单位,保证来自相同客户端的通信能够一直在同一服务器中进行处理。我认为这个算法也比较好理解,关键就是要处理好如何实现的问题。
通过这门课的学习,加深了对上学期计算机网络课程的理解,初步掌握了软件定义网络的思想和实现方法,总之收获不少。