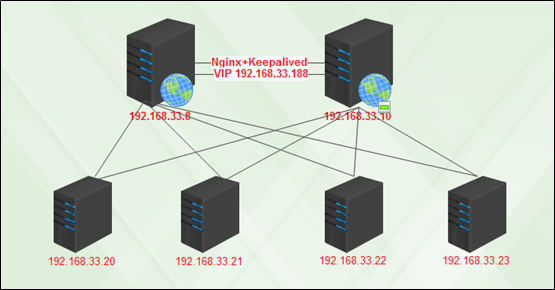
随着Nginx在国内的发展潮流,越来越多的互联网公司都在使用Nginx,Nginx高性能、稳定性成为IT人士青睐的HTTP和反向代理服务器。Nginx负载均衡一般位于整个网站架构的最前端或者中间层,如果为最前端时单台Nginx会存在单点故障,也就是一台Nginx宕机,会影响用户对整个网站的访问。所以需要加入Nginx备份服务器,Nginx主服务器与备份服务器之间形成高可用,一旦发现Nginx主宕机,能快速将网站恢复至备份主机。Nginx+keepalived网络架构如图23-1所示:

Nginx+keepalived高性能WEB网络架构实战配置如下步骤:
1、环境准备
Nginx版本:nginx v1.12.0
Keepalived版本:keepalived v1.2.1
Nginx-1:192.168.0.138  (Master)
Nginx-2:192.168.0.139 (Backup)
2、Nginx安装配置,Master、Backup服务器安装Nginx和keepalived
yum install -y pcre-devel
wget -c http://nginx.org/download/nginx-1.12.0.tar.gz
tar -xzf nginx-1.12.0.tar.gz
cd nginx-1.12.0
sed -i -e 's/1.12.0//g' -e 's/nginx//TDTWS/g' -e 's/"NGINX"/"TDTWS"/g' src/core/nginx.h
./configure --prefix=/usr/local/nginx --user=www --group=www  --with-http_stub_status_module --with-http_ssl_module
make
make install
3、Keepalived安装配置
wget http://www.keepalived.org/software/keepalived-1.2.1.tar.gz
tar  -xzvf  keepalived-1.2.1.tar.gz
cd keepalived-1.2.1
./configure
make && make install
DIR=/usr/local/
cp $DIR/etc/rc.d/init.d/keepalived  /etc/rc.d/init.d/
cp $DIR/etc/sysconfig/keepalived   /etc/sysconfig/
mkdir  -p  /etc/keepalived
cp   $DIR/sbin/keepalived    /usr/sbin/
注意:如果正常安装keepalive不能使用,可能是在configure时需要指定内核,例如./configure --with-kernel-dir=/usr/src/kernels/2.6.32-431.el6.x86_64/
使用yum安装keepalive
yum install -y keepalived*
4、配置Keepalived,master端keepalived.conf内容如下(包括两个vrrp实例):
! Configuration File for keepalived
global_defs {
  notification_email {
      support@jfedu.net
 }
    notification_email_from wgkgood@163.com
    smtp_server 127.0.0.1
    smtp_connect_timeout 30
    router_id LVS_DEVEL
 }

vrrp_script chk_nginx {
    script  "/data/sh/check_nginx.sh"
    interval 2
    weight 2
}

#VIP1 192.168.0.198
vrrp_instance VI_1 {
     state MASTER
     interface ens33
     lvs_sync_daemon_inteface ens33
     virtual_router_id 151
     priority 100
     advert_int 5
     #nopreempt
     authentication {
         auth_type  PASS
         auth_pass  1111

     }
     virtual_ipaddress {
         192.168.0.198
     }
     track_script {
     chk_nginx
    }
}

#VIP2 192.168.0.199
vrrp_instance VI_2 {
     state BACKUP
     interface ens33
     lvs_sync_daemon_inteface ens33
     virtual_router_id 152
     priority 80
     advert_int 5
     #nopreempt
     authentication {
         auth_type  PASS
         auth_pass  1111

     }
     virtual_ipaddress {
         192.168.0.199
     }
     track_script {
     chk_nginx
    }
}
backup端的keepalived.conf内容如下:
! Configuration File for keepalived
global_defs {
  notification_email {
      support@jfedu.net
 }
    notification_email_from wgkgood@163.com
    smtp_server 127.0.0.1
    smtp_connect_timeout 30
    router_id LVS_DEVEL
 }

vrrp_script chk_nginx {
    script  "/data/sh/check_nginx.sh"
    interval 2
    weight 2
}

#VIP1 192.168.0.198
vrrp_instance VI_1 {
     state BACKUP
     interface ens33
     lvs_sync_daemon_inteface ens33
     virtual_router_id 151
     priority 80
     advert_int 5
     #nopreempt
     authentication {
         auth_type  PASS
         auth_pass  1111

     }
     virtual_ipaddress {
         192.168.0.198
     }
     track_script {
     chk_nginx
    }
}

#VIP2 192.168.0.199
vrrp_instance VI_2 {
     state MASTER
     interface ens33
     lvs_sync_daemon_inteface ens33
     virtual_router_id 152
     priority 100
     advert_int 5
     #nopreempt
     authentication {
         auth_type  PASS
         auth_pass  1111

     }
     virtual_ipaddress {
         192.168.0.199
     }
     track_script {
     chk_nginx
    }
}
5、如上配置还需要建立check_nginx脚本,用于检查本地Nginx是否存活,如果不存活,则kill keepalived实现切换。其中check_nginx.sh脚本内容如下:
#!/bin/bash
#auto check nginx  process
NUM=`ps -ef|grep nginx|grep -vEc "check|grep"`
if [ $NUM -eq 0 ];then
    service keepalived stop
fi
6、通过查看日志/var/log/message,确认keepalived是否启动成功