一、前期准备工作
软件环境:微信开发者工具
官方下载地址:https://mp.weixin.qq.com/debug/wxadoc/dev/devtools/download.html
1、基本需求。
- 实现用户自定义弹框
- 带动画(动画可做参靠,个人要是觉得不好看可以自定义动画)
- 获取弹出框的内容,自定义事件获取
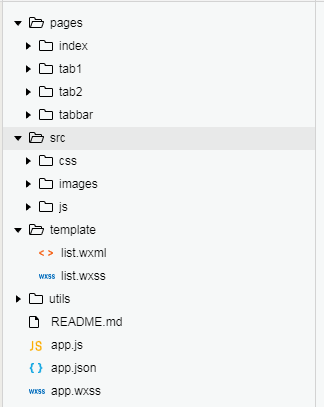
2、案例目录结构

二、程序实现具体步骤
1.选项卡xxx.wxml代码
a.tab1代码
<view class="navbar">
  <view class="navbar-item" wx:for="{{navbar}}" wx:for-index="idx" wx:key="" data-idx="{{idx}}" bindtap="swichNav">
    <text class="navbar-text {{currentNavbar==idx ? 'active' : ''}}">{{item}}</text>
  </view>
</view>
<navigator url="/pages/index/index" hover-class="hover">
	<button class="btn-index">首页</button>
</navigator>
b.tab2代码
<view class="wrap" bindtouchstart="touchStart" bindtouchend="touchEnd">

  <view class="nav-item {{testClass[index]}}" wx:for="{{testNav}}" wx:key="" data-index="{{index}}">
    <view>{{item.word}}</view>
  </view>

</view>
<navigator url="/pages/index/index" hover-class="hover">
	<button class="btn-index">首页</button>
</navigator>
c.tabbar代码
<!--pages/tabbar/tabbar.wxml-->
<import src="../../template/list.wxml"/>

<view class="geekxz-tabbar-content">
  <view class="geekxz-tabbar-group">
    <text data-id="0" bindtap="changeTabbar" class="geekxz-tabbar-cell {{index == 0 ? 'geekxz-active' : ''}}">已获得赏金</text>
    <text data-id="1" bindtap="changeTabbar" class="geekxz-tabbar-cell {{index == 1 ? 'geekxz-active' : ''}}">赏金在路上</text>
    <text data-id="2" bindtap="changeTabbar" class="geekxz-tabbar-cell {{index == 2 ? 'geekxz-active' : ''}}">邀请失败</text>
  </view>
</view>
<view class="geekxz-list-box {{index == 0 ? '' : 'geekxz-hide'}}">
  <template wx:for="{{['选项卡一子选项 - 1','选项卡一子选项 -  2','选项卡一子选项 - 3','选项卡一子选项 - 4','选项卡一子选项 - 5','选项卡一子选项 - 6','选项卡一子选项 - 7','选项卡一子选项 - 8']}}" is="listNoneOnly" data="{{item}}" wx:key=""></template>
</view>
<view class="geekxz-list-box {{index == 1 ? '' : 'geekxz-hide'}}">
  <template wx:for="{{['选项卡二子选项 - 1','选项卡二子选项 -  2','选项卡二子选项 - 3','选项卡二子选项 - 4','选项卡二子选项 - 5']}}" is="listNoneOnly" data="{{item}}" wx:key=""></template>
</view>
<view class="geekxz-list-box {{index == 2 ? '' : 'geekxz-hide'}}">
  <template wx:for="{{['选项卡三子选项 - 1','选项卡三子选项 -  2','选项卡三子选项 - 3']}}" is="listNoneOnly" data="{{item}}" wx:key=""></template>
</view>
<navigator url="/pages/index/index" hover-class="hover">
	<button class="btn-index">首页</button>
</navigator>
2.xxx.wxss代码
.wrap{
  margin-top: 20rpx;
  color: #999;
  position: relative;
   750rpx;
  height: 250rpx;
  border-top:1px solid #ccc;
  border-bottom:1px solid #ccc;

}

.nav-item{
  margin-top:10px;
   400rpx;
  height: 200rpx;
  box-shadow: 0 0 5rpx #e24233;
  padding: 5rpx;
  transition: all 0.5s;
  word-break:break-all;
  background-color: snow;
}

.prev{
  position: absolute;
  transform: scale(0.8);
  left: -280rpx;
  margin-right: 55rpx;
}

.current{
  position: absolute;
  left: 50%;
  margin-left: -200rpx;

}

.next{
  position: absolute;
  left:620rpx;
  top: 0;
  transform: scale(0.8);
  z-index: 10;
}

.next+.next{
  z-index: -1;
  background-color: deepskyblue;
}
3.部分xxx.js逻辑代码
a.部分的功能实现
swipNext (e) {
     flag++;
     if (flag < this.data.testNav.length){
       for (var i = 0; i < this.data.testNav.length; i++) {
         if (i == flag) {
           classCatch[i] = 'current';
         } else if (i < flag) {
           classCatch[i] = 'prev';
         } else {
           classCatch[i] = 'next';
         }
       }
       this.setData({
         testClass: classCatch
       })
     }else{
       flag = this.data.testNav.length-1;
     }
  },
  swipPrev(e) {
    flag--;
    if (flag+1 > 0 ) {
      for (var i = 0; i < this.data.testNav.length; i++) {
        if (i == flag) {
          classCatch[i] = 'current';
        } else if (i < flag) {
          classCatch[i] = 'prev';
        } else {
          classCatch[i] = 'next';
        }
      }
      this.setData({
        testClass: classCatch
      })
    } else {
      flag = 0;
    }
  }
三、案例运行效果图

微信小程序Tab选项卡切换大集合
注:本文著作权归作者,由demo大师代发,拒绝转载,转载需要作者授权