少年佳节倍多情,老去谁知感慨生;
不效艾符趋习俗,但祈蒲酒话升平。
鬓丝日日添白头,榴锦年年照眼明;
千载贤愚同瞬息,几人湮没几垂名。
UI想要的效果,我...只能默默的承受着

前言
端午将近,想想再过一个小时就要回家,心里难免有点激动,但是作为一个程序猿,怎么也不能闲着,于是想起了最近正在做的项目中关于自定义键盘,下面就与大家分享分享,因为时间关系,[GLKeyBoard]就写的有点简单,下面就来看看具体实现
思路
就以UITextField为例,在API中有这么一个属性inputView,当我们的UITextField成为第一响应者的时候就会弹出该view,当然我们默认情况下是系统默认的键盘,所以,要想自定义键盘,就需要在此处下功夫了。
动手
- 想必写这个界面,对各位是没有什么难度的,绝对妥妥的,十来分钟就搞定的事情,贴上部分代码
-(void)initializeViewComponents
{
    self.backgroundColor =UICOLOR_FROM_RGB_OxFF(0xbfc5ca);

    NSArray *array = @[@"1",@"2",@"3",@"4",@"5",@"6",@"7",@"8",@"9",@"0",@"千",@"万",@"十万",@"百万",@"Delete",@"清除",];

    for (int i = 0; i < kKeyBoardNumber; i ++) {
        UIButton *button = [UIButton buttonWithType:UIButtonTypeCustom];
        button.tag = kKeyBoardTag + i;
        [button setBackgroundColor:UICOLOR_FROM_RGB_OxFF(0xfefefe)];
        if (i == kKeyBoardNumber-2) {
            [button setTitleColor:[UIColor whiteColor] forState:UIControlStateNormal];
            [button setBackgroundColor:UICOLOR_FROM_RGB_OxFF(0xff4238)];
        }else{
            [button setTitleColor:UICOLOR_FROM_RGB_OxFF(0x303030) forState:UIControlStateNormal];
        }
        if (i > 9) {
            button.titleLabel.font = [UIFont systemFontOfSize:12];
        }else{
            button.titleLabel.font = [UIFont systemFontOfSize:15];
        }

        button.layer.cornerRadius = 5;
        [button.layer setMasksToBounds:YES];

        [button setTitle:array[i] forState:UIControlStateNormal];
        [button addTarget:self action:@selector(keyBoardClick:) forControlEvents:UIControlEventTouchUpInside];
        [self addSubview:button];

        if (i == 0) {
            [button mas_makeConstraints:^(MASConstraintMaker *make) {
                make.size.mas_equalTo(CGSizeMake(GTReViewXFloat(kKeyBoardWidth), GTReViewXFloat(kKeyBoardHeight)));
                make.top.equalTo(@(GTReViewXFloat(kKeyBoardTopPadding)));
                make.left.equalTo(self.mas_left).offset(GTReViewXFloat(5));
            }];

            _lastButton = button;
        }else if(i < 10){
            [button mas_makeConstraints:^(MASConstraintMaker *make) {
                make.size.mas_equalTo(CGSizeMake(GTReViewXFloat(kKeyBoardWidth), GTReViewXFloat(kKeyBoardHeight)));
                make.top.equalTo(@(GTReViewXFloat(kKeyBoardTopPadding)));
                make.left.equalTo(_lastButton.mas_right).offset(GTReViewXFloat(kKeyBoardMiddlePadding));
            }];

            _lastButton = button;
        }else if(i == 10){
            [button mas_makeConstraints:^(MASConstraintMaker *make) {
                make.size.mas_equalTo(CGSizeMake(GTReViewXFloat(kKeyBoardBigWidth), GTReViewXFloat(kKeyBoardHeight)));
                make.top.equalTo(_lastButton.mas_bottom).offset((GTReViewXFloat(kKeyBoardTopPadding)));
                make.left.equalTo(self.mas_left).offset(GTReViewXFloat(5));
            }];
            _lastButton = button;
        }else if (i < 14 && i > 10){
            [button mas_makeConstraints:^(MASConstraintMaker *make) {
                make.size.mas_equalTo(CGSizeMake(GTReViewXFloat(kKeyBoardBigWidth), GTReViewXFloat(kKeyBoardHeight)));
                make.top.equalTo(_lastButton.mas_top);
                make.left.equalTo(_lastButton.mas_right).offset(GTReViewXFloat(kKeyBoardBottomMiddlePadding));
            }];
            _lastButton = button;
        }else if (i == 14){
            [button mas_makeConstraints:^(MASConstraintMaker *make) {
                make.size.mas_equalTo(CGSizeMake(GTReViewXFloat(100), GTReViewXFloat(kKeyBoardHeight)));
                make.top.equalTo(_lastButton.mas_top);
                make.left.equalTo(_lastButton.mas_right).offset(GTReViewXFloat(kKeyBoardBottomMiddlePadding));
            }];
            _lastButton = button;

        }else if (i == 15){
            [button mas_makeConstraints:^(MASConstraintMaker *make) {
                make.size.mas_equalTo(CGSizeMake(GTReViewXFloat(84), GTReViewXFloat(kKeyBoardHeight)));
                make.top.equalTo(_lastButton.mas_top);
                make.left.equalTo(_lastButton.mas_right).offset(GTReViewXFloat(kKeyBoardBottomMiddlePadding));
            }];
            _lastButton = button;
        }
    }
}
这里不建议像我这样,把需要的键值写在这里,最好是新建一个plist文件,这个布局代码也有点乱,大家多担待。
2. 写完之后,激动的我赶快想看下效果,于是飞快的写下了下面的代码
    GLKeyBoard *keyBoard = [[GLKeyBoard alloc] initWithFrame:CGRectMake(0, 0, self.view.frame.size.width, GTReViewXFloat(85))];

    _textFiled = [[UITextField alloc] init];
    _textFiled.delegate = (id)self;
    _textFiled.textColor = [UIColor orangeColor];
    _textFiled.borderStyle = UITextBorderStyleRoundedRect;
    _textFiled.placeholder = @"随便输...";
    _textFiled.inputView = keyBoard;
    [self.view addSubview:_textFiled];
正当我兴奋不已的时候,我艹,什么鬼,点了按钮都没反应,恍然大悟,原来按钮点击那里什么都没处理....
3. 进入按钮点击后的核心处理
首先,我们的在GLKeyBoard中添加点东西
//键盘点击类型
typedef NS_ENUM(NSInteger,GLKeyBoardType) {
    GLKeyBoardClearAll,
    GLKeyBoardDelete,
    GLKeyBoardOther
};
//键盘点击事件
typedef void(^KeyBoardClickBlcok)(GLKeyBoardType keyBoardType, NSString *text);
这样后,我们在点击处就可以添加下面的代码了
-(void)keyBoardClick:(UIButton *)sender
{
    NSInteger tag = sender.tag - kKeyBoardTag;
    switch (tag) {
        case 0:case 1:case 2:case 3:case 4:case 5:case 6:case 7:case 8:case 9:case 10:case 11:case 12:case 13:
        {
            if (self.keyBoardClickBlock) {
                self.keyBoardClickBlock(GLKeyBoardOther, sender.currentTitle);
            }
        }
            break;
        case 14:
        {
            if (self.keyBoardClickBlock) {
                self.keyBoardClickBlock(GLKeyBoardDelete, sender.currentTitle);
            }
        }
            break;
        case 15:{
            if (self.keyBoardClickBlock) {
                self.keyBoardClickBlock(GLKeyBoardClearAll, sender.currentTitle);
            }
        }
            break;
        default:
            break;
    }
}
然后我们就可以在block中对textField中进行值的处理了
一开始,我想的是在viewcontroller中,直接添加处理方法,根据按钮的类型,来改变值,但是这样的话,岂不是每个用到的地方都要写一篇,难免太复杂,于是我想到了category,这就有了UITextField+GLKeyBoard这个类的诞生
在该类中主要添加了一个方法
- (void)updateText:(NSString *)text,根据按钮点击的文字来更改输入控件的值,方法过程也不是很复杂,每个地方都有标注,相信大家看了都会明白
最主要的思想就是根据光标来分割两边的字符,然后将新的字符插入到光标位置,并移动光标的位置。
- (void)updateText:(NSString *)text
{
    if ([text isEqualToString:@"千"]) {
        [self changeTextWithNumber:1000];
    }else if ([text isEqualToString:@"万"]){
        [self changeTextWithNumber:10000];
    }else if ([text isEqualToString:@"十万"]){
        [self changeTextWithNumber:100000];
    }else if ([text isEqualToString:@"百万"]){
        [self changeTextWithNumber:1000000];
    }
    else{
        UITextPosition *beginning = self.beginningOfDocument;//文字的开始地方
        UITextPosition *startPosition = self.selectedTextRange.start;//光标开始位置
        UITextPosition *endPosition = self.selectedTextRange.end;//光标结束位置
        NSInteger startIndex = [self offsetFromPosition:beginning toPosition:startPosition];//获取光标开始位置在文字中所在的index
        NSInteger endIndex = [self offsetFromPosition:beginning toPosition:endPosition];//获取光标结束位置在文字中所在的index

        // 将输入框中的文字分成两部分,生成新字符串,判断新字符串是否满足要求
        NSString *originText = self.text;
        NSString *beforeString = [originText substringToIndex:startIndex];//从起始位置到当前index
        NSString *afterString = [originText substringFromIndex:endIndex];//从光标结束位置到末尾

        NSInteger offset;

        if (![text isEqualToString:@""]) {
            offset = text.length;
        } else {
            // 只删除一个字符
            if (startIndex == endIndex) {
                if (startIndex == 0) {
                    return;
                }
                offset = -1;
                beforeString = [beforeString substringToIndex:(beforeString.length - 1)];
            } else {
                //光标选中多个
                offset = 0;
            }
        }

        NSString *newText = [NSString stringWithFormat:@"%@%@%@", beforeString, text, afterString];
        self.text = newText;

        // 重置光标位置
        UITextPosition *nowPosition = [self positionFromPosition:startPosition offset:offset];
        UITextRange *range = [self textRangeFromPosition:nowPosition toPosition:nowPosition];
        self.selectedTextRange = range;
    }
}
到此为止,我们的键盘就OK啦,来看看效果

嗯哼,怎么感觉不对呢?
- 位置不对
- 键盘上面怎么多了一截呢?
排查后,才发现是导入了IQKeyboard这个类,导致键盘默认会有个工具栏在上面,但是我们美工妹子说了,不能要,好吧,于是我查看API,发现了这个参数
/**
 Automatic add IQToolbar functionality. Default is YES.
 */
@property(nonatomic, assign, getter = isEnableAutoToolbar) BOOL enableAutoToolbar;
于是我添加了一行代码,在vc中
   //如果不需要
  [[IQKeyboardManager sharedManager] setEnableAutoToolbar:NO];
瞬间就对了,那么第一个问题怎么办呢?我首先想到的就是在键盘弹出的时候去修改坐标,但是我们必须的拿到这个键盘的view,我显示把GLKeyBoard *keyBoard这个对象当作键盘来设置,然后当头一棒,不行的,完全没反应。
看来只能自己写个方法来查找我们自定义的keyBoard了
- (UIView *)findKeyboard
{
    UIView *keyboardView = nil;
    NSArray *windows = [[UIApplication sharedApplication] windows];
    for (UIWindow *window in [windows reverseObjectEnumerator])//逆序效率更高,因为键盘总在上方
    {
        keyboardView = [self findKeyboardInView:window];
        if (keyboardView)
        {
            return keyboardView;
        }
    }
    return nil;
}

- (UIView *)findKeyboardInView:(UIView *)view
{
    for (UIView *subView in [view subviews])
    {
        NSLog(@" 打印信息:%s",object_getClassName(subView));
        if (strstr(object_getClassName(subView), "UIInputSetHostView"))
        {
            return subView;
        }
        else
        {
            UIView *tempView = [self findKeyboardInView:subView];
            if (tempView)
            {
                return tempView;
            }
        }
    }
    return nil;
}
这里有个问题要注意下,就是如果你不晓得哪个是我们的keyBoard,可以在NSLog(@" 打印信息:%s",object_getClassName(subView));这个位置打个断点,看看view具体展示的是那个

网上有这样的
if (strstr(object_getClassName(subView), "UIKeyboard")) ,经测试是不行的,我估计应该是在后面的版本中发生了变化
在找到keyBoard这个view后,一切就变的简单了
我们只需要在键盘即将弹出的通知处添加下面代码就搞定啦
//键盘出现时候调用的事件
-(void) keyboadWillShow:(NSNotification *)note{
    NSDictionary *info = [note userInfo];
    CGRect keyboardFrame = [[info objectForKey:UIKeyboardFrameEndUserInfoKey] CGRectValue];//键盘的frame

    keyboardFrame.origin.y = CGRectGetMaxY(_textFiled.frame) + 4.5;
    UIView *keyBoardView = [self findKeyboard];


    [UIView animateWithDuration:0.2 animations:^{
        [keyBoardView setFrame:keyboardFrame];
    }];
}
在这里,还遇到个小坑,就是如果textField是写在cell中的,那么添加通知,最好不要在cell的初始化方法中添加,建议在textField的代理textFieldDidBeginEditing中添加,因为通知是一对多的,如果在cell的初始化方法中添加,当有很多cell的时候,键盘会上下跳动,而且坐标不是你想要的坐标
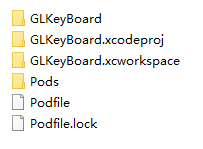
项目文件截图:

结语
关于自定义键盘,就差不多这么,希望大家能喜欢,要放假了,祝大家端午快乐~回家包包子去了....iOS 自定义键盘
注:本文著作权归作者,由demo大师代发,拒绝转载,转载需要作者授权