webpack 之code splitting
code splitting方法
- 入口起点:使用entry配置手动地方分离代码
- 防止重复:使用CommonsChunkPlugin去重和分离chunk、
- 动态导入:通过模块的内联函数调用来分离代码
一、入口起点
示例
项目目录
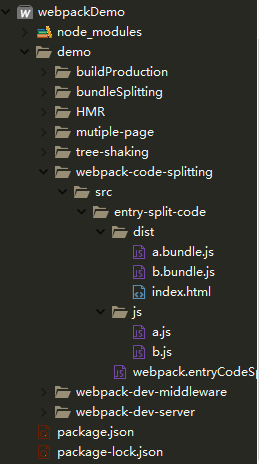
a.js
import _ from "lodash"
function add(a,b){
	return a + b;
}

function minus(a,b){
	return a - b
}

function multiple(a,b){
	return a*b
}

export default{
	add,
	minus,
	multiple
}
b.js
console.log("I am b.js")
import _ from "lodash";
console.log(_)
webpack.entryCodeSplitting.js
const path = require("path");
const htmlWebpackPlugin = require("html-webpack-plugin");
module.exports = {
	entry:{
		a:path.resolve(__dirname,'js/a.js'),
		b:path.resolve(__dirname,'js/b.js')
	},
	output:{
		filename:"[name].bundle.js",
		path:path.resolve(__dirname,"dist")
	},
	plugins:[
		new htmlWebpackPlugin({
			title:"code split"
		})
	]
}
package.json
{
  "name": "webpackDevServer",
  "sideEffects": [
    "*.css",
    ".scss"
  ],
  "version": "1.0.0",
  "description": "",
  "main": "index.js",
  "scripts": {
    "test": "echo "Error: no test specified" && exit 1",
    "dev": "webpack-dev-server --config demo/webpack-dev-server/webpack-dev-server.js",
    "server": "node demo/webpack-dev-middleware/server.js",
    "hmr": "webpack-dev-server  --config demo/HMR/webpack.hmr.js",
    "treeShaking:dev": "webpack-dev-server --config demo/tree-shaking/tree-shaking.js",
    "treeShaking:build": "webpack  --config demo/tree-shaking/tree-shaking.js",
    "buildProd:dev": "webpack-dev-server --config demo/buildProduction/webpack.dev.js",
    "buildProd:build": "webpack --config demo/buildProduction/webpack.prod.js",
    "bundleSplitting": "webpack --config demo/bundleSplitting/webpack.bundleSplitting.js",
    "codeSplittingEntry": "webpack --config demo/webpack-code-splitting/src/entry-split-code/webpack.entryCodeSplitting.js"
  },
  "keywords": [],
  "author": "",
  "license": "ISC",
  "devDependencies": {
    "@babel/core": "7.6.4",
    "@babel/plugin-transform-runtime": "^7.6.2",
    "@babel/preset-env": "^7.6.3",
    "autoprefixer": "^9.7.1",
    "babel-loader": "8.0.6",
    "clean-webpack-plugin": "3.0.0",
    "css-loader": "^3.2.0",
    "express": "4.17.1",
    "file-loader": "^4.2.0",
    "html-webpack-plugin": "3.2.0",
    "mini-css-extract-plugin": "^0.8.0",
    "node-sass": "^4.13.0",
    "postcss-import": "^12.0.1",
    "postcss-loader": "^3.0.0",
    "postcss-url": "^8.0.0",
    "sass-loader": "8.0.0",
    "style-loader": "^1.0.0",
    "url-loader": "^2.2.0",
    "webpack": "4.41.2",
    "webpack-cli": "3.3.9",
    "webpack-dev-middleware": "3.7.2",
    "webpack-dev-server": "3.8.2",
    "webpack-merge": "^4.2.2"
  },
  "dependencies": {
    "lodash": "^4.17.15"
  }
}
执行npm run codeSplittingEntry
结果如下:
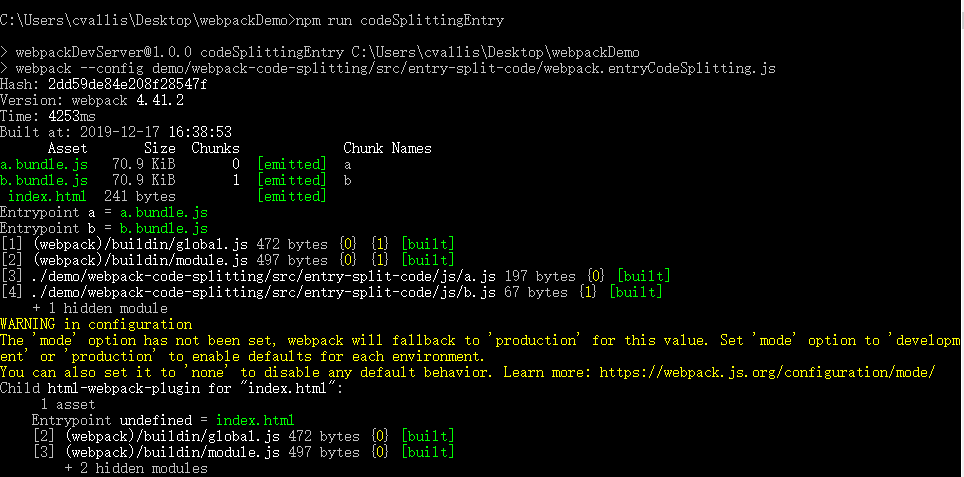
从打包的a.bundle.js看里面有lodash,从b.bundle.js看里面有lodash,这样我们就重复打包了lodash,这说明了如果入口chunks之间包含重复的
模块,那些重复模块都会被引入到各个bundle中
防止重复
commonsChunkPlugin
简介
CommonsChunkPlugin主要是用来提取第三方库和公共模块,避免首屏加载的bundle文件或者按需加载的bundle文件体积过大,从而导致加载时间过长
所谓chunk?
- webpack当中配置的入口文件(entry)是chunk,可理解为entry chunk
- 入口文件以及他的依赖文件通过code split(代码分隔)出来来的也是chunk,可以理解为children chunk
- 通过CommonsChunkPlugin创建出来的文件也是chunk,可以理解为commons chunk
commonsChunkPlugin配置
- name(string)/names(string[]):这是common chunk的名称。已经存在的chunk可以通过传入一个已存在的chunk名称而被选择。如果一个字符串数组传入,这些相当于插件针对每个chunk名被多次调用。
如果该选项被忽略,同时options.async或者options.children被设置,所有都会被使用,否则options.filename会用于作为chunk名。 - filename(string):common chunk的文件模板。可以包含与
output.filename相同占位符。如果被忽略,原本的文件名不会被修改(通常是output.filename或者output chunkFilename) - minChunks(number|Infinity|function(module,count)->boolean):在传入公共chunk(commons chunk)之前所需要包含的最少数量的chunks。数量必须大于等于2,或者少于等于chunks的数量,
传入Infinity会马上生成公共chunk,但里面没有模块。你可以传入一个function,已添加定制的逻辑,默认是chunk的数量 - chunks(string[]):通过chunk name去选择chunks的来源。chunk必须是公共chunk的子模块。如果被忽略,所有的入口chunk(entry chunk)都会被选择
- children(boolean):如果设置为
true,所有公共chunk的后代模块都会被选择 - async(boolean|string):如果设置为
true,一个异步的公共chunk会作为options.name的子模块,和options.chunks的兄弟模块被创建。他会与options.chunks并行被加载。 - minSize(number):在公共chunk被创建之前,所有公共模块(common module)的最少大小
实战应用
实战目的
- 使用commonsChunkPlugin分离第三方库(loadsh,jquery)、自定义模块(common.js)、处理业务的js文件(包含在同一个文件中)
- 使用CommonsChunkPlugin分离第三方库(loadsh,jquery)、自定义模块(common.js)、处理业务的js文件(不包含在同一个文件中)
使用commonsChunkPlugin分离第三方库(loadsh,jquery)、自定义模块(common.js)、处理业务的js文件(包含在同一个文件中)
-
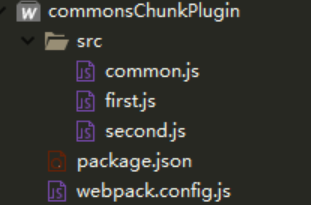
文件目录
-
common.js
export const common = "common file"
console.log(common)
- first.js
import _ from "lodash"
import $ from "jquery"
import {common} from "./common"
console.log($,_,"I AM FIRST")
- second.js
import _ from "lodash"
import $ from "jquery"
import {common} from "./common"
console.log($,_,"I AM SECOND")
- package.json
{
  "name": "commonschunkplugin",
  "version": "1.0.0",
  "description": "",
  "main": "index.js",
  "scripts": {
    "test": "echo "Error: no test specified" && exit 1",
    "build":"webpack --config webpack.config.js"
  },
  "author": "",
  "license": "ISC",
  "devDependencies": {
    "webpack": "^3.10.0"
  },
  "dependencies": {
    "jquery": "^3.4.1",
    "lodash": "^4.17.15"
  }
}
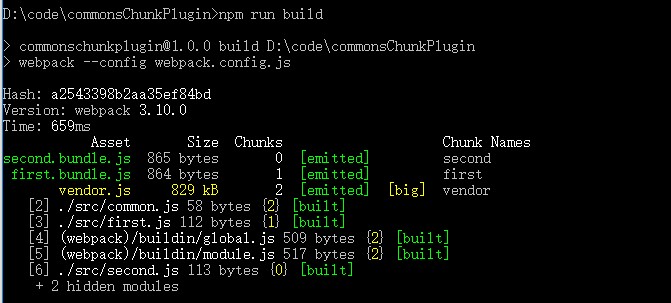
执行npm run build
打包结果
总结
从打包结果,我们可以看出,在设置了CommonsChunkPlugin的name和filename属性后,打包的出来的dist文件中包含entry中的chunk(first.bundle.js和second.bundle.js)和CommonsChunkPlugin
打包出来的commons chunk(vendor.js),其中commons chunk(vendor.js)中包含了entry chunk 中所引用的第三方库(loadsh和jquery)和公共文件(common.js)。通过这个示例我们可以理解到CommonsChunkPlugin
配置中name和filename字段的含义,name就是提取entry chunk 文件中引用到的文件,filename就是entry chunk 模板,但是在项目中,我们需要vendor.js只包含第三方插件,需要将common.js和第三方插件分开来
使用CommonsChunkPlugin分离第三方库(loadsh,jquery)、自定义模块(common.js)、处理业务的js文件(不包含在同一个文件中)
- 修改webpack.config.js
const path = require("path");
const webpack = require("webpack");
module.exports = {
	entry:{
		first:"./src/first.js",
		second:"./src/second.js"
	},
	output:{
		filename:'[name].bundle.js',
		path:path.resolve(__dirname,"dist")
	},
	plugins:[
		new webpack.optimize.CommonsChunkPlugin({
			name:['vendor','runtime'],
			filename:"[name].js"
		})
	]

}
上面代码等同于
 plugins: [
    new webpack.optimize.CommonsChunkPlugin({
        name: 'vendor',
        filename: '[name].js'
    }),
    new webpack.optimize.CommonsChunkPlugin({
        name: 'runtime',
        filename: '[name].js',
        chunks: ['vendor']
    }),
]
执行npm run build
结果

结论
我们可以对已经分离的js进行再一次分离,相当于把entry chunk中的分离完后,可以在对commons chunk 在一次分离
在webpack4以后是通过splitChunksPlugin实现 code Splitting
实例
项目目录

a.js
import Jquery from "jquery";
import _ from "lodash"
import {divid,add} from "./common.js"
console.log("I AM a ")
b.js
import Jquery from "jquery"
import _ from "lodash"
import {divid,add} from "./common.js"
console.log("I AM b page")
function createEle(){
	let div = document.createElement("div");
	div.innerHTML = `3 + 2 = ${add(3,2)}`;
	document.body.innerHTML = div;
}
createEle()
common.js
export function divid(a,b){
	return a - b
}
export function add(a,b){
	return a+b
}
package.json
{
  "name": "splitchunks",
  "version": "1.0.0",
  "description": "",
  "main": "index.js",
  "scripts": {
    "test": "echo "Error: no test specified" && exit 1",
    "build": "webpack --config webpack.config.js"
  },
  "author": "",
  "license": "ISC",
  "devDependencies": {
    "html-webpack-plugin": "^3.2.0",
    "webpack": "^4.41.4"
  },
  "dependencies": {
    "jquery": "^3.4.1",
    "lodash": "^4.17.15"
  }
}
webpack.config.js
const path = require('path');
const HtmlWebpackPlugin  = require('html-webpack-plugin')
module.exports = {
	entry:{
		a:"./src/js/a.js",
		b:"./src/js/b.js"
	},
	output:{
		path:path.resolve(__dirname,"dist"),
		filename:"[name].bundle.js"
	},
	mode:"production",
	plugins:[
		new HtmlWebpackPlugin({
			title:"splitChunks"
		})
	]
}
执行npm run build
运行结果
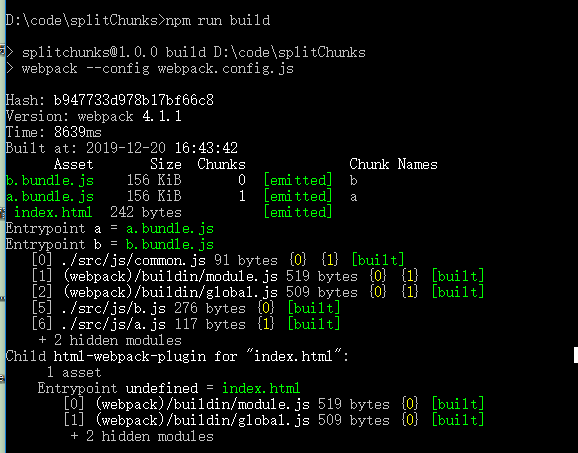
在没有配置splitChunkPlugin的打包,打包结果就是entry chunk,在entry chunk里面都引用了相同的第三方库,这一部分并没有打包出来
在webpack4+使用splitChunkPlugin(开箱即用)可以在webpack.config.js中的optimization.splitChunks和optimization.runtimeChunk这两个选项
webpack将根据以下条件自动分割块
- 可以共享新块,或者模块来自
node_modules文件夹 - 新的bundle将大于30kb(在min + gz之前)
- 异步加载并加载的bundle数不能大于5个
- 初始加载的bundle数不能大于3个
使用splitChunkPlugin拆分相同代码
修改webpack.config.js
const path = require('path');
const HtmlWebpackPlugin  = require('html-webpack-plugin')
module.exports = {
	mode:"production",
	entry:{
		a:"./src/js/a.js",
		b:"./src/js/b.js"
	},
	output:{
		path:path.resolve(__dirname,"dist"),
		filename:"[name].bundle.js"
	},
	optimization:{
		splitChunks:{
			chunks:'all'
		}
	},
	plugins:[
		new HtmlWebpackPlugin({
			title:"splitChunks"
		})
	]
}
执行npm run build
结果
