记录Centos7下编写驱动模块
参考自以下文章。
《嵌入式应用程序设计》--华清远见
1.最简单模块
hello.c
#include<linux/init.h>
#include<linux/module.h>

int __init start(void)
{
	printk(KERN_INFO "this is module onload finish\n");//中间就是空格,一开始写的,,怎么也没有输出,还看了好久。
	return 0;
}
void __exit end(void)
{
	printk(KERN_INFO "this is module on close last\n");
}

module_init(start);//模块装载运行的函数,可以理解为入口点
module_exit(end);//模块卸载运行的函数,用来做一些释放资源的操作
MODULE_AUTHOR("yyjeqhc");
MODULE_LICENSE("GPL");
MODULE_DESCRIPTION("simple hello");
Makefile
obj-m :=hello.o
CONFIG_MODULE_SIG=n
all:
	make -C /lib/modules/$(shell uname -r)/build M=$(PWD) modules //注意都是Tab,不是空格
clean:
	echo "clean"
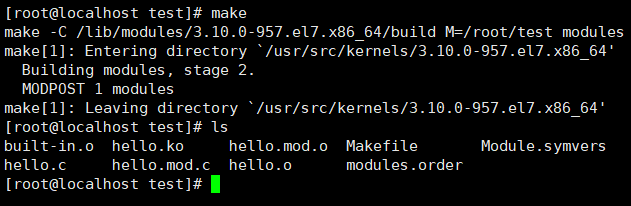
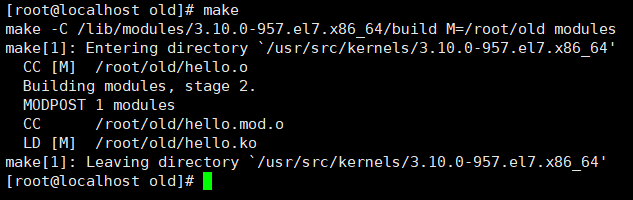
注意Makefile里面hello.o和文件hello.c是同名的,然后直接make即可
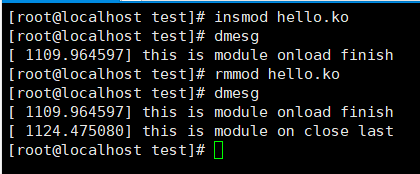
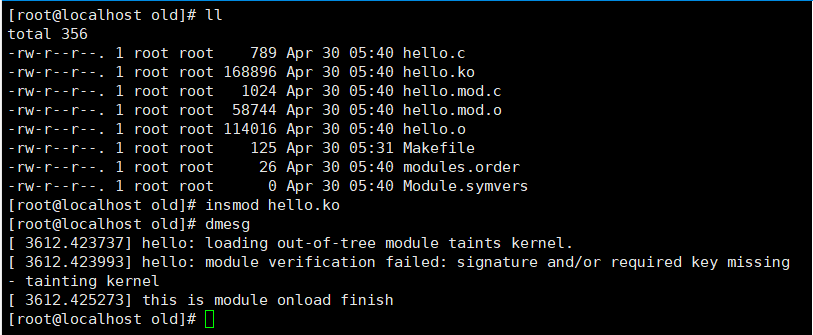
insmod hello.ko	//加载模块
rmmod	hello.ko //卸载模块
lsmod //查看所有模块
dmesg //查看系统输出,可以看加载和卸载模块的输出
dmesg -c 清除系统输出
2.带参数模块
hello.c
#include<linux/init.h>
#include<linux/module.h>
static int num = 1234;
static char *str = "this is default printstr";
static int __init start(void)
{
	printk(KERN_INFO "this is module onload finish\n");
	printk("<1> num is %d str = %s\n",num,str);
	return 0;
}
static void __exit end(void)
{
	printk(KERN_INFO "this is module on close last\n");
}

module_init(start);
module_exit(end);
module_param(num,int,S_IRUGO);//固定写法,名称,类型,权限
module_param(str,charp,S_IRUGO);
MODULE_AUTHOR("yyjeqhc");
MODULE_LICENSE("GPL");
MODULE_DESCRIPTION("simple hello");
Makefile和上面一样。

之前已经清除系统输出了。
不带参数的加载/卸载模块。
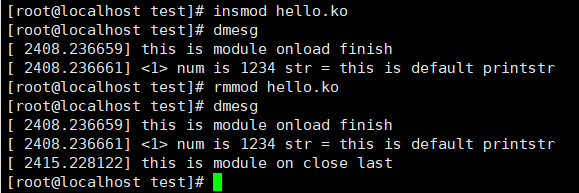
不带参数,就输出的默认的值。
带参数的加载模块:
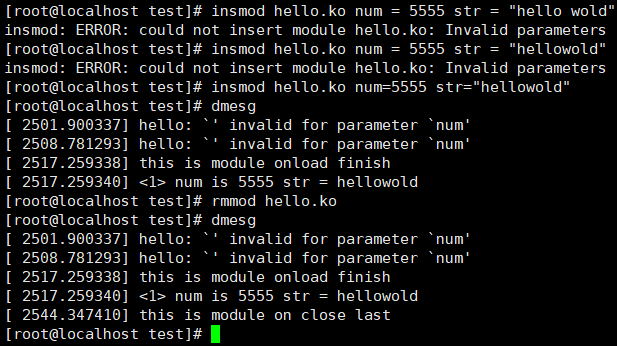
需要注意的是,参数的值和参数之间不能有空格;然后参数是字符串,中间也不能有空格。

3.导出符号。
hello.c
#include<linux/init.h>
#include<linux/module.h>

int addNum(int a,int b)
{
	return a + b;
}
int subNum(int a,int b)
{
	return a - b;
}
EXPORT_SYMBOL(addNum);//固定使用EXPORT_SYMBOL()
EXPORT_SYMBOL(subNum);
MODULE_AUTHOR("yyjeqhc");
MODULE_LICENSE("GPL");
MODULE_DESCRIPTION("simple hello");
Makefile不变,直接make即可。
/proc/kallsyms //查看系统符号,添加grep过滤一下
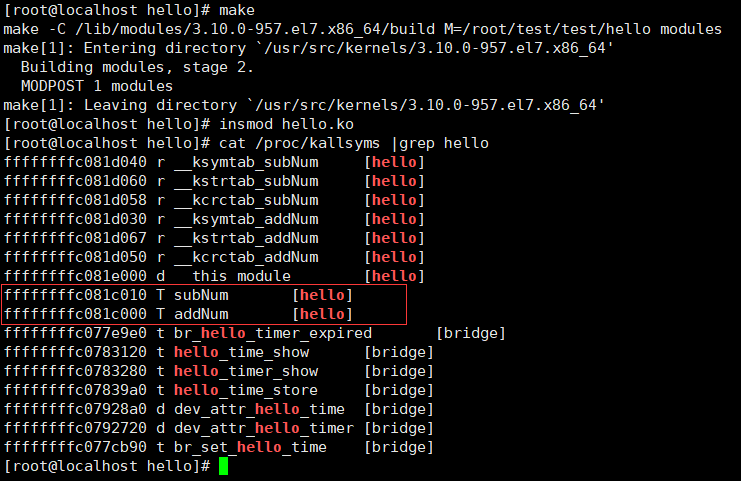
可见这个导出符号已经装载了。
这时,编写其它模块就可以调用它,只需要extern即可。
test.c
#include<linux/init.h>
#include<linux/module.h>

extern int addNum(int,int);
extern int subNum(int,int);

static int __init start(void)
{
	printk(KERN_INFO "this is module onload finish\n");
	int a = 25;
	int b = 7;
	printk("<1> test add %d + %d = %d \n",a,b,addNum(a,b));
	printk("<1> test sub %d + %d = %d \n",a,b,subNum(a,b));
	return 0;
}
static void __exit end(void)
{
	printk(KERN_INFO "this is module on close last\n");
}

module_init(start);
module_exit(end);
MODULE_AUTHOR("yyjeqhc");
MODULE_LICENSE("GPL");
MODULE_DESCRIPTION("simple hello");
Makefile改一下对应的名称即可。
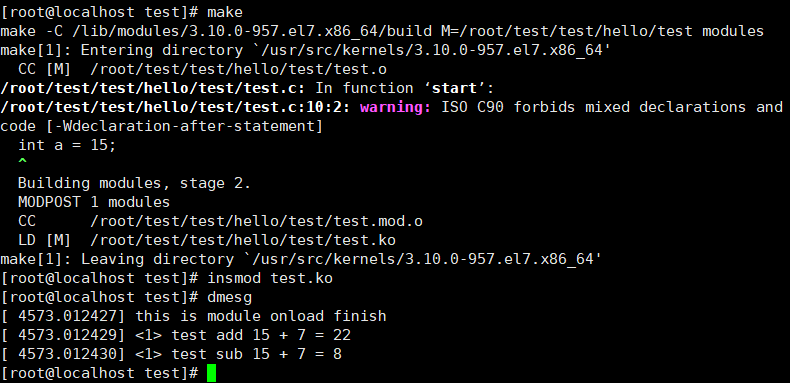
重新make,然后装载,可以看见调用了上面hello.ko中的函数
本来以为普通的C程序也能调用呢,但是好像不太行。
4.字符设备驱动编程
字符设备驱动是一种在不使用缓冲区高速缓存的情况下一次读取和写入一个字符数据的驱动程序,例如:键盘、声卡、打印机驱动程序。
此外还有块设备和网络驱动程序:
- 块设备驱动程序允许通过缓冲区告诉缓存和块单元中的I/O进行随机访问,例如硬盘。
- 网络设备驱动程序位于网络堆栈和网络硬件之间,负责发送和接受数据,例如以太网、网卡。
file_operations结构是为字符设备、块设备驱动程序与通用程序之间的通信提供的接口。可以使用结构体内的函数指针,例如:read, write, open, release, unlocked_ioctl。而网络设备不使用file_operations 结构,应当使用*include/linux/netdevice.h*中的net_device结构体。
驱动程序中,主要涉及3个重要的内核数据结构,分别是file_operations/file/inode
这个结构应该和linux系统的内核有关,可以用uname看一下系统,也可以直接查找这个文件 fs.h
能找到很多,看linux/fs.h这个就好了。

比如这个centos7下的定义。
struct file_operations {
	struct module *owner;
	loff_t (*llseek) (struct file *, loff_t, int);
	ssize_t (*read) (struct file *, char __user *, size_t, loff_t *);
	ssize_t (*write) (struct file *, const char __user *, size_t, loff_t *);
	ssize_t (*aio_read) (struct kiocb *, const struct iovec *, unsigned long, loff_t);
	ssize_t (*aio_write) (struct kiocb *, const struct iovec *, unsigned long, loff_t);
	int (*readdir) (struct file *, void *, filldir_t);
	unsigned int (*poll) (struct file *, struct poll_table_struct *);
	long (*unlocked_ioctl) (struct file *, unsigned int, unsigned long);
	long (*compat_ioctl) (struct file *, unsigned int, unsigned long);
	int (*mmap) (struct file *, struct vm_area_struct *);
	int (*open) (struct inode *, struct file *);
	int (*flush) (struct file *, fl_owner_t id);
	int (*release) (struct inode *, struct file *);
	int (*fsync) (struct file *, loff_t, loff_t, int datasync);
	int (*aio_fsync) (struct kiocb *, int datasync);
	int (*fasync) (int, struct file *, int);
	int (*lock) (struct file *, int, struct file_lock *);
	ssize_t (*sendpage) (struct file *, struct page *, int, size_t, loff_t *, int);
	unsigned long (*get_unmapped_area)(struct file *, unsigned long, unsigned long, unsigned long, unsigned long);
	int (*check_flags)(int);
	int (*flock) (struct file *, int, struct file_lock *);
	ssize_t (*splice_write)(struct pipe_inode_info *, struct file *, loff_t *, size_t, unsigned int);
	ssize_t (*splice_read)(struct file *, loff_t *, struct pipe_inode_info *, size_t, unsigned int);
	RH_KABI_REPLACE(int (*setlease)(struct file *, long, struct file_lock **), int (*setlease)(struct file *, long, struct file_lock **, void **))
	long (*fallocate)(struct file *file, int mode, loff_t offset,
			  loff_t len);
	int (*show_fdinfo)(struct seq_file *m, struct file *f);
	RH_KABI_EXTEND(int (*iterate) (struct file *, struct dir_context *))
};
早期的字符设备注册主要通过以下函数:
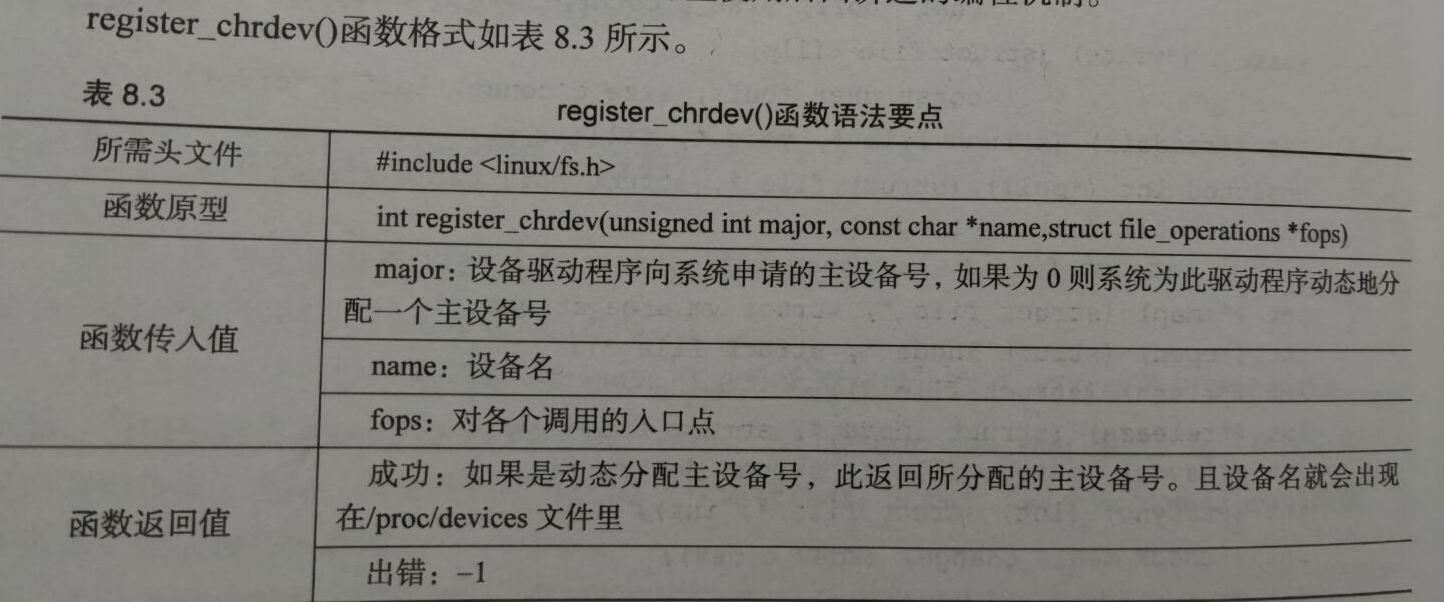
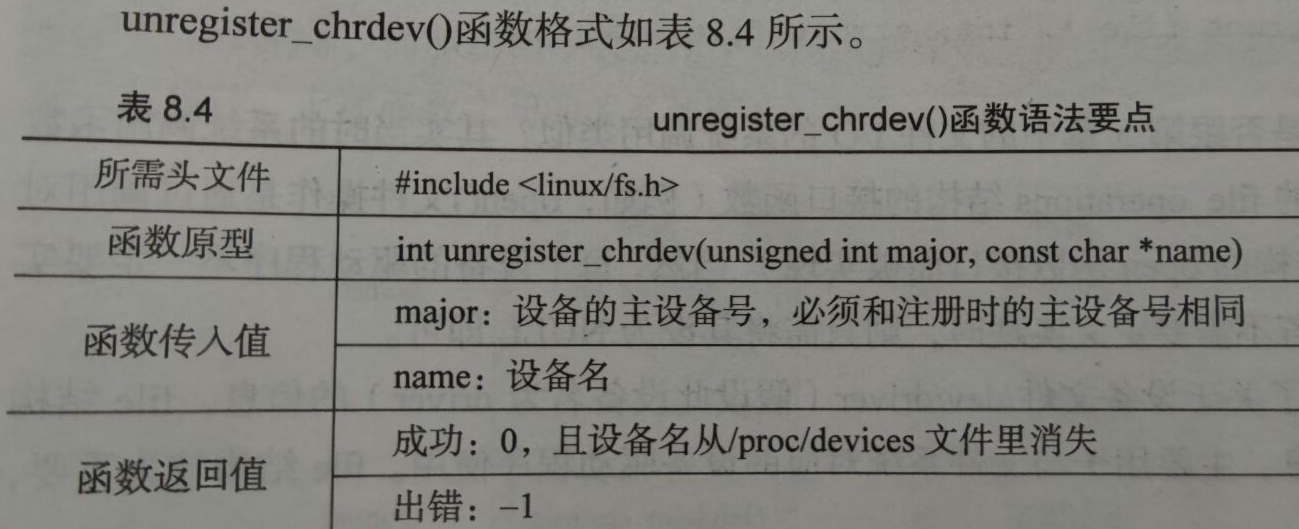
写个例子看看。
hello.c
#include<linux/init.h>
#include<linux/module.h>
#include<linux/fs.h>

#define filename "testOpen"
unsigned int major = 0;

static int openFile(struct inode* node,struct file* filea)
{
	printk(KERN_INFO "this is open!\n");
	return 0;
}

//这个结构有很多可以自己写的函数,参见上面的结构体,为了简单起见,这里就写一个open
static struct file_operations fops =
{
	.open = openFile,
};
static int __init start(void)
{
	int result;
	printk(KERN_INFO "this is module onload finish\n");
	result = register_chrdev(major,filename,&fops);
    major = result;
	if(result<0)
	{
		printk(KERN_INFO "register device error!\n");
		return result;
	}
	return 0;
}
static void __exit end(void)
{
	printk(KERN_INFO "this is module on close last\n");
	unregister_chrdev(major,filename);
}

module_init(start);
module_exit(end);
MODULE_AUTHOR("yyjeqhc");
MODULE_LICENSE("GPL");
MODULE_DESCRIPTION("simple hello");
Makefile和之前的差不多,改改文件名就好了。
直接make一波。
然后装载模块,看看输出(已经提前清空系统输出)
装载成功,可以用这个命令看看分配的设备号是多少。
cat /proc/devices
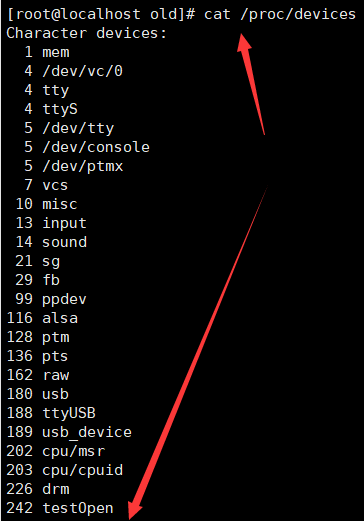
可以看见分配了242的主设备号,等下如果卸载模块,就看不见了。
接下来测试一下写的openFile。
参考如下:
使用mknod命令将加载的模块创建为设备文件。这里介绍一下mknod命令的用法:
- 基本格式:
mknod <设备文件名> <设备文件格式> <主设备号> <次设备号> - 设备文件格式有三种:p(FIFO先进先出)、b(block device file 块设备文件)、c和u(character special file字符特殊文件,无缓冲的特殊文件)
- 主设备号和次设备号:主设备号是分配给块设备或字符设备的数字;次设备号是分配给由MAJOR限定的字符设备组之一的编号。简单来说就是可以用这两个数字来识别设备。
mknod testOpen c 242 0   //名称应该是自己随便定义,因为242已经代表上面的驱动了,0代表系统分配
然后再使用ls查看当前目录
hello.c   hello.mod.c  hello.o   modules.order   testOpen
hello.ko  hello.mod.o  Makefile  Module.symvers
可见多了个黄色的文件testOpen
直接使用>在命令行下重定向就好了,省得写代码打开设备啥的。。。
echo "hello" >testOpen
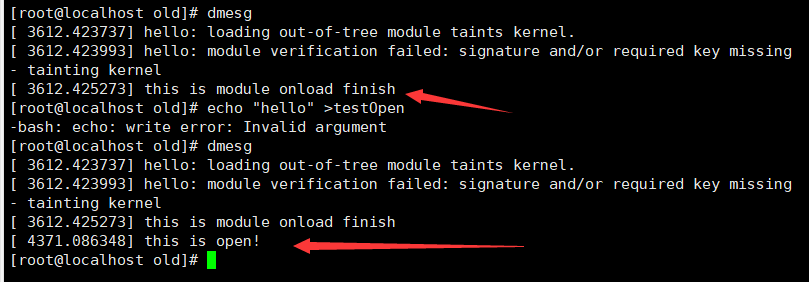
管它提示什么不合法的参数啊,这里已经成功打开设备了,即openFile正常调用了。
[root@localhost old]# ls
hello.c   hello.mod.c  hello.o   modules.order   testOpen
hello.ko  hello.mod.o  Makefile  Module.symvers
[root@localhost old]# rm -f ./testOpen
[root@localhost old]# ls
hello.c   hello.mod.c  hello.o   modules.order
hello.ko  hello.mod.o  Makefile  Module.symvers
[root@localhost old]#
删除的话当做普通文件删除就好了。
接下来试一下另一种方式获取设备号:
#include<linux/coda.h> //每个系统版本,dev_t 可能定义的地方不一样,应根据个人系统查找
MAJOR(dev_t dev);//返回主设备号
MINOR(dev_t dev);//返回次设备号
MKDEV(int major,int minor);//根据主设备号和次设备号,组合得到dev_t类型的设备号
一般来说,dev_t代表一个32位的整数,高12位为主设备号,低20位为次设备号
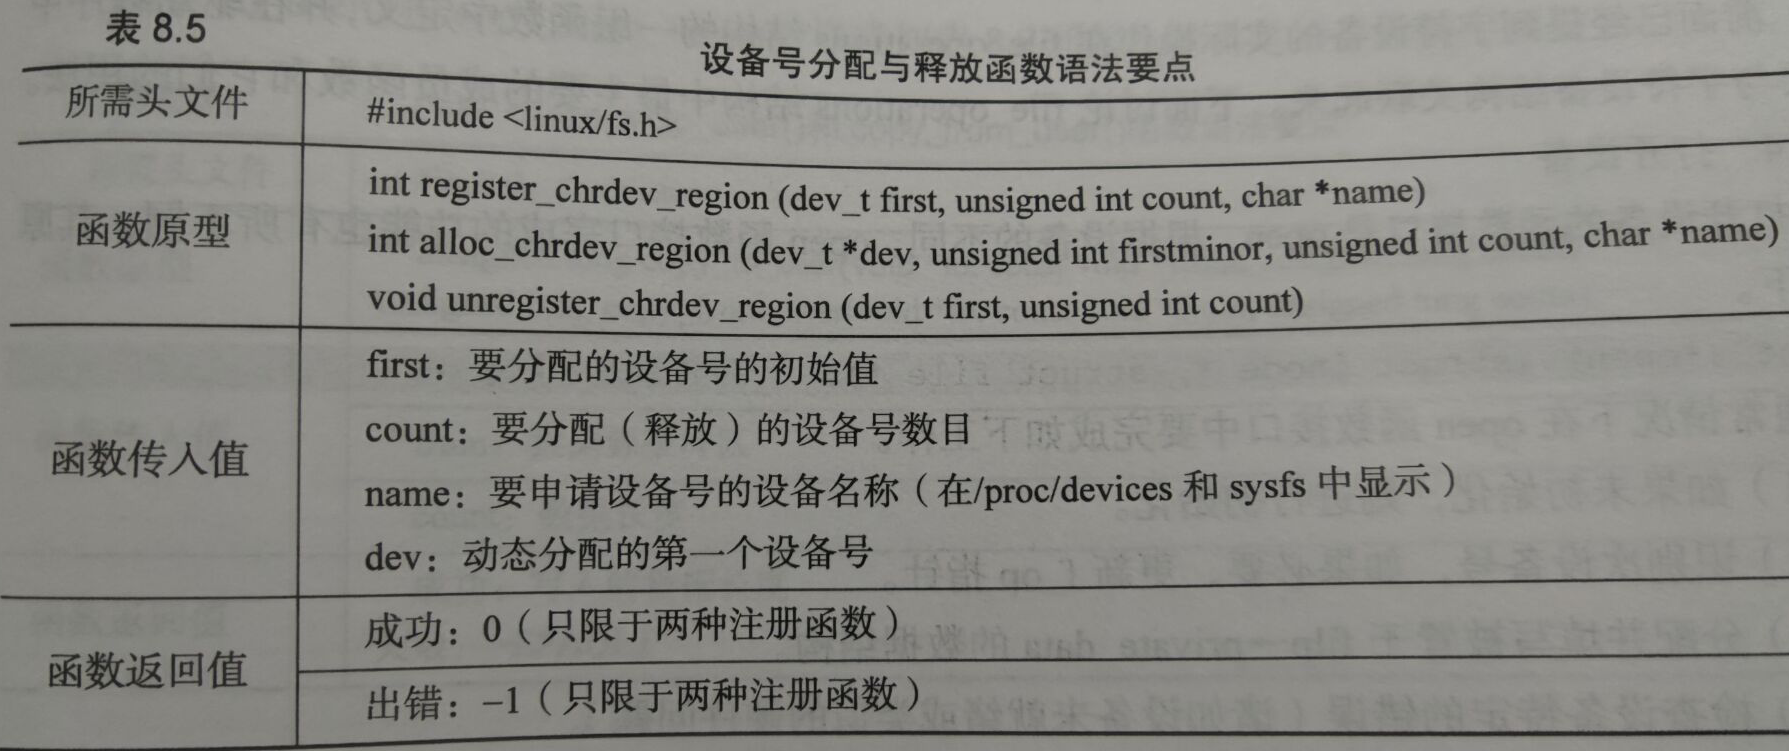
firstminor代表次设备号的起始,count代表数量。比如分别为5 5,那么分配的次设备号应该是5 6 7 8 9
代码:
hello.c
#include<linux/init.h>
#include<linux/module.h>
#include<linux/fs.h>
#include<linux/coda.h>
#define filename "otherType"

dev_t device;

static int openFile(struct inode* node,struct file* filea)
{
	printk(KERN_INFO "this is open!\n");
	return 0;
}
static int __init start(void)
{
	int result;
	device = MKDEV(100,0);//这次我们指定设备号为100吧,反正也不冲突
	printk(KERN_INFO "this is module onload finish\n");
	result = register_chrdev_region(device,1,filename);
	if(result<0)
	{
		printk(KERN_INFO "register device error!\n");
		return result;
	}
	return 0;
}
static void __exit end(void)
{
	printk(KERN_INFO "this is module on close last\n");
	unregister_chrdev_region(device,1);
}

module_init(start);
module_exit(end);
MODULE_AUTHOR("yyjeqhc");
MODULE_LICENSE("GPL");
MODULE_DESCRIPTION("simple hello");
Makefile没有变化,直接make即可。
[root@localhost test]# insmod hello.ko
[root@localhost test]# dmesg
[ 6440.856413] this is module onload finish
[root@localhost test]# cat /proc/devices
Character devices:
  1 mem
  4 /dev/vc/0
  4 tty
  4 ttyS
  5 /dev/tty
  5 /dev/console
  5 /dev/ptmx
  7 vcs
 10 misc
 13 input
 14 sound
 21 sg
 29 fb
 99 ppdev
100 otherType
可见,装载模块后,设备号按照我们填写的100。
动态分配那个就不尝试了,效果应该是一样的。
接下来看看新版本的字符设备注册。
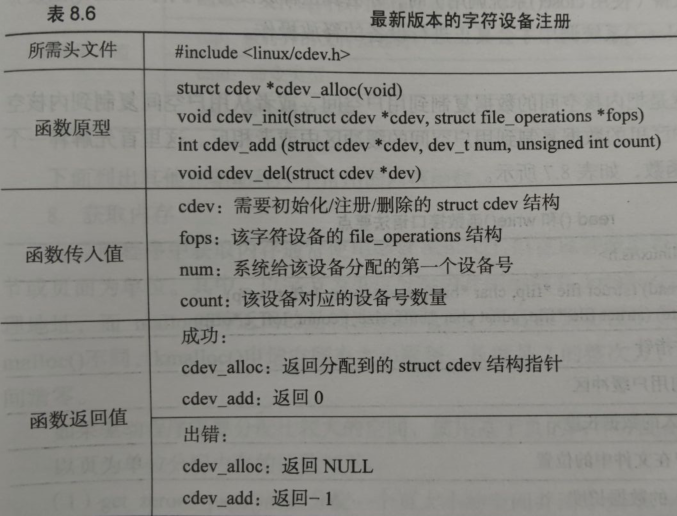
代码:
#include<linux/init.h>
#include<linux/module.h>
#include<linux/fs.h>
#include<linux/coda.h>
#include<linux/cdev.h>
#define filename "lastFile"

dev_t device;//这次使用动态分配主设备号
struct cdev dev;
static int openFile(struct inode* node,struct file* filea)
{
	printk(KERN_INFO "this is open!\n");
	return 0;
}
static struct file_operations fops =
{
	.open = openFile,
};
static int __init start(void)
{
	int result;
	printk(KERN_INFO "this is module onload finish\n");
	result = alloc_chrdev_region(&device,0,1,filename);//只分配一个次设备号,固定为0
	if(result<0)
	{
		printk(KERN_INFO "register device error!\n");
		return result;
	}
	cdev_init(&dev,&fops);
	result = cdev_add(&dev,device,1);
	if(result<0)
	{
		printk(KERN_INFO "cdev_add error!\n");
	}
	printk(KERN_INFO "device add success!\n");
	return 0;
}
static void __exit end(void)
{
	cdev_del(&dev);
	unregister_chrdev_region(device,1);
	printk(KERN_INFO "this is module on close last\n");
}

module_init(start);
module_exit(end);
MODULE_AUTHOR("yyjeqhc");
MODULE_LICENSE("GPL");
MODULE_DESCRIPTION("simple hello");
直接make,然后装载模块,看看效果。
[root@localhost test]# insmod hello.ko
[root@localhost test]# dmesg
[ 8838.013234] this is module onload finish
[ 8838.013237] device add success!
[root@localhost test]# cat /proc/deices
241 lastFile	//这次分配的241号
[root@localhost test]# mknod filename c 241 0
[root@localhost test]# echo "hello">filename
-bash: echo: write error: Invalid argument
[root@localhost test]# dmesg
[ 9148.807800] this is module onload finish
[ 9148.807802] device add success!
[ 9175.894334] this is open!
[root@localhost test]#
注册设备成功,open也成功了。
一直都不太理解,但是慢慢的运行出结果,也开始慢慢熟悉了。