PythonMagick是imagemagick的python版本
实际上他是magick++的封装。函数,参数和magick++是一样的
参考文档:https://imagemagick.org/Magick++/tutorial/Magick++_tutorial.pdf
下面是一些摸索下来的心得,提供给需要的人,少走弯路
1 颜色空间转换
接到一个任务,批量生成荣誉证书,要求根据设计稿,生成图片:格式:JPG,PPI:300,颜色模式:CMYK,提供的素材也是这样的格式
首先想到的是用PIL库来操作,毕竟在python上面基本是标准库了
因为证书上还需要添加证件照,证件照只有RGB模式的,所以需要将图片从RGB转到CMYK
PIL下面就是一个convert就搞定了
lena =Image.open("lena.jpg")
lena_CMYK =lena.convert("CMYK")
但是就是颜色不对,转过来的图片变色了(如下图,右边是美工提供的设计稿,左边是通过PIL转换的cmyk),这样的色差是难以接受的
查了下原因,PIL的转换,操作比较简单,k值直接是0,这样颜色必然是不准的
模式“RGB”转换为模式“CMYK”以后,图像从三通道变成了四通道,其C、M、Y三个通道的数值是通过之前的公式计算得到,K通道被直接赋值为0。

C = 255 - R
M = 255 - G
Y = 255 - B
K = 0
通过查询,得知需要导入icc文件才能得到ps的转换效果,查询了PIL,没有找到导入的选项(这里可能是本人水平有限,没有找到,如果有的话,希望能回复下,研究下看看)
查询下来,找到了一个工具imagemagick,是一个图片处理的工具包,这个工具包可以将图片转换颜色,按照提供的icc进行转换
命令行操作很简单
convert -profile "sRGB.icm" RGB.jpg -profile "CMYK.icc" CMYK.jpg
这样就完成了颜色的转换,和PS下转换的效果是一样的
然后发现这个工具包有python下面的库,http://www.lfd.uci.edu/~gohlke/pythonlibs/#pythonmagick
2.7版本的不知道为啥,总是装不好,换了3.7的就ok了
安装好以后查看支持的函数,dir(PythonMagick),可以看到如下函数,具体的函数帮助可以输入help()来查看
['Blob', 'Color', 'ColorspaceType', 'CompositeOperator', 'CompressionType', 'Coordinate', 'DecorationType', 'DrawableAffine', 'DrawableAlpha', 'DrawableArc', 'DrawableBezier', 'DrawableCircle', 'DrawableClipPath', 'DrawableColor', 'DrawableCompositeImage', 'DrawableEllipse', 'DrawableFillColor', 'DrawableFillOpacity', 'DrawableFillRule', 'DrawableFont', 'DrawableGravity', 'DrawableLine', 'DrawableMiterLimit', 'DrawablePath', 'DrawablePoint', 'DrawablePointSize', 'DrawablePolygon', 'DrawablePolyline', 'DrawablePopClipPath', 'DrawablePopGraphicContext', 'DrawablePopPattern', 'DrawablePushClipPath', 'DrawablePushGraphicContext', 'DrawablePushPattern', 'DrawableRectangle', 'DrawableRotation', 'DrawableRoundRectangle', 'DrawableScaling', 'DrawableSkewX', 'DrawableSkewY', 'DrawableStrokeAntialias', 'DrawableStrokeColor', 'DrawableStrokeDashArray', 'DrawableStrokeDashOffset', 'DrawableStrokeLineCap', 'DrawableStrokeLineJoin', 'DrawableStrokeOpacity', 'DrawableStrokeWidth', 'DrawableText', 'DrawableTextAntialias', 'DrawableTextDecoration', 'DrawableTextUnderColor', 'DrawableTranslation', 'DrawableViewbox', 'Exception', 'FilterType', 'Geometry', 'GravityType', 'Image', 'PathArcAbs', 'PathArcArgs', 'PathArcRel', 'PathClosePath', 'PathCurvetoAbs', 'PathCurvetoArgs', 'PathCurvetoRel', 'PathLinetoAbs', 'PathLinetoHorizontalAbs', 'PathLinetoHorizontalRel', 'PathLinetoRel', 'PathLinetoVerticalAbs', 'PathLinetoVerticalRel', 'PathMovetoAbs', 'PathMovetoRel', 'PathQuadraticCurvetoAbs', 'PathQuadraticCurvetoArgs', 'PathQuadraticCurvetoRel', 'PathSmoothCurvetoAbs', 'PathSmoothCurvetoRel', 'PathSmoothQuadraticCurvetoAbs', 'PathSmoothQuadraticCurvetoRel', 'Pixels', 'TypeMetric', 'VPath', '_PythonMagick', '__builtins__', '__cached__', '__doc__', '__file__', '__loader__', '__name__', '__package__', '__path__', '__spec__']
这个是PythonMagick.Image下的函数
['__class__', '__delattr__', '__dict__', '__dir__', '__doc__', '__eq__', '__format__', '__ge__', '__getattribute__', '__gt__', '__hash__', '__init__', '__init_subclass__', '__instance_size__', '__le__', '__lt__', '__module__', '__ne__', '__new__', '__reduce__', '__reduce_ex__', '__repr__', '__setattr__', '__sizeof__', '__str__', '__subclasshook__', '__weakref__', 'adaptiveThreshold', 'addNoise', 'adjoin', 'affineTransform', 'alpha', 'animationDelay', 'animationIterations', 'annotate', 'attribute', 'backgroundColor', 'backgroundTexture', 'baseColumns', 'baseFilename', 'baseRows', 'blur', 'border', 'borderColor', 'boundingBox', 'boxColor', 'channel', 'channelDepth', 'charcoal', 'chop', 'chromaBluePrimary', 'chromaGreenPrimary', 'chromaRedPrimary', 'chromaWhitePoint', 'classType', 'colorFuzz', 'colorMap', 'colorMapSize', 'colorSpace', 'colorize', 'columns', 'comment', 'compare', 'compose', 'composite', 'compressType', 'contrast', 'convolve', 'crop', 'cycleColormap', 'debug', 'defineSet', 'defineValue', 'density', 'depth', 'despeckle', 'directory', 'display', 'draw', 'edge', 'emboss', 'endian', 'enhance', 'equalize', 'erase', 'fileName', 'fileSize', 'fillColor', 'fillPattern', 'fillRule', 'filterType', 'flip', 'floodFillAlpha', 'floodFillColor', 'floodFillTexture', 'flop', 'font', 'fontPointsize', 'fontTypeMetrics', 'format', 'frame', 'gamma', 'gaussianBlur', 'geometry', 'gifDisposeMethod', 'iccColorProfile', 'implode', 'interlaceType', 'iptcProfile', 'isValid', 'label', 'magick', 'magnify', 'map', 'matteColor', 'meanErrorPerPixel', 'medianFilter', 'minify', 'modifyImage', 'modulate', 'modulusDepth', 'monochrome', 'montageGeometry', 'negate', 'normalize', 'normalizedMaxError', 'normalizedMeanError', 'oilPaint', 'opaque', 'page', 'ping', 'pixelColor', 'process', 'profile', 'quality', 'quantize', 'quantizeColorSpace', 'quantizeColors', 'quantizeDither', 'quantizeTreeDepth', 'raise', 'read', 'readPixels', 'reduceNoise', 'renderingIntent', 'resize', 'resolutionUnits', 'roll', 'rotate', 'rows', 'sample', 'scale', 'scene', 'segment', 'shade', 'sharpen', 'shave', 'shear', 'signature', 'size', 'solarize', 'spread', 'statistics', 'stegano', 'stereo', 'strip', 'strokeAntiAlias', 'strokeColor', 'strokeDashOffset', 'strokeLineCap', 'strokeLineJoin', 'strokeMiterLimit', 'strokePattern', 'strokeWidth', 'subImage', 'subRange', 'swirl', 'syncPixels', 'textEncoding', 'texture', 'threshold', 'totalColors', 'transformOrigin', 'transformReset', 'transformRotation', 'transformScale', 'transformSkewX', 'transformSkewY', 'transparent', 'trim', 'type', 'unsharpmask', 'verbose', 'wave', 'write', 'writePixels', 'x11Display', 'xResolution', 'yResolution', 'zoom']
=============================================================================================
上面都是介绍,下面才是正文
=============================================================================================
经过测试,加载icc文件使用的是'iccColorProfile'这个函数,如下是内置的帮助,可以看到,有2中用法,
1,传入blob类型参数,就可以设置icc文件
2,不传入参数,可以返回一个blob类型,意思是获取这个图片当前的icc文件
blob是内存中的二进制文件类型
Help on built-in function iccColorProfile:

iccColorProfile(...)
    iccColorProfile( (Image)arg1, (Blob)arg2) -> None :

        C++ signature :
            void iccColorProfile(class Magick::Image {lvalue},class Magick::Blob)

    iccColorProfile( (Image)arg1) -> Blob :

        C++ signature :
            class Magick::Blob iccColorProfile(class Magick::Image {lvalue})
官方的文档提供了blob类型的设置
Blob::Blob();
Blob::Blob(void* data, unsigned int size); // explicitly specifies a memory area to be
                          // associated with the new Blob object
Blob::operator=(const Blob& blob);
                          // Examples of using Blobs in conjuction with Images
Blob my_blob; // create a blob
Image my_image("my_image.gif");       // create an image form a GIF image file
my_image.magick("JPEG");           // set JPEG output format
my_image.write(&my_blob);           // encode 'my_image' in JPEG format,
                         // and store the encoded image in my_blob
Image image_from_blob(my_blob);       // create an image from the JPEG blob
                         // (use the Blob-based Image constructor)
image_from_blob.magick("BMP");       // set the image format to bitmap
image_from_blob.write("image_from_blob.bmp"); // save the image on disk in BMP format
使用image打开一个文件,然后写入到一个新的Blob类型即可,这边写了一个函数,调用即可得到一个Blob类型的实例,内容是相应的icc文件
#获取对应颜色空间的blob(例如cmyk,rgb)
def get_color_blob(file_name):
    color = PythonMagick.Blob()
    im = PythonMagick.Image(file_name)
    im.write(color,"icc")
    return color
cmyk = get_color_blob("CMYK.icc")
temp = PythonMagick.Image("rgb.jpg")
temp.iccColorProfile(cmyk)
temp.write("cmyk.jpg")
这样就能完成从rgb到cmyk的转换了,经测试,转换效果完美,和ps转换出来是一摸一样的
2 PPI设置
使用pythonmagick的话无需设置PPI,原始是300PPI,保存下来就是300PPI,但是使用PIL打开300PPI的图片,进行操作,然后保存,就会变成蜜汁72PPI(这个在印刷制品上是
不行的,印刷出来会模糊),pythonmagick完美的避开了这个坑
3 图片缩放
img = PythonMagick.Image("test.jpg")
#不保持比例
img.sample('298x412!')
#保持比例
img.sample('298x412')
4 图片覆盖
有时候需要把一个透明的PNG覆盖到底图的某个位置,比如说一个印章
back_img = PythonMagick.Image("back.jpg")
logo_img = PythonMagick.Image("logo.png")
#此操作会出现logo的底图是黑色的
back_img.composite(logo_img,x,y)
#使用over模式,具体可以查看magick++的文档,对应查找pythonmagick下面的函数,其他模式类似
back_img.composite(logo_img,x,y,PythonMagick.CompositeOperator.OverCompositeOp)
5 文字书写
系统提供DrawableFont,Image.annotate来在图片上书写字体
这里介绍使用ttf字体进行书写,并且使用奇葩的方法来实现粗体,字间距
Image.annotate查看系统的说明如下
Help on built-in function annotate:

annotate(...)
    annotate( (Image)arg1, (str)arg2, (Geometry)arg3) -> None :

        C++ signature :
            void annotate(class Magick::Image {lvalue},class std::basic_string<char,struct std::char_traits<char>,class std::allocator<char> >,class Magick::Geometry)

    annotate( (Image)arg1, (str)arg2, (Geometry)arg3, (GravityType)arg4) -> None :

        C++ signature :
            void annotate(class Magick::Image {lvalue},class std::basic_string<char,struct std::char_traits<char>,class std::allocator<char> >,class Magick::Geometry,enum MagickCore::GravityType)

    annotate( (Image)arg1, (str)arg2, (Geometry)arg3, (GravityType)arg4, (float)arg5) -> None :

        C++ signature :
            void annotate(class Magick::Image {lvalue},class std::basic_string<char,struct std::char_traits<char>,class std::allocator<char> >,class Magick::Geometry,enum MagickCore::GravityType,double)

    annotate( (Image)arg1, (str)arg2, (GravityType)arg3) -> None :

        C++ signature :
            void annotate(class Magick::Image {lvalue},class std::basic_string<char,struct std::char_traits<char>,class std::allocator<char> >,enum MagickCore::GravityType)
测试代码如下,注意:如果图片是cmyk模式,请先转换成rgb再书写文字,最后再保存cmyk,否则会变色
#打开底图
img = PythonMagick.Image("test.jpg")
#设置ttf字体
img.font("W3.TTF")
#设置字体大小
img.fontPointsize(60)
#设置颜色
img.fillColor(PythonMagick.Color("#ff00ff"))
#书写字体(100,100是xy坐标)
img.annotate("你好",PythonMagick.Geometry("+100+100"))
#保存
img.write("000.jpg")
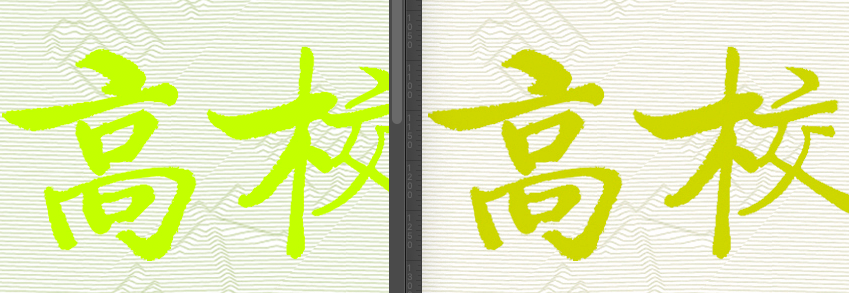
测试写字(下图是使用了奇葩方法实现的粗体,因为找不到粗体的选项)
之前使用PIL写字可以加粗,但是他写出来的字体比ps里面粗,而且无法调整粗的程度
这里就自己写了个加粗方法,原理很简单,写5次文字,
首先x,y坐标写一次
然后x-1,y写一次,x+1,y写一次,x,y-1写一次,x,y+1写一次
就是上下左右各偏一个像素写一遍,这样写出来的文字和ps里面的粗体可以说能达到99%的相似度
可以看出,书写出来的文字还是有一些差异的,不过这样的效果完全是OK的
#书写粗体字(默认间隔)
def img_text_bold(img,font_name,size,text,postion):
    img.font(font_name)
    img.fontPointsize(size)
    #img.annotate(text,PythonMagick.Geometry("+%s+%s"%(postion[0],postion[1])))
    img.annotate(text,PythonMagick.Geometry("+%s+%s"%(postion[0]+1,postion[1])))
    img.annotate(text,PythonMagick.Geometry("+%s+%s"%(postion[0]-1,postion[1])))
    img.annotate(text,PythonMagick.Geometry("+%s+%s"%(postion[0],postion[1]+1)))
    img.annotate(text,PythonMagick.Geometry("+%s+%s"%(postion[0],postion[1]-1)))
#书写粗体字(自定义间隔)
def img_text_bold_space(img,font_name,size,space,text,postion):
    zz = 0
    for i in text:
        postion_new = [postion[0]+int(round(zz*space)),postion[1]]
        img_text_bold(img,font_name,size,i,postion_new)
        zz = zz + 1
因为找不到行间距这个参数,所以只能写一个奇葩的方法来实现字间距,实现原理就是一个个字写,写完一个字偏移一定的像素,如此来达到设置字间距的效果
如下效果
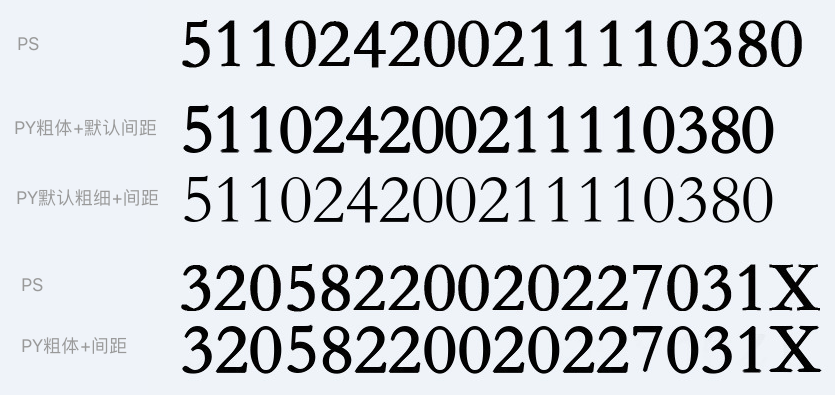
通过这一系列奇葩实现,可以达到设计稿的95%相似度,这样就完成了任务
6 图片对象引用
back_img = PythonMagick.Image("back.png")

temp1 = back_img
#对temp1进行各种操作,比如写字,剪裁,反转等
temp1.xxx()
temp1.xxx()
temp1.write("001.png")


temp2 = back_img
#对temp2进行各种操作,比如写字,剪裁,反转等
temp2.xxx()
temp2.xxx()
temp2.write("002.png")
上面的引用是不行的,temp2保存下来会带有temp1的操作效果,他这里 = 操作只是引用,不是复制
正确的做法是先新建一个Blob对象,把底图放在里面,然后temp去读取这个Blob对象来获得一个图片对象
#获取一个图片的Blob对象
def get_img_blob(file_name):
    last = file_name.split(".")[-1]
    img = PythonMagick.Image(file_name)
    blob = PythonMagick.Blob()
    img.write(blob,last)
    return blob
back_img_blob = get_img_blob("back.png")

temp1 = PythonMagick.Image(back_img_blob)
#对temp1进行各种操作,比如写字,剪裁,反转等
temp1.xxx()
temp1.xxx()
temp1.write("001.png")


temp2 = PythonMagick.Image(back_img_blob)
#对temp2进行各种操作,比如写字,剪裁,反转等
temp2.xxx()
temp2.xxx()
temp2.write("002.png")