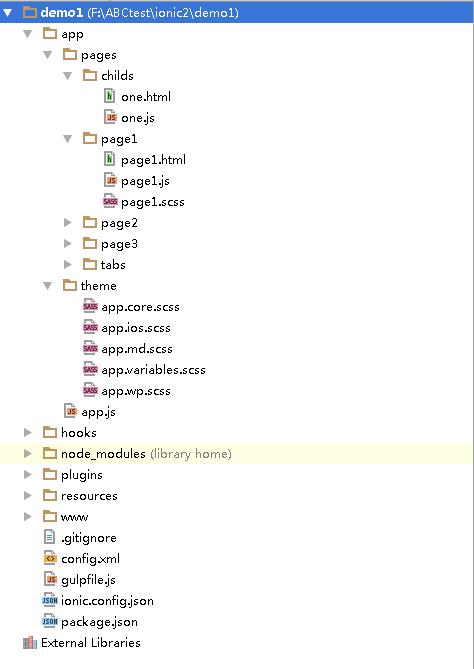
同理 在看 嵌套路由的时候 来分析一下 ionic2 默认生成的 tabs 项目。目录结构:

child 目录是我新加的 因为这里是要做用来做嵌套路由的。 首先先看app.js
/* --- app.js ----*/

import {App, Platform} from 'ionic-angular';
import {StatusBar} from 'ionic-native';
import { TabsPage } from './pages/tabs/tabs';


@App({
  template: '<ion-nav [root]="rootPage"></ion-nav>',
  config: {} // http://ionicframework.com/docs/v2/api/config/Config/
})

export class MyApp {
  static get parameters() {
    return [[Platform]];
  }

  constructor(platform) {
    this.rootPage = TabsPage;

    platform.ready().then(() => {
      // Okay, so the platform is ready and our plugins are available.
      // Here you can do any higher level native things you might need.
      StatusBar.styleDefault();
    });
  }
}

/* --- app.js  ----*/
看完上一章 之后 就觉得没啥特别的嘛。看三个红色部分就知道了。 贴 tabs 代码。
/* --- html ----*/

<ion-tabs>
  <ion-tab [root]="tab1Root" tabTitle="Tab 1" tabIcon="pulse"></ion-tab>
  <ion-tab [root]="tab2Root" tabTitle="Tab 2" tabIcon="chatbubbles"></ion-tab>
  <ion-tab [root]="tab3Root" tabTitle="Tab 3" tabIcon="cog"></ion-tab>
</ion-tabs>

/* --- tabs.html  ----*/
/* --- tabs.js ---*/

import {Page} from 'ionic-angular';
import {Page1} from '../page1/page1';
import {Page2} from '../page2/page2';
import {Page3} from '../page3/page3';

@Page({
  templateUrl: 'build/pages/tabs/tabs.html'
})

export class TabsPage {
  constructor() {
    // this tells the tabs component which Pages
    // should be each tab's root Page
    this.tab1Root = Page1;
    this.tab2Root = Page2;
    this.tab3Root = Page3;
  }
}

/* --- tabs.js ---*/
这个 也没啥 可解释的。root 对应着 组件 贴 pages
/* --- page1.html ---*/

<ion-navbar *navbar>
  <ion-title>Tab 1</ion-title>
</ion-navbar>

<ion-content padding class="page1">
  <h2>Welcome to Ionic!</h2>
  <p>
    This starter project comes with simple tabs-based layout for apps
    that are going to primarily use a Tabbed UI.
  </p>
  <p>
    Take a look at the <code>app/</code> directory to add or change tabs,
    update any existing page or create new pages.
  </p>
</ion-content>

/* --- page1.html ---*/
/* --- page1.js ---*/

import {Page} from 'ionic-angular';


@Page({
  templateUrl: 'build/pages/page1/page1.html'
})
export class Page1 {
  constructor() {

  }
}

/* --- page1.js ---*/
/* --- page2.html ---*/

<ion-navbar *navbar>
  <ion-title>
    Tab 2
  </ion-title>
</ion-navbar>

<ion-content class="page2">
  2222222222222222222222222222
</ion-content>

/* --- page2.html ---*/
/* --- page2.js ---*/

import {Page} from 'ionic-angular';

@Page({
  templateUrl: 'build/pages/page2/page2.html'
})
export class Page2 {
  constructor() {

  }
}

/* --- page2.js ---*/
上边的两个代码 没有什么新鲜的。。接下来看 我加入的 childs
/* --- one.html ---*/

<h1>我是嵌套页面。!!one </h1>

/* --- one.html ---*/
/* --- one.js ---*/

import {Page} from 'ionic-angular';

@Page({
    templateUrl: 'build/pages/childs/one.html'
})
export class One {
    constructor() {

    }
}

/* --- one.js ---*/
也没啥特别的嘛。无非就是写了个页面。接下来看page3做的事情。
/* --- page3.html ---*/

<ion-navbar *navbar>
  <ion-title>
    Tab 3
  </ion-title>
</ion-navbar>

<ion-content class="page3">
  333333333333333333333
  <ion-nav [root]="rootPage"></ion-nav>
</ion-content>

/* --- page3.html ---*/
/* --- page3.js ---*/

import {Page} from 'ionic-angular';
import { One } from '../childs/one.js';

@Page({
  templateUrl: 'build/pages/page3/page3.html'
})
export class Page3 {
  constructor() {
    this.rootPage = One;
  }
}

/* --- page3.js ---*/
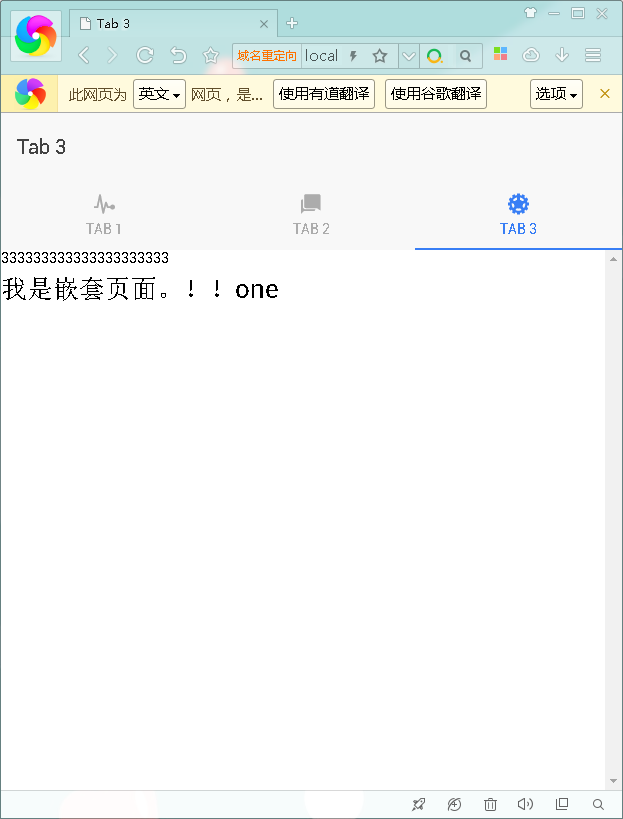
我在page3中 加了一个
<ion-nav [root]="rootPage"></ion-nav> 然后 然后在js中添加了一个 组件One 那这个时候 就嵌套成功了。。还记的angular2 中的 @RoterConfig 么 父级要设置一个 @RoterConfig 子集也要设置一个。但是 ionic2 直接 把组件放进去 就OK了。。
