RabbitMq安装
[root@topcheer ~]# docker images
REPOSITORY                TAG                 IMAGE ID            CREATED             SIZE
elasticsearch             latest              874179f19603        11 days ago         771 MB
springbootdemo4docker     latest              cd13bc7f56a0        2 weeks ago         678 MB
docker.io/tomcat          latest              ee48881b3e82        4 weeks ago         506 MB
docker.io/rabbitmq        latest              a00bc560660a        4 weeks ago         147 MB
docker.io/centos          latest              67fa590cfc1c        7 weeks ago         202 MB
docker.io/redis           latest              f7302e4ab3a8        8 weeks ago         98.2 MB
docker.io/rabbitmq        3.7.16-management   3f92e6354d11        2 months ago        177 MB
[root@topcheer ~]# docker run -d -p 5672:5672  -p 15672:15672 --name myrabbitmq 3f92e6354d11
ab8a0c8bae576f12ff334b22aae36d5fd87e744062462765628b06b5a65b9005
[root@topcheer ~]# docker ps -l
CONTAINER ID        IMAGE               COMMAND                  CREATED             STATUS              PORTS                                                                                        NAMES
ab8a0c8bae57        3f92e6354d11        "docker-entrypoint..."   27 seconds ago      Up 26 seconds       4369/tcp, 5671/tcp, 0.0.0.0:5672->5672/tcp, 15671/tcp, 25672/tcp, 0.0.0.0:15672->15672/tcp   myrabbitmq
[root@topcheer ~]#

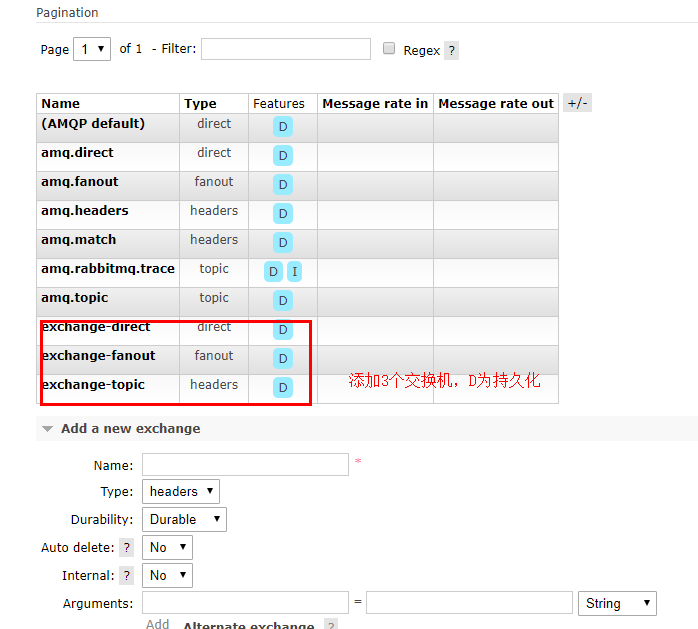
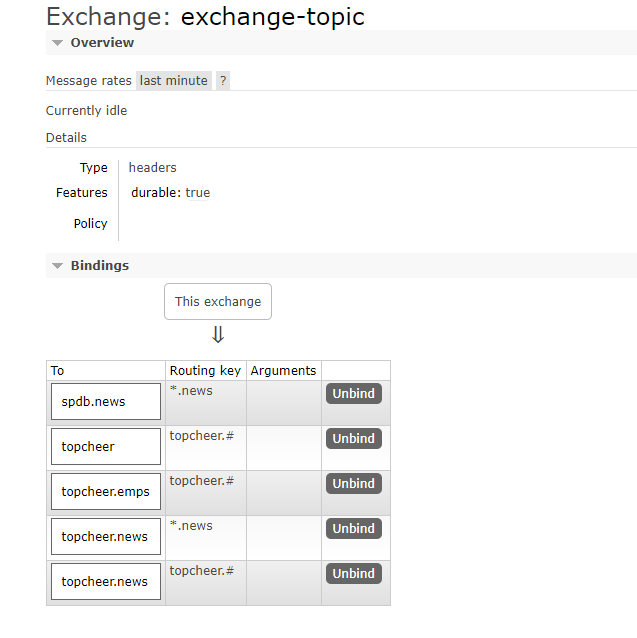
账号密码都为guest,创建交换机
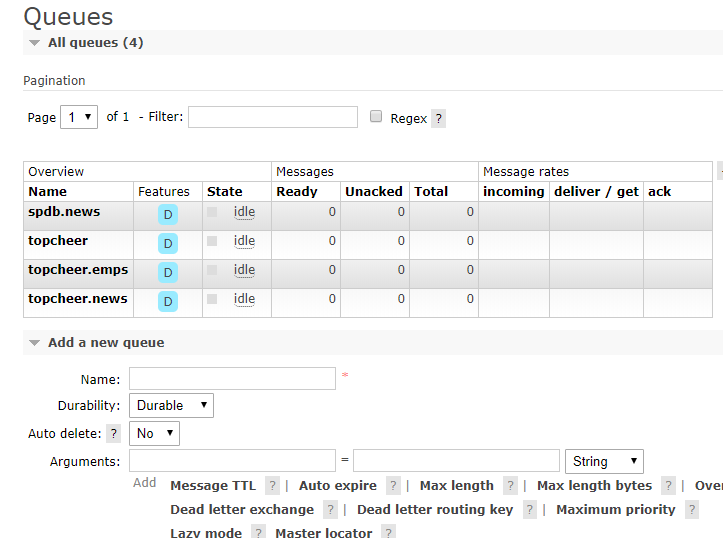
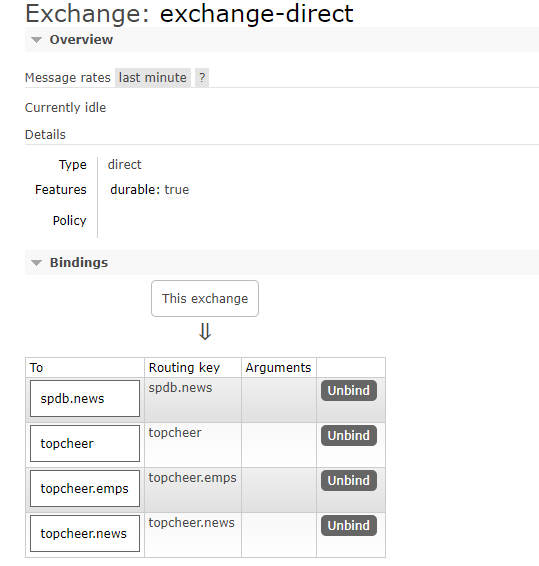
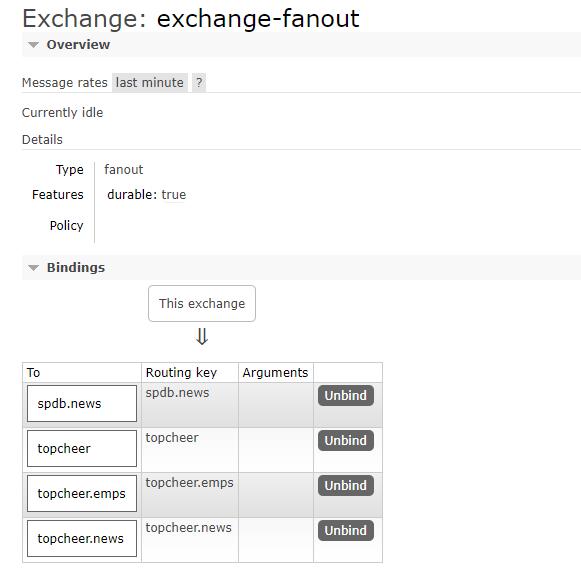
进行交换机和队列进行绑定

Springboot开发
 1 <dependencies>
 2         <!--消息队列依赖-->
 3         <dependency>
 4             <groupId>org.springframework.boot</groupId>
 5             <artifactId>spring-boot-starter-amqp</artifactId>
 6         </dependency>
 7         <!--web相关依赖-->
 8         <dependency>
 9             <groupId>org.springframework.boot</groupId>
10             <artifactId>spring-boot-starter-web</artifactId>
11         </dependency>
12         <!--fastjson依赖-->
13         <dependency>
14             <groupId>com.alibaba</groupId>
15             <artifactId>fastjson</artifactId>
16             <version>1.2.44</version>
17         </dependency>
18         <!--lombok依赖-->
19         <dependency>
20             <groupId>org.projectlombok</groupId>
21             <artifactId>lombok</artifactId>
22             <optional>true</optional>
23         </dependency>
24         <!--测试依赖-->
25         <dependency>
26             <groupId>org.springframework.boot</groupId>
27             <artifactId>spring-boot-starter-test</artifactId>
28             <scope>test</scope>
29         </dependency>
启动类
1 /** 2 * 自动配置 3 * 1、RabbitAutoConfiguration 4 * 2、有自动配置了连接工厂ConnectionFactory; 5 * 3、RabbitProperties 封装了 RabbitMQ的配置 6 * 4、 RabbitTemplate :给RabbitMQ发送和接受消息; 7 * 5、 AmqpAdmin : RabbitMQ系统管理功能组件; 8 * AmqpAdmin:创建和删除 Queue,Exchange,Binding 9 * 6、@EnableRabbit + @RabbitListener 监听消息队列的内容 10 * 11 */ 12 @MapperScan("com.topcheer.*.*.dao") 13 @SpringBootApplication 14 @EnableCaching 15 @EnableRabbit 16 public class Oss6Application { 17 18 public static void main(String[] args) { 19 SpringApplication.run(Oss6Application.class, args); 20 } 21 22 }
配置文件
1 spring:
2   rabbitmq:
3     host: 192.168.180.113
4     username: guest
5     password: guest
Bo类
1 /** 2 * @author WGR 3 * @create 2019/9/3 -- 0:34 4 */ 5 @Document(indexName = "topcheer",type = "book" ) 6 @Slf4j 7 @Data 8 //@Builder 用这个来构造,反序列化的时候会出问题 9 public class Book implements Serializable { 10 11 private Integer id; 12 private String name; 13 private String author; 14 15 public Book(String name, String author) { 16 this.name = name; 17 this.author = author; 18 } 19 20 public Book(Integer id, String name, String author) { 21 this.id = id; 22 this.name = name; 23 this.author = author; 24 } 25 26 public Book() { 27 } 28 }
MessageConverter
我们先来创建一个转换的实现类,只需要继承抽象类AbstractMessageConverter并实现内部的createMessage、fromMessage两个方法就可以完成实体类的序列化与反序列化的转换,代码如下所示:
1 /** 2 * 自定义消息转换器 3 * 采用FastJson完成消息转换 4 * 5 * @author:于起宇 <br/> 6 * =============================== 7 * Created with Eclipse. 8 * Date:2017/10/26 9 * Time:19:28 10 * 简书:http://www.jianshu.com/u/092df3f77bca 11 * ================================ 12 */ 13 public class RabbitMqFastJsonConverter 14 extends AbstractMessageConverter { 15 /** 16 * 日志对象实例 17 */ 18 private Logger logger = LoggerFactory.getLogger(RabbitMqFastJsonConverter.class); 19 /** 20 * 消息类型映射对象 21 */ 22 private static ClassMapper classMapper = new DefaultClassMapper(); 23 /** 24 * 默认字符集 25 */ 26 private static String DEFAULT_CHART_SET = "UTF-8"; 27 28 /** 29 * 创建消息 30 * 31 * @param o 消息对象 32 * @param messageProperties 消息属性 33 * @return 34 */ 35 @Override 36 protected Message createMessage(Object o, MessageProperties messageProperties) { 37 byte[] bytes = null; 38 try { 39 String jsonString = JSON.toJSONString(o); 40 bytes = jsonString.getBytes(DEFAULT_CHART_SET); 41 } catch (IOException e) { 42 throw new MessageConversionException( 43 "Failed to convert Message content", e); 44 } 45 messageProperties.setContentType(MessageProperties.CONTENT_TYPE_JSON); 46 messageProperties.setContentEncoding(DEFAULT_CHART_SET); 47 if (bytes != null) { 48 messageProperties.setContentLength(bytes.length); 49 } 50 classMapper.fromClass(o.getClass(), messageProperties); 51 return new Message(bytes, messageProperties); 52 } 53 54 /** 55 * 转换消息为对象 56 * 57 * @param message 消息对象 58 * @return 59 * @throws MessageConversionException 60 */ 61 @Override 62 public Object fromMessage(Message message) throws MessageConversionException { 63 Object content = null; 64 MessageProperties properties = message.getMessageProperties(); 65 if (properties != null) { 66 String contentType = properties.getContentType(); 67 if (contentType != null && contentType.contains("json")) { 68 String encoding = properties.getContentEncoding(); 69 if (encoding == null) { 70 encoding = DEFAULT_CHART_SET; 71 } 72 try { 73 Class<?> targetClass = classMapper.toClass( 74 message.getMessageProperties()); 75 76 content = convertBytesToObject(message.getBody(), 77 encoding, targetClass); 78 } catch (IOException e) { 79 throw new MessageConversionException( 80 "Failed to convert Message content", e); 81 } 82 } else { 83 logger.warn("Could not convert incoming message with content-type [" 84 + contentType + "]"); 85 } 86 } 87 if (content == null) { 88 content = message.getBody(); 89 } 90 return content; 91 } 92 93 /** 94 * 将字节数组转换成实例对象 95 * 96 * @param body Message对象主体字节数组 97 * @param encoding 字符集 98 * @param clazz 类型 99 * @return 100 * @throws UnsupportedEncodingException 101 */ 102 private Object convertBytesToObject(byte[] body, String encoding, 103 Class<?> clazz) throws UnsupportedEncodingException { 104 String contentAsString = new String(body, encoding); 105 return JSON.parseObject(contentAsString, clazz); 106 } 107 } 108 在该转换类内我们使用了DefaultClassMapper来作为类的映射,我们可以先来看下该类相关信任package的源码,如下所示: 109 110 ...... 111 public class DefaultClassMapper implements ClassMapper, InitializingBean { 112 public static final String DEFAULT_CLASSID_FIELD_NAME = "__TypeId__"; 113 private static final String DEFAULT_HASHTABLE_TYPE_ID = "Hashtable"; 114 // 默认信任的package列表 115 private static final List<String> TRUSTED_PACKAGES = Arrays.asList("java.util", "java.lang"); 116 private final Set<String> trustedPackages; 117 private volatile Map<String, Class<?>> idClassMapping; 118 private volatile Map<Class<?>, String> classIdMapping; 119 private volatile Class<?> defaultMapClass; 120 private volatile Class<?> defaultType; 121 122 public DefaultClassMapper() { 123 // 构造函数初始化信任的package为默认的pakcage列表 124 // 仅支持java.util、java.lang两个package 125 this.trustedPackages = new LinkedHashSet(TRUSTED_PACKAGES); 126 this.idClassMapping = new HashMap(); 127 this.classIdMapping = new HashMap(); 128 this.defaultMapClass = LinkedHashMap.class; 129 this.defaultType = LinkedHashMap.class; 130 } 131 ......
RabbitMqConfiguration
下面我们需要将该转换设置到RabbitTemplate、SimpleRabbitListenerContainerFactory内,让RabbitMQ支持自定义的消息转换,如下所示:
1 /** 2 * rabbitmq 相关配置 3 * @author:于起宇 <br/> 4 * =============================== 5 * Created with IDEA. 6 * Date:2018/3/11 7 * Time:下午5:42 8 * 简书:http://www.jianshu.com/u/092df3f77bca 9 * ================================ 10 */ 11 @Configuration 12 public class RabbitMqConfiguration { 13 14 15 /** 16 * 配置消息队列模版 17 * 并且设置MessageConverter为自定义FastJson转换器 18 * @param connectionFactory 19 * @return 20 */ 21 @Bean 22 public RabbitTemplate rabbitTemplate(ConnectionFactory connectionFactory) { 23 RabbitTemplate template = new RabbitTemplate(connectionFactory); 24 template.setMessageConverter(new RabbitMqFastJsonConverter()); 25 return template; 26 } 27 28 /** 29 * 自定义队列容器工厂 30 * 并且设置MessageConverter为自定义FastJson转换器 31 * @param connectionFactory 32 * @return 33 */ 34 @Bean 35 public SimpleRabbitListenerContainerFactory rabbitListenerContainerFactory(ConnectionFactory connectionFactory) { 36 SimpleRabbitListenerContainerFactory factory = new SimpleRabbitListenerContainerFactory(); 37 factory.setConnectionFactory(connectionFactory); 38 factory.setMessageConverter(new RabbitMqFastJsonConverter()); 39 factory.setDefaultRequeueRejected(false); 40 return factory; 41 } 42 43 }
重写DefaultClassMapper构造函数
不加这个会报错,显示这个类没有被信任
创建一个名为RabbitMqFastJsonClassMapper的类并且继承DefaultClassMapper,如下所示:
 1 /**
 2  * fastjson 转换映射
 3  *
 4  * @author:于起宇 <br/>
 5  * ===============================
 6  * Created with IDEA.
 7  * Date:2018/3/13
 8  * Time:下午10:17
 9  * 简书:http://www.jianshu.com/u/092df3f77bca
10  * ================================
11  */
12 public class RabbitMqFastJsonClassMapper extends DefaultClassMapper {
13     /**
14      * 构造函数初始化信任所有pakcage
15      */
16     public RabbitMqFastJsonClassMapper() {
17         super();
18         setTrustedPackages("*");
19     }
20 }
在上面构造函数内我们设置了信任全部的package,添加了RabbitMqFastJsonClassMapper类后,需要让MessageConverter使用该类作为映射,修改RabbitMqFastJsonConverter部分代码如下所示:
/**
 * 消息类型映射对象
 */
private static ClassMapper classMapper = new DefaultClassMapper();
>>> 修改为 >>>
/**
* 消息类型映射对象
*/
private static ClassMapper classMapper = new RabbitMqFastJsonClassMapper();
监听类
1 @Service 2 public class BookService { 3 4 @RabbitListener(queues = "topcheer.news") 5 public void receive(Book book){ 6 System.out.println("收到消息:"+book); 7 } 8 9 @RabbitListener(queues = "topcheer") 10 public void receive02(Message message){ 11 System.out.println(message.getBody()); 12 System.out.println(message.getMessageProperties()); 13 } 14 } 15
测试类
1 /** 2 * 1、单播(点对点) 3 */ 4 @Test 5 public void contextLoads() { 6 //Message需要自己构造一个;定义消息体内容和消息头 7 //rabbitTemplate.send(exchage,routeKey,message); 8 9 //object默认当成消息体,只需要传入要发送的对象,自动序列化发送给rabbitmq; 10 //rabbitTemplate.convertAndSend(exchage,routeKey,object); 11 Map<String,Object> map = new HashMap<>(); 12 map.put("msg","这是第一个消息"); 13 map.put("data", Arrays.asList("helloworld",123,true)); 14 //对象被默认序列化以后发送出去 15 rabbitTemplate.convertAndSend("exchange-direct","topcheer",new Book("红楼梦","曹雪芹")); 16 17 } 18 19 //接受数据,如何将数据自动的转为json发送出去 20 @Test 21 public void receive(){ 22 Object o = rabbitTemplate.receiveAndConvert("topcheer.news"); 23 // System.out.println(o.getClass()); 24 System.out.println(o); 25 } 26 27 /** 28 * 广播 29 */ 30 @Test 31 public void sendMsg(){ 32 rabbitTemplate.convertAndSend("exchange-fanout","",new Book("红楼梦1","曹雪芹1")); 33 }
测试结果如下:
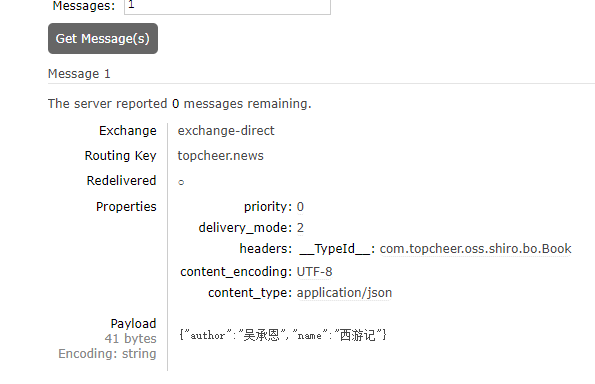
2019-10-11 22:20:50.730  INFO --- [           main] tMqFastJsonConverter : 消息为对象
Book(id=null, name=红楼梦, author=曹雪芹)
2019-10-11 22:39:04.284 INFO --- [ntContainer#1-1] tMqFastJsonConverter : 消息为对象
[B@4da0a5ae
MessageProperties [headers={__TypeId__=com.topcheer.oss.shiro.bo.Book}, contentType=application/json, contentEncoding=UTF-8, contentLength=0, receivedDeliveryMode=PERSISTENT, priority=0, redelivered=false, receivedExchange=exchange-direct, receivedRoutingKey=topcheer, deliveryTag=4, consumerTag=amq.ctag-mFGYgGzoHK3Utt8uk2Hxdg, consumerQueue=topcheer]