请参见下面代码及其注释(xaml/pathscene.xaml):
<!--EllipseGeometry-->
<Path Fill="Gold" Stroke="Black" StrokeThickness="1">
<Path.Data>
<EllipseGeometry Center="50,50" RadiusX="50" RadiusY="50" />
</Path.Data>
</Path>
<!--RectangleGeometry-->
<Path Fill="Gold" Stroke="Black" StrokeThickness="1">
<Path.Data>
<RectangleGeometry Rect="250,0,100,100" />
<!--左,上,长,高-->
</Path.Data>
</Path>
<!--PathGeometry-->
<Path Stroke="Black" StrokeThickness="1">
<Path.Data>
<PathGeometry>
<PathGeometry.Figures>
<PathFigure StartPoint="10,200">
<!--起点坐标(左,高)-->
<PathFigure.Segments>
<LineSegment Point="100,130"/>
<!--终点坐标(左,高)-->
</PathFigure.Segments>
</PathFigure>
</PathGeometry.Figures>
</PathGeometry>
</Path.Data>
</Path>
<!--LineGeometry-->
<Path Stroke="Red" StrokeThickness="10" >
<Path.Data>
<LineGeometry StartPoint="100,200" EndPoint="180,140" />
</Path.Data>
</Path>
<!--GeometryGroup组合的几何类型-->
<Path Stroke="Black" StrokeThickness="1" Fill="#CCCCFF">
<Path.Data>
<!-- Creates a composite shape from two geometries. -->
<GeometryGroup FillRule="EvenOdd">
<LineGeometry StartPoint="220,200" EndPoint="390,250" />
<EllipseGeometry Center="250,200" RadiusX="40" RadiusY="40" />
<RectangleGeometry Rect="250, 150, 100, 100" />
</GeometryGroup>
</Path.Data>
</Path>
<Path Fill="Gold" Stroke="Black" StrokeThickness="1">
<Path.Data>
<EllipseGeometry Center="50,50" RadiusX="50" RadiusY="50" />
</Path.Data>
</Path>
<!--RectangleGeometry-->
<Path Fill="Gold" Stroke="Black" StrokeThickness="1">
<Path.Data>
<RectangleGeometry Rect="250,0,100,100" />
<!--左,上,长,高-->
</Path.Data>
</Path>
<!--PathGeometry-->
<Path Stroke="Black" StrokeThickness="1">
<Path.Data>
<PathGeometry>
<PathGeometry.Figures>
<PathFigure StartPoint="10,200">
<!--起点坐标(左,高)-->
<PathFigure.Segments>
<LineSegment Point="100,130"/>
<!--终点坐标(左,高)-->
</PathFigure.Segments>
</PathFigure>
</PathGeometry.Figures>
</PathGeometry>
</Path.Data>
</Path>
<!--LineGeometry-->
<Path Stroke="Red" StrokeThickness="10" >
<Path.Data>
<LineGeometry StartPoint="100,200" EndPoint="180,140" />
</Path.Data>
</Path>
<!--GeometryGroup组合的几何类型-->
<Path Stroke="Black" StrokeThickness="1" Fill="#CCCCFF">
<Path.Data>
<!-- Creates a composite shape from two geometries. -->
<GeometryGroup FillRule="EvenOdd">
<LineGeometry StartPoint="220,200" EndPoint="390,250" />
<EllipseGeometry Center="250,200" RadiusX="40" RadiusY="40" />
<RectangleGeometry Rect="250, 150, 100, 100" />
</GeometryGroup>
</Path.Data>
</Path>
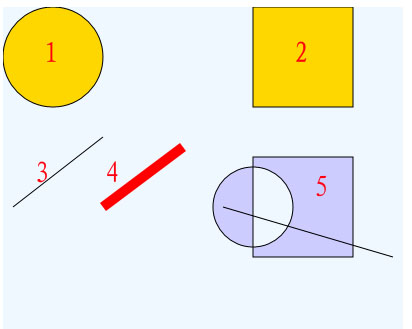
运行结果如下图(图中数字顺序为其代码的分布次序):

下面演示使用createFromXaml动态加载上面的xaml内容的js脚本(xaml\CreateFromXaml.js):
Silverlight_JsWeb.CreateFromXaml.prototype =
{
handleLoad: function(plugIn, userContext, sender)
{
this.plugIn = plugIn;
// 按钮事件挂钩示例: 查找按钮,然后附加事件处理程序
sender.findName("container").addEventListener("MouseLeftButtonDown", Silverlight.createDelegate(this,
this.handleMouseLeftButtonDown));
},
// 事件处理程序示例
handleMouseLeftButtonDown:function (sender, eventArgs)
{
this.createXaml(sender);
},
createXaml:function (sender)
{
var plugin = sender.getHost();
//同心圆
var xamlFragment = '<Path Fill="Gold" Stroke="Black" StrokeThickness="1">';
xamlFragment += '<Path.Data>';
xamlFragment += ' <GeometryGroup>';
xamlFragment += ' <EllipseGeometry Center="60,80" RadiusX="50" RadiusY="50" />';
xamlFragment += ' <EllipseGeometry Center="60,80" RadiusX="30" RadiusY="30" />';
xamlFragment += ' </GeometryGroup>';
xamlFragment += '</Path.Data>';
xamlFragment += '</Path>';
sender.children.add(plugin.content.createFromXaml(xamlFragment, false));
//矩形RectangleGeometry
xamlFragment = '<Path Fill="Gold" Stroke="Black" StrokeThickness="1">';
xamlFragment += ' <Path.Data>';
xamlFragment += ' <RectangleGeometry Rect="200,30,100,100" />';
xamlFragment += ' <!--左,上,长,高-->';
xamlFragment += ' </Path.Data>';
xamlFragment += '</Path>';
sender.children.add(plugin.content.createFromXaml(xamlFragment, false));
//直线PathGeometry
xamlFragment = '<Path Stroke="Black" StrokeThickness="1">';
xamlFragment += '<Path.Data>';
xamlFragment += ' <PathGeometry>';
xamlFragment += ' <PathGeometry.Figures>';
xamlFragment += ' <PathFigure StartPoint="10,200">';
xamlFragment += ' <!--起点坐标(左,高)-->';
xamlFragment += ' <PathFigure.Segments>';
xamlFragment += ' <LineSegment Point="100,130"/>';
xamlFragment += ' <!--终点坐标(左,高)-->';
xamlFragment += ' </PathFigure.Segments>';
xamlFragment += ' </PathFigure>';
xamlFragment += ' </PathGeometry.Figures>';
xamlFragment += ' </PathGeometry>';
xamlFragment += '</Path.Data>';
xamlFragment += '</Path>';
sender.children.add(plugin.content.createFromXaml(xamlFragment, false));
// <!--LineGeometry-->
xamlFragment = '<Path Stroke="Red" StrokeThickness="10" >';
xamlFragment += '<Path.Data>';
xamlFragment += ' <LineGeometry StartPoint="100,200" EndPoint="180,140" />';
xamlFragment += '</Path.Data>';
xamlFragment += '</Path>';
sender.children.add(plugin.content.createFromXaml(xamlFragment, false));
//<!--GeometryGroup组合的几何类型-->
xamlFragment = '<Path Stroke="Black" StrokeThickness="1" Fill="#CCCCFF">';
xamlFragment += '<Path.Data>';
xamlFragment += ' <!-- Creates a composite shape from two geometries. -->';
xamlFragment += ' <GeometryGroup FillRule="EvenOdd">';
xamlFragment += ' <LineGeometry StartPoint="220,200" EndPoint="390,250" />';
xamlFragment += ' <EllipseGeometry Center="250,200" RadiusX="40" RadiusY="40" />';
xamlFragment += ' <RectangleGeometry Rect="250, 150, 100, 100" />';
xamlFragment += ' </GeometryGroup>';
xamlFragment += '</Path.Data>';
xamlFragment += '</Path>';
sender.children.add(plugin.content.createFromXaml(xamlFragment, false));
// sender.children.add(ellipse);
// var xamlFragment = '<TextBlock Canvas.Top="0" Text="createFromXaml 方法调用!" />';
// textBlock = plugin.content.createFromXaml(xamlFragment, false);
//
// var xamlFragment2 = '<Ellipse Canvas.ZIndex="1" Canvas.Left="95" Canvas.Top="95" Height="200"
// Width="200" Stroke="Black" StrokeThickness="10" Fill="Lime" />';
// ellipse = plugin.content.createFromXaml(xamlFragment2, false);
// ellipse.fill = this.createLinearGradientBrush(plugin);
//
// sender.children.add(textBlock);
// sender.children.add(ellipse);
},
createLinearGradientBrush:function (plugin)
{
var xamlFragment = '<LinearGradientBrush>';
xamlFragment += '<GradientStop Color="Yellow" Offset="0.0" />';
xamlFragment += '<GradientStop Color="Orange" Offset="0.5" />';
xamlFragment += '<GradientStop Color="Red" Offset="1.0" />';
xamlFragment += '</LinearGradientBrush>';
return plugin.content.createFromXaml(xamlFragment);
}
}
{
handleLoad: function(plugIn, userContext, sender)
{
this.plugIn = plugIn;
// 按钮事件挂钩示例: 查找按钮,然后附加事件处理程序
sender.findName("container").addEventListener("MouseLeftButtonDown", Silverlight.createDelegate(this,
this.handleMouseLeftButtonDown));
},
// 事件处理程序示例
handleMouseLeftButtonDown:function (sender, eventArgs)
{
this.createXaml(sender);
},
createXaml:function (sender)
{
var plugin = sender.getHost();
//同心圆
var xamlFragment = '<Path Fill="Gold" Stroke="Black" StrokeThickness="1">';
xamlFragment += '<Path.Data>';
xamlFragment += ' <GeometryGroup>';
xamlFragment += ' <EllipseGeometry Center="60,80" RadiusX="50" RadiusY="50" />';
xamlFragment += ' <EllipseGeometry Center="60,80" RadiusX="30" RadiusY="30" />';
xamlFragment += ' </GeometryGroup>';
xamlFragment += '</Path.Data>';
xamlFragment += '</Path>';
sender.children.add(plugin.content.createFromXaml(xamlFragment, false));
//矩形RectangleGeometry
xamlFragment = '<Path Fill="Gold" Stroke="Black" StrokeThickness="1">';
xamlFragment += ' <Path.Data>';
xamlFragment += ' <RectangleGeometry Rect="200,30,100,100" />';
xamlFragment += ' <!--左,上,长,高-->';
xamlFragment += ' </Path.Data>';
xamlFragment += '</Path>';
sender.children.add(plugin.content.createFromXaml(xamlFragment, false));
//直线PathGeometry
xamlFragment = '<Path Stroke="Black" StrokeThickness="1">';
xamlFragment += '<Path.Data>';
xamlFragment += ' <PathGeometry>';
xamlFragment += ' <PathGeometry.Figures>';
xamlFragment += ' <PathFigure StartPoint="10,200">';
xamlFragment += ' <!--起点坐标(左,高)-->';
xamlFragment += ' <PathFigure.Segments>';
xamlFragment += ' <LineSegment Point="100,130"/>';
xamlFragment += ' <!--终点坐标(左,高)-->';
xamlFragment += ' </PathFigure.Segments>';
xamlFragment += ' </PathFigure>';
xamlFragment += ' </PathGeometry.Figures>';
xamlFragment += ' </PathGeometry>';
xamlFragment += '</Path.Data>';
xamlFragment += '</Path>';
sender.children.add(plugin.content.createFromXaml(xamlFragment, false));
// <!--LineGeometry-->
xamlFragment = '<Path Stroke="Red" StrokeThickness="10" >';
xamlFragment += '<Path.Data>';
xamlFragment += ' <LineGeometry StartPoint="100,200" EndPoint="180,140" />';
xamlFragment += '</Path.Data>';
xamlFragment += '</Path>';
sender.children.add(plugin.content.createFromXaml(xamlFragment, false));
//<!--GeometryGroup组合的几何类型-->
xamlFragment = '<Path Stroke="Black" StrokeThickness="1" Fill="#CCCCFF">';
xamlFragment += '<Path.Data>';
xamlFragment += ' <!-- Creates a composite shape from two geometries. -->';
xamlFragment += ' <GeometryGroup FillRule="EvenOdd">';
xamlFragment += ' <LineGeometry StartPoint="220,200" EndPoint="390,250" />';
xamlFragment += ' <EllipseGeometry Center="250,200" RadiusX="40" RadiusY="40" />';
xamlFragment += ' <RectangleGeometry Rect="250, 150, 100, 100" />';
xamlFragment += ' </GeometryGroup>';
xamlFragment += '</Path.Data>';
xamlFragment += '</Path>';
sender.children.add(plugin.content.createFromXaml(xamlFragment, false));
// sender.children.add(ellipse);
// var xamlFragment = '<TextBlock Canvas.Top="0" Text="createFromXaml 方法调用!" />';
// textBlock = plugin.content.createFromXaml(xamlFragment, false);
//
// var xamlFragment2 = '<Ellipse Canvas.ZIndex="1" Canvas.Left="95" Canvas.Top="95" Height="200"
// Width="200" Stroke="Black" StrokeThickness="10" Fill="Lime" />';
// ellipse = plugin.content.createFromXaml(xamlFragment2, false);
// ellipse.fill = this.createLinearGradientBrush(plugin);
//
// sender.children.add(textBlock);
// sender.children.add(ellipse);
},
createLinearGradientBrush:function (plugin)
{
var xamlFragment = '<LinearGradientBrush>';
xamlFragment += '<GradientStop Color="Yellow" Offset="0.0" />';
xamlFragment += '<GradientStop Color="Orange" Offset="0.5" />';
xamlFragment += '<GradientStop Color="Red" Offset="1.0" />';
xamlFragment += '</LinearGradientBrush>';
return plugin.content.createFromXaml(xamlFragment);
}
}
源码下载,请点击这里:)