在silverlight 中,我们可以通过js事件绑定方法addEventListener,往xaml文件中的UIElement
元素上绑定事件js事件,也可以通过直接属性赋值的方法来将事件绑定到UIElement元素上,比如下面
的语法声明:
 " MouseEnter="onMouseEnter" />
 本人比较喜欢前者的定义方法,主要是因为其灵活性和支持prototype式的代码结构。下面就通过
一个获取鼠标当前坐标位置的例子,来说明一下如果使用js事件绑定。
首先我们需要定义一个Silverlight JScript 文件,并将其命名为MoveScene.xaml,如下图所示:
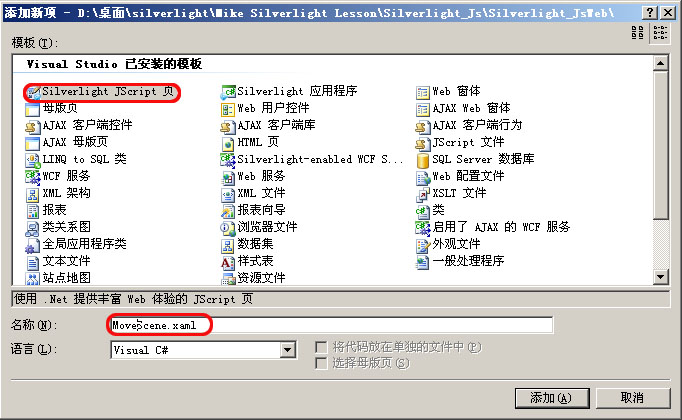
这时系统会生成两个文件,一个是同名的MoveScene.xaml,而另一个就是其绑定的js文件:
MoveScene.js。我们可以将相应的代码放入这两个文件中,其中xaml代码如下:
xmlns:x="http://schemas.microsoft.com/winfx/2006/xaml"
Width="300" Height="300" x:Name="rootCanvas" Background="pink">
<Ellipse x:Name="MouseEllipse"
Height="100" Width="100"
Canvas.Left="30" Canvas.Top="30" Fill="Red"/>
<TextBlock x:Name="Status" Canvas.Top="140" MouseLeftButtonDown="onMouseLeftButtonUp" />
</Canvas>
上面代码中定义了两个元素:
1. Ellipse元素, 名称为:MouseEllipse, 该元素将会绑定鼠标事件。
2. TextBlock元素,名称为:Status,该元素会显示当前鼠标在MouseEllipse元素中的位置。
下面就是关于鼠标事件绑定的代码(因系统已为我们生成了一个简单的初始化代码,我们仅需放
入相应的事件绑定代码即可),取终代码结构如下(MoveScene.js):
{
}
Silverlight_JsWeb.MoveScene.prototype =
{
handleLoad: function(plugIn, userContext, rootElement)
{
this.plugIn = plugIn;
// 按钮事件挂钩示例: 查找按钮,然后附加事件处理程序
var MouseEllipse = rootElement.findName("MouseEllipse");
MouseEllipse.addEventListener("MouseMove", Silverlight.createDelegate(this, this.handleMouseMove));
MouseEllipse.addEventListener("MouseLeave", Silverlight.createDelegate(this, this.handleMouseLeave));
MouseEllipse.addEventListener("MouseLeftButtonUp", Silverlight.createDelegate(this, this.handleMouseLeftButtonUp));
},
// 鼠标移入处理程序
handleMouseMove: function(sender, mouseEventArgs)
{
sender.Fill = "Coral";
var currX = mouseEventArgs.getPosition(null).x;
var currY = mouseEventArgs.getPosition(null).y;
var Status = sender.findName("Status");
Status.Text = "x:" + currX + " y:" + currY;
},
// 鼠标离开处理程序
handleMouseLeave: function(sender, mouseEventArgs)
{
sender.Fill = "Teal";
},
// 鼠标左键单击处理程序
handleMouseLeftButtonUp: function(sender, mouseEventArgs)
{
sender.Fill = "Blue";
alert("x:" +mouseEventArgs.getPosition(null).x +
" y:" +mouseEventArgs.getPosition(null).y);
}
}
这里面有两个方法需要着重介绍一下:
addEventListener 该方法用于向指定的元素绑定相应的方法。其函数声明如下:
其参数:
eventName表示事件的名称,string类型(如KeyDown等)。
functionReference ,表示事件处理方法的引用,Object类型(通常采用Silverlight.createDelegate方法创建)。
该方法的使用已如上面代码所声明的那样:
这样我们就将handleMouseMove方法绑定到了MouseEllipse元素的MouseMove事件上。
另外一个要介绍的方法是FindName,其函数声明如下:
其name即是在XAML中元素的名称,它返回该元素的引用(有点像我们经常使用的getElementById).
通过该方法我们就可以该XMAL中的元素了。
目前我们只是完成了相应的代码声明工作。仅下面就是创建该silverlight对象的代码(因为要演示三种鼠标应用
场景,所以这里采用了参数化的方式来简化代码, 文件 CreateSilverlight.js):
//Source:资源文件名称
//ParentElement:相应的父元素名称
//PluginID: 插件名称
function createSilverlight(Instance, Source, ParentElement, PluginID)
{
var scene = Instance;
Silverlight.createObjectEx({
source: Source,
parentElement: ParentElement,
id: PluginID,
properties: {
'300',
height:'300',
version:'2.0',
isWindowless:'true',
background:'aliceblue',
framerate:'24',
version:'2.0'
},
events: {
//注意此处的代码使用方式,它将相应的prototype实例和相应方法
//绑定到onLoad事件上
onLoad: Silverlight.createDelegate(scene, scene.handleLoad),
onError: function(sender, args) {
var errorDiv = document.getElementById("errorLocation");
if (errorDiv != null) {
var errorText = args.errorType + "- " + args.errorMessage;
if (args.ErrorType == "ParserError") {
errorText += "<br>File: " + args.xamlFile;
errorText += ", line " + args.lineNumber;
errorText += " character " + args.charPosition;
}
else if (args.ErrorType == "RuntimeError") {
errorText += "<br>line " + args.lineNumber;
errorText += " character " + args.charPosition;
}
errorDiv.innerHTML = errorText;
}
}
},
initParams:null, // 初始化参数
context:null
});
}
到这里我们仅需要在HTM文件中写入下面的js代码,便可创建对象了:
"xaml/MoveScene.xaml",
document.getElementById("SilverlightControlHost_Move"),
"MouseMove");
其运行结果如下图所示:

上面介绍和鼠标MOVE事件的处理方法。下面介绍一下鼠标元素拖动的方法:
其JS声明如下(DragAdnDrop.js):
//当前是否设置鼠标捕获
var isMouseCaptured;
//全局位置变量
var mouseVerticalPosition;
var mouseHorizontalPosition;
Silverlight_JsWeb.DragDrop = function()
{
}
Silverlight_JsWeb.DragDrop.prototype =
{
handleLoad: function(plugIn, userContext, rootElement)
{
this.plugIn = plugIn;
// 按钮事件挂钩示例: 查找按钮,然后附加事件处理程序
var DragRec = rootElement.findName("DragRec");
DragRec.addEventListener("MouseLeftButtonDown", Silverlight.createDelegate(this, this.handleMouseLeftButtonDown));
DragRec.addEventListener("MouseMove", Silverlight.createDelegate(this, this.handleMouseMove));
DragRec.addEventListener("MouseLeftButtonUp", Silverlight.createDelegate(this, this.handleMouseLeftButtonUp));
},
// 鼠标左键单击处理程序
handleMouseLeftButtonDown: function(sender, mouseEventArgs)
{
//获取当前鼠标左键按下的位置
mouseVerticalPosition = mouseEventArgs.getPosition(null).y;
mouseHorizontalPosition = mouseEventArgs.getPosition(null).x;
isMouseCaptured = true;
sender.CaptureMouse();
},
// 鼠标离开处理程序
handleMouseMove: function(sender, mouseEventArgs)
{
var item = sender;
if (isMouseCaptured)
{
// 计算当前对象的位置.
var deltaV = mouseEventArgs.getPosition(null).y - mouseVerticalPosition;
var deltaH = mouseEventArgs.getPosition(null).x - mouseHorizontalPosition;
var newTop = deltaV + item["Canvas.Top"];
var newLeft = deltaH + item["Canvas.Left"];
// 对鼠标选中的元素设置新的移动位置.
item["Canvas.Top"] = newTop;
item["Canvas.Left"] = newLeft;
// 更新全局位置变量.
mouseVerticalPosition = mouseEventArgs.getPosition(null).y;
mouseHorizontalPosition = mouseEventArgs.getPosition(null).x;
}
},
//鼠标左键松开处理程序
handleMouseLeftButtonUp: function(sender, mouseEventArgs)
{
isMouseCaptured = false;
sender.ReleaseMouseCapture();
mouseVerticalPosition = -1;
mouseHorizontalPosition = -1;
}
}
上面代码中有两个方法要说明一下:
该方法的调用者object即是支持被拖动的元素,当元素对象支持拖动时,该方法调用返回true
与上面方法相对应的是 object.ReleaseMouseCapture(), 它会放弃对当前元素的鼠标捕获操作。
其最终的运行结果如下:

前两个DEMO是对鼠标基本事件的操作。下面将会演示一下UIElement的Bubble问题。写过IE脚本的朋
友应该都会知道这个元素冒泡的问题这个问题有时我们希望发生的,有时即是我们不希望看到了。在XMAL
中,先声明元素在整个Canvas的最下面,而后声明的元素在最上面。这样当我们将鼠标从上面的元素移入
到下面的元素时,就会出现下图中所显示的结果(注意在两个元素交叉区域时下方所显示的元素名称):
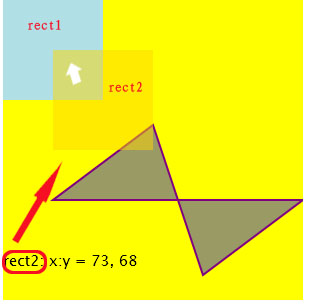
因为rect2是在rect1之后声明的,所以在交叉区域显示的是rect2。当然我们可以通过在相应元素中
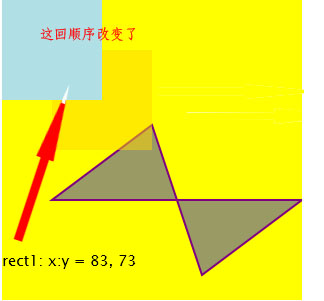
设置Canvas.ZIndex 属性来改变这里顺序,如下所示:
x:Name="Rect1"
Width="100" Height="100"
Fill="PowderBlue" Canvas.ZIndex="3"/>
<Rectangle
x:Name="Rect2"
Canvas.Top="50" Canvas.Left="50"
Width="100" Height="100"
Fill="Gold" Opacity="0.5" Canvas.ZIndex="2" />
<Polygon x:Name="Polygon1"
Points="50,200 150,125 200,275 300,200" Stroke="Purple" StrokeThickness="2" Canvas.ZIndex="1">
<Polygon.Fill>
<SolidColorBrush Color="Blue" Opacity="0.4" />
</Polygon.Fill>
</Polygon>
这样我们就可以控件鼠标事件的响应顺序了,如下图。
好了,今天的内容就到这里了。
源码下载,请点击这里:)