首先试想一个场景:
多个线程都要访问数据库,先要获得一个Connection,然后执行一些操作。为了线程安全,如果用synchronized锁定一个Connection对象,那么任何时候,都只有一个线程能通过Connection对象操作数据库。这样的话,程序的效率太低。反过来,如果每次需要Connection对象就去new一个的话,就会同时存在数量庞大的数据库连接,你受得了,数据库受不了。于是就有人提出折中方案:为每个线程只生成一个Connection对象,这样别的线程访问不到这个对象,线程安全问题解决;而且无论线程有多少地方需要数据库连接,都是在复用这个Connection对象,数据库的压力会小很多。
其实不仅仅是数据库,其它的场景比如说,SimpleDateFormat。我们处理日期的时候,经常要用到这个类,但是这个类不是线程安全的,在多线程下是会出问题的。这时候,采用上述折中方案是比较合理的。
那么如何实现这种折中方案呢?我们先动手试一试呗!!!
要确保某类型的变量,每个线程只有一份。因为每个线程的ID是唯一的,这是JVM保证的,所有我们可以定义一个Map:线程ID作为key,我们要用的变量作为value。
稍微对这个Map进行简单的封装,当做一个类来用:
package threadlocal;

import java.util.HashMap;
import java.util.Map;

public class ThreadLocalVar<T> {

    Map<Long, T> threadVarMap = new HashMap<Long, T>();

    public T get() {
        return threadVarMap.get(Thread.currentThread().getId());
    }

    public void set(T value) {
        threadVarMap.put(Thread.currentThread().getId(), value);
    }
}
接下来,就把这个类扔到多线程环境里面练一练
package threadlocal;

public class MyTest {
    ThreadLocalVar<Long> longLocal = new ThreadLocalVar<Long>();
    ThreadLocalVar<String> stringLocal = new ThreadLocalVar<String>();


    public void set() {
        longLocal.set(Thread.currentThread().getId());
        stringLocal.set(Thread.currentThread().getName());
    }

    public long getLong() {
        return longLocal.get();
    }

    public String getString() {
        return stringLocal.get();
    }

    public static void main(String[] args) throws InterruptedException {
        final MyTest test = new MyTest();

        test.set();
        System.out.println(test.getLong());
        System.out.println(test.getString());

        for (int i=0; i<3; i++) {
            Thread thread1 = new Thread(){
                public void run() {
                    test.set();
                    System.out.println(test.getLong());
                    System.out.println(test.getString());
                };
            };
            thread1.start();
            thread1.join();
        }

        System.out.println(test.getLong());
        System.out.println(test.getString());
    }
}
这个程序很简单,看一遍就能明白具体逻辑。虽然都是调用的同一个对象test的getLong和getString方法,但是不同的线程获取到的值不一样。
运行结果:

1
main
9
Thread-0
10
Thread-1
11
Thread-2
1
main
哈哈,我们就是使用了奇淫巧技,把一个对象简单的get和set操作,转到了对Map的get和set操作。如果光看MyTest这个类,再看结果,还是挺迷惑的吧。
这个时候就有人说了,Java的ThreadLocal机制,不是这么实现的。对,也不对。JDK之前的老版本其实就是这么实现来着,不过后来改了。为什么改,且听我慢慢道来。
先上一个真正的ThreadLocal版本的test程序:
package threadlocal;

public class Test {
    ThreadLocal<Long> longLocal = new ThreadLocal<Long>();
    ThreadLocal<String> stringLocal = new ThreadLocal<String>();


    public void set() {
        longLocal.set(Thread.currentThread().getId());
        stringLocal.set(Thread.currentThread().getName());
    }

    public long getLong() {
        return longLocal.get();
    }

    public String getString() {
        return stringLocal.get();
    }

    public static void main(String[] args) throws InterruptedException {
        final Test test = new Test();


        test.set();
        System.out.println(test.getLong());
        System.out.println(test.getString());


        for (int i=0; i<3; i++) {
            Thread thread1 = new Thread(){
                public void run() {
                    test.set();
                    System.out.println(test.getLong());
                    System.out.println(test.getString());
                };
            };
            thread1.start();
            thread1.join();
        }

        System.out.println(test.getLong());
        System.out.println(test.getString());
    }
}
和我们之前的test程序唯一的区别,就是使用了Java自带的ThreadLocal类,那就进去看一看。
    /**
     * Returns the value in the current thread's copy of this
     * thread-local variable.  If the variable has no value for the
     * current thread, it is first initialized to the value returned
     * by an invocation of the {@link #initialValue} method.
     *
     * @return the current thread's value of this thread-local
     */
    public T get() {
        Thread t = Thread.currentThread();
        // 其实还是通过Map的数据结构
        ThreadLocalMap map = getMap(t);
        if (map != null) {
            ThreadLocalMap.Entry e = map.getEntry(this);
            if (e != null) {
                @SuppressWarnings("unchecked")
                T result = (T)e.value;
                return result;
            }
        }
        return setInitialValue();
    }
这是ThreadLocal的get方法,最终还是Map操作,但是这个Map以及Map里面的Entry都是为ThreadLocal专门定制的,后面再说。看看getMap方法的逻辑
    /**
     * Get the map associated with a ThreadLocal. Overridden in
     * InheritableThreadLocal.
     *
     * @param  t the current thread
     * @return the map
     */
    ThreadLocalMap getMap(Thread t) {
        return t.threadLocals;
    }
    /* ThreadLocal values pertaining to this thread. This map is maintained
     * by the ThreadLocal class. */
    // 定义在Thread类里面
    ThreadLocal.ThreadLocalMap threadLocals = null;
从这里能看出2点:
1、ThreadLocalMap这个Map是ThreadLocal的内部类
2、这个Map的持有者是Thread类,就是说每个线程都直接持有自己的Map
第2点跟我们之前的实现思路截然不同,我们定义的ThreadLocalVar类不被任何线程直接持有,只是独立的第三方,保持各个线程的数据。
后面再详细分析这里为什么要这么实现。
先来看看ThreadLocal的内部类ThreadLocalMap的内部类Entry(别绕晕了)
        static class Entry extends WeakReference<ThreadLocal<?>> {
            /** The value associated with this ThreadLocal. */
            Object value;

            Entry(ThreadLocal<?> k, Object v) {
                super(k);
                value = v;
            }
        }
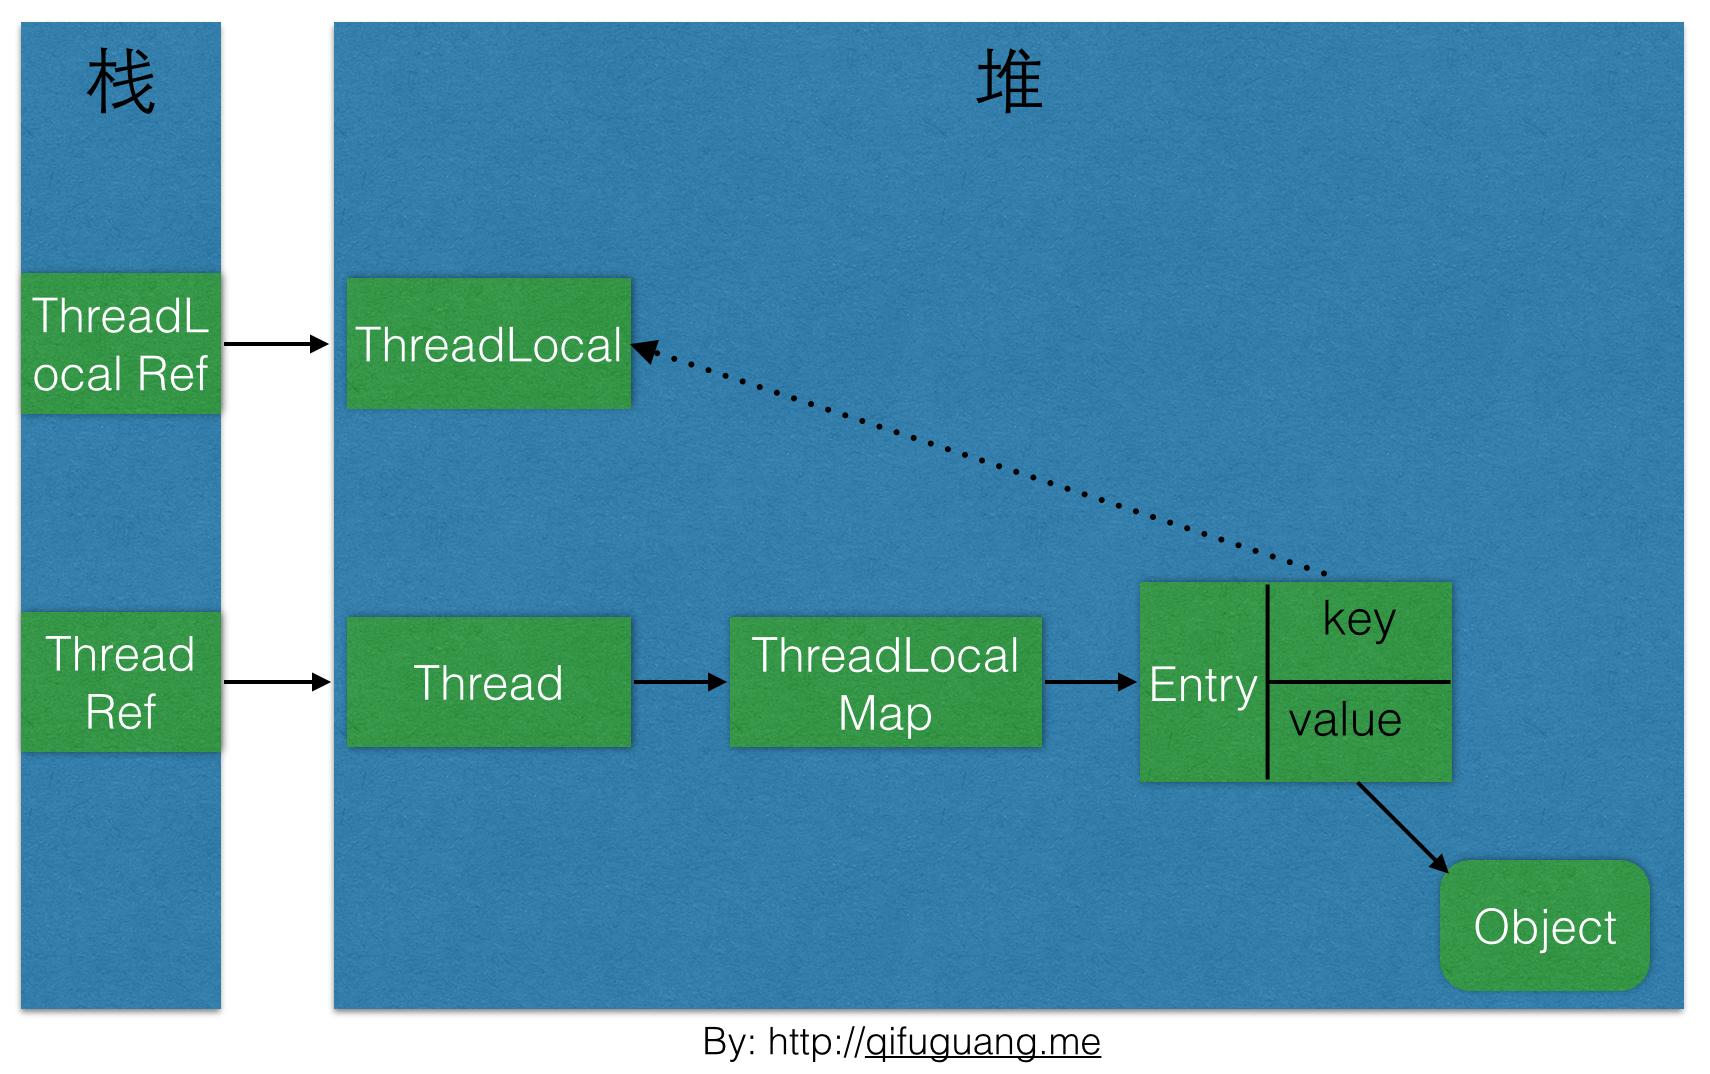
Entry继承自弱引用,说明持有key的弱引用,而且key是ThreadLocal类型(跟之前的实现方式也截然不同)。
为了说明ThreadLocal的实现机制和类直接的关系,从网上盗一张图,图中实线是强引用,虚线是弱引用。

每个线程持有Map有什么好处?
1、线程消失,Map跟着消失,释放了内存
2、保存数据的Map数量变多了,但是每个Map里面Entry数量变少了。之前的实现里面,每个Map里面的Entry数量是线程的个数,现在是ThreadLocal的个数。熟悉Map数据结构的人都知道,这样对Map的操作性能会提升。
至于为什么要用弱引用,先来看看Entry类的注释
        /**
         * The entries in this hash map extend WeakReference, using
         * its main ref field as the key (which is always a
         * ThreadLocal object).  Note that null keys (i.e. entry.get()
         * == null) mean that the key is no longer referenced, so the
         * entry can be expunged from table.  Such entries are referred to
         * as "stale entries" in the code that follows.
         */
简单来说,就是当ThreadLocal类型的key不再被引用时(值为null),对应的Entry能够被删除。
具体的实现就是,get操作会调用expungeStaleEntry,set操作会调用replaceStaleEntry,它们的效果就是遇到的key为null的Entry都会被删除,那么Entry内的value也就没有强引用链,自然会被回收,防止内存泄露。这部分,请读者仔细阅读源码。
经这么一分析,是不是豁然开朗。
下面在看看ThreadLocal在一些框架里面的应用:
1、Hibernate处理session,看看一个类ThreadLocalSessionContext
       private static final ThreadLocal<Map> CONTEXT_TL = new ThreadLocal<Map>();


       protected static Map sessionMap() {
        return CONTEXT_TL.get();
    }

    @SuppressWarnings({"unchecked"})
    private static void doBind(org.hibernate.Session session, SessionFactory factory) {
        Map sessionMap = sessionMap();
        if ( sessionMap == null ) {
            sessionMap = new HashMap();
            CONTEXT_TL.set( sessionMap );
        }
        sessionMap.put( factory, session );
    }
2、Spring处理事务,看看一个类TransactionSynchronizationManager
private static final ThreadLocal<Map<Object, Object>> resources =
            new NamedThreadLocal<Map<Object, Object>>("Transactional resources");

    private static final ThreadLocal<Set<TransactionSynchronization>> synchronizations =
            new NamedThreadLocal<Set<TransactionSynchronization>>("Transaction synchronizations");

    private static final ThreadLocal<String> currentTransactionName =
            new NamedThreadLocal<String>("Current transaction name");

    private static final ThreadLocal<Boolean> currentTransactionReadOnly =
            new NamedThreadLocal<Boolean>("Current transaction read-only status");

    private static final ThreadLocal<Integer> currentTransactionIsolationLevel =
            new NamedThreadLocal<Integer>("Current transaction isolation level");

    private static final ThreadLocal<Boolean> actualTransactionActive =
            new NamedThreadLocal<Boolean>("Actual transaction active");


public static void bindResource(Object key, Object value) throws IllegalStateException {
        Object actualKey = TransactionSynchronizationUtils.unwrapResourceIfNecessary(key);
        Assert.notNull(value, "Value must not be null");
                // 处理ThreadLocal
        Map<Object, Object> map = resources.get();
        // set ThreadLocal Map if none found
        if (map == null) {
            map = new HashMap<Object, Object>();
                        // 处理ThreadLocal
            resources.set(map);
        }
        Object oldValue = map.put(actualKey, value);
        // Transparently suppress a ResourceHolder that was marked as void...
        if (oldValue instanceof ResourceHolder && ((ResourceHolder) oldValue).isVoid()) {
            oldValue = null;
        }
        if (oldValue != null) {
            throw new IllegalStateException("Already value [" + oldValue + "] for key [" +
                    actualKey + "] bound to thread [" + Thread.currentThread().getName() + "]");
        }
        if (logger.isTraceEnabled()) {
            logger.trace("Bound value [" + value + "] for key [" + actualKey + "] to thread [" +
                    Thread.currentThread().getName() + "]");
        }
    }
