一、redis集群基本介绍
Redis 集群是一个可以在多个 Redis 节点之间进行数据共享的设施installation。
Redis 集群不支持那些需要同时处理多个键的 Redis 命令, 因为执行这些命令需要在多个 Redis 节点之间移动数据, 并且在高负载的情况下, 这些命令将降低Redis集群的性能, 并导致不可预测的行为。
Redis 集群通过分区partition来提供一定程度的可用性availability: 即使集群中有一部分节点失效或者无法进行通讯, 集群也可以继续处理命令请求。
将数据自动切分(split)到多个节点的能力。
当集群中的一部分节点失效或者无法进行通讯时,仍然可以继续处理命令请求的能力。
二、redis集群数据共享
Redis集群使用数据分片(sharding)而非一致性哈希(consistency hashing)来实现:一个Redis集群包含16384个哈希槽(hash slot),数据库中的每个键都属于这16384个哈希槽的其中一个,集群使用公CRC16(key)%16384来计算键key属于哪个槽,其中CRC16(key)语句用于计算键key的CRC16校验和。
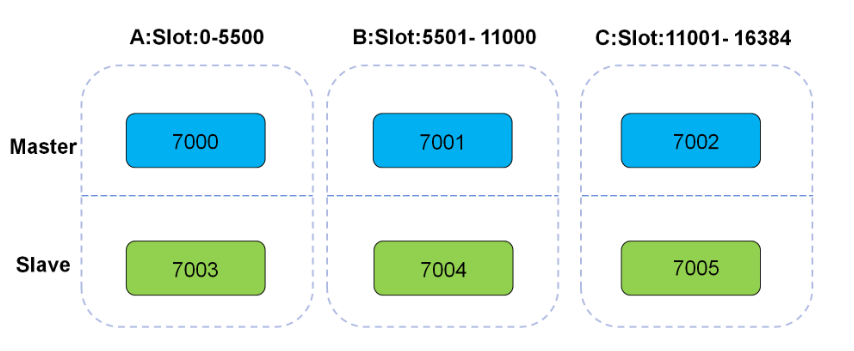
节点A负责处理0号至5500号哈希槽。
节点B负责处理5501号至11000号哈希槽。
节点C负责处理11001号至16384号哈希槽。
三、redis cluster

四、集群安装部署
6个redis实例,一般会放到3台硬件服务器
注:在企业规划中,一个分片的两个分到不同的物理机,防止硬件主机宕机造成整个分片数据丢失。
4.1 安装基础软件
# 安装redis,带有redis-trib.rb命令
wget http://download.redis.io/releases/redis-3.2.12.tar.gz
tar xf redis-3.2.12.tar.gz -C /usr/local/
ln -s /usr/local/redis-3.2.12/ /usr/local/redis
cd /usr/local/redis/
make
PATH=/usr/local/redis/src:$PATH
source /etc/profile

# 安装ruby软件支持
yum install ruby rubygems -y
gem sources -l

# 修改为国内源
gem sources -a http://mirrors.aliyun.com/rubygems/
gem sources --remove https://rubygems.org/
gem sources -l

# 安装redis集群软件,可以指定版本,否则为最新版本
gem install redis -v 3.3.3
4.2 创建各节点配置文件
mkdir -p /data/700{0..5}
vim /data/7000/redis.conf
port 7000
daemonize yes
pidfile /data/7000/redis.pid
loglevel notice
logfile /data/7000/redis.log
dbfilename dump.rdb
dir /data/7000
protected-mode no
cluster-enabled yes
cluster-config-file nodes.conf
cluster-node-timeout 5000
appendonly yes

vim /data/7001/redis.conf
port 7001
daemonize yes
pidfile /data/7001/redis.pid
loglevel notice
logfile /data/7001/redis.log
dbfilename dump.rdb
dir /data/7001
protected-mode no
cluster-enabled yes
cluster-config-file nodes.conf
cluster-node-timeout 5000
appendonly yes

vim /data/7002/redis.conf
port 7002
daemonize yes
pidfile /data/7002/redis.pid
loglevel notice
logfile /data/7002/redis.log
dbfilename dump.rdb
dir /data/7002
protected-mode no
cluster-enabled yes
cluster-config-file nodes.conf
cluster-node-timeout 5000
appendonly yes

vim /data/7003/redis.conf
port 7003
daemonize yes
pidfile /data/7003/redis.pid
loglevel notice
logfile /data/7003/redis.log
dbfilename dump.rdb
dir /data/7003
protected-mode no
cluster-enabled yes
cluster-config-file nodes.conf
cluster-node-timeout 5000
appendonly yes

vim /data/7004/redis.conf
port 7004
daemonize yes
pidfile /data/7004/redis.pid
loglevel notice
logfile /data/7004/redis.log
dbfilename dump.rdb
dir /data/7004
protected-mode no
cluster-enabled yes
cluster-config-file nodes.conf
cluster-node-timeout 5000
appendonly yes

vim /data/7005/redis.conf
port 7005
daemonize yes
pidfile /data/7005/redis.pid
loglevel notice
logfile /data/7005/redis.log
dbfilename dump.rdb
dir /data/7005
protected-mode no
cluster-enabled yes
cluster-config-file nodes.conf
cluster-node-timeout 5000
appendonly yes
4.3 启动节点服务
redis-server /data/7000/redis.conf
redis-server /data/7001/redis.conf
redis-server /data/7002/redis.conf
redis-server /data/7003/redis.conf
redis-server /data/7004/redis.conf
redis-server /data/7005/redis.conf
4.4 将节点加入集群
会自动将前3个节点认为是master节点,后三个作为对应的从节点。主节点和从节点应该分布到不同的物理节点。

redis-trib.rb create --replicas 1 127.0.0.1:7000 127.0.0.1:7001 127.0.0.1:7002 127.0.0.1:7003 127.0.0.1:7004 127.0.0.1:7005
>>> Creating cluster
>>> Performing hash slots allocation on 6 nodes...
Using 3 masters:
127.0.0.1:7000
127.0.0.1:7001
127.0.0.1:7002
Adding replica 127.0.0.1:7003 to 127.0.0.1:7000
Adding replica 127.0.0.1:7004 to 127.0.0.1:7001
Adding replica 127.0.0.1:7005 to 127.0.0.1:7002
M: c4983be04f95d9c9c848ba692cd42cb9201ff4b5 127.0.0.1:7000
   slots:0-5460 (5461 slots) master
M: 4223ef9cb913d796bb96187f7a737bc232a68d93 127.0.0.1:7001
   slots:5461-10922 (5462 slots) master
M: 4bb6c9008c10530a13379b738eaee8611ac96738 127.0.0.1:7002
   slots:10923-16383 (5461 slots) master
S: 5d112be8cd376d039a4ab2c66141d2fc25c50486 127.0.0.1:7003
   replicates c4983be04f95d9c9c848ba692cd42cb9201ff4b5
S: 9c758f060663f92e60e4c5c2389e33279e72cb7b 127.0.0.1:7004
   replicates 4223ef9cb913d796bb96187f7a737bc232a68d93
S: 78540a81d3d6d9bb6f73f848b7e5fb6b1d3bc5d2 127.0.0.1:7005
   replicates 4bb6c9008c10530a13379b738eaee8611ac96738
Can I set the above configuration? (type 'yes' to accept): yes
>>> Nodes configuration updated
>>> Assign a different config epoch to each node
>>> Sending CLUSTER MEET messages to join the cluster
Waiting for the cluster to join...
>>> Performing Cluster Check (using node 127.0.0.1:7000)
M: c4983be04f95d9c9c848ba692cd42cb9201ff4b5 127.0.0.1:7000
   slots:0-5460 (5461 slots) master
   1 additional replica(s)
M: 4223ef9cb913d796bb96187f7a737bc232a68d93 127.0.0.1:7001
   slots:5461-10922 (5462 slots) master
   1 additional replica(s)
M: 4bb6c9008c10530a13379b738eaee8611ac96738 127.0.0.1:7002
   slots:10923-16383 (5461 slots) master
   1 additional replica(s)
S: 5d112be8cd376d039a4ab2c66141d2fc25c50486 127.0.0.1:7003
   slots: (0 slots) slave
   replicates c4983be04f95d9c9c848ba692cd42cb9201ff4b5
S: 9c758f060663f92e60e4c5c2389e33279e72cb7b 127.0.0.1:7004
   slots: (0 slots) slave
   replicates 4223ef9cb913d796bb96187f7a737bc232a68d93
S: 78540a81d3d6d9bb6f73f848b7e5fb6b1d3bc5d2 127.0.0.1:7005
   slots: (0 slots) slave
   replicates 4bb6c9008c10530a13379b738eaee8611ac96738
[OK] All nodes agree about slots configuration.
>>> Check for open slots...
>>> Check slots coverage...
[OK] All 16384 slots covered.
4.5 集群状态查看
redis-cli -p 7000 cluster nodes| grep master
redis-cli -p 7000 cluster nodes| grep slave
五、集群管理
5.1 新增节点,创建两个节点的目录及配置文件
mkdir /data/700{6,7}
vim /data/7006/redis.conf
port 7006
daemonize yes
pidfile /data/7006/redis.pid
loglevel notice
logfile /data/7006/redis.log
dbfilename dump.rdb
dir /data/7006
protected-mode no
cluster-enabled yes
cluster-config-file nodes.conf
cluster-node-timeout 5000
appendonly yes

vim /data/7007/redis.conf
port 7007
daemonize yes
pidfile /data/7007/redis.pid
loglevel notice
logfile /data/7007/redis.log
dbfilename dump.rdb
dir /data/7007
protected-mode no
cluster-enabled yes
cluster-config-file nodes.conf
cluster-node-timeout 5000
appendonly yes
5.2 启动新增两节点的服务
redis-server /data/7006/redis.conf
redis-server /data/7007/redis.conf
5.3 添加主节点,把7006添加到7000节点所在的主集群中
# redis-trib.rb add-node 127.0.0.1:7006 127.0.0.1:7000
# redis-cli -p 7000 cluster nodes | grep master
c4983be04f95d9c9c848ba692cd42cb9201ff4b5 127.0.0.1:7000 myself,master - 0 0 1 connected 0-5460
10b8ae75c548e46dbabbc5667c0b749813f855e5 127.0.0.1:7006 master - 0 1559015085602 0 connected                     # 添加到集群之后,并没有分配slot槽位,需要我们手动来平均分配
4223ef9cb913d796bb96187f7a737bc232a68d93 127.0.0.1:7001 master - 0 1559015085602 2 connected 5461-10922          # 平均分配计算:16384/4=4096
4bb6c9008c10530a13379b738eaee8611ac96738 127.0.0.1:7002 master - 0 1559015084101 3 connected 10923-16383
5.4 转移slot(重新分片)
redis-trib.rb reshard 127.0.0.1:7000
>>> Performing Cluster Check (using node 127.0.0.1:7000)
M: c4983be04f95d9c9c848ba692cd42cb9201ff4b5 127.0.0.1:7000
   slots:0-5460 (5461 slots) master
   1 additional replica(s)
M: 10b8ae75c548e46dbabbc5667c0b749813f855e5 127.0.0.1:7006
   slots: (0 slots) master
   0 additional replica(s)
M: 4223ef9cb913d796bb96187f7a737bc232a68d93 127.0.0.1:7001
   slots:5461-10922 (5462 slots) master
   1 additional replica(s)
M: 4bb6c9008c10530a13379b738eaee8611ac96738 127.0.0.1:7002
   slots:10923-16383 (5461 slots) master
   1 additional replica(s)
S: 5d112be8cd376d039a4ab2c66141d2fc25c50486 127.0.0.1:7003
   slots: (0 slots) slave
   replicates c4983be04f95d9c9c848ba692cd42cb9201ff4b5
S: 9c758f060663f92e60e4c5c2389e33279e72cb7b 127.0.0.1:7004
   slots: (0 slots) slave
   replicates 4223ef9cb913d796bb96187f7a737bc232a68d93
S: 78540a81d3d6d9bb6f73f848b7e5fb6b1d3bc5d2 127.0.0.1:7005
   slots: (0 slots) slave
   replicates 4bb6c9008c10530a13379b738eaee8611ac96738
[OK] All nodes agree about slots configuration.
>>> Check for open slots...
>>> Check slots coverage...
[OK] All 16384 slots covered.
How many slots do you want to move (from 1 to 16384)? 4096                     # 要移动槽位的大小:4096
What is the receiving node ID? 10b8ae75c548e46dbabbc5667c0b749813f855e5        # 接收节点的ID:7006的ID
Please enter all the source node IDs.
  Type 'all' to use all the nodes as source nodes for the hash slots.          # 键入all以将所有节点用作散列槽的源节点。
  Type 'done' once you entered all the source nodes IDs.                       # 输入所有源节点ID后,键入done。
Source node #1:all                                                             # 输入all所有节点分配槽位
……
Do you want to proceed with the proposed reshard plan (yes/no)? yes            # 是否继续,选择yes
5.5 添加从节点
# 查询7006的ID
redis-cli -p 7000 cluster nodes | grep master
# 给7006添加7007的slave节点
redis-trib.rb add-node --slave --master-id 10b8ae75c548e46dbabbc5667c0b749813f855e5 127.0.0.1:7007 127.0.0.1:7000
5.6 删除master槽位

redis-trib.rb reshard 127.0.0.1:7000
>>> Performing Cluster Check (using node 127.0.0.1:7000)
M: c4983be04f95d9c9c848ba692cd42cb9201ff4b5 127.0.0.1:7000
   slots:2731-5460 (2730 slots) master
   1 additional replica(s)
M: 10b8ae75c548e46dbabbc5667c0b749813f855e5 127.0.0.1:7006
   slots:0-2730,5461-8191,10923-13652 (8192 slots) master
   1 additional replica(s)
M: 4223ef9cb913d796bb96187f7a737bc232a68d93 127.0.0.1:7001
   slots:8192-10922 (2731 slots) master
   1 additional replica(s)
S: f1792f755d1b50e8e66073e5c03b1776b7cb36a7 127.0.0.1:7007
   slots: (0 slots) slave
   replicates 10b8ae75c548e46dbabbc5667c0b749813f855e5
M: 4bb6c9008c10530a13379b738eaee8611ac96738 127.0.0.1:7002
   slots:13653-16383 (2731 slots) master
   1 additional replica(s)
S: 5d112be8cd376d039a4ab2c66141d2fc25c50486 127.0.0.1:7003
   slots: (0 slots) slave
   replicates c4983be04f95d9c9c848ba692cd42cb9201ff4b5
S: 9c758f060663f92e60e4c5c2389e33279e72cb7b 127.0.0.1:7004
   slots: (0 slots) slave
   replicates 4223ef9cb913d796bb96187f7a737bc232a68d93
S: 78540a81d3d6d9bb6f73f848b7e5fb6b1d3bc5d2 127.0.0.1:7005
   slots: (0 slots) slave
   replicates 4bb6c9008c10530a13379b738eaee8611ac96738
[OK] All nodes agree about slots configuration.
>>> Check for open slots...
>>> Check slots coverage...
[OK] All 16384 slots covered.
How many slots do you want to move (from 1 to 16384)? 8192      # 输入要删除master的slot的大小。
What is the receiving node ID? c4983be04f95d9c9c848ba692cd42cb9201ff4b5     # 要把槽位移动到的节点ID
Please enter all the source node IDs.
  Type 'all' to use all the nodes as source nodes for the hash slots.
  Type 'done' once you entered all the source nodes IDs.
Source node #1:10b8ae75c548e46dbabbc5667c0b749813f855e5    # 要删除节点的ID
Source node #2:done    # 如果只有一个的话,后面填写done
5.7 删除master和slave节点
redis-cli -p 7000 cluster nodes
redis-trib.rb del-node 127.0.0.1:7006 10b8ae75c548e46dbabbc5667c0b749813f855e5
redis-trib.rb del-node 127.0.0.1:7007 f1792f755d1b50e8e66073e5c03b1776b7cb36a7
