转自:https://blog.csdn.net/linghu8812/article/details/103403231
开源仓库
InsightFace: https://github.com/deepinsight/insightface
作者演讲:https://www.bilibili.com/video/av54356295?t=785
测试demo:https://www.bilibili.com/video/av79544654
识别算法配置
1. 安装mxnet
pip install mxnet-cu80 #or mxnet-cu90 or mxnet-cu100
2. 下载insightface算法仓库
git clone --recursive https://github.com/deepinsight/insightface.git
3. 下载(MS1MV2-Arcface)数据集
数据集下载地址在:https://pan.baidu.com/s/1S6LJZGdqcZRle1vlcMzHOQ,数据集里包含以下内容
faces_emore/
train.idx
train.rec
property
lfw.bin
cfp_ff.bin
cfp_fp.bin
agedb_30.bin
calfw.bin
cplfw.bin
vgg2_fp.bin
4. 复制配置文件
cp sample_config.py config.py
vim config.py # edit dataset path etc..
如果后面需要Fine Tune模型,需要将config.py的config.ckpt_embedding这一行的值改为False,这样可以保存网络的fc7层的权重,否则不会保存,不保存就会从头开始重新训练。
可选:将config.py文件中的这一行dataset.emore.val_targets = ['lfw', 'cfp_fp', 'agedb_30']修改为:dataset.emore.val_targets = ['lfw', 'cfp_ff', 'cfp_fp', 'agedb_30'],在训练评估时可以同时评估cpf_ff数据集,想看模型在该数据集上的准确率可以加上,该数据集上的准确率与LFW的准确率接近。
5. 配置环境变量
export MXNET_CPU_WORKER_NTHREADS=24
export MXNET_ENGINE_TYPE=ThreadedEnginePerDevice
模型训练
在训练前先确定模型训练的学习率,测试一下学习率为0.1,0.01和0.005等条件下的训练速度,选择准确率增长较快的学习率进行训练!!!
1. 训练命令
训练LResNet100E-IR网络,损失函数为ArcFace。
CUDA_VISIBLE_DEVICES='0,1,2,3' python -u train.py --network r100 --loss arcface --dataset emore
训练LResNet50E-IR网络,损失函数为CosineFace。
CUDA_VISIBLE_DEVICES='0,1,2,3' python -u train.py --network r50 --loss cosface --dataset emore
训练MobileFaceNet网络,损失函数为Softmax。
CUDA_VISIBLE_DEVICES='0,1,2,3' python -u train.py --network y1 --loss softmax --dataset emore
Fine tune MobileFaceNet网络, 损失函数改为Triplet loss。
CUDA_VISIBLE_DEVICES='0,1,2,3' python -u train.py --network mnas05 --loss triplet --lr 0.005 --pretrained ./models/y1-softmax-emore,1
多GPU训练可以使用train_parall.py文件进行多GPU加速。
作者的训练配置如下所示:每张卡上的batch size为128,共使用4张卡进行训练,故batch size为512。
Namespace(batch_size=512, beta=1000.0, beta_freeze=0, beta_min=5.0, bn_mom=0.9, ckpt=1, ctx_num=4, cutoff=0, data_dir='/cache/jiaguo/faces_ms1mi_112x112', easy_margin=0, emb_size=512, end_epoch=100000, fc7_wd_mult=1.0, gamma=0.12, image_channel=3, image_h=112, image_w=112, loss_type=5, lr=0.1, lr_steps='100000,140000,160000', margin=4, margin_a=1.0, margin_b=0.2, margin_m=0.3, margin_s=64.0, max_steps=0, mom=0.9, network='r100', num_classes=85742, num_layers=100, per_batch_size=128, power=1.0, prefix='../models2/model-r100-ii/model', pretrained='', rand_mirror=1, rescale_threshold=0, scale=0.9993, target='lfw,cfp_fp,agedb_30', use_deformable=0, verbose=2000, version_act='prelu', version_input=1, version_output='E', version_se=0, version_unit=3, wd=0.0005)
2. 训练结果
作者在LFW、CFP和AgeDB30数据集上得到的训练结果如下所示:
testing verification..
(12000, 512)
infer time 21.69233
[lfw][168000]XNorm: 22.172497
[lfw][168000]Accuracy-Flip: 0.99783+-0.00269
testing verification..
(14000, 512)
infer time 24.988244
[cfp_fp][168000]XNorm: 21.383092
[cfp_fp][168000]Accuracy-Flip: 0.98271+-0.00569
testing verification..
(12000, 512)
infer time 21.44195
[agedb_30][168000]XNorm: 22.695239
[agedb_30][168000]Accuracy-Flip: 0.98233+-0.00716
[168000]Accuracy-Highest: 0.98283
模型评估
1. MegaFace数据集评估
需要安装的依赖项:
tbb2 opencv2.4
如果高版本cuda不支持opencv2.4,将FindCUDA.cmake替换为最新版的FindCUDA.cmake,如果不支持compute_20,将OpenCVDetectCUDA.cmake替换为最新版的OpenCVDetectCUDA.cmake,
下载MegaFace的评估工具devkit.tar.gz,
从网盘中下载MegaFace测试数据megaface_testpack_v1.0.zip,解压后文件夹中包含的数据有
facescrub_images/
megaface_images/
facescrub_lst
facescrub_lst_all
facescrub_noises.txt
facescrub_noises_empty.txt
megaface_lst
megaface_noises.txt
megaface_noises_empty.txt
在工程的./Evaluation/Megaface/文件夹中,运行./run.sh文件,测试模型在MegaFace数据集上的识别精度。运行./run.sh前,先修改devkit的路径DEVKIT,将DEVKIT="/raid5data/dplearn/megaface/devkit/experiments"改为devkit/experiments实际所在的位置,修改后,可以得到模型在MegaFace数据集上的识别精度,测试模型需要花费较长时间。
Done matching! Score matrix size: 3530 1000000
Saving to ../../mx_results/otherFiles/facescrub_megaface_r100ii_1000000_1.bin
Computing test results with 1000000 images for set 1
Loaded 3530 probes spanning 80 classes
Loading from ../../mx_results/otherFiles/facescrub_facescrub_r100ii.bin
Probe score matrix size: 3530 3530
distractor score matrix size: 3530 1000000
Done loading. Time to compute some stats!
Finding top distractors!
Done sorting distractor scores
Making gallery!
Done Making Gallery!
Allocating ranks (1000080)
Rank 1: 0.983584
2. LFW, CFP, AgeDB数据集评估
进入./recognition/eval/文件夹,输入以下命令,使用verification.py文件进行评估。需要指定模型所在的文件夹和评估数据所在的文件夹。
python verification.py --model ../../models/model-r100-ii/model --data-dir ../../datasets/faces_emore/
得到的结果如下所示:
(12000, 512)
infer time 108.986159
[lfw]XNorm: 22.132480
[lfw]Accuracy: 0.00000+-0.00000
[lfw]Accuracy-Flip: 0.99767+-0.00281
Max of [lfw] is 0.99767
testing verification..
(14000, 512)
infer time 121.617964
[cfp_ff]XNorm: 21.077436
[cfp_ff]Accuracy: 0.00000+-0.00000
[cfp_ff]Accuracy-Flip: 0.99843+-0.00162
Max of [cfp_ff] is 0.99843
testing verification..
(14000, 512)
infer time 122.128096
[cfp_fp]XNorm: 21.340035
[cfp_fp]Accuracy: 0.00000+-0.00000
[cfp_fp]Accuracy-Flip: 0.98271+-0.00559
Max of [cfp_fp] is 0.98271
testing verification..
(12000, 512)
infer time 104.282227
[agedb_30]XNorm: 22.654594
[agedb_30]Accuracy: 0.00000+-0.00000
[agedb_30]Accuracy-Flip: 0.98250+-0.00712
Max of [agedb_30] is 0.98250
人脸识别为一分类网络,insight face训练先在大数据集上使用ArcFace损失函数做分类训练,然后再使用Triplet损失函数进行微调提高识别精度。
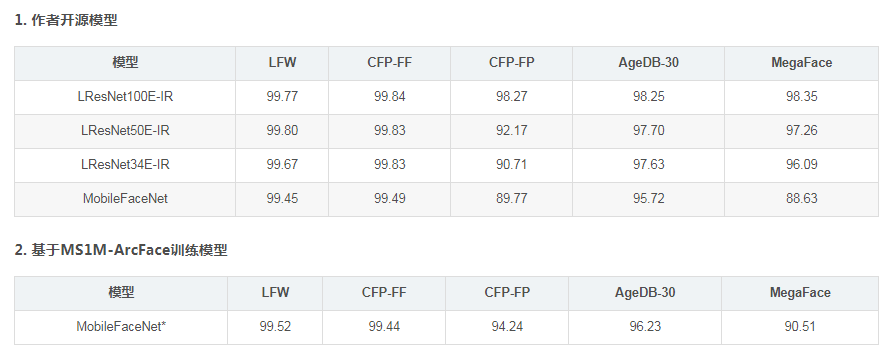
评估结果
相关算法
人脸检测: RetinaFace
人脸对齐: Dense U-Net
人脸识别: ArcFace
根据文献[1],文章首先介绍了三种利用卷积神经网络识别人脸的主要属性。先是训练数据,介绍了主要的人脸识别训练数据集;其次是网络结构,介绍了各种卷积神经网络;第三是损失函数,介绍了基于欧几里得距离的损失函数和基于角度和余弦的损失函数。
文章介绍了从SoftMax到ArcFace损失函数。介绍了:(1)SoftMax损失函数;(2)权重归一化;(3)Angular Margin倍数损失函数;(4)特征归一化;(5)Cosine Margin损失函数;(6)Angular Margin损失函数;
数据集
LFW: http://vis-www.cs.umass.edu/lfw/
CFP: http://www.cfpw.io/index.html
AgeDB https://ibug.doc.ic.ac.uk/resources/agedb/
MegaFace: http://megaface.cs.washington.edu/
MS-Celeb-1M: https://www.microsoft.com/en-us/research/project/ms-celeb-1m-challenge-recognizing-one-million-celebrities-real-world/
参考文献
arcface论文:
[1] ArcFace: Additive Angular Margin Loss for Deep Face Recognition, Jiankang Deng, Jia Guo, Niannan Xue,
Stefanos Zafeiriou, https://arxiv.org/abs/1801.07698
ArcFace论文中文翻译:https://blog.csdn.net/weixin_42546496/article/details/88387325
retinaface论文:
[2] RetinaFace: Single-stage Dense Face Localisation in the Wild, Jiankang Deng, Jia Guo, Yuxiang Zhou,
Jinke Yu, Irene Kotsia, Stefanos Zafeiriou, https://arxiv.org/abs/1905.00641
U-Nets论文:
[3] Stacked Dense U-Nets with Dual Transformers for Robust Face Alignment, Jia Guo, Jiankang Deng,
Niannan Xue, Stefanos Zafeiriou, https://arxiv.org/abs/1812.01936
深度学习网络结构
人脸识别损失函数
mxnet lst,rec文件
insithtface lst,rec文件
bAligned img_path label bbox_x1 bbox_x2 bbox_y1 bbox_y2 lmk_x1 lmk_x2 ... lmk_y1 lmk_y2 ... lmk_y5
bAligned: 0-无裁剪,1-裁剪对齐
img_path: 图片路径
label: 图片标签
bbox_x1 bbox_x2 bbox_y1 bbox_y2:图片边框信息,bAligned=0时需要带上,可全部填0
lmk_x1 lmk_x2 ... lmk_y1 lmk_y2 ... lmk_y5: 图片5点信息,bAligned=0时需要带上

最终rec文件是将裁剪好的图片mx.recordio.pack_img打包在一起,参考face2rec2.py
rec文件需要输入lst,其内部操作是通过lst中的文件路径读取图片,根据5个lmk点进行人脸对齐,得到归一化的人脸区域,然后打包到rec文件中,供网络训练,脚本位于src/data/face2rec2.py
property文件格式:
ids image_h image_w
ids: 有多少类别
image_h: 图片大小
image_w: 图片大小
idx文件格式:
recid  pos
recid: 资源id
pos:  资源id所在的rec二进制文件位置
rec文件格式:
rec二进制文件一个内存资源组成:
[header, value],其中value可选

header组成为:flag, label, id, id2

图片资源为:
flag = 0
label = [label, bAligned]  # lst文件中的label, bAligned值
id = 1~n                   # rec资源id
id2 = 0                    # 无用到
value = pack_img           # 打包的图片img

数据集信息资源为:
flag = 2
label = [_id, _id+len(identities)]  # 图片资源总数量,图片+身份信息资源总数量
id = 0                              # rec资源id = 0
id2 = 0                             # 无用到

身份信息资源为:
flag = 2
label = [imgid_start, imgid_id_end]  # 存储每个label的imgid范围,即同一类别的多张图片
id = n+1, 2n                         # rec资源id
id2 = 0                              # 无用到
mxnet fine-tune:
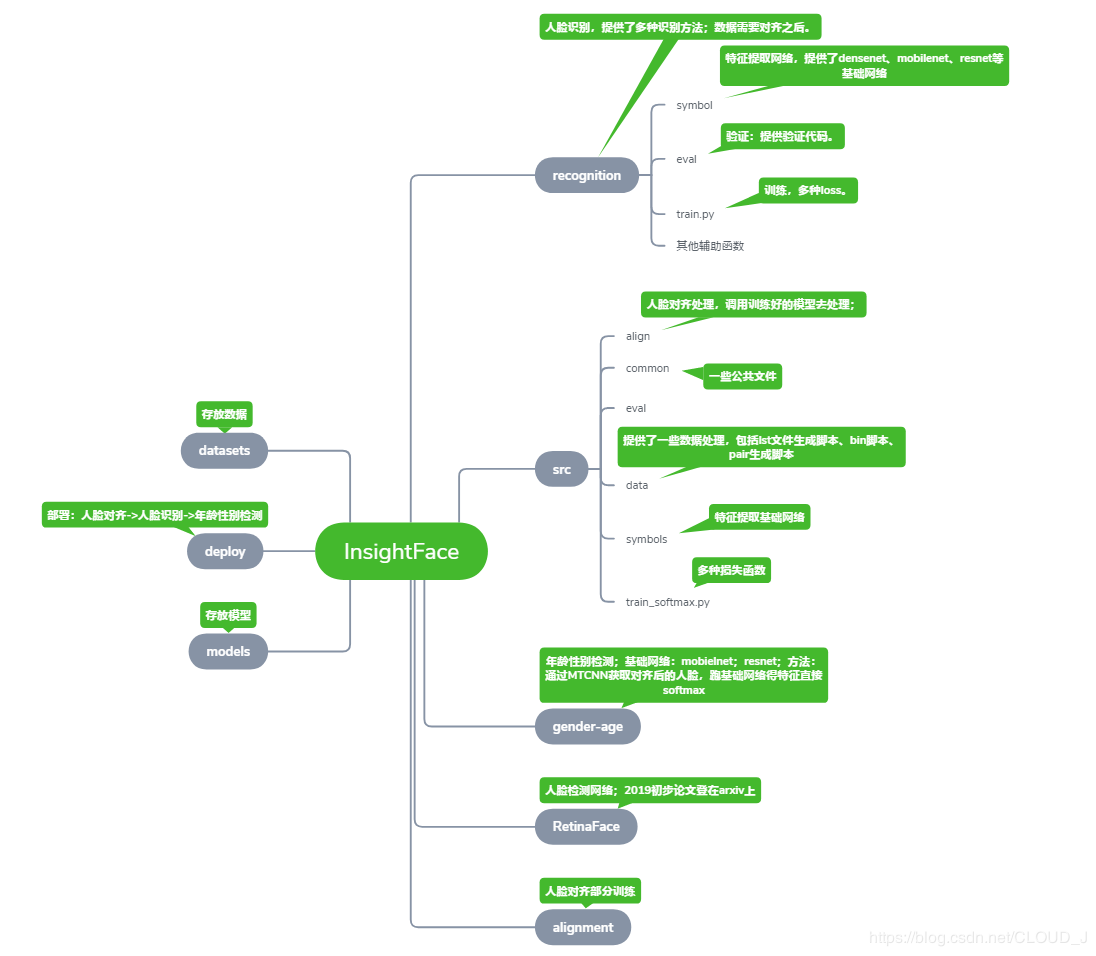
insightface源码目录结构