在完成作业之前需要在虚拟环境中安装TensorFlow和Keras
Keras中几个函数用法https://blog.csdn.net/u012969412/article/details/70882296/
导包
 1 import numpy as np
 2 from keras import layers
 3 from keras.layers import Input, Dense, Activation, ZeroPadding2D, BatchNormalization, Flatten, Conv2D
 4 from keras.layers import AveragePooling2D, MaxPooling2D, Dropout, GlobalMaxPooling2D, GlobalAveragePooling2D
 5 from keras.models import Model
 6 from keras.preprocessing import image
 7 from keras.utils import layer_utils
 8 from keras.utils.data_utils import get_file
 9 from keras.applications.imagenet_utils import preprocess_input
10 import pydot
11 from IPython.display import SVG
12 from keras.utils.vis_utils import model_to_dot
13 from keras.utils import plot_model
14 from kt_utils import *
15
16 import keras.backend as K
17 K.set_image_data_format('channels_last')
18 import matplotlib.pyplot as plt
19 from matplotlib.pyplot import imshow
加载数据
1 X_train_orig, Y_train_orig, X_test_orig, Y_test_orig, classes = load_dataset()
2
3 # Normalize image vectors
4 X_train = X_train_orig/255.          #(600, 64, 64, 3)
5 X_test = X_test_orig/255.            #(150, 64, 64, 3)
6
7 # Reshape
8 Y_train = Y_train_orig.T             #(600, 1)
9 Y_test = Y_test_orig.T               #(150, 1)
构建模型
Keras框架使用的变量名和我们以前使用的numpy和TensorFlow变量不一样。它不是在前向传播的每一步上创建新变量(比如X, Z1, A1, Z2, A2,…)以便于不同层之间的计算。在Keras中,我们使用X覆盖了所有的值,没有保存每一层结果,我们只需要最新的值,唯一例外的就是X_input,我们将它分离出来是因为它是输入的数据,我们要在最后的创建模型那一步中用到。
 1 def HappyModel(input_shape):
 2     """
 3     Implementation of the HappyModel.
 4
 5     Arguments:
 6     input_shape -- shape of the images of the dataset
 7
 8     Returns:
 9     model -- a Model() instance in Keras
10     """
11
12     ### START CODE HERE ###
13     # Feel free to use the suggested outline in the text above to get started, and run through the whole
14     # exercise (including the later portions of this notebook) once. The come back also try out other
15     # network architectures as well.
16     X_input = Input(input_shape)
17
18     # Zero-Padding: pads the border of X_input with zeroes
19     X = ZeroPadding2D((3, 3))(X_input)
20
21     # CONV -> BN -> RELU Block applied to X
22     X = Conv2D(32, (3, 3), strides = (1, 1), name = 'conv0')(X)
23     X = BatchNormalization(axis = 3, name = 'bn0')(X)
24     X = Activation('relu')(X)
25
26     # MAXPOOL
27     X = MaxPooling2D((2, 2), name='max_pool')(X)
28
29     X = Conv2D(16, (3, 3), strides = (1, 1), name = 'conv1')(X)
30     X = Activation('relu')(X)
31     X = MaxPooling2D((2, 2), name='max_pool1')(X)
32
33     # FLATTEN X (means convert it to a vector) + FULLYCONNECTED
34     X = Flatten()(X)
35     X = Dense(1, activation='sigmoid', name='fc')(X)
36
37     # Create model. This creates your Keras model instance, you'll use this instance to train/test the model.
38     model = Model(inputs = X_input, outputs = X, name='HappyModel')
39     ### END CODE HERE ###
40
41     return model
训练、评估模型
 1 #1.Create the model
 2 happy_model=HappyModel(X_train.shape[1:])
 3 #2.Compile the model
 4 happy_model.compile(optimizer = "adam", loss = "binary_crossentropy", metrics = ["accuracy"])
 5 #3.Train the model on train data
 6 happy_model.fit(x =X_train, y = Y_train, epochs = 40, batch_size = 50)
 7 #4.Test the model on test data
 8 preds=happy_model.evaluate(x = X_test, y = Y_test)
 9
10 print ("Loss = " + str(preds[0]))
11 print ("Test Accuracy = " + str(preds[1]))
Epoch 1/40
600/600 [==============================] - 14s - loss: 0.7618 - acc: 0.5683
Epoch 2/40
600/600 [==============================] - 12s - loss: 0.4747 - acc: 0.8100
Epoch 3/40
600/600 [==============================] - 11s - loss: 0.3806 - acc: 0.8467
Epoch 4/40
600/600 [==============================] - 12s - loss: 0.2832 - acc: 0.9183
Epoch 5/40
600/600 [==============================] - 13s - loss: 0.2239 - acc: 0.9367
Epoch 6/40
600/600 [==============================] - 13s - loss: 0.1918 - acc: 0.9500
Epoch 7/40
600/600 [==============================] - 12s - loss: 0.1568 - acc: 0.9550
Epoch 8/40
600/600 [==============================] - 13s - loss: 0.1326 - acc: 0.9683
Epoch 9/40
600/600 [==============================] - 13s - loss: 0.1152 - acc: 0.9717
Epoch 10/40
600/600 [==============================] - 13s - loss: 0.0982 - acc: 0.9800
Epoch 11/40
600/600 [==============================] - 12s - loss: 0.0980 - acc: 0.9817
Epoch 12/40
600/600 [==============================] - 12s - loss: 0.0836 - acc: 0.9817
Epoch 13/40
600/600 [==============================] - 12s - loss: 0.0732 - acc: 0.9883
Epoch 14/40
600/600 [==============================] - 12s - loss: 0.0687 - acc: 0.9817
Epoch 15/40
600/600 [==============================] - 12s - loss: 0.0770 - acc: 0.9817
Epoch 16/40
600/600 [==============================] - 12s - loss: 0.0592 - acc: 0.9933
Epoch 17/40
600/600 [==============================] - 11s - loss: 0.0545 - acc: 0.9900
Epoch 18/40
600/600 [==============================] - 11s - loss: 0.0475 - acc: 0.9917
Epoch 19/40
600/600 [==============================] - 11s - loss: 0.0541 - acc: 0.9867
Epoch 20/40
600/600 [==============================] - 11s - loss: 0.0564 - acc: 0.9867
Epoch 21/40
600/600 [==============================] - 11s - loss: 0.0700 - acc: 0.9783
Epoch 22/40
600/600 [==============================] - 11s - loss: 0.0428 - acc: 0.9900
Epoch 23/40
600/600 [==============================] - 12s - loss: 0.0348 - acc: 0.9917
Epoch 24/40
600/600 [==============================] - 11s - loss: 0.0347 - acc: 0.9900
Epoch 25/40
600/600 [==============================] - 11s - loss: 0.0353 - acc: 0.9933
Epoch 26/40
600/600 [==============================] - 12s - loss: 0.0307 - acc: 0.9917
Epoch 27/40
600/600 [==============================] - 12s - loss: 0.0286 - acc: 0.9950
Epoch 28/40
600/600 [==============================] - 11s - loss: 0.0313 - acc: 0.9967
Epoch 29/40
600/600 [==============================] - 11s - loss: 0.0436 - acc: 0.9883
Epoch 30/40
600/600 [==============================] - 11s - loss: 0.0303 - acc: 0.9900
Epoch 31/40
600/600 [==============================] - 12s - loss: 0.0241 - acc: 0.9983
Epoch 32/40
600/600 [==============================] - 11s - loss: 0.0246 - acc: 0.9933
Epoch 33/40
600/600 [==============================] - 11s - loss: 0.0259 - acc: 0.9950
Epoch 34/40
600/600 [==============================] - 12s - loss: 0.0293 - acc: 0.9917
Epoch 35/40
600/600 [==============================] - 12s - loss: 0.0255 - acc: 0.9900
Epoch 36/40
600/600 [==============================] - 12s - loss: 0.0200 - acc: 0.9933
Epoch 37/40
600/600 [==============================] - 12s - loss: 0.0175 - acc: 0.9983
Epoch 38/40
600/600 [==============================] - 11s - loss: 0.0187 - acc: 0.9967
Epoch 39/40
600/600 [==============================] - 11s - loss: 0.0148 - acc: 0.9983
Epoch 40/40
600/600 [==============================] - 11s - loss: 0.0174 - acc: 0.9983
150/150 [==============================] - 1s
Loss = 0.0885118440787
Test Accuracy = 0.973333330949
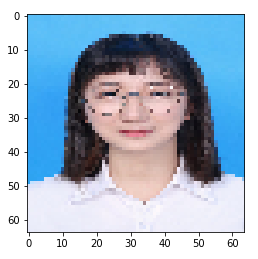
预测数据
 1 ### START CODE HERE ###
 2 img_path = 'images/a.jpg'
 3 ### END CODE HERE ###
 4 img = image.load_img(img_path, target_size=(64, 64))
 5 imshow(img)
 6
 7 x = image.img_to_array(img)
 8 x = np.expand_dims(x, axis=0)
 9 x = preprocess_input(x)
10
11 print(happy_model.predict(x))
[[ 1.]]
打印出每一层的大小细节
print(happy_model.summary())
_________________________________________________________________
Layer (type) Output Shape Param #
=================================================================
input_1 (InputLayer) (None, 64, 64, 3) 0
_________________________________________________________________
zero_padding2d_1 (ZeroPaddin (None, 70, 70, 3) 0
_________________________________________________________________
conv0 (Conv2D) (None, 68, 68, 32) 896
_________________________________________________________________
bn0 (BatchNormalization) (None, 68, 68, 32) 128
_________________________________________________________________
activation_1 (Activation) (None, 68, 68, 32) 0
_________________________________________________________________
max_pool (MaxPooling2D) (None, 34, 34, 32) 0
_________________________________________________________________
conv1 (Conv2D) (None, 32, 32, 16) 4624
_________________________________________________________________
activation_2 (Activation) (None, 32, 32, 16) 0
_________________________________________________________________
max_pool1 (MaxPooling2D) (None, 16, 16, 16) 0
_________________________________________________________________
flatten_1 (Flatten) (None, 4096) 0
_________________________________________________________________
fc (Dense) (None, 1) 4097
=================================================================
Total params: 9,745
Trainable params: 9,681
Non-trainable params: 64
_________________________________________________________________
None
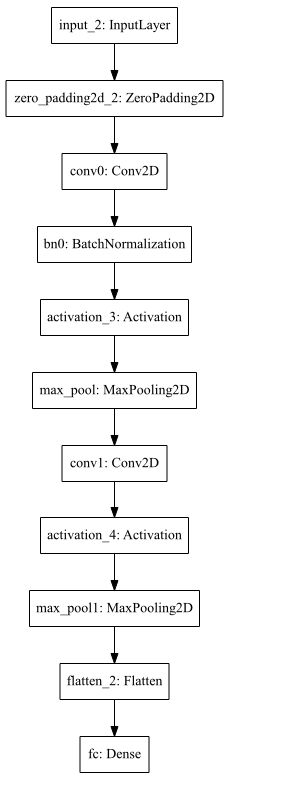
绘制布局图(下载、安装并配置Graphviz)
pip install pydot-ng & pip install graphviz
plot_model(happy_model, to_file='happy_model.png')
SVG(model_to_dot(happy_model).create(prog='dot', format='svg'))