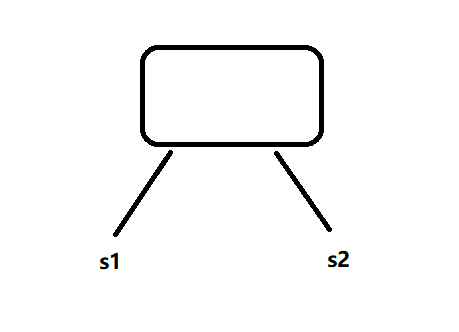
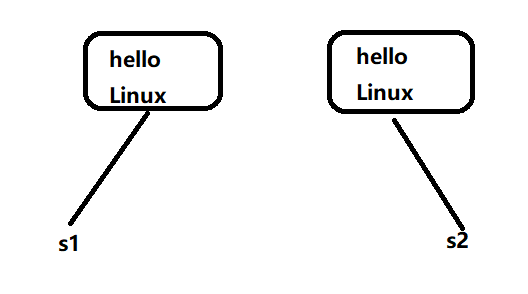
浅拷贝:又称值拷贝,将源对象的值拷贝到目标对象中去,本质上来说源对象和目标对象共用一份实体,只是所引用的变量名不同,地址其实还是相同的。举个简单的例子,你的小名叫西西,大名叫冬冬,当别人叫你西西或者冬冬的时候你都会答应,这两个名字虽然不相同,但是都指的是你。
假设有一个String类,String s1;String s2(s1);在进行拷贝构造的时候将对象s1里的值全部拷贝到对象s2里。
我们现在来简单的实现一下这个类
 1 #include <iostream>
 2 #include<cstring>
 3
 4 using namespace std;
 5
 6 class STRING
 7 {
 8 public:
 9     STRING( const char* s = "" ) :_str( new char[strlen(s)+1] )
10
11     {
12         strcpy_s( _str, strlen(s)+1, s );
13     }
14     STRING( const STRING& s )
15     {
16         _str = s._str;
17     }
18     STRING& operator=(const STRING& s)
19     {
20         if (this != &s)
21         {
22             this->_str = s._str;
23         }
24         return *this;
25     }
26
27     ~STRING()
28     {
29         cout << "~STRING" << endl;
30         if (_str)
31         {
32             delete[] _str;
33             _str = NULL;
34         }
35     }
36
37     void show()
38     {
39         cout << _str << endl;
40     }
41 private:
42     char* _str;
43 };
44
45 int main()
46 {
47     STRING s1("hello linux");
48     STRING s2(s1);
49     s2.show();
50
51     return 0;
52 }
其实这个程序是存在问题的,什么问题呢?我们想一下,创建s2的时候程序必然会去调用拷贝构造函数,这时候拷贝构造仅仅只是完成了值拷贝,导致两个指针指向了同一块内存区域。随着程序的运行结束,又去调用析构函数,先是s2去调用析构函数,释放了它指向的内存区域,接着s1又去调用析构函数,这时候析构函数企图释放一块已经被释放的内存区域,程序将会崩溃。s1和s2的关系就是这样的:

进行调试程序发现s1和s2确实指向了同一块区域:

所以程序会崩溃是应该的,那么这个问题应该怎么去解决呢?这就引出了深拷贝。
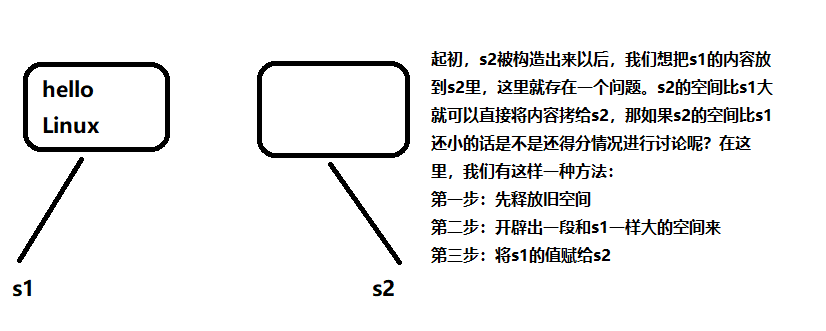
深拷贝,拷贝的时候先开辟出和源对象大小一样的空间,然后将源对象里的内容拷贝到目标对象中去,这样两个指针就指向了不同的内存位置。并且里面的内容是一样的,这样不但达到了我们想要的目的,还不会出现问题,两个指针先后去调用析构函数,分别释放自己所指向的位置。即为每次增加一个指针,便申请一块新的内存,并让这个指针指向新的内存,深拷贝情况下,不会出现重复释放同一块内存的错误。
深拷贝实际上是这样的:

深拷贝的拷贝构造函数和赋值运算符的重载传统实现:
 1 STRING( const STRING& s )
 2     {
 3         //_str = s._str;
 4         _str = new char[strlen(s._str) + 1];
 5         strcpy_s( _str, strlen(s._str) + 1, s._str );
 6     }
 7     STRING& operator=(const STRING& s)
 8     {
 9         if (this != &s)
10         {
11             //this->_str = s._str;
12             delete[] _str;
13             this->_str = new char[strlen(s._str) + 1];
14             strcpy_s(this->_str, strlen(s._str) + 1, s._str);
15         }
16         return *this;
17     }
这里的拷贝构造函数我们很容易理解,先开辟出和源对象一样大的内存区域,然后将需要拷贝的数据复制到目标拷贝对象,
那么这里的赋值运算符的重载是怎么样做的呢?

这种方法解决了我们的指针悬挂问题,通过不断的开空间让不同的指针指向不同的内存,以防止同一块内存被释放两次的问题,还有一种深拷贝的现代写法:
 1 STRING( const STRING& s ):_str(NULL)
 2     {
 3         STRING tmp(s._str);// 调用了构造函数,完成了空间的开辟以及值的拷贝
 4         swap(this->_str, tmp._str); //交换tmp和目标拷贝对象所指向的内容
 5     }
 6
 7     STRING& operator=(const STRING& s)
 8     {
 9         if ( this != &s )//不让自己给自己赋值
10         {
11             STRING tmp(s._str);//调用构造函数完成空间的开辟以及赋值工作
12             swap(this->_str, tmp._str);//交换tmp和目标拷贝对象所指向的内容
13         }
14         return *this;
15     }
先来分析一下拷贝构造是怎么实现的:

拷贝构造调用完成之后,会接着去调用析构函数来销毁局部对象tmp,按照这种思路,不难可以想到s2的值一定和拷贝构造里的tmp的值一样,指向同一块内存区域,通过调试可以看出来:
在拷贝构造函数里的tmp:

调用完拷贝构造后的s2:(此时tmp被析构)

可以看到s2的地址值和拷贝构造里的tmp的地址值是一样
关于赋值运算符的重载还可以这样来写:
STRING& operator=(STRING s)
{
swap(_str, s._str);
return *this;
}
 1 #include <iostream>
 2 #include<cstring>
 3
 4 using namespace std;
 5
 6 class STRING
 7 {
 8 public:
 9     STRING( const char* s = "" ) :_str( new char[strlen(s)+1] )
10
11     {
12         strcpy_s( _str, strlen(s)+1, s );
13     }
14     //STRING( const STRING& s )
15     //{
16     //    //_str = s._str; //浅拷贝的写法
17     //    cout << "拷贝构造函数" << endl;
18     //    _str = new char[strlen(s._str) + 1];
19     //    strcpy_s( _str, strlen(s._str) + 1, s._str );
20     //}
21     //STRING& operator=(const STRING& s)
22     //{
23     //    cout << "运算符重载" << endl;
24     //    if (this != &s)
25     //    {
26     //        //this->_str = s._str; //浅拷贝的写法
27     //        delete[] _str;
28     //        this->_str = new char[strlen(s._str) + 1];
29     //        strcpy_s(this->_str, strlen(s._str) + 1, s._str);
30     //    }
31     //    return *this;
32     //}
33
34     STRING( const STRING& s ):_str(NULL)
35     {
36         STRING tmp(s._str);// 调用了构造函数,完成了空间的开辟以及值的拷贝
37         swap(this->_str, tmp._str); //交换tmp和目标拷贝对象所指向的内容
38     }
39
40     STRING& operator=(const STRING& s)
41     {
42         if ( this != &s )//不让自己给自己赋值
43         {
44             STRING tmp(s._str);//调用构造函数完成空间的开辟以及赋值工作
45             swap(this->_str, tmp._str);//交换tmp和目标拷贝对象所指向的内容
46         }
47         return *this;
48     }
49
50     ~STRING()
51     {
52         cout << "~STRING" << endl;
53         if (_str)
54         {
55             delete[] _str;
56             _str = NULL;
57         }
58     }
59
60     void show()
61     {
62         cout << _str << endl;
63     }
64 private:
65     char* _str;
66 };
67
68 int main()
69 {
70     //STRING s1("hello linux");
71     //STRING s2(s1);
72     //STRING s2 = s1;
73     //s2.show();
74     const char* str = "hello linux!";
75     STRING  s1(str);
76     STRING s2;
77     s2 = s1;
78     s1.show();
79     s2.show();
80
81     return 0;
82 }
参考与
浅析C++中的深浅拷贝 - qq_39344902的博客 - CSDN博客
https://blog.csdn.net/qq_39344902/article/details/79798297