主体代码文件有三个,mypcb.h,myinterupt.h, mymain.h,mypcb定义了进程控制块结构,myinterupt实现了中断处理程序,mymain是实际入口点,以下代码省去了头文件部分,并有详细注释,下面的分析中只挑选关键部分进行分析
 1 /* A simply process control block */
 2
 3 #define MAX_TASK_NUM 10 //max number of tasks
 4 #define KERNEL_STACK_SIZE 1024*8 //max kernel stack size of a single process, here is 8KiB
 5
 6 //This struct describes basic CPU info
 7 struct Thread
 8 {
 9     unsigned long ip; //EIP Register, Points to next instruction
10     unsigned long sp; //ESP Register, Points to Stack head
11 };
12
13 //This struct describes the structure of PCB
14 typedef struct PCB
15 {
16     int pid;    //pid
17     volatile long state;    //process state
18     /* -1 unrunnable,
19      * 0 runnable,
20      * >0 stopped */
21     char stack[KERNEL_STACK_SIZE];
22     //each PCB stack size is KERNEL_STACK_SIZE, here is 8KiB
23     struct Thread thread; //CPU info
24     unsigned long task_entry; //task execute entry
25     struct PCB *next; //all processes are in a circled linked list
26 }tPCB;
27
28 void my_schedule(void);
 1 #include "mypcb.h"
 2
 3 extern tPCB task[MAX_TASK_NUM];
 4 extern tPCB *my_current_task;
 5 extern volatile int my_need_sched;
 6 volatile int time_count;
 7
 8 /*
 9  * Called by timer interrupt.
10  */
11 void my_timer_handler(void)
12 {
13 #if 1
14     //here defines the system circle count, after that count the processes should be resheduled
15     if(time_count % 10 == 0 && my_need_sched != 1)
16     {
17         printk(KERN_NOTICE ">>>my_timer_handler here<<<
");
18         my_need_sched = 1;
19     }
20     time_count ++;
21 #endif
22     return;
23 }
24
25 void my_schedule(void)
26 {
27     tPCB *next;
28     tPCB *prev;
29
30     printk(KERN_NOTICE "This is process %d, next is process %d", my_current_task->pid, my_current_task->next->pid);
31
32     if(my_current_task == NULL || my_current_task->next == NULL)
33     {
34         return;
35     }
36
37     printk(KERN_NOTICE ">>>my_schedule<<<
");
38
39     //Scheduler code below
40     next = my_current_task->next;
41     prev = my_current_task;
42
43     //state 0 means next process is runnable
44     if(next->state == 0) // -1 unrunnable, 0 runnable, >0 stopped
45     {
46         asm volatile(
47                 //saving current task scene
48                 "pushl %%ebp
	"   //save ebp, aka current scene
49                 "movl %%esp, %0
	"//save esp, also part of current scene
50                 //changing to next task
51                 "movl %2, %%esp
	"//set esp to the very value of next task
52                 "movl $1f, %1
	"  //save current EIP to memory
53                 "pushl %3
	"      //next task's EIP is now in stack
54                 "ret
	"           //reset EIP to next task's EIP, same as 'popl %eip'
55                 "1:	"              //flag, next process start here
56                 "popl %%ebp
	"    //
57                 :"=m"(prev->thread.sp), "=m"(prev->thread.ip)
58                 :"m"(next->thread.sp), "m"(next->thread.ip)
59         );
60         //The inline assembly did everything to cut the scene, now we are running 'next' task
61         my_current_task = next;
62         printk(KERN_NOTICE ">>>switch %d to %d<<<
", prev->pid, next->pid);
63     }
64     else
65     {
66         next->state = 0;
67         my_current_task = next;
68         printk(KERN_NOTICE ">>>switch %d to %d<<<
", prev->pid, next->pid);
69         //Switch to new process
70         asm volatile(
71                 //Saving current task scene
72                 "pushl %%ebp
	"   //save ebp, same as above
73                 "movl %%esp, %0
	"//save esp, same as above
74                 //Changing to next task
75                 "movl %2, %%esp
	"//reset esp, same as above
76                 "movl %2, %%ebp
	"//set ebp to next->thread.sp, since next task is totally new, so its stack should be empty. aka esp == ebp
77                 "movl $1f, %1
	"  //save EIP
78                 "pushl %3
	"      //enstack next task's EIP, same as above
79                 "ret
	"           //reset EIP, same as above
80                 :"=m"(prev->thread.sp), "=m"(prev->thread.ip)
81                 :"m"(next->thread.sp), "m"(next->thread.ip)
82         );
83     }
84     return;
85 }
#include "mypcb.h"

tPCB task[MAX_TASK_NUM];
tPCB *my_current_task = NULL;
volatile int my_need_sched = 0;

void my_process(void);

void __init my_start_kernel(void)
{
    int pid = 0;
    //Initializing process 0, root of everything
    task[pid].pid = pid;
    task[pid].state = 0; // -1 unrunnable, 0 runnable, >0 stopped
    task[pid].task_entry = task[pid].thread.ip = (unsigned long)my_process;
    task[pid].thread.sp = (unsigned long)&task[pid].stack[KERNEL_STACK_SIZE-1];
    task[pid].next = &task[pid];

    //fork more processes
    for(++pid; pid < MAX_TASK_NUM; ++pid)
    {
        memcpy(&task[pid], &task[0], sizeof(tPCB)); //Just a simple memcpy, copies every thing of process 0
        //Reset PCB info, everything is similar as above, except this new process's state is 'unrunnable'
        task[pid].pid = pid;
        task[pid].state = -1; // -1 unrunnable, 0 runnable, >0 stopped
        task[pid].task_entry = task[pid].thread.ip = (unsigned long)my_process;
        task[pid].thread.sp = (unsigned long)&task[pid].stack[KERNEL_STACK_SIZE-1];
        //Link the new process to process list
        task[pid].next = task[pid-1].next;
        task[pid-1].next = &task[pid];
    }

    //Starting process 0
    pid = 0;
    my_current_task = &task[pid];
    asm volatile(
            "movl %1, %%esp
	"    //set task[pid].thread.sp to esp
            "pushl %1
	"          //push process 0's sp to stack
            //Redirect EIP to entry point of process 0
            "pushl %0
	"          //push task[pid].thread.ip
            "ret
	"               //Set actuall EIP via ret
            "popl %%ebp
	"        //ebp is now process0's esp, aka the process is new
            :
            :"c"(task[pid].thread.ip),"d"(task[pid].thread.sp)
    );
}

//user process
void my_process(void)
{
    int i = 0;
    while(true)
    {
        ++i;
        if(i % 10000000 == 0)
        {
            printk(KERN_NOTICE "this is process %d -
", my_current_task->pid);
            if(my_need_sched == 1)
            {
                my_need_sched = 0;
                my_schedule();
            }
            printk(KERN_NOTICE "this is process %d +
", my_current_task->pid);
        }
    }
}
mypcb.h中定义了pcb的数据结构,每个字段都已经用注释注明含义,此处不再赘述,需要注意的是tPCB.next如何指向下一个PCB从某种程度上影响了进程调度的方式,这儿采用时间片轮转调度法,因此在后面的mymain中将所有进程连接成了一个环形链表进行调度。
mymain是入口点,从整体结构上可以看出,系统启动时首先创建了0号进程,然后由0号进程fork出了所有其他进程,这个过程很简单,不赘述,需要详细说一下的是0号进程的启动过程,代码如下
 1 //Starting process 0
 2 pid = 0;
 3 my_current_task = &task[pid];
 4 asm volatile(
 5        "movl %1, %%esp
	"    //set task[pid].thread.sp to esp
 6        "pushl %1
	"          //push process 0's sp to stack
 7        //Redirect EIP to entry point of process 0
 8        "pushl %0
	"          //push task[pid].thread.ip
 9        "ret
	"               //Set actuall EIP via ret
10        "popl %%ebp
	"        //ebp is now process0's esp, aka the process is new
11        :
12        :"c"(task[pid].thread.ip),"d"(task[pid].thread.sp)
13 );
这段代码首先将0号进程设置为当前进程,接下来的汇编才真正让0号进程跑了起来
L5,将0号进程的sp保存到esp中,即将栈顶挪到了0号进程栈的栈顶,但由于0号进程此时还未运行,实际上这儿也是其栈底
L6,继续将0号进程的sp入栈作为栈底
下面几行将程序执行流真正定向到了process 0
L8,L9,我们知道ret相当于popl %eip,所以现将进程0的eip入栈然后ret,不难理解,这是将0号进程的eip值实际注入到了cpu的eip寄存器中
L10,如上面所说,当前栈顶位置储存的是0号进程的栈底,所以这句重设ebp为0号进程的栈底
这段汇编执行完成后,CPU就会根据eip指向的0号进程的入口点继续执行了
以上就是系统启动的过程,下面的my_process则是一个进程的主体,这个进程干的事情很简单,计时,达到预设时间后调用中断处理函数做好准备切换到下一个进程,代码很简单不再赘述
下面要说的myinterupt是调度器的核心,内含了中断处理函数,也就是调度器真正实现保护现场和恢复现场的部分
time_handler不难理解,计时,到达预设时间时候通知用户进程准备进行调度,不详细解释
 1     //Scheduler code below
 2     next = my_current_task->next;
 3     prev = my_current_task;
 4
 5     //state 0 means next process is runnable
 6     if(next->state == 0) // -1 unrunnable, 0 runnable, >0 stopped
 7     {
 8         asm volatile(
 9                 //saving current task scene
10                 "pushl %%ebp
	"   //save ebp, aka current scene
11                 "movl %%esp, %0
	"//save esp, also part of current scene
12                 //changing to next task
13                 "movl %2, %%esp
	"//set esp to the very value of next task
14                 "movl $1f, %1
	"  //save current EIP to memory
15                 "pushl %3
	"      //next task's EIP is now in stack
16                 "ret
	"           //reset EIP to next task's EIP, same as 'popl %eip'
17                 "1:	"              //flag, next process start here
18                 "popl %%ebp
	"    //
19                 :"=m"(prev->thread.sp), "=m"(prev->thread.ip)
20                 :"m"(next->thread.sp), "m"(next->thread.ip)
21         );
22         //The inline assembly did everything to cut the scene, now we are running 'next' task
23         my_current_task = next;
24         printk(KERN_NOTICE ">>>switch %d to %d<<<
", prev->pid, next->pid);
25     }
26     else
27     {
28         next->state = 0;
29         my_current_task = next;
30         printk(KERN_NOTICE ">>>switch %d to %d<<<
", prev->pid, next->pid);
31         //Switch to new process
32         asm volatile(
33                 //Saving current task scene
34                 "pushl %%ebp
	"   //save ebp, same as above
35                 "movl %%esp, %0
	"//save esp, same as above
36                 //Changing to next task
37                 "movl %2, %%esp
	"//reset esp, same as above
38                 "movl %2, %%ebp
	"//set ebp to next->thread.sp, since next task is totally new, so its stack should be empty. aka esp == ebp
39                 "movl $1f, %1
	"  //save EIP
40                 "pushl %3
	"      //enstack next task's EIP, same as above
41                 "ret
	"           //reset EIP, same as above
42                 :"=m"(prev->thread.sp), "=m"(prev->thread.ip)
43                 :"m"(next->thread.sp), "m"(next->thread.ip)
44         );
45     }
调度器首先将下一个进程记为next,并将当前进程记为prev,然后需要根据下一个进程的状态来进行处理,如果下一个进程正在运行,即状态为那么执行上面这段汇编
L10,L11两行进行的就是保存当前进程运行现场,L10将栈底设置到当前栈底,L11将esp保存到了内存中,这样就完成了当前运行现场,即调用栈的保护
L13由于next处于运行状态,所以首先要恢复其运行现场,和L11相反,这行是将next的esp从内存读取到了CPU的esp寄存器中
L14将现场保护完成后的EIP,即FLAG1的地址存入prev的ip中,记录了当前运行状态以便下次恢复,L15和L16和mymain中的类似,将next的ip值送入CPU的EIP寄存器中
L17处已经完成了现场保护
L18设置了下一个进程执行时的栈底,现场切换完成,下面将当前任务设置为next就完成了进程上下文的切换
如果下一个进程并未运行,是一个新进程,处理方式则略有不同
L33,34和L10,L11并无区别,保存现场
L37同上
L38有所区别,由于下一个进程是一个新进程,所以他的栈是空的,所以直接将ebp设置为esp就可以了
后续过程和继续运行一个已运行的进程一样,没有区别,不再赘述
这样两段代码就构成了进程调度器的主体,通过设置时间片大小可以获取不同的调度效果
程序的运行效果如下
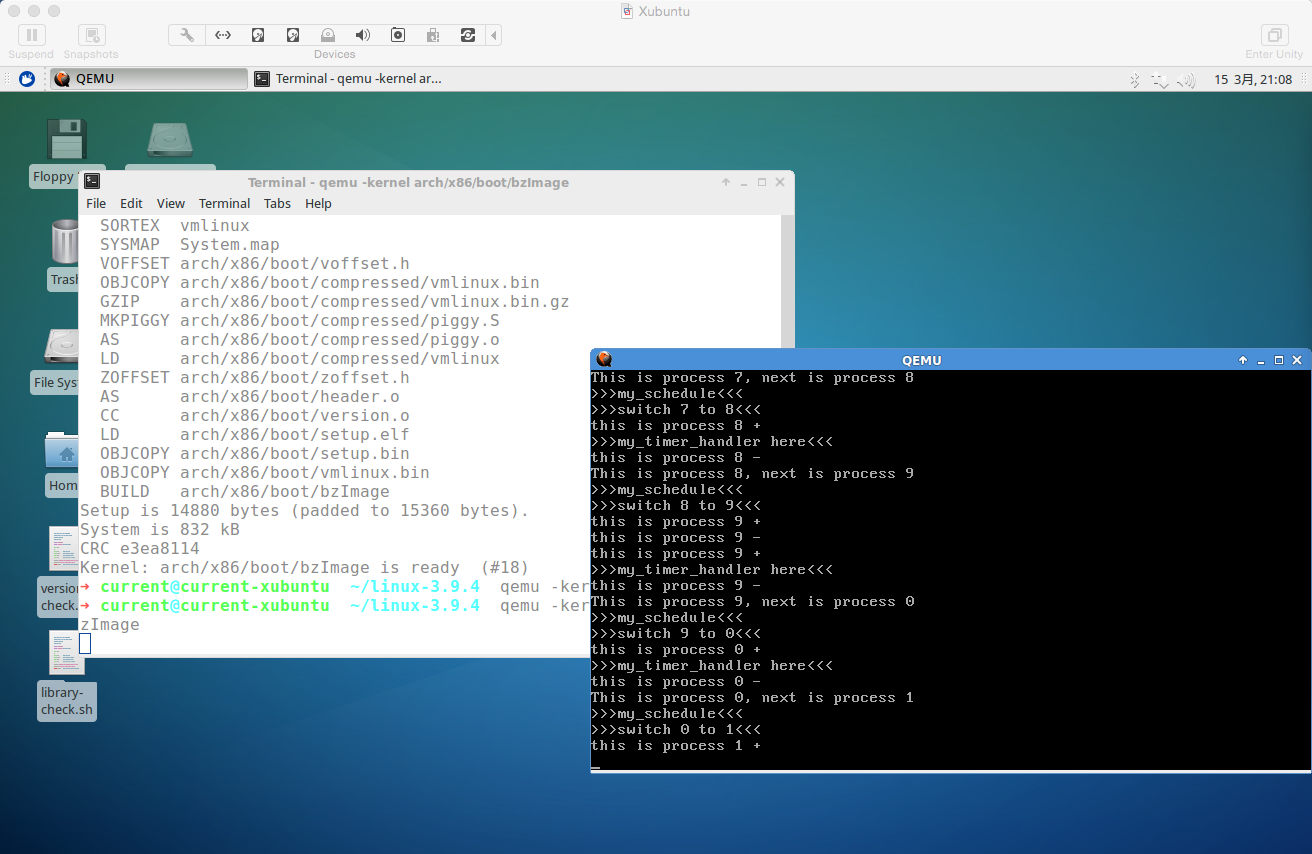
可以看见10个进程按照环形顺序依次调度运行,说明这个简单的时间片轮转调度器工作正常
从这个实验也不难理解,为什么中断和进程上下文切换是操作系统最重要的一部分功能,我们知道操作系统存在的目的是统一管理计算机的资源,并按照一定的策略分配给用户进程使用,而中断和进程上下文切换就是实现这一管理功能的手段,没有这两项功能,操作系统对计算机资源的管理也就无从谈起了
云课堂作业
吴韬 原创作品转载请注明出处 《Linux内核分析》MOOC课程http://mooc.study.163.com/course/USTC-1000029000