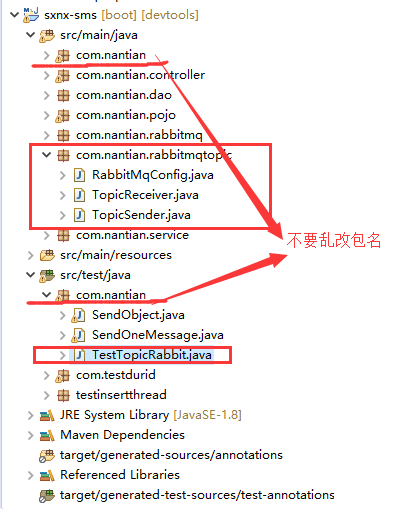
0.项目目录截图
=====================================================================
springboot的版本:
<groupId>org.springframework.boot</groupId>
<artifactId>spring-boot-starter-parent</artifactId>
<version>2.2.0.RELEASE</version>
<relativePath /> <!-- lookup parent from repository -->
==========================================================================================================================================
引入jar包:
<!-- springboot整合rabbitMQ -->
<dependency>
<groupId>org.springframework.boot</groupId>
<artifactId>spring-boot-starter-amqp</artifactId>
</dependency>
========================================================================================================================
使用junit5做测试.
========================================================================================================================
1.application.yml配置文件
#SpringBoot整合RabbitMQ
rabbitmq:
host: localhost
port: 5672
username: guest
password: guest
#connection-timeout: 15000
2.RabbitMqConfig.java
package com.nantian.rabbitmqtopic;
import org.springframework.amqp.core.Binding;
import org.springframework.amqp.core.BindingBuilder;
import org.springframework.amqp.core.Queue;
import org.springframework.amqp.core.TopicExchange;
import org.springframework.beans.factory.annotation.Qualifier;
import org.springframework.context.annotation.Bean;
import org.springframework.context.annotation.Configuration;
/**
* Created by Administrator on 2018/4/10.
* 1. yaml
* 2. RabbitMqConfig
* a 创建queue
* b. 创建交换机TopicExchange
* c. 根据绑定规则将队列绑定到相应的交换机上
* 3. sender
* 4. test
* 5. receiver
*/
@Configuration
public class RabbitMqConfig {
// a 创建queue
@Bean(name = "message") // 指定该参数名是message 见下面Qualifier("message")
public Queue queueMessage(){
return new Queue("topic.message"); // topic.message 是rounting-key,匹配规则
}
@Bean(name = "messages")
public Queue queueMessages(){
return new Queue("topic.messages");
}
// b. 创建交换机TopicExchange
@Bean
public TopicExchange exchange(){
return new TopicExchange("topicExchange");
}
/*
c. 根据绑定规则将队列绑定到相应的交换机上(bindingKey)--Exchange Queues
*/
@Bean
public Binding bindingExchangeMessage(@Qualifier("message") Queue queueMessage,TopicExchange exchange){
return BindingBuilder.bind(queueMessage).to(exchange).with("topic.message");
}
@Bean
/**
* 将队列"messages" 绑定到交换机上,绑定规则是 topic.messages
*
*/
public Binding bindingExchangeMessages(@Qualifier("messages")Queue queueMessages,TopicExchange exchange){
return BindingBuilder.bind(queueMessages).to(exchange).with("topic.#");
}
}
3.发送者:TopicSender.java
package com.nantian.rabbitmqtopic;
import org.springframework.amqp.core.AmqpTemplate;
import org.springframework.beans.factory.annotation.Autowired;
import org.springframework.stereotype.Component;
/**
* Created by Administrator on 2018/4/10.
*/
@Component
public class TopicSender {
@Autowired
private AmqpTemplate amqpTemplate;
/**
* 交换机 rountingkey 发送的内容 发送消息到相应的Exchange
* 向名称为 topicExchange 的交换机 发送满足routingkey规则为 "topic.messages " 的内容为 "我是发送消息的内容" 的消息
*/
public void sendMessage(){
this.amqpTemplate.convertAndSend("topicExchange","topic.messages","我是发送消息的内容! ");
}
/**
* 消息一
*/
public void send1() {
String context = "hi, i am message 1";
System.out.println("Sender : " + context);
this.amqpTemplate.convertAndSend("topicExchange", "topic.message", context);
}
/**
* 消息2
*/
public void send2() {
String context = "hi, i am messages 2";
System.out.println("Sender : " + context);
this.amqpTemplate.convertAndSend("topicExchange", "topic.messages", context);
}
}
4.接受者:TopicReceiver.java
package com.nantian.rabbitmqtopic;
import org.springframework.amqp.rabbit.annotation.RabbitListener;
import org.springframework.stereotype.Component;
/**
* Created by Administrator on 2018/4/10.
*/
@Component
public class TopicReceiver {
@RabbitListener(queues ="topic.message" )
public void receiveMessage1(String str){
System.out.println("赵云1:我是监听topic.message的,仅满足topic.message的过来 , "+str);
}
@RabbitListener(queues ="topic.messages" )
public void receiveMessage2(String str){
System.out.println("关羽2:我是监听topic.# 的,满足 topic.# 的都过来 , "+str);
}
}
5.测试类:TestTopicRabbitMq.java
package com.nantian;
import org.junit.Test;
import org.junit.runner.RunWith;
import org.springframework.beans.factory.annotation.Autowired;
import org.springframework.boot.test.context.SpringBootTest;
import org.springframework.test.context.junit4.SpringRunner;
import com.nantian.rabbitmqtopic.TopicSender;
@RunWith(SpringRunner.class)
@SpringBootTest
public class TestTopicRabbit {
@Autowired
private TopicSender topicSender;
@Test
public void contextLoads() {
topicSender.sendMessage();
}
/**
* 测试消息一
*/
@Test
public void send1() {
topicSender.send1();
}
/**
* 测试消息二
*/
@Test
public void send2() {
topicSender.send2();
}
}