三种代价函数
1,二次代价函数

![]() 式子代表预测值与样本值的差得平方和
式子代表预测值与样本值的差得平方和
由于使用的是梯度下降法,我们对变量w,b分别求偏导:

这种函数对于处理线性的关系比较好,但是如果遇到s型函数(如下图所示),效率不高。
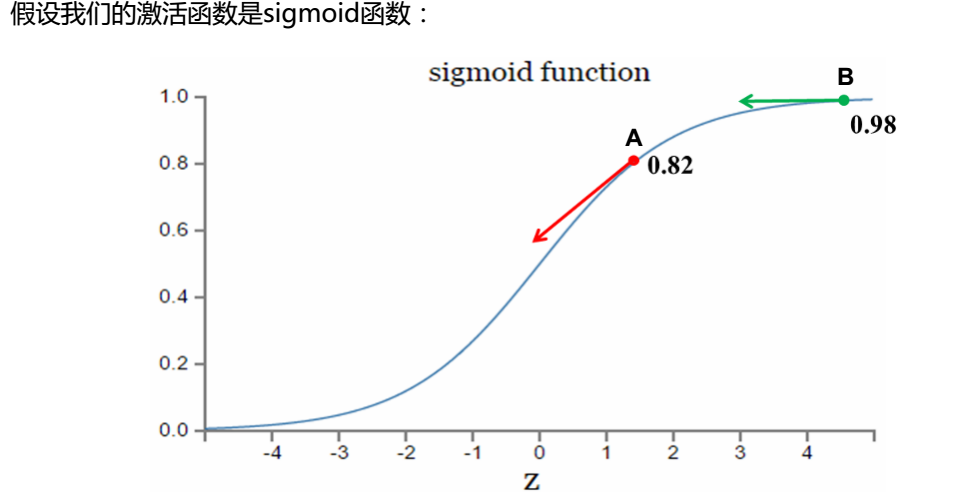
从图中我们看出:当我们想要趋近于1时,B点接近于1,变化趋势变小(很正确),A点与1距离较远,变化趋势较大(很正确),C点(假设在x = -3处)远离1,变化趋势很小(发生错误),因此,二次代价函数中单凭梯度的大小决定变化的快慢是不对的。
由此我们引出了第二个代价函数——交叉熵代价函数
2,交叉熵代价函数
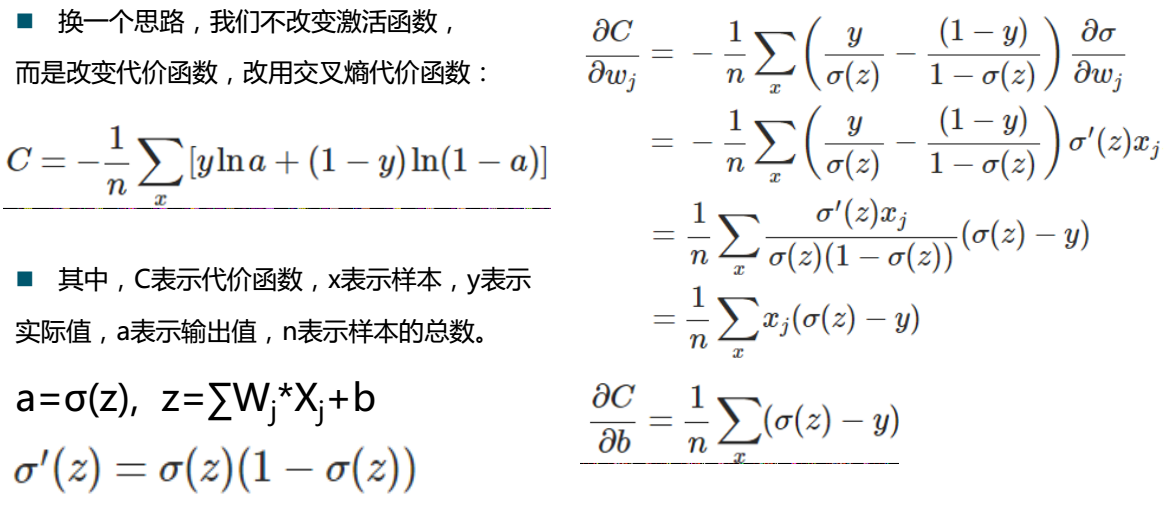
右边是babababab的推导过程,最终得到表达式:
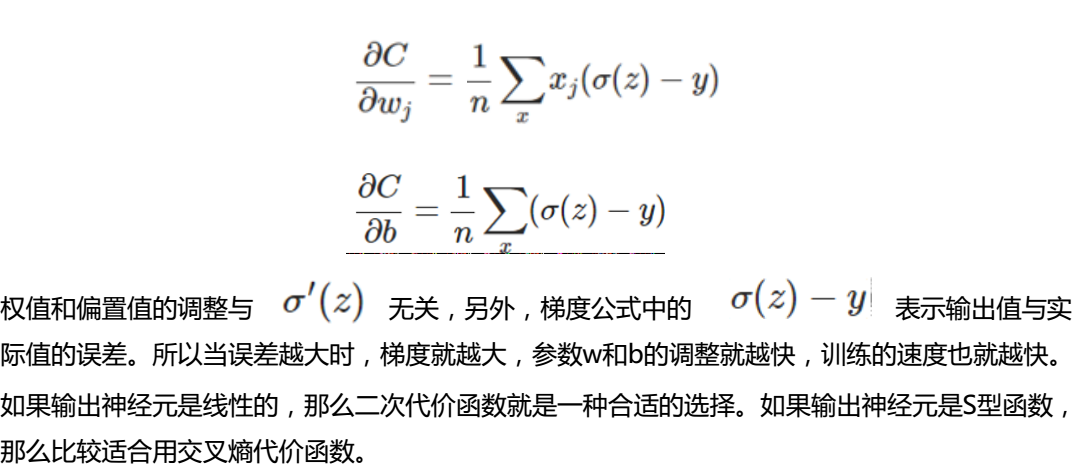
结论如上↑
3,对数释然代价函数

我们对上次的代码进行修改,修改了loss的函数
import tensorflow as tf
from tensorflow.examples.tutorials.mnist import input_data

#载入数据集
mnist = input_data.read_data_sets("MNIST_data",one_hot=True)

#每个批次的大小
batch_size = 100
#计算一共有多少个批次
n_batch = mnist.train.num_examples // batch_size

#定义两个placeholder
x = tf.placeholder(tf.float32,[None,784]) #图片
y = tf.placeholder(tf.float32,[None,10]) #标签

#创建一个简单的神经网络
w = tf.Variable(tf.zeros([784,10]))
b = tf.Variable(tf.zeros([10]))
prediction = tf.nn.softmax(tf.matmul(x,w)+b)

#二次代价函数
loss = tf.reduce_mean(tf.nn.softmax_cross_entropy_with_logits(labels=y,logits=prediction))
#梯度下降算法
train_step = tf.train.GradientDescentOptimizer(0.2).minimize(loss)

#初始化变量
init = tf.global_variables_initializer()

#结果存放在一个bool类型的列表中,argmax()返回一维张量中最大值所在的位置,equal函数判断两者是否相等
correct_prediction = tf.equal(tf.argmax(y,1),tf.argmax(prediction,1))
#求准确率,cast:将bool型转换为0,1然后求平均正好算到是准确率
accuracy = tf.reduce_mean(tf.cast(correct_prediction,tf.float32))

with tf.Session() as sess:
    sess.run(init)
    for epoch in range(21):
        for batch in range(batch_size):#next_batch:不断获取下一组数据
            batch_xs,batch_ys = mnist.train.next_batch(batch_size)
            sess.run(train_step,feed_dict={x:batch_xs,y:batch_ys})

        acc = sess.run(accuracy,feed_dict={x:mnist.test.images,y:mnist.test.labels})
        print("Iter "+str(epoch)+",Testing Accuracy "+str(acc))
得到结果:
Iter 0,Testing Accuracy 0.7051
Iter 1,Testing Accuracy 0.8002
Iter 2,Testing Accuracy 0.8105
Iter 3,Testing Accuracy 0.8183
Iter 4,Testing Accuracy 0.8218
Iter 5,Testing Accuracy 0.8268
Iter 6,Testing Accuracy 0.8585
Iter 7,Testing Accuracy 0.8724
Iter 8,Testing Accuracy 0.8866
Iter 9,Testing Accuracy 0.8899
Iter 10,Testing Accuracy 0.8936
Iter 11,Testing Accuracy 0.8968
Iter 12,Testing Accuracy 0.8979
Iter 13,Testing Accuracy 0.8985
Iter 14,Testing Accuracy 0.8994
Iter 15,Testing Accuracy 0.9007
Iter 16,Testing Accuracy 0.9015
Iter 17,Testing Accuracy 0.9024
Iter 18,Testing Accuracy 0.9047
Iter 19,Testing Accuracy 0.9041
Iter 20,Testing Accuracy 0.9057
哇,准确率提高很多诶!
——