本文博客地址:http://blog.csdn.net/qq1084283172/article/details/70500488
一、Android内核源码的选择
Android手机设备内核源码的调试需要外部硬件设备的支持,调试步骤比较麻烦。相对来说,Android模拟器内核源码的调试就比较简单了,这里以Android模拟器内核源码的调试为例。首先创建一个Android API 19(Android 4.4.x版本)的Android模拟器,然后运行该Android模拟器。在 ubuntu 14.04.5系统或者 Windows 系统上打开命令行终端,执行下面的命令,获取移动设备使用的芯片即获取移动设备内核源码的版本信息。
$ adb shell

# 查看设备使用的芯片
$ ls /dev/block/platform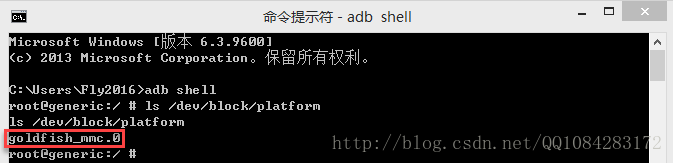
二、Android内核源码的下载
根据 ls /dev/block/platform 获取到的Android设备的芯片平台为 goldfish ,然后查阅google官方提供的Android内核源码的编译文档,执行下面的命令进行Android内核源码和Android内核源码交叉编译工具链的下载。
$ git clone https://android.googlesource.com/kernel/goldfish.git
$ cd goldfish/

# 查看可以下载的Linux内核源码的版本
$ git branch -a
* master
  remotes/origin/HEAD -> origin/master
  remotes/origin/android-3.10
  remotes/origin/android-3.18
  remotes/origin/android-goldfish-2.6.29
  remotes/origin/android-goldfish-3.10
  remotes/origin/android-goldfish-3.10-l-mr1-dev
  remotes/origin/android-goldfish-3.10-m-dev
  remotes/origin/android-goldfish-3.10-n-dev
  remotes/origin/android-goldfish-3.18
  remotes/origin/android-goldfish-3.18-dev
  remotes/origin/android-goldfish-3.4
  remotes/origin/android-goldfish-3.4-l-mr1-dev
  remotes/origin/android-goldfish-4.4-dev
  remotes/origin/heads/for/android-goldfish-3.18-dev
  remotes/origin/linux-goldfish-3.0-wip
  remotes/origin/master

# 选择下载android-goldfish-3.4的内核源码
$ git checkout remotes/origin/android-goldfish-3.4
# 或
$ git checkout -t remotes/origin/android-goldfish-3.4 -b goldfish3.4

# 下载编译工具链
$ git clone https://android.googlesource.com/platform/prebuilts/gcc/linux-x86/arm/arm-eabi-4.7/
三、Android内核源码的配置和编译
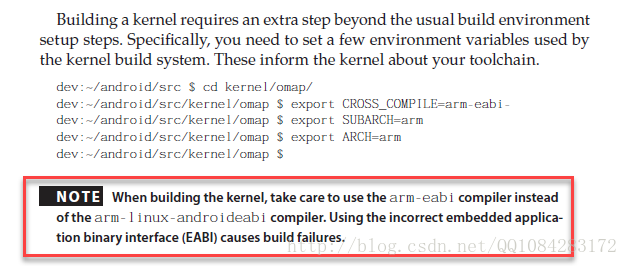
设置环境变量,导出Android内核交叉编译工具的路径,生成内核编译时使用的配置文件。可以将配置的相关命令行保存为脚本文件run_make_config.sh 。有关Android内核源码的编译环境的配置可以参考google官方的文档:https://source.android.com/source/building-kernels#building。
export CROSS_COMPILE=$(pwd)/arm-eabi-4.7/bin/arm-eabi-
export ARCH=arm
export SUBARCH=arm

# 生成编译配置文件
make goldfish_armv7_defconfig$ chmod +x run_make_config.sh
$ source run_make_config.sh 1.根据《Android安全攻防权威指南》中文版第251页的提示了解到,在编译Android内核时,要使用 arm-eabi 编译器,而不是 arm-linux-androideabi 编译器。使用不正确的 EABI 会导致编译失败。
2.在生成Android内核编译的配置文件 .config 时,make 命令的选择既可以参考google官方的文档:https://source.android.com/source/building-kernels#building,也可以参考Android内核源码下帮助文件,这里是 /goldfish/README 文件,关于make命令生成编译配置文件的说明如下:
在当前Android内核源码的根目录下,执行 make help 命令,获取到Android内核编译配置命令的信息。
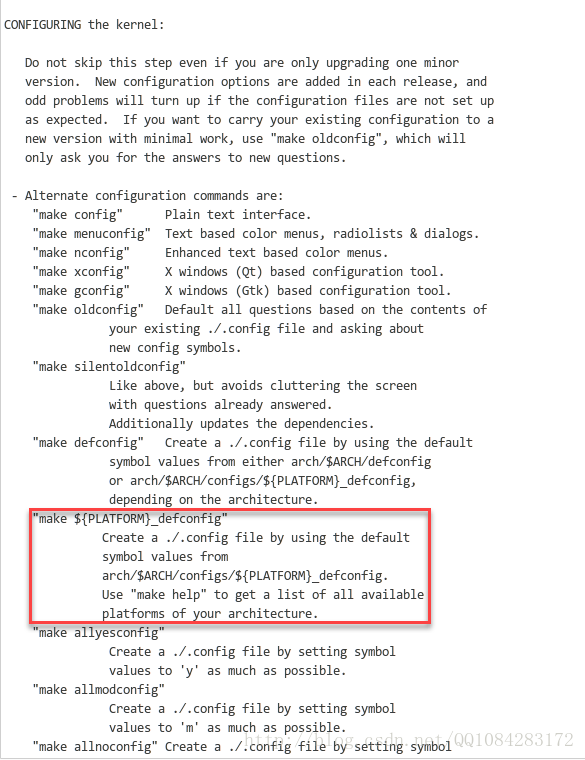
$ make help
Cleaning targets:
  clean		  - Remove most generated files but keep the config and
                    enough build support to build external modules
  mrproper	  - Remove all generated files + config + various backup files
  distclean	  - mrproper + remove editor backup and patch files

Configuration targets:
  config	  - Update current config utilising a line-oriented program
  nconfig         - Update current config utilising a ncurses menu based program
  menuconfig	  - Update current config utilising a menu based program
  xconfig	  - Update current config utilising a QT based front-end
  gconfig	  - Update current config utilising a GTK based front-end
  oldconfig	  - Update current config utilising a provided .config as base
  localmodconfig  - Update current config disabling modules not loaded
  localyesconfig  - Update current config converting local mods to core
  silentoldconfig - Same as oldconfig, but quietly, additionally update deps
  defconfig	  - New config with default from ARCH supplied defconfig
  savedefconfig   - Save current config as ./defconfig (minimal config)
  allnoconfig	  - New config where all options are answered with no
  allyesconfig	  - New config where all options are accepted with yes
  allmodconfig	  - New config selecting modules when possible
  alldefconfig    - New config with all symbols set to default
  randconfig	  - New config with random answer to all options
  listnewconfig   - List new options
  oldnoconfig     - Same as silentoldconfig but set new symbols to n (unset)

Other generic targets:
  all		  - Build all targets marked with [*]
* vmlinux	  - Build the bare kernel
* modules	  - Build all modules
  modules_install - Install all modules to INSTALL_MOD_PATH (default: /)
  firmware_install- Install all firmware to INSTALL_FW_PATH
                    (default: $(INSTALL_MOD_PATH)/lib/firmware)
  dir/            - Build all files in dir and below
  dir/file.[oisS] - Build specified target only
  dir/file.lst    - Build specified mixed source/assembly target only
                    (requires a recent binutils and recent build (System.map))
  dir/file.ko     - Build module including final link
  modules_prepare - Set up for building external modules
  tags/TAGS	  - Generate tags file for editors
  cscope	  - Generate cscope index
  gtags           - Generate GNU GLOBAL index
  kernelrelease	  - Output the release version string
  kernelversion	  - Output the version stored in Makefile
  headers_install - Install sanitised kernel headers to INSTALL_HDR_PATH
                    (default: /home/fly2016/Android4.4.4r1/goldfish-kernel-3.4/goldfish/usr)

Static analysers
  checkstack      - Generate a list of stack hogs
  namespacecheck  - Name space analysis on compiled kernel
  versioncheck    - Sanity check on version.h usage
  includecheck    - Check for duplicate included header files
  export_report   - List the usages of all exported symbols
  headers_check   - Sanity check on exported headers
  headerdep       - Detect inclusion cycles in headers
  coccicheck      - Check with Coccinelle.

Kernel packaging:
  rpm-pkg             - Build both source and binary RPM kernel packages
  binrpm-pkg          - Build only the binary kernel package
  deb-pkg             - Build the kernel as a deb package
  tar-pkg             - Build the kernel as an uncompressed tarball
  targz-pkg           - Build the kernel as a gzip compressed tarball
  tarbz2-pkg          - Build the kernel as a bzip2 compressed tarball
  tarxz-pkg           - Build the kernel as a xz compressed tarball
  perf-tar-src-pkg    - Build perf-3.4.67.tar source tarball
  perf-targz-src-pkg  - Build perf-3.4.67.tar.gz source tarball
  perf-tarbz2-src-pkg - Build perf-3.4.67.tar.bz2 source tarball
  perf-tarxz-src-pkg  - Build perf-3.4.67.tar.xz source tarball

Documentation targets:
 Linux kernel internal documentation in different formats:
  htmldocs        - HTML
  pdfdocs         - PDF
  psdocs          - Postscript
  xmldocs         - XML DocBook
  mandocs         - man pages
  installmandocs  - install man pages generated by mandocs
  cleandocs       - clean all generated DocBook files

Architecture specific targets (arm):
* zImage        - Compressed kernel image (arch/arm/boot/zImage)
  Image         - Uncompressed kernel image (arch/arm/boot/Image)
* xipImage      - XIP kernel image, if configured (arch/arm/boot/xipImage)
  uImage        - U-Boot wrapped zImage
  bootpImage    - Combined zImage and initial RAM disk
                  (supply initrd image via make variable INITRD=<path>)
  dtbs          - Build device tree blobs for enabled boards
  install       - Install uncompressed kernel
  zinstall      - Install compressed kernel
  uinstall      - Install U-Boot wrapped compressed kernel
                  Install using (your) ~/bin/installkernel or
                  (distribution) /sbin/installkernel or
                  install to $(INSTALL_PATH) and run lilo

  acs5k_defconfig          - Build for acs5k
  acs5k_tiny_defconfig     - Build for acs5k_tiny
  afeb9260_defconfig       - Build for afeb9260
  ag5evm_defconfig         - Build for ag5evm
  am200epdkit_defconfig    - Build for am200epdkit
  ap4evb_defconfig         - Build for ap4evb
  assabet_defconfig        - Build for assabet
  at91rm9200_defconfig     - Build for at91rm9200
  at91sam9260_defconfig    - Build for at91sam9260
  at91sam9261_defconfig    - Build for at91sam9261
  at91sam9263_defconfig    - Build for at91sam9263
  at91sam9g20_defconfig    - Build for at91sam9g20
  at91sam9g45_defconfig    - Build for at91sam9g45
  at91sam9rl_defconfig     - Build for at91sam9rl
  at91x40_defconfig        - Build for at91x40
  badge4_defconfig         - Build for badge4
  bcmring_defconfig        - Build for bcmring
  bonito_defconfig         - Build for bonito
  cam60_defconfig          - Build for cam60
  cerfcube_defconfig       - Build for cerfcube
  cm_x2xx_defconfig        - Build for cm_x2xx
  cm_x300_defconfig        - Build for cm_x300
  cns3420vb_defconfig      - Build for cns3420vb
  colibri_pxa270_defconfig - Build for colibri_pxa270
  colibri_pxa300_defconfig - Build for colibri_pxa300
  collie_defconfig         - Build for collie
  corgi_defconfig          - Build for corgi
  cpu9260_defconfig        - Build for cpu9260
  cpu9g20_defconfig        - Build for cpu9g20
  da8xx_omapl_defconfig    - Build for da8xx_omapl
  davinci_all_defconfig    - Build for davinci_all
  dove_defconfig           - Build for dove
  ebsa110_defconfig        - Build for ebsa110
  edb7211_defconfig        - Build for edb7211
  em_x270_defconfig        - Build for em_x270
  ep93xx_defconfig         - Build for ep93xx
  eseries_pxa_defconfig    - Build for eseries_pxa
  exynos4_defconfig        - Build for exynos4
  ezx_defconfig            - Build for ezx
  footbridge_defconfig     - Build for footbridge
  fortunet_defconfig       - Build for fortunet
  g3evm_defconfig          - Build for g3evm
  g4evm_defconfig          - Build for g4evm
  goldfish_armv7_defconfig - Build for goldfish_armv7
  goldfish_defconfig       - Build for goldfish
  h3600_defconfig          - Build for h3600
  h5000_defconfig          - Build for h5000
  h7201_defconfig          - Build for h7201
  h7202_defconfig          - Build for h7202
  hackkit_defconfig        - Build for hackkit
  imote2_defconfig         - Build for imote2
  imx_v4_v5_defconfig      - Build for imx_v4_v5
  imx_v6_v7_defconfig      - Build for imx_v6_v7
  integrator_defconfig     - Build for integrator
  iop13xx_defconfig        - Build for iop13xx
  iop32x_defconfig         - Build for iop32x
  iop33x_defconfig         - Build for iop33x
  ixp2000_defconfig        - Build for ixp2000
  ixp23xx_defconfig        - Build for ixp23xx
  ixp4xx_defconfig         - Build for ixp4xx
  jornada720_defconfig     - Build for jornada720
  kirkwood_defconfig       - Build for kirkwood
  kota2_defconfig          - Build for kota2
  ks8695_defconfig         - Build for ks8695
  lart_defconfig           - Build for lart
  lpc32xx_defconfig        - Build for lpc32xx
  lpd270_defconfig         - Build for lpd270
  lubbock_defconfig        - Build for lubbock
  mackerel_defconfig       - Build for mackerel
  magician_defconfig       - Build for magician
  mainstone_defconfig      - Build for mainstone
  marzen_defconfig         - Build for marzen
  mini2440_defconfig       - Build for mini2440
  mmp2_defconfig           - Build for mmp2
  msm_defconfig            - Build for msm
  mv78xx0_defconfig        - Build for mv78xx0
  mxs_defconfig            - Build for mxs
  neponset_defconfig       - Build for neponset
  netwinder_defconfig      - Build for netwinder
  netx_defconfig           - Build for netx
  nhk8815_defconfig        - Build for nhk8815
  nuc910_defconfig         - Build for nuc910
  nuc950_defconfig         - Build for nuc950
  nuc960_defconfig         - Build for nuc960
  omap1_defconfig          - Build for omap1
  omap2plus_defconfig      - Build for omap2plus
  orion5x_defconfig        - Build for orion5x
  palmz72_defconfig        - Build for palmz72
  pcm027_defconfig         - Build for pcm027
  pleb_defconfig           - Build for pleb
  pnx4008_defconfig        - Build for pnx4008
  pxa168_defconfig         - Build for pxa168
  pxa255-idp_defconfig     - Build for pxa255-idp
  pxa3xx_defconfig         - Build for pxa3xx
  pxa910_defconfig         - Build for pxa910
  qil-a9260_defconfig      - Build for qil-a9260
  raumfeld_defconfig       - Build for raumfeld
  realview_defconfig       - Build for realview
  realview-smp_defconfig   - Build for realview-smp
  rpc_defconfig            - Build for rpc
  s3c2410_defconfig        - Build for s3c2410
  s3c6400_defconfig        - Build for s3c6400
  s5p64x0_defconfig        - Build for s5p64x0
  s5pc100_defconfig        - Build for s5pc100
  s5pv210_defconfig        - Build for s5pv210
  sam9_l9260_defconfig     - Build for sam9_l9260
  shannon_defconfig        - Build for shannon
  shark_defconfig          - Build for shark
  simpad_defconfig         - Build for simpad
  spear3xx_defconfig       - Build for spear3xx
  spear6xx_defconfig       - Build for spear6xx
  spitz_defconfig          - Build for spitz
  stamp9g20_defconfig      - Build for stamp9g20
  tct_hammer_defconfig     - Build for tct_hammer
  tegra_defconfig          - Build for tegra
  trizeps4_defconfig       - Build for trizeps4
  u300_defconfig           - Build for u300
  u8500_defconfig          - Build for u8500
  usb-a9260_defconfig      - Build for usb-a9260
  versatile_defconfig      - Build for versatile
  vexpress_defconfig       - Build for vexpress
  viper_defconfig          - Build for viper
  xcep_defconfig           - Build for xcep
  zeus_defconfig           - Build for zeus

  make V=0|1 [targets] 0 => quiet build (default), 1 => verbose build
  make V=2   [targets] 2 => give reason for rebuild of target
  make O=dir [targets] Locate all output files in "dir", including .config
  make C=1   [targets] Check all c source with $CHECK (sparse by default)
  make C=2   [targets] Force check of all c source with $CHECK
  make RECORDMCOUNT_WARN=1 [targets] Warn about ignored mcount sections
  make W=n   [targets] Enable extra gcc checks, n=1,2,3 where
		1: warnings which may be relevant and do not occur too often
		2: warnings which occur quite often but may still be relevant
		3: more obscure warnings, can most likely be ignored
		Multiple levels can be combined with W=12 or W=123

Execute "make" or "make all" to build all targets marked with [*]
For further info see the ./README file
Linux kernel release 3.x <http://kernel.org/>
These are the release notes for Linux version 3. Read them carefully,
as they tell you what this is all about, explain how to install the
kernel, and what to do if something goes wrong.
WHAT IS LINUX?
Linux is a clone of the operating system Unix, written from scratch by
Linus Torvalds with assistance from a loosely-knit team of hackers across
the Net. It aims towards POSIX and Single UNIX Specification compliance.
It has all the features you would expect in a modern fully-fledged Unix,
including true multitasking, virtual memory, shared libraries, demand
loading, shared copy-on-write executables, proper memory management,
and multistack networking including IPv4 and IPv6.
It is distributed under the GNU General Public License - see the
accompanying COPYING file for more details.
ON WHAT HARDWARE DOES IT RUN?
Although originally developed first for 32-bit x86-based PCs (386 or higher),
today Linux also runs on (at least) the Compaq Alpha AXP, Sun SPARC and
UltraSPARC, Motorola 68000, PowerPC, PowerPC64, ARM, Hitachi SuperH, Cell,
IBM S/390, MIPS, HP PA-RISC, Intel IA-64, DEC VAX, AMD x86-64, AXIS CRIS,
Xtensa, Tilera TILE, AVR32 and Renesas M32R architectures.
Linux is easily portable to most general-purpose 32- or 64-bit architectures
as long as they have a paged memory management unit (PMMU) and a port of the
GNU C compiler (gcc) (part of The GNU Compiler Collection, GCC). Linux has
also been ported to a number of architectures without a PMMU, although
functionality is then obviously somewhat limited.
Linux has also been ported to itself. You can now run the kernel as a
userspace application - this is called UserMode Linux (UML).
DOCUMENTATION:
- There is a lot of documentation available both in electronic form on
the Internet and in books, both Linux-specific and pertaining to
general UNIX questions. I'd recommend looking into the documentation
subdirectories on any Linux FTP site for the LDP (Linux Documentation
Project) books. This README is not meant to be documentation on the
system: there are much better sources available.
- There are various README files in the Documentation/ subdirectory:
these typically contain kernel-specific installation notes for some
drivers for example. See Documentation/00-INDEX for a list of what
is contained in each file. Please read the Changes file, as it
contains information about the problems, which may result by upgrading
your kernel.
- The Documentation/DocBook/ subdirectory contains several guides for
kernel developers and users. These guides can be rendered in a
number of formats: PostScript (.ps), PDF, HTML, & man-pages, among others.
After installation, "make psdocs", "make pdfdocs", "make htmldocs",
or "make mandocs" will render the documentation in the requested format.
INSTALLING the kernel source:
- If you install the full sources, put the kernel tarball in a
directory where you have permissions (eg. your home directory) and
unpack it:
gzip -cd linux-3.X.tar.gz | tar xvf -
or
bzip2 -dc linux-3.X.tar.bz2 | tar xvf -
Replace "XX" with the version number of the latest kernel.
Do NOT use the /usr/src/linux area! This area has a (usually
incomplete) set of kernel headers that are used by the library header
files. They should match the library, and not get messed up by
whatever the kernel-du-jour happens to be.
- You can also upgrade between 3.x releases by patching. Patches are
distributed in the traditional gzip and the newer bzip2 format. To
install by patching, get all the newer patch files, enter the
top level directory of the kernel source (linux-3.x) and execute:
gzip -cd ../patch-3.x.gz | patch -p1
or
bzip2 -dc ../patch-3.x.bz2 | patch -p1
(repeat xx for all versions bigger than the version of your current
source tree, _in_order_) and you should be ok. You may want to remove
the backup files (xxx~ or xxx.orig), and make sure that there are no
failed patches (xxx# or xxx.rej). If there are, either you or me has
made a mistake.
Unlike patches for the 3.x kernels, patches for the 3.x.y kernels
(also known as the -stable kernels) are not incremental but instead apply
directly to the base 3.x kernel. Please read
Documentation/applying-patches.txt for more information.
Alternatively, the script patch-kernel can be used to automate this
process. It determines the current kernel version and applies any
patches found.
linux/scripts/patch-kernel linux
The first argument in the command above is the location of the
kernel source. Patches are applied from the current directory, but
an alternative directory can be specified as the second argument.
- If you are upgrading between releases using the stable series patches
(for example, patch-3.x.y), note that these "dot-releases" are
not incremental and must be applied to the 3.x base tree. For
example, if your base kernel is 3.0 and you want to apply the
3.0.3 patch, you do not and indeed must not first apply the
3.0.1 and 3.0.2 patches. Similarly, if you are running kernel
version 3.0.2 and want to jump to 3.0.3, you must first
reverse the 3.0.2 patch (that is, patch -R) _before_ applying
the 3.0.3 patch.
You can read more on this in Documentation/applying-patches.txt
- Make sure you have no stale .o files and dependencies lying around:
cd linux
make mrproper
You should now have the sources correctly installed.
SOFTWARE REQUIREMENTS
Compiling and running the 3.x kernels requires up-to-date
versions of various software packages. Consult
Documentation/Changes for the minimum version numbers required
and how to get updates for these packages. Beware that using
excessively old versions of these packages can cause indirect
errors that are very difficult to track down, so don't assume that
you can just update packages when obvious problems arise during
build or operation.
BUILD directory for the kernel:
When compiling the kernel all output files will per default be
stored together with the kernel source code.
Using the option "make O=output/dir" allow you to specify an alternate
place for the output files (including .config).
Example:
kernel source code: /usr/src/linux-3.N
build directory: /home/name/build/kernel
To configure and build the kernel use:
cd /usr/src/linux-3.N
make O=/home/name/build/kernel menuconfig
make O=/home/name/build/kernel
sudo make O=/home/name/build/kernel modules_install install
Please note: If the 'O=output/dir' option is used then it must be
used for all invocations of make.
CONFIGURING the kernel:
Do not skip this step even if you are only upgrading one minor
version. New configuration options are added in each release, and
odd problems will turn up if the configuration files are not set up
as expected. If you want to carry your existing configuration to a
new version with minimal work, use "make oldconfig", which will
only ask you for the answers to new questions.
- Alternate configuration commands are:
"make config" Plain text interface.
"make menuconfig" Text based color menus, radiolists & dialogs.
"make nconfig" Enhanced text based color menus.
"make xconfig" X windows (Qt) based configuration tool.
"make gconfig" X windows (Gtk) based configuration tool.
"make oldconfig" Default all questions based on the contents of
your existing ./.config file and asking about
new config symbols.
"make silentoldconfig"
Like above, but avoids cluttering the screen
with questions already answered.
Additionally updates the dependencies.
"make defconfig" Create a ./.config file by using the default
symbol values from either arch/$ARCH/defconfig
or arch/$ARCH/configs/${PLATFORM}_defconfig,
depending on the architecture.
"make ${PLATFORM}_defconfig"
Create a ./.config file by using the default
symbol values from
arch/$ARCH/configs/${PLATFORM}_defconfig.
Use "make help" to get a list of all available
platforms of your architecture.
"make allyesconfig"
Create a ./.config file by setting symbol
values to 'y' as much as possible.
"make allmodconfig"
Create a ./.config file by setting symbol
values to 'm' as much as possible.
"make allnoconfig" Create a ./.config file by setting symbol
values to 'n' as much as possible.
"make randconfig" Create a ./.config file by setting symbol
values to random values.
You can find more information on using the Linux kernel config tools
in Documentation/kbuild/kconfig.txt.
NOTES on "make config":
- having unnecessary drivers will make the kernel bigger, and can
under some circumstances lead to problems: probing for a
nonexistent controller card may confuse your other controllers
- compiling the kernel with "Processor type" set higher than 386
will result in a kernel that does NOT work on a 386. The
kernel will detect this on bootup, and give up.
- A kernel with math-emulation compiled in will still use the
coprocessor if one is present: the math emulation will just
never get used in that case. The kernel will be slightly larger,
but will work on different machines regardless of whether they
have a math coprocessor or not.
- the "kernel hacking" configuration details usually result in a
bigger or slower kernel (or both), and can even make the kernel
less stable by configuring some routines to actively try to
break bad code to find kernel problems (kmalloc()). Thus you
should probably answer 'n' to the questions for
"development", "experimental", or "debugging" features.
COMPILING the kernel:
- Make sure you have at least gcc 3.2 available.
For more information, refer to Documentation/Changes.
Please note that you can still run a.out user programs with this kernel.
- Do a "make" to create a compressed kernel image. It is also
possible to do "make install" if you have lilo installed to suit the
kernel makefiles, but you may want to check your particular lilo setup first.
To do the actual install you have to be root, but none of the normal
build should require that. Don't take the name of root in vain.
- If you configured any of the parts of the kernel as `modules', you
will also have to do "make modules_install".
- Verbose kernel compile/build output:
Normally the kernel build system runs in a fairly quiet mode (but not
totally silent). However, sometimes you or other kernel developers need
to see compile, link, or other commands exactly as they are executed.
For this, use "verbose" build mode. This is done by inserting
"V=1" in the "make" command. E.g.:
make V=1 all
To have the build system also tell the reason for the rebuild of each
target, use "V=2". The default is "V=0".
- Keep a backup kernel handy in case something goes wrong. This is
especially true for the development releases, since each new release
contains new code which has not been debugged. Make sure you keep a
backup of the modules corresponding to that kernel, as well. If you
are installing a new kernel with the same version number as your
working kernel, make a backup of your modules directory before you
do a "make modules_install".
Alternatively, before compiling, use the kernel config option
"LOCALVERSION" to append a unique suffix to the regular kernel version.
LOCALVERSION can be set in the "General Setup" menu.
- In order to boot your new kernel, you'll need to copy the kernel
image (e.g. .../linux/arch/i386/boot/bzImage after compilation)
to the place where your regular bootable kernel is found.
- Booting a kernel directly from a floppy without the assistance of a
bootloader such as LILO, is no longer supported.
If you boot Linux from the hard drive, chances are you use LILO which
uses the kernel image as specified in the file /etc/lilo.conf. The
kernel image file is usually /vmlinuz, /boot/vmlinuz, /bzImage or
/boot/bzImage. To use the new kernel, save a copy of the old image
and copy the new image over the old one. Then, you MUST RERUN LILO
to update the loading map!! If you don't, you won't be able to boot
the new kernel image.
Reinstalling LILO is usually a matter of running /sbin/lilo.
You may wish to edit /etc/lilo.conf to specify an entry for your
old kernel image (say, /vmlinux.old) in case the new one does not
work. See the LILO docs for more information.
After reinstalling LILO, you should be all set. Shutdown the system,
reboot, and enjoy!
If you ever need to change the default root device, video mode,
ramdisk size, etc. in the kernel image, use the 'rdev' program (or
alternatively the LILO boot options when appropriate). No need to
recompile the kernel to change these parameters.
- Reboot with the new kernel and enjoy.
IF SOMETHING GOES WRONG:
- If you have problems that seem to be due to kernel bugs, please check
the file MAINTAINERS to see if there is a particular person associated
with the part of the kernel that you are having trouble with. If there
isn't anyone listed there, then the second best thing is to mail
them to me (torvalds@linux-foundation.org), and possibly to any other
relevant mailing-list or to the newsgroup.
- In all bug-reports, *please* tell what kernel you are talking about,
how to duplicate the problem, and what your setup is (use your common
sense). If the problem is new, tell me so, and if the problem is
old, please try to tell me when you first noticed it.
- If the bug results in a message like
unable to handle kernel paging request at address C0000010
Oops: 0002
EIP: 0010:XXXXXXXX
eax: xxxxxxxx ebx: xxxxxxxx ecx: xxxxxxxx edx: xxxxxxxx
esi: xxxxxxxx edi: xxxxxxxx ebp: xxxxxxxx
ds: xxxx es: xxxx fs: xxxx gs: xxxx
Pid: xx, process nr: xx
xx xx xx xx xx xx xx xx xx xx
or similar kernel debugging information on your screen or in your
system log, please duplicate it *exactly*. The dump may look
incomprehensible to you, but it does contain information that may
help debugging the problem. The text above the dump is also
important: it tells something about why the kernel dumped code (in
the above example it's due to a bad kernel pointer). More information
on making sense of the dump is in Documentation/oops-tracing.txt
- If you compiled the kernel with CONFIG_KALLSYMS you can send the dump
as is, otherwise you will have to use the "ksymoops" program to make
sense of the dump (but compiling with CONFIG_KALLSYMS is usually preferred).
This utility can be downloaded from
ftp://ftp.<country>.kernel.org/pub/linux/utils/kernel/ksymoops/ .
Alternately you can do the dump lookup by hand:
- In debugging dumps like the above, it helps enormously if you can
look up what the EIP value means. The hex value as such doesn't help
me or anybody else very much: it will depend on your particular
kernel setup. What you should do is take the hex value from the EIP
line (ignore the "0010:"), and look it up in the kernel namelist to
see which kernel function contains the offending address.
To find out the kernel function name, you'll need to find the system
binary associated with the kernel that exhibited the symptom. This is
the file 'linux/vmlinux'. To extract the namelist and match it against
the EIP from the kernel crash, do:
nm vmlinux | sort | less
This will give you a list of kernel addresses sorted in ascending
order, from which it is simple to find the function that contains the
offending address. Note that the address given by the kernel
debugging messages will not necessarily match exactly with the
function addresses (in fact, that is very unlikely), so you can't
just 'grep' the list: the list will, however, give you the starting
point of each kernel function, so by looking for the function that
has a starting address lower than the one you are searching for but
is followed by a function with a higher address you will find the one
you want. In fact, it may be a good idea to include a bit of
"context" in your problem report, giving a few lines around the
interesting one.
If you for some reason cannot do the above (you have a pre-compiled
kernel image or similar), telling me as much about your setup as
possible will help. Please read the REPORTING-BUGS document for details.
- Alternately, you can use gdb on a running kernel. (read-only; i.e. you
cannot change values or set break points.) To do this, first compile the
kernel with -g; edit arch/i386/Makefile appropriately, then do a "make
clean". You'll also need to enable CONFIG_PROC_FS (via "make config").
After you've rebooted with the new kernel, do "gdb vmlinux /proc/kcore".
You can now use all the usual gdb commands. The command to look up the
point where your system crashed is "l *0xXXXXXXXX". (Replace the XXXes
with the EIP value.)
gdb'ing a non-running kernel currently fails because gdb (wrongly)
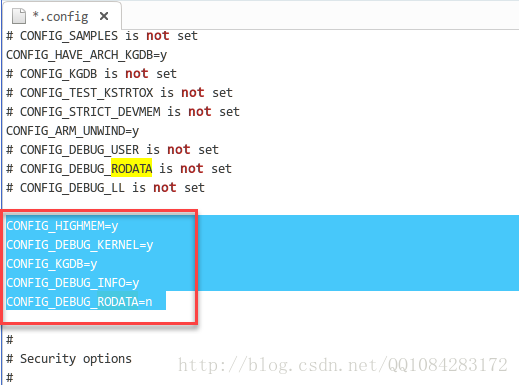
disregards the starting offset for which the kernel is compiled.修改生成的Android内核编译配置文件.config,增加Android内核编译的config选项。默认的 make goldfish_armv7_defconfig 配置没有打开调试选项,也没有使用HIGHMEM等选项,因此为了使用 kgdb 调试Android内核必须增加这些选项。这里手动打开goldfish/.config文件,增加调试相关的选项配置。
# 打开Android内核编译的配置文件
$ gedit .config# 设置模拟器的运行内存-可选参数
CONFIG_HIGHMEM=y
CONFIG_DEBUG_KERNEL=y
CONFIG_KGDB=y
CONFIG_DEBUG_INFO=y
# 真机设备调试需要设置这一项,模拟器不需要
#CONFIG_KGDB_SERIAL_CONSOLE=y
# 可以是直接在配置文件中去掉这一项
CONFIG_DEBUG_RODATA=n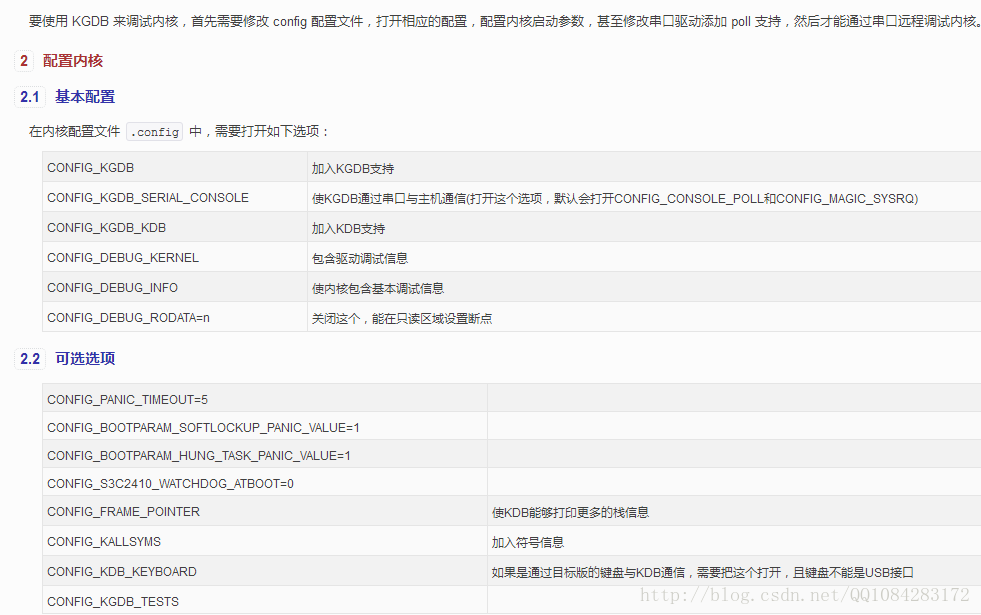
执行修改Android内核编译配置文件.config的结果如下图所示:
Android内核编译配置文件的修改也可以通过执行 make menuconfig 命令进行修改,只不过麻烦一下。上面修改.config完成以后,保存和关闭.config文件,然后执行下面的命令进行Android内核源码的编译。由于前面修改Android内核编译配置时,增加了几个配置,因此编译一开始会有提示让选择配置选项,记得相关的配置全部选 y 就可以了。Android内核编译完成后,goldfish/arch/arm/boot/zImage文件出现,这个文件就是Android内核文件了。
$ make -j4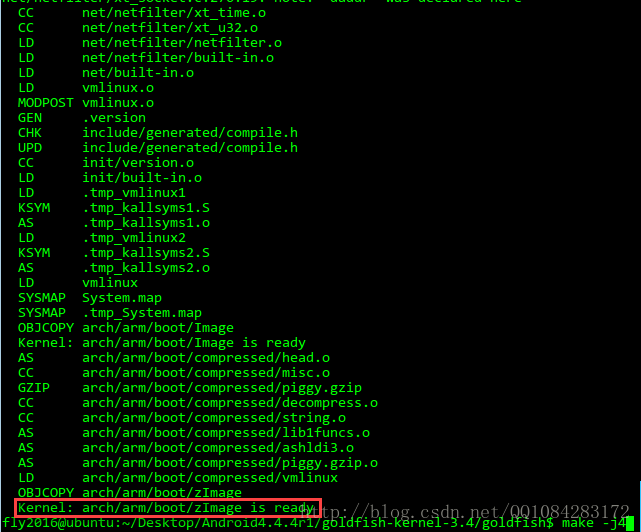
四、Android内核的调试
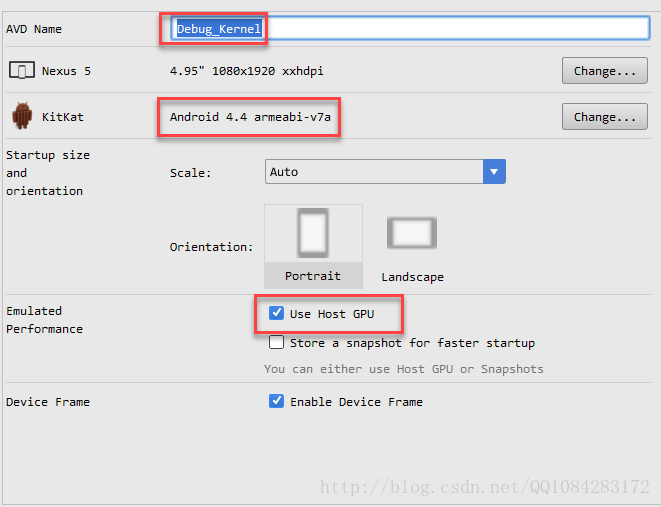
1.使用 Adt-bundle-x86_64 或者 Android Studio 开发Android程序时搭建的环境中的Android模拟器 emulator 来加载上面编译成功的Android内核镜像文件。根据Android内核源码 android-goldfish-3.4 支持的Android系统的版本,来创建Android 模拟器命名为 Debug_Kernel 。这里根据实际情况创建Android 4.4.4 API 19 版本的Android模拟器。首先使用Android综合开发工具 Android Studio 创建名称为 Debug_Kernel 的Android模拟器,设参数置如下图,后面用创建的这个模拟器来加载上面编译成功的Android内核镜像文件 goldfish/arch/arm/boot/zImage,进行Android内核的调试。
提示:
1.在进行后面的实践中,需要添加Android SDK到系统的环境变量中,否则执行 emulator 命令时需要使用全路径比较麻烦,下面是添加 Android SDK 到环境变量中的操作命令:
# 编辑环境变量配置文件
$ sudo gedit /etc/profile

# 添加到环境变量配置文件/etc/profile中的内容

# Android SDK
export ANDROID_SDK=/home/fly2016/Android/Sdk
export PATH=$PATH:${ANDROID_SDK}/platform-tools:${ANDROID_SDK}/tools

# Android NDK(顺便添加)
export ANDROID_NDK=/home/fly2016/Android/Sdk/ndk-bundle
export PATH=$PATH:${ANDROID_NDK}

# 更新系统环境变量
$ source /etc/profile

# 测试Android SDK是否配置成功的命令
$ adb verison
$ emulator -help

# 测试Android NDK是否配置成功的命令
$ ndk-build
$ android create avd
Error: The parameters --name, --target must be defined for action 'create avd'

       Usage:
       android [global options] create avd [action options]
       Global options:
  -h --help       : Help on a specific command.
  -v --verbose    : Verbose mode, shows errors, warnings and all messages.
     --clear-cache: Clear the SDK Manager repository manifest cache.
  -s --silent     : Silent mode, shows errors only.

                     Action "create avd":
  Creates a new Android Virtual Device.
Options:
  -g --tag     : The sys-img tag to use for the AVD. The default is to
                 auto-select if the platform has only one tag for its system
                 images.
  -c --sdcard  : Path to a shared SD card image, or size of a new sdcard for
                 the new AVD.
  -n --name    : Name of the new AVD. [required]
  -a --snapshot: Place a snapshots file in the AVD, to enable persistence.
  -p --path    : Directory where the new AVD will be created.
  -f --force   : Forces creation (overwrites an existing AVD)
  -s --skin    : Skin for the new AVD.
  -t --target  : Target ID of the new AVD. [required]
  -b --abi     : The ABI to use for the AVD. The default is to auto-select the
                 ABI if the platform has only one ABI for its system images.
  -d --device  : The optional device definition to use. Can be a device index
                 or id.
使用 android create avd 命令,创建Android模拟器Debug_Kernel的示例,如下:
# 查看本地下载的Android SDK
$ android list targets

# 创建Android模拟器 Debug_Kernel
$ android create avd -n Debug_Kernel -t android-19 -b default/armeabi-v7a -s HVGA
Android API 19的Android模拟器 Debug_Kernel 创建成功以后,使用下面的命令检查新创建的Android模拟器 Debug_Kernel 能否正常启动成功。
# 查看已经创建的Android模拟器
$ emulator -list-avds

# 启动运行创建的Android模拟器Debug_Kernel
$ emulator -avd Debug_Kernel -gpu mesa$ emulator -avd Debug_Kernel -verbose -netfast -show-kernel -kernel ./arch/arm/boot/zImage -gpu mesa -qemu -s -S 调试内核一般不需要显示图形界面和声音,因此增加启动选项 -no-window, no-audio ,增加 -verbose -show-kernel 选项 可以看到内核的详细输出信息,-kernel 选项 指定加载的内核镜像文件为前面编译的Android内核镜像文件,增加 -qemu -s -S 选项 启动调试监听即Android内核启动以后会监听端口 1234 ,暂停等待调试,这时需要打开另一个命令终端运行 gdb 程序,对Android内核进行调试,还可以增加 -memory 2048 选项 设置运行的内存大小,增加运行内存使调试运行更流畅。
执行结果输出信息,如下所示:
fly2016@ubuntu:~/Desktop/Android4.4.4r1/goldfish-kernel-3.4/goldfish$ emulator -avd Debug_Kernel -verbose -netfast -show-kernel -kernel ./arch/arm/boot/zImage  -gpu mesa -qemu -s -S
emulator:Found AVD name 'Debug_Kernel'
emulator:Found AVD target architecture: arm
emulator:  Found directory: /home/fly2016/Android/Sdk/system-images/android-19/default/armeabi-v7a/

emulator:Probing for /home/fly2016/Android/Sdk/system-images/android-19/default/armeabi-v7a//kernel-ranchu: file missing
emulator:Auto-config: -engine classic (based on configuration)
emulator:  Found directory: /home/fly2016/Android/Sdk/system-images/android-19/default/armeabi-v7a/

emulator:Looking for emulator-arm to emulate 'arm' CPU
emulator:Probing program: /home/fly2016/Android/Sdk/tools/emulator64-arm
emulator:return result: /home/fly2016/Android/Sdk/tools/emulator64-arm
emulator:Found target-specific 64-bit emulator binary: /home/fly2016/Android/Sdk/tools/emulator64-arm
emulator:Adding library search path: '/home/fly2016/Android/Sdk/tools/lib64'
emulator:Adding library search path: '/home/fly2016/Android/Sdk/tools/lib64/libstdc++'
emulator:  Found directory: /home/fly2016/Android/Sdk/system-images/android-19/default/armeabi-v7a/

emulator:  Found directory: /home/fly2016/Android/Sdk/system-images/android-19/default/armeabi-v7a/

emulator:GPU emulation enabled using 'mesa' mode
WARNING: The Mesa software renderer is deprecated. Use Swiftshader (-gpu swiftshader) for software rendering.
emulator: Adding library search path for Qt: '/home/fly2016/Android/Sdk/tools/lib64/qt/lib'
emulator: Setting Qt plugin search path: QT_QPA_PLATFORM_PLUGIN_PATH=/home/fly2016/Android/Sdk/tools/lib64/qt/plugins
emulator: Running :/home/fly2016/Android/Sdk/tools/emulator64-arm
emulator: qemu backend: argv[00] = "/home/fly2016/Android/Sdk/tools/emulator64-arm"
emulator: qemu backend: argv[01] = "-avd"
emulator: qemu backend: argv[02] = "Debug_Kernel"
emulator: qemu backend: argv[03] = "-verbose"
emulator: qemu backend: argv[04] = "-netfast"
emulator: qemu backend: argv[05] = "-show-kernel"
emulator: qemu backend: argv[06] = "-kernel"
emulator: qemu backend: argv[07] = "./arch/arm/boot/zImage"
emulator: qemu backend: argv[08] = "-gpu"
emulator: qemu backend: argv[09] = "mesa"
emulator: qemu backend: argv[10] = "-qemu"
emulator: qemu backend: argv[11] = "-s"
emulator: qemu backend: argv[12] = "-S"
emulator: Concatenated backend parameters:
 /home/fly2016/Android/Sdk/tools/emulator64-arm -avd Debug_Kernel -verbose -netfast -show-kernel -kernel ./arch/arm/boot/zImage -gpu mesa -qemu -s -S
emulator: Android virtual device file at: /home/fly2016/.android/avd/Debug_Kernel.ini
emulator: virtual device content at /home/fly2016/.android/avd/Debug_Kernel.avd
emulator: virtual device config file: /home/fly2016/.android/avd/Debug_Kernel.avd/config.ini
emulator: using core hw config path: /home/fly2016/.android/avd/Debug_Kernel.avd/hardware-qemu.ini
emulator: Found AVD target API level: 19
emulator: Read property file at /home/fly2016/Android/Sdk/system-images/android-19/default/armeabi-v7a//build.prop
emulator: No boot.prop property file found.
emulator: found skin 'nexus_5' in directory: /opt/android-studio/plugins/android/lib/device-art-resources/
emulator: autoconfig: -skin nexus_5
emulator: autoconfig: -skindir /opt/android-studio/plugins/android/lib/device-art-resources/
emulator: Auto-detect: Kernel image requires legacy device naming scheme.
emulator: Auto-detect: Kernel does support YAFFS2 partitions.
emulator: autoconfig: -ramdisk /home/fly2016/Android/Sdk/system-images/android-19/default/armeabi-v7a//ramdisk.img
emulator: Using initial system image: /home/fly2016/Android/Sdk/system-images/android-19/default/armeabi-v7a//system.img
emulator: autoconfig: -initdata /home/fly2016/.android/avd/Debug_Kernel.avd/userdata.img
emulator: autoconfig: -cache /home/fly2016/.android/avd/Debug_Kernel.avd/cache.img
emulator: autoconfig: -sdcard /home/fly2016/.android/avd/Debug_Kernel.avd/sdcard.img
emulator: Physical RAM size: 1536MB

emulator: VM heap size 64MB is below hardware specified minimum of 384MB,setting it to that value
emulator: System image is read only
emulator: GPU emulation enabled using 'mesa' mode
emulator: Found 1 DNS servers: 192.168.170.2
emulator: trying to load skin file '/opt/android-studio/plugins/android/lib/device-art-resources//nexus_5/layout'
emulator: Found 1 DNS servers: 192.168.170.2
emulator: WARNING: Classic qemu does not support SMP. The hw.cpu.ncore option from your config file is ignored.
Content of hardware configuration file:
  hw.cpu.arch = arm
  hw.cpu.model = cortex-a8
  hw.cpu.ncore = 2
  hw.ramSize = 1536
  hw.screen = touch
  hw.mainKeys = false
  hw.trackBall = false
  hw.keyboard = true
  hw.keyboard.lid = false
  hw.keyboard.charmap = qwerty2
  hw.dPad = false
  hw.gsmModem = true
  hw.gps = true
  hw.battery = true
  hw.accelerometer = true
  hw.audioInput = true
  hw.audioOutput = true
  hw.sdCard = true
  hw.sdCard.path = /home/fly2016/.android/avd/Debug_Kernel.avd/sdcard.img
  disk.cachePartition = true
  disk.cachePartition.path = /home/fly2016/.android/avd/Debug_Kernel.avd/cache.img
  disk.cachePartition.size = 66m
  hw.lcd.width = 1080
  hw.lcd.height = 1920
  hw.lcd.depth = 16
  hw.lcd.density = 480
  hw.lcd.backlight = true
  hw.gpu.enabled = true
  hw.gpu.mode = mesa
  hw.gpu.blacklisted = no
  hw.initialOrientation = portrait
  hw.camera.back = none
  hw.camera.front = none
  vm.heapSize = 384
  hw.sensors.light = true
  hw.sensors.pressure = true
  hw.sensors.humidity = true
  hw.sensors.proximity = true
  hw.sensors.magnetic_field = true
  hw.sensors.orientation = true
  hw.sensors.temperature = true
  hw.useext4 = true
  kernel.path = ./arch/arm/boot/zImage
  kernel.newDeviceNaming = no
  kernel.supportsYaffs2 = yes
  disk.ramdisk.path = /home/fly2016/Android/Sdk/system-images/android-19/default/armeabi-v7a//ramdisk.img
  disk.systemPartition.initPath = /home/fly2016/Android/Sdk/system-images/android-19/default/armeabi-v7a//system.img
  disk.systemPartition.size = 550m
  disk.dataPartition.path = /home/fly2016/.android/avd/Debug_Kernel.avd/userdata-qemu.img
  disk.dataPartition.initPath = /home/fly2016/.android/avd/Debug_Kernel.avd/userdata.img
  disk.dataPartition.size = 550m
  avd.name = Debug_Kernel
.
emulator: WARNING: CPU acceleration only works with x86/x86_64 system images.
QEMU options list:
emulator: argv[00] = "/home/fly2016/Android/Sdk/tools/emulator64-arm"
emulator: argv[01] = "-netfast"
emulator: argv[02] = "-dns-server"
emulator: argv[03] = "192.168.170.2"
emulator: argv[04] = "-serial"
emulator: argv[05] = "android-kmsg"
emulator: argv[06] = "-serial"
emulator: argv[07] = "null"
emulator: argv[08] = "-android-hw"
emulator: argv[09] = "/home/fly2016/.android/avd/Debug_Kernel.avd/hardware-qemu.ini"
emulator: argv[10] = "-s"
emulator: argv[11] = "-S"
emulator: argv[12] = "-append"
emulator: argv[13] = "qemu=1 androidboot.hardware=goldfish console=ttyS0 android.qemud=1 android.checkjni=1 qemu.gles=1"
Concatenated QEMU options:
 /home/fly2016/Android/Sdk/tools/emulator64-arm -netfast -dns-server 192.168.170.2 -serial android-kmsg -serial null -android-hw /home/fly2016/.android/avd/Debug_Kernel.avd/hardware-qemu.ini -s -S -append 'qemu=1 androidboot.hardware=goldfish console=ttyS0 android.qemud=1 android.checkjni=1 qemu.gles=1'
emulator: Starting QEMU main loop
emulator: registered 'boot-properties' qemud service
emulator: Using kernel serial device prefix: ttyS
emulator: AVD Name: Debug_Kernel
emulator: Ramdisk image contains fstab.goldfish file
emulator: Found format of system partition: 'ext4'
emulator: Found format of userdata partition: 'ext4'
emulator: Found format of cache partition: 'ext4'
emulator: system partition format: ext4
emulator: nand_add_dev: system,size=0x22600000,file=/home/fly2016/Android/Sdk/system-images/android-19/default/armeabi-v7a//system.img,pagesize=512,extrasize=0,readonly
emulator: userdata partition format: ext4
emulator: nand_add_dev: userdata,size=0x22600000,file=/home/fly2016/.android/avd/Debug_Kernel.avd/userdata-qemu.img,pagesize=512,extrasize=0
emulator: cache partition format: ext4
emulator: Creating empty cache partition image at: /home/fly2016/.android/avd/Debug_Kernel.avd/cache.img
Creating filesystem with parameters:
    Size: 69206016
    Block size: 4096
    Blocks per group: 32768
    Inodes per group: 4224
    Inode size: 256
    Journal blocks: 1024
    Label:
    Blocks: 16896
    Block groups: 1
    Reserved block group size: 7
Created filesystem with 11/4224 inodes and 1302/16896 blocks
emulator: nand_add_dev: cache,size=0x4200000,file=/home/fly2016/.android/avd/Debug_Kernel.avd/cache.img,pagesize=512,extrasize=0
emulator: Adding boot property: 'dalvik.vm.heapsize' = '384m'
emulator: Adding boot property: 'qemu.sf.lcd_density' = '480'
emulator: Adding boot property: 'qemu.hw.mainkeys' = '0'
emulator: Adding boot property: 'qemu.sf.fake_camera' = 'none'
emulator: Found 1 DNS servers: 192.168.170.2
emulator: Adding boot property: 'ro.opengles.version' = '131072'
emulator: Initializing hardware OpenGLES emulation support
emulator: Kernel parameters: qemu=1 androidboot.hardware=goldfish console=ttyS0 android.qemud=1 android.checkjni=1 qemu.gles=1
emulator: ro.adb.qemud invalid or not found, API >= 16, defaulting ro.adb.qemud = 0
emulator: (setup_console_and_adb_ports) trying console port 5554, adb port 5555 (legacy: true)
emulator: (android_console_start) initializing on port 5554
bind: Transport endpoint is not connected
emulator: (setup_console_and_adb_ports) trying console port 5556, adb port 5557 (legacy: true)
emulator: (android_console_start) initializing on port 5556
emulator: control console listening on port 5556, ADB on port 5557
emulator: sent '0012host:emulator:5557' to ADB server
emulator: Listening for console connections on port: 5556
emulator: Serial number of this emulator (for ADB): emulator-5556
emulator: android_hw_fingerprint_init: fingerprint qemud listen service initialized

emulator: Skipping metrics reporting: No user opt-in.
Android模拟器 emulator 命令的使用帮助说明如下,上面Android模拟器的各个启动参数的意思,可以参考下面命令帮助。
$ emulator -help
sh: 1: glxinfo: not found
Android Emulator usage: emulator [options] [-qemu args]
  options:
    -list-avds                     list available AVDs
    -sysdir <dir>                  search for system disk images in <dir>
    -system <file>                 read initial system image from <file>
    -writable-system               make system image writable after 'adb remount'
    -datadir <dir>                 write user data into <dir>
    -kernel <file>                 use specific emulated kernel
    -ramdisk <file>                ramdisk image (default <system>/ramdisk.img
    -image <file>                  obsolete, use -system <file> instead
    -initdata <file>               same as '-init-data <file>'
    -data <file>                   data image (default <datadir>/userdata-qemu.img
    -partition-size <size>         system/data partition size in MBs
    -cache <file>                  cache partition image (default is temporary file)
    -cache-size <size>             cache partition size in MBs
    -no-cache                      disable the cache partition
    -nocache                       same as -no-cache
    -sdcard <file>                 SD card image (default <datadir>/sdcard.img
    -snapstorage <file>            file that contains all state snapshots (default <datadir>/snapshots.img)
    -no-snapstorage                do not mount a snapshot storage file (this disables all snapshot functionality)
    -snapshot <name>               name of snapshot within storage file for auto-start and auto-save (default 'default-boot')
    -no-snapshot                   perform a full boot and do not do not auto-save, but qemu vmload and vmsave operate on snapstorage
    -no-snapshot-save              do not auto-save to snapshot on exit: abandon changed state
    -no-snapshot-load              do not auto-start from snapshot: perform a full boot
    -snapshot-list                 show a list of available snapshots
    -no-snapshot-update-time       do not do try to correct snapshot time on restore
    -wipe-data                     reset the user data image (copy it from initdata)
    -avd <name>                    use a specific android virtual device
    -skindir <dir>                 search skins in <dir> (default <system>/skins)
    -skin <name>                   select a given skin
    -no-skin                       deprecated: create an AVD with no skin instead
    -noskin                        same as -no-skin
    -memory <size>                 physical RAM size in MBs
    -accel <mode>                  Configure emulation acceleration
    -no-accel                      Same as '-accel off'
    -ranchu                        Use new emulator backend instead of the classic one
    -engine <engine>               Select engine. auto|classic|qemu2
    -netspeed <speed>              maximum network download/upload speeds
    -netdelay <delay>              network latency emulation
    -netfast                       disable network shaping
    -code-profile <name>           enable code profiling
    -show-kernel                   display kernel messages
    -shell                         enable root shell on current terminal
    -no-jni                        disable JNI checks in the Dalvik runtime
    -nojni                         same as -no-jni
    -logcat <tags>                 enable logcat output with given tags
    -use-system-libs               Use system libstdc++ instead of bundled one
    -no-audio                      disable audio support
    -noaudio                       same as -no-audio
    -audio <backend>               use specific audio backend
    -raw-keys                      disable Unicode keyboard reverse-mapping (deprecated)
    -radio <device>                redirect radio modem interface to character device
    -port <port>                   TCP port that will be used for the console
    -ports <consoleport>,<adbport> TCP ports used for the console and adb bridge
    -onion <image>                 use overlay PNG image over screen
    -onion-alpha <%age>            specify onion-skin translucency
    -onion-rotation 0|1|2|3        specify onion-skin rotation
    -dpi-device <dpi>              specify device's resolution in dpi (default 165)
    -scale <scale>                 scale emulator window (deprecated)
    -http-proxy <proxy>            make TCP connections through a HTTP/HTTPS proxy
    -timezone <timezone>           use this timezone instead of the host's default
    -dns-server <servers>          use this DNS server(s) in the emulated system
    -cpu-delay <cpudelay>          throttle CPU emulation
    -no-boot-anim                  disable animation for faster boot
    -no-window                     disable graphical window display
    -version                       display emulator version number
    -report-console <socket>       report console port to remote socket
    -gps <device>                  redirect NMEA GPS to character device
    -keyset <name>                 specify keyset file name
    -shell-serial <device>         specific character device for root shell
    -tcpdump <file>                capture network packets to file
    -bootchart <timeout>           enable bootcharting
    -charmap <file>                use specific key character map
    -prop <name>=<value>           set system property on boot
    -shared-net-id <number>        join the shared network, using IP address 10.1.2.<number>
    -nand-limits <nlimits>         enforce NAND/Flash read/write thresholds
    -gpu <mode>                    set hardware OpenGLES emulation mode
    -camera-back <mode>            set emulation mode for a camera facing back
    -camera-front <mode>           set emulation mode for a camera facing front
    -webcam-list                   lists web cameras available for emulation
    -screen <mode>                 set emulated screen mode
    -force-32bit                   always use 32-bit emulator
    -selinux <disabled|permissive> Set SELinux to either disabled or permissive mode
    -unix-pipe <path>              Add <path> to the list of allowed Unix pipes
    -fixed-scale                   Use fixed 1:1 scale for the initial emulator window.

     -qemu args...                 pass arguments to qemu
     -qemu -h                      display qemu help

     -verbose                      same as '-debug-init'
     -debug <tags>                 enable/disable debug messages
     -debug-<tag>                  enable specific debug messages
     -debug-no-<tag>               disable specific debug messages

     -help                         print this help
     -help-<option>                print option-specific help

     -help-disk-images             about disk images
     -help-keys                    supported key bindings
     -help-debug-tags              debug tags for -debug <tags>
     -help-char-devices            character <device> specification
     -help-environment             environment variables
     -help-keyset-file             key bindings configuration file
     -help-virtual-device          virtual device management
     -help-sdk-images              about disk images when using the SDK
     -help-build-images            about disk images when building Android
     -help-all                     prints all help content
其实Android模拟器 emulator 就是
基于qemu虚拟机 开发的,因此Android模拟器 emulator 在运行的时候也支持qemu虚拟机的命令,在上面以 调试模式启动 Android虚拟机 Debug_Kernel 时使用的启动选项 -qemu -s -S的作用,可以参考命令行的帮助,如下图:
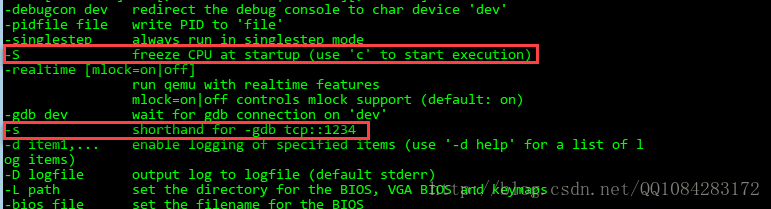
Android模拟器 emulator 使用qemu虚拟机命令行参数 的详细帮助参考如下:
fly2016@ubuntu:~$ emulator -qemu -h
sh: 1: glxinfo: not found
QEMU emulator version 2.2.0 , Copyright (c) 2003-2008 Fabrice Bellard
usage: qemu-system-i386 [options] [disk_image]

'disk_image' is a raw hard disk image for IDE hard disk 0

Standard options:
-h or -help     display this help and exit
-version        display version information and exit
-machine [type=]name[,prop[=value][,...]]
                selects emulated machine ('-machine help' for list)
                property accel=accel1[:accel2[:...]] selects accelerator
                supported accelerators are kvm, xen, tcg (default: tcg)
                kernel_irqchip=on|off controls accelerated irqchip support
                vmport=on|off|auto controls emulation of vmport (default: auto)
                kvm_shadow_mem=size of KVM shadow MMU
                dump-guest-core=on|off include guest memory in a core dump (default=on)
                mem-merge=on|off controls memory merge support (default: on)
                iommu=on|off controls emulated Intel IOMMU (VT-d) support (default=off)
-cpu cpu        select CPU ('-cpu help' for list)
-smp [cpus=]n[,maxcpus=cpus][,cores=cores][,threads=threads][,sockets=sockets]
                set the number of CPUs to 'n' [default=1]
                maxcpus= maximum number of total cpus, including
                offline CPUs for hotplug, etc
                cores= number of CPU cores on one socket
                threads= number of threads on one CPU core
                sockets= number of discrete sockets in the system
-numa node[,mem=size][,cpus=cpu[-cpu]][,nodeid=node]
-numa node[,memdev=id][,cpus=cpu[-cpu]][,nodeid=node]
-add-fd fd=fd,set=set[,opaque=opaque]
                Add 'fd' to fd 'set'
-set group.id.arg=value
                set <arg> parameter for item <id> of type <group>
                i.e. -set drive.$id.file=/path/to/image
-global driver.prop=value
                set a global default for a driver property
-boot [order=drives][,once=drives][,menu=on|off]
      [,splash=sp_name][,splash-time=sp_time][,reboot-timeout=rb_time][,strict=on|off]
                'drives': floppy (a), hard disk (c), CD-ROM (d), network (n)
                'sp_name': the file's name that would be passed to bios as logo picture, if menu=on
                'sp_time': the period that splash picture last if menu=on, unit is ms
                'rb_timeout': the timeout before guest reboot when boot failed, unit is ms
-m[emory] [size=]megs[,slots=n,maxmem=size]
                configure guest RAM
                size: initial amount of guest memory (default: 128MiB)
                slots: number of hotplug slots (default: none)
                maxmem: maximum amount of guest memory (default: none)
NOTE: Some architectures might enforce a specific granularity
-mem-path FILE  provide backing storage for guest RAM
-mem-prealloc   preallocate guest memory (use with -mem-path)
-k language     use keyboard layout (for example 'fr' for French)
-audio-help     print list of audio drivers and their options
-soundhw c1,... enable audio support
                and only specified sound cards (comma separated list)
                use '-soundhw help' to get the list of supported cards
                use '-soundhw all' to enable all of them
-balloon none   disable balloon device
-balloon virtio[,addr=str]
                enable virtio balloon device (default)
-device driver[,prop[=value][,...]]
                add device (based on driver)
                prop=value,... sets driver properties
                use '-device help' to print all possible drivers
                use '-device driver,help' to print all possible properties
-name string1[,process=string2][,debug-threads=on|off]
                set the name of the guest
                string1 sets the window title and string2 the process name (on Linux)
                When debug-threads is enabled, individual threads are given a separate name (on Linux)
                NOTE: The thread names are for debugging and not a stable API.
-uuid %08x-%04x-%04x-%04x-%012x
                specify machine UUID

Block device options:
-fda/-fdb file  use 'file' as floppy disk 0/1 image
-hda/-hdb file  use 'file' as IDE hard disk 0/1 image
-hdc/-hdd file  use 'file' as IDE hard disk 2/3 image
-cdrom file     use 'file' as IDE cdrom image (cdrom is ide1 master)
-drive [file=file][,if=type][,bus=n][,unit=m][,media=d][,index=i]
       [,cyls=c,heads=h,secs=s[,trans=t]][,snapshot=on|off]
       [,cache=writethrough|writeback|none|directsync|unsafe][,format=f]
       [,serial=s][,addr=A][,rerror=ignore|stop|report]
       [,werror=ignore|stop|report|enospc][,id=name][,aio=threads|native]
       [,readonly=on|off][,copy-on-read=on|off]
       [,discard=ignore|unmap][,detect-zeroes=on|off|unmap]
       [[,bps=b]|[[,bps_rd=r][,bps_wr=w]]]
       [[,iops=i]|[[,iops_rd=r][,iops_wr=w]]]
       [[,bps_max=bm]|[[,bps_rd_max=rm][,bps_wr_max=wm]]]
       [[,iops_max=im]|[[,iops_rd_max=irm][,iops_wr_max=iwm]]]
       [[,iops_size=is]]
                use 'file' as a drive image
-mtdblock file  use 'file' as on-board Flash memory image
-sd file        use 'file' as SecureDigital card image
-pflash file    use 'file' as a parallel flash image
-snapshot       write to temporary files instead of disk image files
-hdachs c,h,s[,t]
                force hard disk 0 physical geometry and the optional BIOS
                translation (t=none or lba) (usually QEMU can guess them)
-fsdev fsdriver,id=id[,path=path,][security_model={mapped-xattr|mapped-file|passthrough|none}]
 [,writeout=immediate][,readonly][,socket=socket|sock_fd=sock_fd]
-virtfs local,path=path,mount_tag=tag,security_model=[mapped-xattr|mapped-file|passthrough|none]
        [,writeout=immediate][,readonly][,socket=socket|sock_fd=sock_fd]
-virtfs_synth Create synthetic file system image

USB options:
-usb            enable the USB driver (will be the default soon)
-usbdevice name add the host or guest USB device 'name'

Display options:
-display sdl[,frame=on|off][,alt_grab=on|off][,ctrl_grab=on|off]
            [,window_close=on|off]|curses|none|
            gtk[,grab_on_hover=on|off]|
            vnc=<display>[,<optargs>]
                select display type
-nographic      disable graphical output and redirect serial I/Os to console
-curses         use a curses/ncurses interface instead of SDL
-no-frame       open SDL window without a frame and window decorations
-alt-grab       use Ctrl-Alt-Shift to grab mouse (instead of Ctrl-Alt)
-ctrl-grab      use Right-Ctrl to grab mouse (instead of Ctrl-Alt)
-no-quit        disable SDL window close capability
-sdl            enable SDL
-spice [port=port][,tls-port=secured-port][,x509-dir=<dir>]
       [,x509-key-file=<file>][,x509-key-password=<file>]
       [,x509-cert-file=<file>][,x509-cacert-file=<file>]
       [,x509-dh-key-file=<file>][,addr=addr][,ipv4|ipv6]
       [,tls-ciphers=<list>]
       [,tls-channel=[main|display|cursor|inputs|record|playback]]
       [,plaintext-channel=[main|display|cursor|inputs|record|playback]]
       [,sasl][,password=<secret>][,disable-ticketing]
       [,image-compression=[auto_glz|auto_lz|quic|glz|lz|off]]
       [,jpeg-wan-compression=[auto|never|always]]
       [,zlib-glz-wan-compression=[auto|never|always]]
       [,streaming-video=[off|all|filter]][,disable-copy-paste]
       [,disable-agent-file-xfer][,agent-mouse=[on|off]]
       [,playback-compression=[on|off]][,seamless-migration=[on|off]]
   enable spice
   at least one of {port, tls-port} is mandatory
-portrait       rotate graphical output 90 deg left (only PXA LCD)
-rotate <deg>   rotate graphical output some deg left (only PXA LCD)
-vga [std|cirrus|vmware|qxl|xenfb|tcx|cg3|none]
                select video card type
-full-screen    start in full screen
-vnc display    start a VNC server on display

i386 target only:
-win2k-hack     use it when installing Windows 2000 to avoid a disk full bug
-no-fd-bootchk  disable boot signature checking for floppy disks
-no-acpi        disable ACPI
-no-hpet        disable HPET
-acpitable [sig=str][,rev=n][,oem_id=str][,oem_table_id=str][,oem_rev=n][,asl_compiler_id=str][,asl_compiler_rev=n][,{data|file}=file1[:file2]...]
                ACPI table description
-smbios file=binary
                load SMBIOS entry from binary file
-smbios type=0[,vendor=str][,version=str][,date=str][,release=%d.%d][,uefi=on|off]
                specify SMBIOS type 0 fields
-smbios type=1[,manufacturer=str][,product=str][,version=str][,serial=str]
              [,uuid=uuid][,sku=str][,family=str]
                specify SMBIOS type 1 fields

Network options:
-net nic[,vlan=n][,macaddr=mac][,model=type][,name=str][,addr=str][,vectors=v]
                create a new Network Interface Card and connect it to VLAN 'n'
-net user[,vlan=n][,name=str][,net=addr[/mask]][,host=addr][,restrict=on|off]
         [,hostname=host][,dhcpstart=addr][,dns=addr][,dnssearch=domain][,tftp=dir]
         [,bootfile=f][,hostfwd=rule][,guestfwd=rule][,smb=dir[,smbserver=addr]]
                connect the user mode network stack to VLAN 'n', configure its
                DHCP server and enabled optional services
-net tap[,vlan=n][,name=str][,fd=h][,fds=x:y:...:z][,ifname=name][,script=file][,downscript=dfile][,helper=helper][,sndbuf=nbytes][,vnet_hdr=on|off][,vhost=on|off][,vhostfd=h][,vhostfds=x:y:...:z][,vhostforce=on|off][,queues=n]
                connect the host TAP network interface to VLAN 'n'
                use network scripts 'file' (default=/etc/qemu-ifup)
                to configure it and 'dfile' (default=/etc/qemu-ifdown)
                to deconfigure it
                use '[down]script=no' to disable script execution
                use network helper 'helper' (default=/opt2/digit/repo/studio-dev/prebuilts/android-emulator-build/qemu-android-deps/linux-x86_64/libexec/qemu-bridge-helper) to
                configure it
                use 'fd=h' to connect to an already opened TAP interface
                use 'fds=x:y:...:z' to connect to already opened multiqueue capable TAP interfaces
                use 'sndbuf=nbytes' to limit the size of the send buffer (the
                default is disabled 'sndbuf=0' to enable flow control set 'sndbuf=1048576')
                use vnet_hdr=off to avoid enabling the IFF_VNET_HDR tap flag
                use vnet_hdr=on to make the lack of IFF_VNET_HDR support an error condition
                use vhost=on to enable experimental in kernel accelerator
                    (only has effect for virtio guests which use MSIX)
                use vhostforce=on to force vhost on for non-MSIX virtio guests
                use 'vhostfd=h' to connect to an already opened vhost net device
                use 'vhostfds=x:y:...:z to connect to multiple already opened vhost net devices
                use 'queues=n' to specify the number of queues to be created for multiqueue TAP
-net bridge[,vlan=n][,name=str][,br=bridge][,helper=helper]
                connects a host TAP network interface to a host bridge device 'br'
                (default=br0) using the program 'helper'
                (default=/opt2/digit/repo/studio-dev/prebuilts/android-emulator-build/qemu-android-deps/linux-x86_64/libexec/qemu-bridge-helper)
-net l2tpv3[,vlan=n][,name=str],src=srcaddr,dst=dstaddr[,srcport=srcport][,dstport=dstport],txsession=txsession[,rxsession=rxsession][,ipv6=on/off][,udp=on/off][,cookie64=on/off][,counter][,pincounter][,txcookie=txcookie][,rxcookie=rxcookie][,offset=offset]
                connect the VLAN to an Ethernet over L2TPv3 pseudowire
                Linux kernel 3.3+ as well as most routers can talk
                L2TPv3. This transport allows connecting a VM to a VM,
                VM to a router and even VM to Host. It is a nearly-universal
                standard (RFC3391). Note - this implementation uses static
                pre-configured tunnels (same as the Linux kernel).
                use 'src=' to specify source address
                use 'dst=' to specify destination address
                use 'udp=on' to specify udp encapsulation
                use 'srcport=' to specify source udp port
                use 'dstport=' to specify destination udp port
                use 'ipv6=on' to force v6
                L2TPv3 uses cookies to prevent misconfiguration as
                well as a weak security measure
                use 'rxcookie=0x012345678' to specify a rxcookie
                use 'txcookie=0x012345678' to specify a txcookie
                use 'cookie64=on' to set cookie size to 64 bit, otherwise 32
                use 'counter=off' to force a 'cut-down' L2TPv3 with no counter
                use 'pincounter=on' to work around broken counter handling in peer
                use 'offset=X' to add an extra offset between header and data
-net socket[,vlan=n][,name=str][,fd=h][,listen=[host]:port][,connect=host:port]
                connect the vlan 'n' to another VLAN using a socket connection
-net socket[,vlan=n][,name=str][,fd=h][,mcast=maddr:port[,localaddr=addr]]
                connect the vlan 'n' to multicast maddr and port
                use 'localaddr=addr' to specify the host address to send packets from
-net socket[,vlan=n][,name=str][,fd=h][,udp=host:port][,localaddr=host:port]
                connect the vlan 'n' to another VLAN using an UDP tunnel
-net dump[,vlan=n][,file=f][,len=n]
                dump traffic on vlan 'n' to file 'f' (max n bytes per packet)
-net none       use it alone to have zero network devices. If no -net option
                is provided, the default is '-net nic -net user'
-netdev [user|tap|bridge|vhost-user|socket|hubport],id=str[,option][,option][,...]

Character device options:
-chardev null,id=id[,mux=on|off]
-chardev socket,id=id[,host=host],port=port[,to=to][,ipv4][,ipv6][,nodelay][,reconnect=seconds]
         [,server][,nowait][,telnet][,reconnect=seconds][,mux=on|off] (tcp)
-chardev socket,id=id,path=path[,server][,nowait][,telnet][,reconnect=seconds][,mux=on|off] (unix)
-chardev udp,id=id[,host=host],port=port[,localaddr=localaddr]
         [,localport=localport][,ipv4][,ipv6][,mux=on|off]
-chardev msmouse,id=id[,mux=on|off]
-chardev vc,id=id[[,width=width][,height=height]][[,cols=cols][,rows=rows]]
         [,mux=on|off]
-chardev ringbuf,id=id[,size=size]
-chardev file,id=id,path=path[,mux=on|off]
-chardev pipe,id=id,path=path[,mux=on|off]
-chardev pty,id=id[,mux=on|off]
-chardev stdio,id=id[,mux=on|off][,signal=on|off]
-chardev serial,id=id,path=path[,mux=on|off]
-chardev tty,id=id,path=path[,mux=on|off]
-chardev parallel,id=id,path=path[,mux=on|off]
-chardev parport,id=id,path=path[,mux=on|off]

Device URL Syntax:
-iscsi [user=user][,password=password]
       [,header-digest=CRC32C|CR32C-NONE|NONE-CRC32C|NONE
       [,initiator-name=initiator-iqn][,id=target-iqn]
                iSCSI session parameters
Bluetooth(R) options:
-bt hci,null    dumb bluetooth HCI - doesn't respond to commands
-bt hci,host[:id]
                use host's HCI with the given name
-bt hci[,vlan=n]
                emulate a standard HCI in virtual scatternet 'n'
-bt vhci[,vlan=n]
                add host computer to virtual scatternet 'n' using VHCI
-bt device:dev[,vlan=n]
                emulate a bluetooth device 'dev' in scatternet 'n'

TPM device options:
-tpmdev passthrough,id=id[,path=path][,cancel-path=path]
                use path to provide path to a character device; default is /dev/tpm0
                use cancel-path to provide path to TPM's cancel sysfs entry; if
                not provided it will be searched for in /sys/class/misc/tpm?/device

Linux/Multiboot boot specific:
-kernel bzImage use 'bzImage' as kernel image
-append cmdline use 'cmdline' as kernel command line
-initrd file    use 'file' as initial ram disk
-dtb    file    use 'file' as device tree image

Debug/Expert options:
-serial dev     redirect the serial port to char device 'dev'
-parallel dev   redirect the parallel port to char device 'dev'
-monitor dev    redirect the monitor to char device 'dev'
-qmp dev        like -monitor but opens in 'control' mode
-mon [chardev=]name[,mode=readline|control][,default]
-debugcon dev   redirect the debug console to char device 'dev'
-pidfile file   write PID to 'file'
-singlestep     always run in singlestep mode
-S              freeze CPU at startup (use 'c' to start execution)
-realtime [mlock=on|off]
                run qemu with realtime features
                mlock=on|off controls mlock support (default: on)
-gdb dev        wait for gdb connection on 'dev'
-s              shorthand for -gdb tcp::1234
-d item1,...    enable logging of specified items (use '-d help' for a list of log items)
-D logfile      output log to logfile (default stderr)
-L path         set the directory for the BIOS, VGA BIOS and keymaps
-bios file      set the filename for the BIOS
-enable-kvm     enable KVM full virtualization support
-enable-hax     enable HAX virtualization support
-xen-domid id   specify xen guest domain id
-xen-create     create domain using xen hypercalls, bypassing xend
                warning: should not be used when xend is in use
-xen-attach     attach to existing xen domain
                xend will use this when starting QEMU
-no-reboot      exit instead of rebooting
-no-shutdown    stop before shutdown
-loadvm [tag|id]
                start right away with a saved state (loadvm in monitor)
-daemonize      daemonize QEMU after initializing
-option-rom rom load a file, rom, into the option ROM space
-rtc [base=utc|localtime|date][,clock=host|rt|vm][,driftfix=none|slew]
                set the RTC base and clock, enable drift fix for clock ticks (x86 only)
-icount [shift=N|auto][,align=on|off]
                enable virtual instruction counter with 2^N clock ticks per
                instruction and enable aligning the host and virtual clocks
-watchdog i6300esb|ib700
                enable virtual hardware watchdog [default=none]
-watchdog-action reset|shutdown|poweroff|pause|debug|none
                action when watchdog fires [default=reset]
-echr chr       set terminal escape character instead of ctrl-a
-virtioconsole c
                set virtio console
-show-cursor    show cursor
-tb-size n      set TB size
-incoming p     prepare for incoming migration, listen on port p
-nodefaults     don't create default devices
-chroot dir     chroot to dir just before starting the VM
-runas user     change to user id user just before starting the VM
-sandbox <arg>  Enable seccomp mode 2 system call filter (default 'off').
-readconfig <file>
-writeconfig <file>
                read/write config file
-nodefconfig
                do not load default config files at startup
-no-user-config
                do not load user-provided config files at startup
-trace [events=<file>][,file=<file>]
                specify tracing options
-enable-fips    enable FIPS 140-2 compliance
-object TYPENAME[,PROP1=VALUE1,...]
                create an new object of type TYPENAME setting properties
                in the order they are specified.  Note that the 'id'
                property must be set.  These objects are placed in the
                '/objects' path.
-msg timestamp[=on|off]
                change the format of messages
                on|off controls leading timestamps (default:on)
-dump-vmstate <file>
                Output vmstate information in JSON format to file.
                Use the scripts/vmstate-static-checker.py file to
                check for possible regressions in migration code
                by comparing two such vmstate dumps.
-netspeed <speed> maximum network download/upload speeds
-netdelay <delay> network latency emulation
-netfast disable network shaping
-boot-property <name>=<value> set system property on boot
-lcd-density density
                select lcd display density value (default is 160)
-android-ports <consoleport>,<adbport> TCP ports used for the emulator instance and adb bridge
-android-report-console <socket> report console port to remote socket
-http-proxy <proxy> make TCP connections through a HTTP/HTTPS proxy
-dns-server <servers> use this DNS server(s) in the emulated system
-list-webcam    list web cameras available for emulation
-android-hw <file>
                specify the hw config ini file location

During emulation, the following keys are useful:
ctrl-alt-f      toggle full screen
ctrl-alt-n      switch to virtual console 'n'
ctrl-alt        toggle mouse and keyboard grab

When using -nographic, press 'ctrl-a h' to get some help.# 编辑环境变量配置文件
$ sudo gedit /etc/profile
# 添加到环境变量配置文件/etc/profile中的内容
export ANDROID_TOOLCHAIN=/home/fly2016/Android4.4.4r1/goldfish-kernel-3.4/goldfish/arm-eabi-4.7
export PATH=$PATH:${ANDROID_TOOLCHAIN}/bin/
# 更新系统环境变量
$ source /etc/profile
# 测试是否配置成功
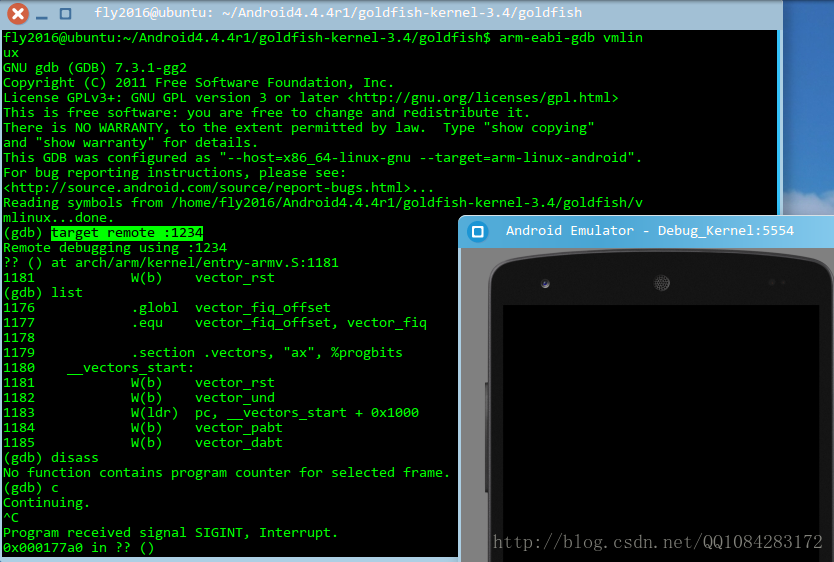
$ arm-eabi-gdb# 在Android内核源码的根目录下执行
# 加载内核符号信息
$ arm-eabi-gdb vmlinux
# 连接远端的调试器
$ target remote :1234
# 测试命令
$ list
$ n
五、gdb的使用帮助
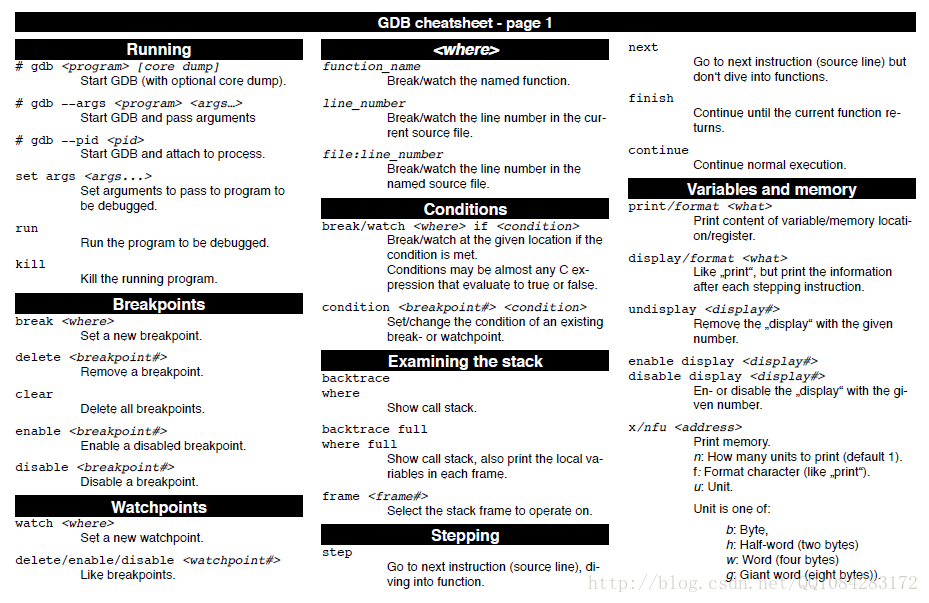
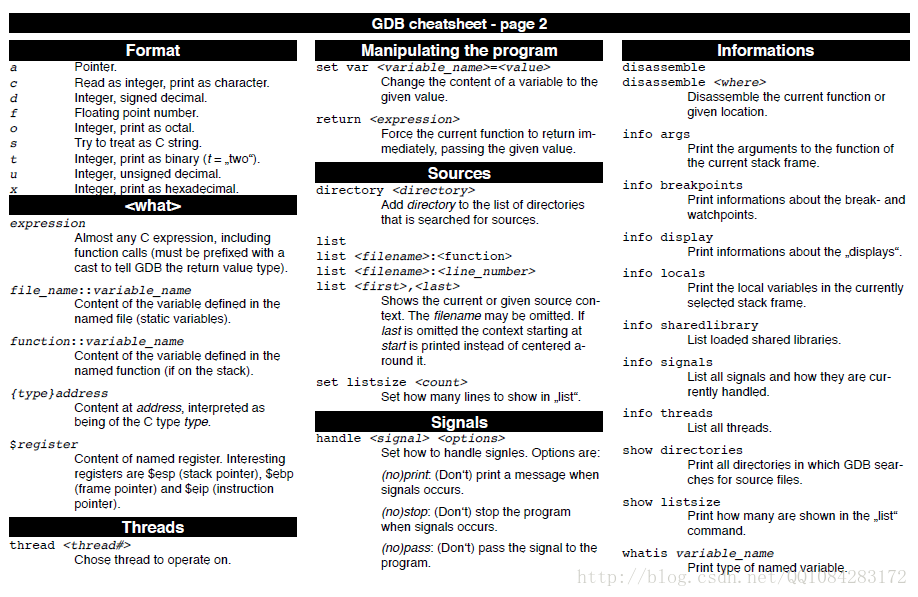
有关 gdb 的使用帮助可以参考文档 《GDBCheatSheet.pdf》,也可以参考 gdb 的命令帮助。《GNU GDB Debugger Command Cheat Sheet》也不错,资料比较详细,也可以好好参考和学习一下。
GDBCheatSheet 的具体内容见下图所示:
gdb 工具的命令使用帮助如下:
$ arm-eabi-gdb --help
This is the GNU debugger.  Usage:

    gdb [options] [executable-file [core-file or process-id]]
    gdb [options] --args executable-file [inferior-arguments ...]

Options:

  --args             Arguments after executable-file are passed to inferior
  -b BAUDRATE        Set serial port baud rate used for remote debugging.
  --batch            Exit after processing options.
  --batch-silent     As for --batch, but suppress all gdb stdout output.
  --return-child-result
                     GDB exit code will be the child's exit code.
  --cd=DIR           Change current directory to DIR.
  --command=FILE, -x Execute GDB commands from FILE.
  --eval-command=COMMAND, -ex
                     Execute a single GDB command.
                     May be used multiple times and in conjunction
                     with --command.
  --core=COREFILE    Analyze the core dump COREFILE.
  --pid=PID          Attach to running process PID.
  --dbx              DBX compatibility mode.
  --directory=DIR    Search for source files in DIR.
  --epoch            Output information used by epoch emacs-GDB interface.
  --exec=EXECFILE    Use EXECFILE as the executable.
  --fullname         Output information used by emacs-GDB interface.
  --help             Print this message.
  --interpreter=INTERP
                     Select a specific interpreter / user interface
  -l TIMEOUT         Set timeout in seconds for remote debugging.
  --nw		     Do not use a window interface.
  --nx               Do not read .gdbinit file.
  --quiet            Do not print version number on startup.
  --readnow          Fully read symbol files on first access.
  --se=FILE          Use FILE as symbol file and executable file.
  --symbols=SYMFILE  Read symbols from SYMFILE.
  --tty=TTY          Use TTY for input/output by the program being debugged.
  --tui              Use a terminal user interface.
  --version          Print version information and then exit.
  -w                 Use a window interface.
  --write            Set writing into executable and core files.
  --xdb              XDB compatibility mode.
  --disable-gdb-index
                     Disable the use of the .gdb_index section.

At startup, GDB reads the following init files and executes their commands:

For more information, type "help" from within GDB, or consult the
GDB manual (available as on-line info or a printed manual).
Report bugs to "<http://source.android.com/source/report-bugs.html>".《Android内核编译调试》
《android 内核调试》