2 springboot项目创建(5)
环境要求:jdk1.8+
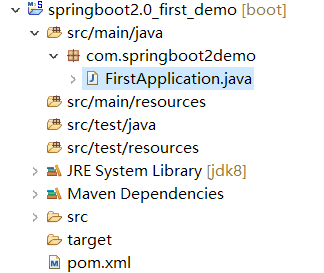
项目结构:
2.1创建maven工程
Group id :com.springbootdemo
Artifact id: springboot2.0_first_demo
Packaging: jar
2.2pom文件配置
<project xmlns="http://maven.apache.org/POM/4.0.0" xmlns:xsi="http://www.w3.org/2001/XMLSchema-instance" xsi:schemaLocation="http://maven.apache.org/POM/4.0.0 http://maven.apache.org/xsd/maven-4.0.0.xsd">
  <modelVersion>4.0.0</modelVersion>
  <groupId>com.springbootdemo</groupId>
  <artifactId>springboot2.0_first_demo</artifactId>
  <version>0.0.1-SNAPSHOT</version>

  <!-- spring-boot-starter-parent 整合第三方常用框架依赖信息(包含各种依赖信息) -->
  <parent>
      <groupId>org.springframework.boot</groupId>
      <artifactId>spring-boot-starter-parent</artifactId>
      <version>2.0.0.RELEASE</version>
  </parent>

  <!-- spring-boot-starter-web springboot整合springmvc web
      实现原理:maven依赖继承关系,相当于把第三方常用maven依赖信息,在parent项目中已封装
  -->
  <dependencies>
      <!-- 根据需要选择parent中封装的第三方框架 -->
      <dependency>
          <groupId>org.springframework.boot</groupId>
          <artifactId>spring-boot-starter-web</artifactId>
          <!-- 不需要写版本号,因为在parent中已封装好版本号 -->
      </dependency>
  </dependencies>
</project>
2.3创建测试类及启动类(6)
Springboot启动原理:使用springmvc注解方式启动(不需要xml配置文件)
2.3.1创建启动类和测试类
简洁起见,可将启动类和controller在同一个类中(一般分别创建controller类和启动类)
@RestController
@SpringBootApplication //或使用@EnableAutoConfiguration配置
//@EnableAutoConfiguration //自动配置,根据pom文件引入的依赖信息,自动配置对应的组件;扫包范围,默认在当前类中
public class FirstApplication {

    @RequestMapping("/test")
    public String test(){
        return "springboot2.0 first application";
    }

    /**
     * 程序入口
     *  SpringApplication.run 相当于java代码创建内置tomcat,加载springmvc注解启动
     * @param args
     */
    public static void main(String[] args) {
        SpringApplication.run(FirstApplication.class, args);
    }

}
2.3.2启动springboot项目
1 FirstApplication类--》右键-->run as或debug as--》java app或springboot app。
启动成功日志:
2019-05-12 12:10:58.560 INFO 12436 --- [ main] o.s.b.w.embedded.tomcat.TomcatWebServer : Tomcat started on port(s): 8080 (http) with context path ''
2019-05-12 12:10:58.563 INFO 12436 --- [ main] com.springboot2demo.FirstApplication : Started FirstApplication in 2.555 seconds (JVM running for 2.97)
2 页面访问
报错:
Whitelabel Error Page
This application has no explicit mapping for /error, so you are seeing this as a fallback.
Sun Apr 14 22:15:23 CST 2019
There was an unexpected error (type=Method Not Allowed, status=405).
Request method 'GET' not supported
Get方式不支持,修改类中的PostMapping为RequestMapping,方便测试。
重启再次访问成功:
springboot2.0 first application